14. Plugins
FreeNAS® provides the ability to extend the built-in NAS services by providing two methods for installing additional software.
Plugins allow the user to browse, install, and configure pre-packaged software from the web interface. This method is easy to use, but provides a limited amount of available software. Each plugin is automatically installed into its own limited FreeBSD jail that cannot install additional software.
Jails provide more control over software installation, but requires working from the command line and a good understanding of networking basics and software installation on FreeBSD-based systems.
Look through the Plugins and Jails sections to become familiar with the features and limitations of each. Choose the method that best meets the needs of the application.
Note
Jail Storage must be configured before plugins are available on FreeNAS®. This means having a suitable pool created to store plugins.
14.1. Install
A plugin is a self-contained application installer designed to integrate into the FreeNAS® web interface. A plugin offers several advantages:
- the FreeNAS® web interface provides a browser for viewing the list of available plugins
- the FreeNAS® web interface provides buttons for installing, starting, managing, and uninstalling plugins
- if the plugin has configuration options, a management screen will be added to the FreeNAS® web interface for these options to be configured
View available plugins by clicking . Figure 14.1.1 shows some of the available plugins.
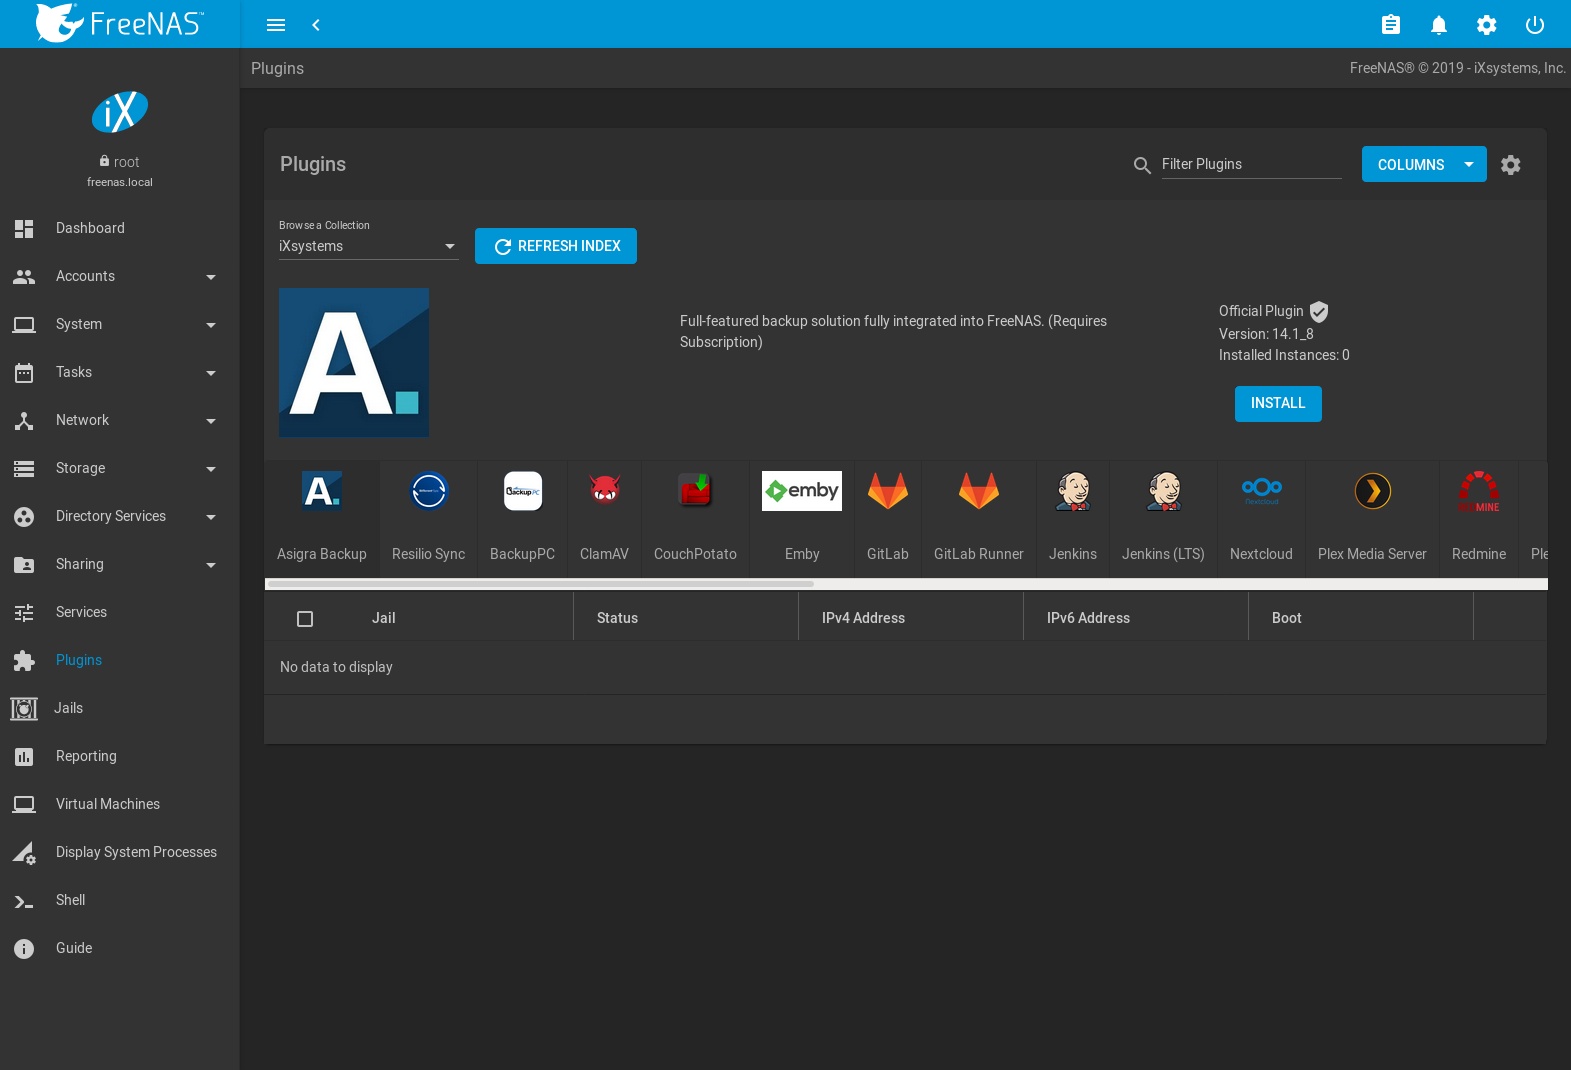
Fig. 14.1.1 Viewing the List of Available Plugins
Note
If the list of available plugins is not displayed, open Shell and verify that the FreeNAS® system can ping an address on the Internet. If it cannot, add a default gateway address and DNS server address in .
Click Browse a Collection to toggle the plugins list between iXsystems plugins, which receive updates every few weeks, and Community plugins.
Click REFRESH INDEX to refresh the current list of plugins.
Click a plugin’s icon to see its description, whether it is an Official or Community plugin, its available version, and the number of installed instances.
To install the selected plugin, click INSTALL.
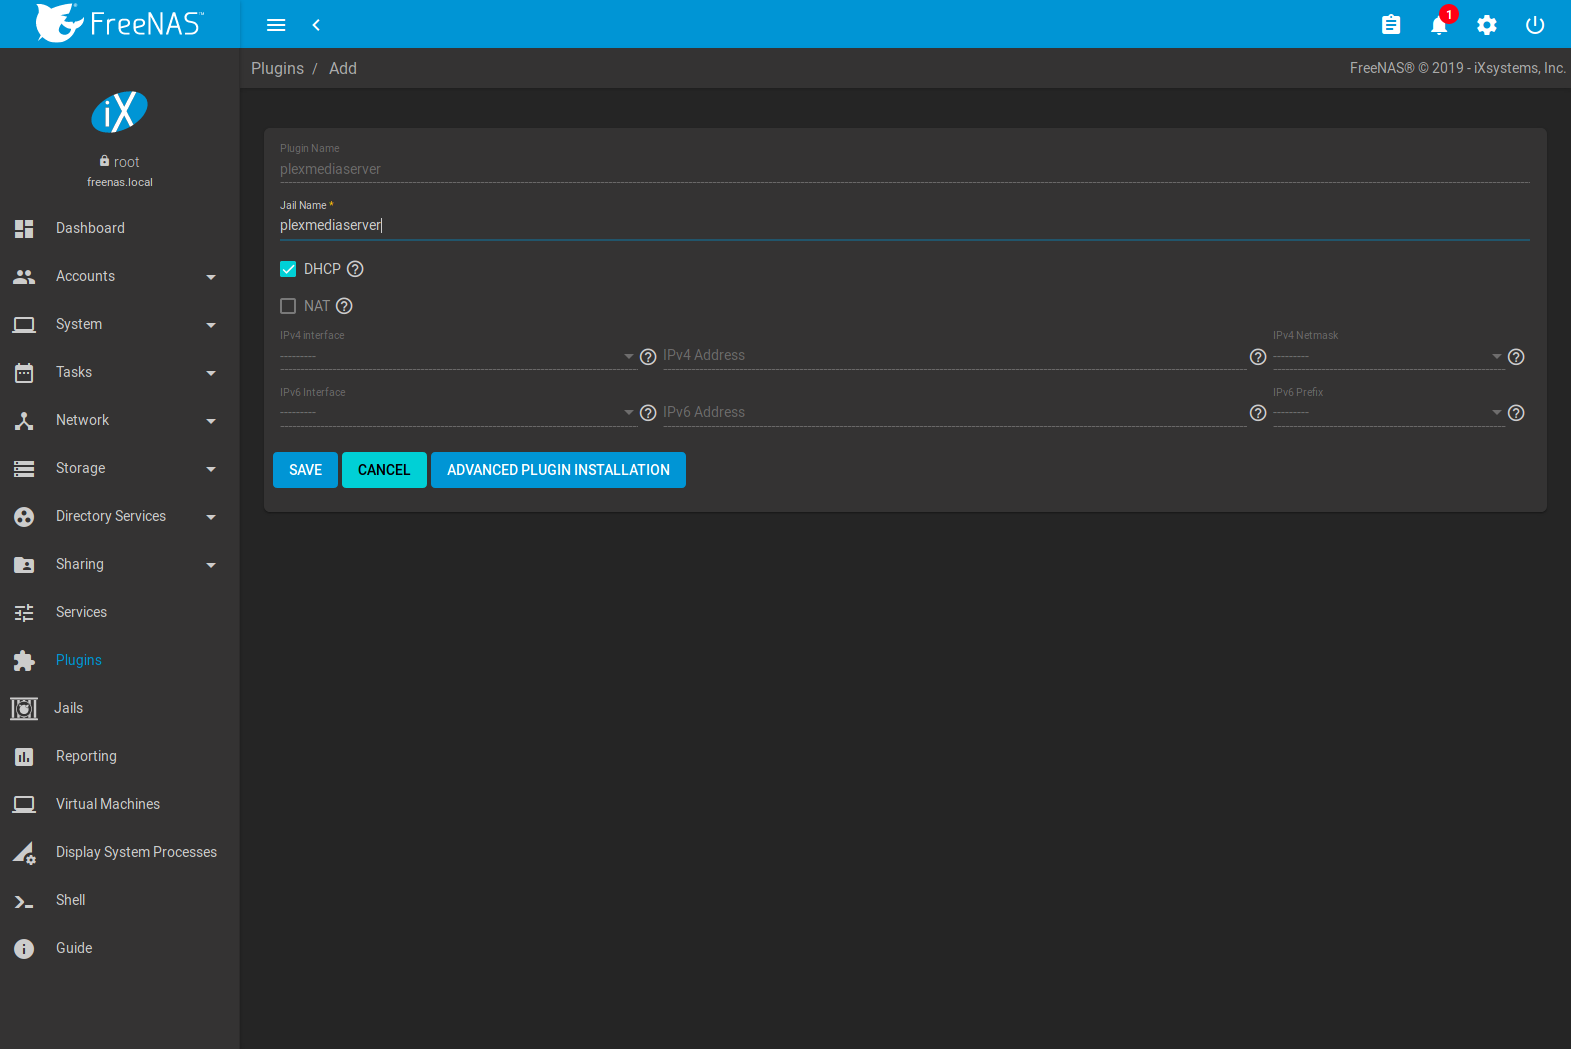
Fig. 14.1.2 Installing the Plex Plugin
Input a Jail Name. This is the only required setting since multiple installations of the same plugin are supported, but each plugin install requires a unique name.
Most plugins default to NAT. This setting is recommended as it does not require manual configuration or multiple available IP addresses and prevents addressing conflicts on the network.
Some plugins default to DHCP as their management utility conflicts with NAT. It is recommended to keep these plugins set to DHCP unless manually configuring an IP address is preferred.
If both NAT and DHCP are unset, an IPv4 or IPv6 address can be manually entered.
Click ADVANCED PLUGIN INSTALLATION to show all options for the plugin jail. The options are described in Advanced Jail Creation.
To start the installation, click SAVE.
Depending upon the size of the application, the installation may take a few minutes to download and install. A confirmation message displays once the plugin installation completes, along with any post-installation notes.
Installed plugins appear on the page as shown in Figure 14.1.3.
Note
Plugins are also added to as a pluginv2 jail. This type of jail is editable like a standard jail, but the UUID cannot be altered. See Managing Jails for more details about modifying jails.

Fig. 14.1.3 Viewing Installed Plugins
Plugins are immediately started after installation. By default, all plugins are started when the system boots. Unsetting Boot means the plugin will not start when the system boots and must be started manually.
In addition to the Jail name, the Columns menu controls which information is displayed for each installed Plugins entry. Options include status, IPv4 address, IPv6 address, installed version, plugin name, release, boot status, and collection.
More information such as RELEASE and VERSION is shown by clicking (Expand). Options to RESTART, STOP, UPDATE, MANAGE, and UNINSTALL the plugin are also displayed. If an installed plugin has notes, the notes can be viewed by clicking POST INSTALL NOTES.
Plugins with additional documentation also have a DOCUMENTATION button which opens the README in the plugin repository.
The plugin must be started before the installed application is
available. Click (Expand) and START. The plugin
Status changes to up when it starts successfully.
Stop and immediately start an up plugin by clicking
(Expand) and RESTART.
Click (Expand) and MANAGE to open a management or configuration screen for the application. For example, clicking MANAGE for an installed Plex plugin opens the Plex web interface in a new browser tab.
Note
Not all plugins have a functional management option. See Managing Jails for more instructions about interacting with a plugin jail with the shell.
Some plugins have options that need to be set before their service will successfully start. Check the website of the application to see what documentation is available. If there are any difficulties using a plugin, refer to the official documentation for that application.
If the application requires access to the data stored on the FreeNAS® system, click the entry for the associated jail in the page and add storage as described in Additional Storage.
Click (Options) and Shell for the plugin jail in the page. This will give access to the shell of the jail containing the application to complete or test the configuration.
If a plugin jail fails to start, open the plugin jail shell from the page and type tail /var/log/messages to see if any errors were logged.
14.2. Updating Plugins
When a newer version of a plugin or release becomes available in the official repository, click (Expand) and UPDATE. Updating a plugin updates the operating system and version of the plugin.
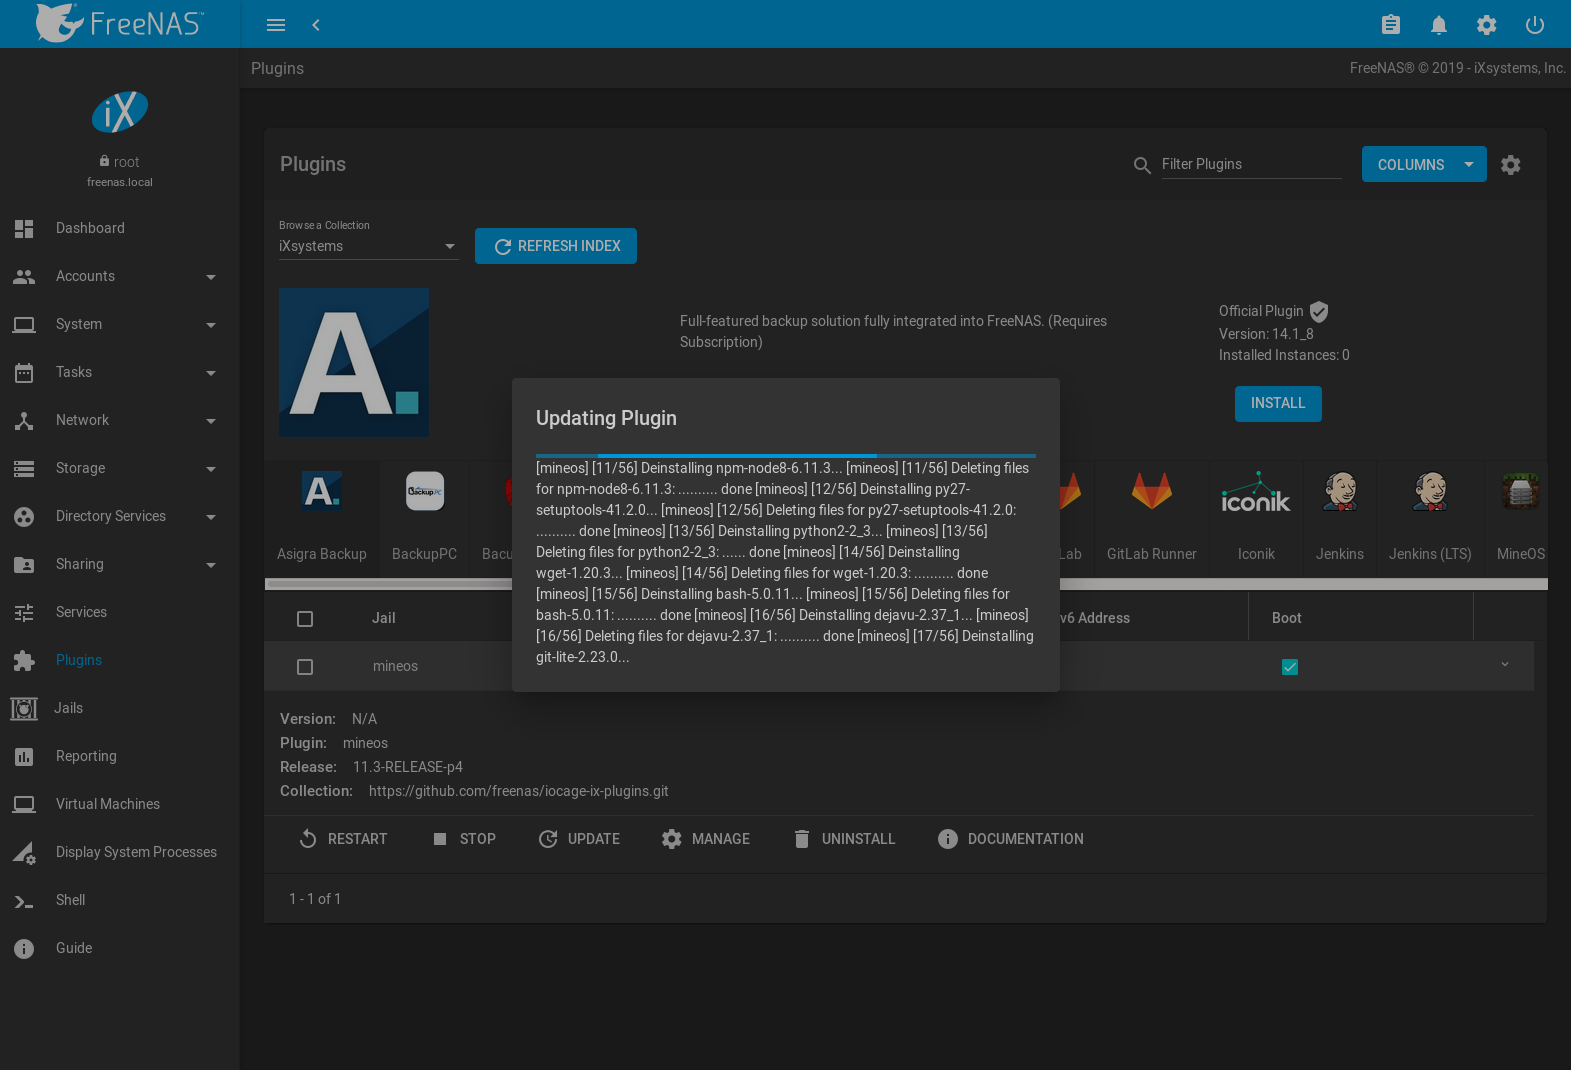
Fig. 14.2.1 Updating a Plugin
To update or upgrade the plugin jail operating system, see Jail Updates and Upgrades.
14.3. Uninstalling Plugins
Installing a plugin creates an associated jail. Uninstalling a plugin deletes the jail because it is no longer required. This means all datasets or snapshots that are associated with the plugin are also deleted. Make sure to back up any important data from the plugin before uninstalling it.
Figure 14.3.1 shows an example of uninstalling a plex plugin by expanding the plex jail entry and clicking UNINSTALL. A two-step dialog opens to confirm the action. This is the only warning. Enter the plugin name, set the Confirm checkbox, and click DELETE to remove the plugin and the associated jail, dataset, and snapshots.
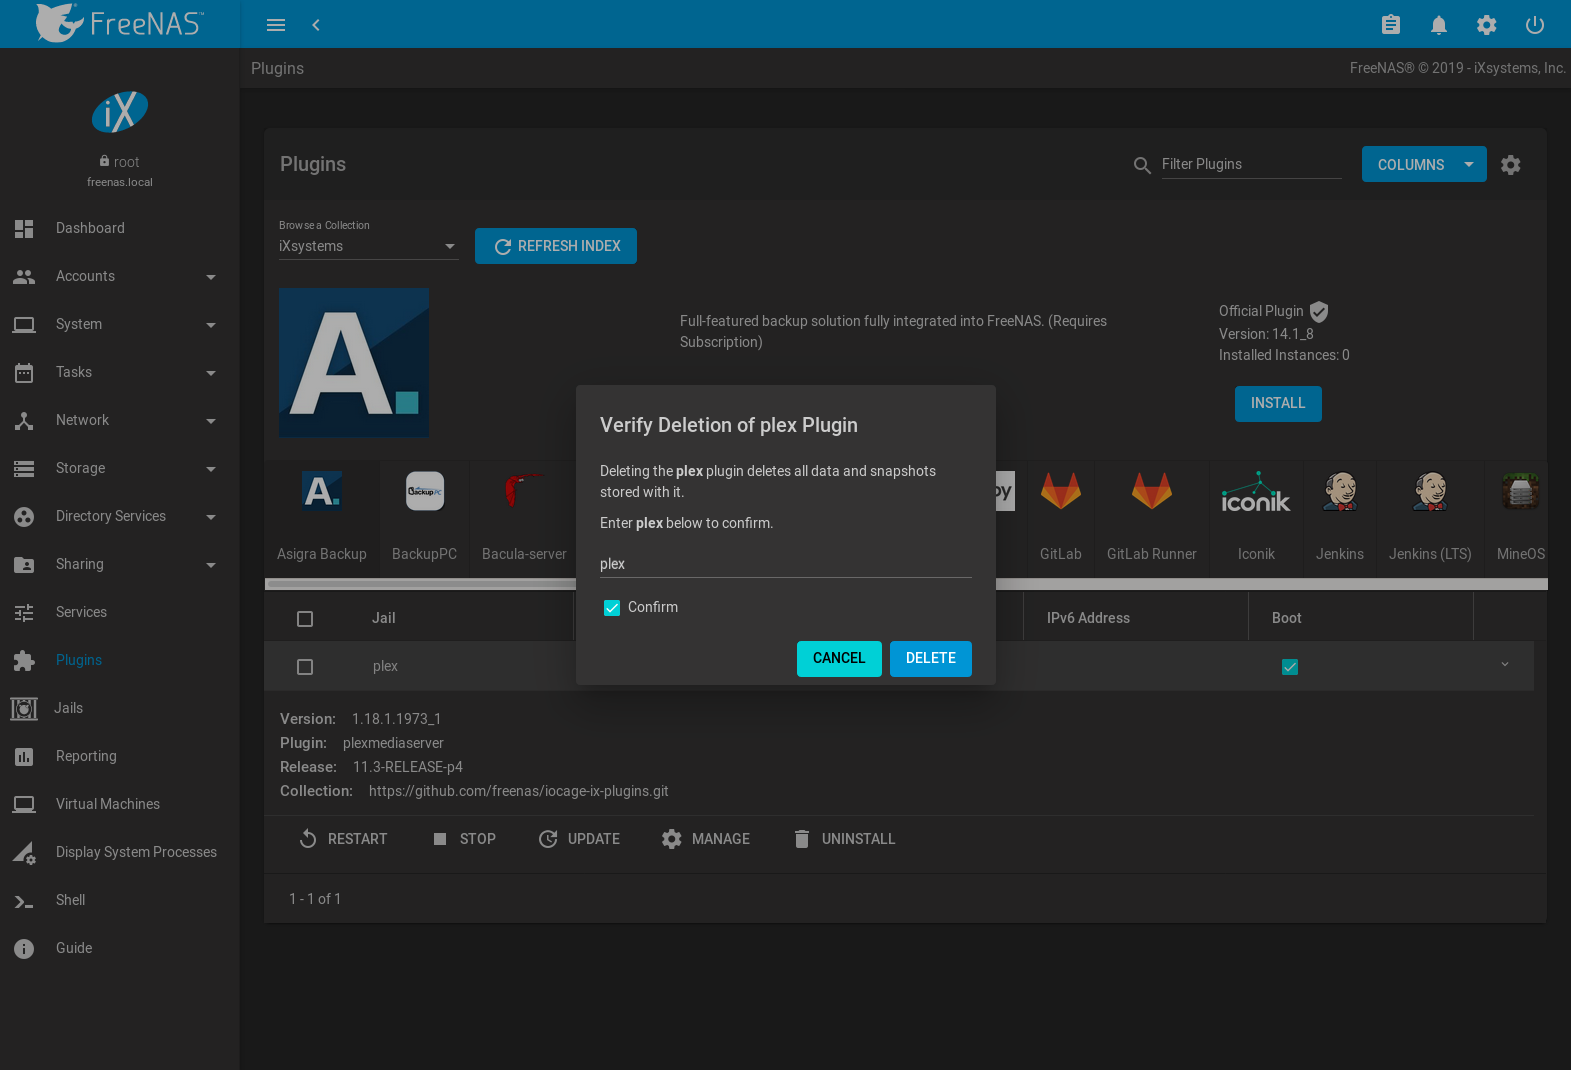
Fig. 14.3.1 Uninstalling a Plugin and Deleting its Associated Jail and Dataset
14.4. Create a Plugin
If an application is not available as a plugin, it is possible to create a new plugin for FreeNAS® in a few steps. This requires an existing GitHub account.
Create a new artifact repository on GitHub.
Refer to table 14.4.1 for the files to add to the artifact repository.
| Directory/File | Description |
|---|---|
post_install.sh |
This script is run inside the jail after it is created and any
packages installed. Enable services in /etc/rc.conf that
need to start with the jail and apply any configuration
customizations with this this script. |
ui.json |
JSON file that accepts the key or value options. For example:
designates the web-interface of the plugin. |
overlay/ |
Directory of files overlaid on the jail after install.
For example, usr/local/bin/myfile is placed in the
/usr/local/bin/myfile location of the jail. Can be used to
supply custom files and configuration data, scripts, and
any other type of customized files to the plugin jail. |
settings.json |
JSON file that manages the settings interface of the plugin. Required fields include:
Command to run when restarting the plugin service after changing settings.
Command used to get values for plugin configuration. Provided by the plugin creator. The command accepts two arguments for key or value pair.
This subsection contains arrays of elements, starting with the “key” name and required arguments for that particular type of setting. See options subsection example below. |
This example settings.json file is used for the
Quasselcore plugin. It is also available online in the
iocage-plugin-quassel artifact repository.
{
        "servicerestart":"service quasselcore restart",
        "serviceget": "/usr/local/bin/quasselget",
        "serviceset": "/usr/local/bin/quasselset",
        "options": {
                "adduser": {
                        "type": "add",
                        "name": "Add User",
                        "description": "Add new quasselcore user",
                        "requiredargs": {
                                "username": {
                                        "type": "string",
                                        "description": "Quassel Client Username"
                                },
                                "password": {
                                        "type": "password",
                                        "description": "Quassel Client Password"
                                },
                                "fullname": {
                                        "type": "string",
                                        "description": "Quassel Client Full Name"
                                }
                        },
                        "optionalargs": {
                                "adminuser": {
                                        "type": "bool",
                                        "description": "Can this user administrate quasselcore?"
                                }
                        }
                },
                "port": {
                        "type": "int",
                        "name": "Quassel Core Port",
                        "description": "Port for incoming quassel connections",
                        "range": "1024-32000",
                        "default": "4242",
                        "requirerestart": true
                },
                "sslmode": {
                        "type": "bool",
                        "name": "SSL Only",
                        "description": "Only accept SSL connections",
                        "default": true,
                        "requirerestart": true

                },
                "ssloption": {
                        "type": "combo",
                        "name": "SSL Options",
                        "description": "SSL Connection Options",
                        "requirerestart": true,
                        "default": "tlsallow",
                        "options": {
                                        "tlsrequire": "Require TLS",
                                        "tlsallow": "Allow TLS",
                                        "tlsdisable": "Disable TLS"
                        }
                },
                "deluser": {
                        "type": "delete",
                        "name": "Delete User",
                        "description": "Remove a quasselcore user"
                }

        }
}
Create and submit a new JSON file for the plugin:
Clone the iocage-plugin-index GitHub repository.
Tip
Full tutorials and documentation for GitHub and git commands are available on GitHub Guides.
On the local copy of iocage-plugin-index, create a new JSON file
for the FreeNAS® plugin. The JSON file describes the plugin, the
packages it requires for operation, and other installation details.
This file is named pluginname.json. For example, the
Madsonic
plugin is named madsonic.json.
The fields of the file are described in table 14.4.2.
| Data Field | Description |
|---|---|
"name": |
Name of the plugin. |
"plugin_schema": |
Optional. Enter 2 if simplified post-install information has
been supplied in post_install.sh. After specifying 2,
echo the information to be presented to the user in
/root/PLUGIN_INFO inside the
post_install.sh file.
See the rslsync.json and
rslsync post_install.sh examples. |
"release": |
FreeBSD RELEASE to use for the plugin jail. |
"artifact": |
URL of the plugin artifact repository. |
"pkgs": |
The FreeBSD packages required by the plugin. |
"packagesite": |
Content Delivery Network (CDN) used by the plugin jail. Default for
the TrueOS CDN is http://pkg.cdn.trueos.org/iocage. |
"fingerprints": |
Default is
The pkg fingerprint for the artifact repository. Default is
|
"official": |
Define whether this is an official iXsystems-supported plugin.
Enter true or false. |
1 2 3 4 5 6 7 8 9 10 11 12 13 14 15 16 17 18 19 | {
"name": "rslsync",
"plugin_schema": "2",
"release": "11.2-RELEASE",
"artifact": "https://github.com/freenas/iocage-plugin-btsync.git",
"pkgs": [
"net-p2p/rslsync"
],
"packagesite": "http://pkg.cdn.trueos.org/iocage/unstable",
"fingerprints": {
"iocage-plugins": [
{
"function": "sha256",
"fingerprint": "226efd3a126fb86e71d60a37353d17f57af816d1c7ecad0623c21f0bf73eb0c7"
}
]
},
"official": true
}
|
1 2 3 4 5 6 7 8 9 | #!/bin/sh -x
# Enable the service
sysrc -f /etc/rc.conf rslsync_enable="YES"
# Start the service
service rslsync start 2>/dev/null
echo "rslsync now installed" > /root/PLUGIN_INFO
echo "foo" >> /root/PLUGIN_INFO
|
Here is quasselcore.json reproduced as an example:
{
  "name": "Quasselcore",
  "release": "11.1-RELEASE",
  "artifact": "https://github.com/freenas/iocage-plugin-quassel.git",
  "pkgs": [
    "irc/quassel-core"
  ],
  "packagesite": "http://pkg.cdn.trueos.org/iocage",
  "fingerprints": {
          "iocage-plugins": [
                  {
                  "function": "sha256",
                  "fingerprint": "226efd3a126fb86e71d60a37353d17f57af816d1c7ecad0623c21f0bf73eb0c7"
          }
          ]
  },
  "official": true
}
The correct directory and package name of the plugin application must be
used for the "pkgs": value. Find the package name and directory
by searching FreshPorts and checking
the “To install the port:” line. For example, the Quasselcore plugin
uses the directory and package name /irc/quassel-core.
Now edit iocage-plugin-index/INDEX. Add an entry for the new
plugin that includes these fields:
"MANIFEST":Add the name of the newly createdplugin.jsonfile here."name":Use the same name used within the.jsonfile."icon":Most plugins will have a specific icon. Search the web and save the icon to theiocage-plugin-index/icons/directory as a.png. The naming convention ispluginname.png. For example, the Madsonic plugin has the icon filemadsonic.png."description":Describe the plugin in a single sentence."official":Specify if the plugin is supported by iXsystems. Enterfalse.
See the
INDEX
for examples of INDEX entries.
Submit the plugin
Open a pull request for the iocage-plugin-index repo. Make sure the pull request contains:
- the new
plugin.jsonfile. - the plugin icon
.pngadded to theiocage-plugin-index/icons/directory. - an update to the
INDEXfile with an entry for the new plugin. - a link to the artifact repository populated with all required plugin files.
14.4.1. Test a Plugin
Warning
Installing experimental plugins is not recommended for general use of FreeNAS®. This feature is meant to help plugin creators test their work before it becomes generally available on FreeNAS®.
Plugin pull requests are merged into the master branch of the
iocage-plugin-index
repository. These plugins are not available in the web interface until they
are tested and added to a RELEASE branch of the repository. It is
possible to test an in-development plugin by using this
iocage command:
iocage fetch -P --name PLUGIN IPADDRESS_PROPS --branch 'master'
This will install the plugin, configure it with any chosen properties,
and specifically use the master branch of the repository to
download the plugin.
Here is an example of downloading and configuring an experimental plugin with the FreeNAS® :
[root@freenas ~]# iocage fetch -P --name mineos ip4_addr="em0|10.231.1.37/24" --branch 'master'
Plugin: mineos
  Official Plugin: False
  Using RELEASE: 11.2-RELEASE
  Using Branch: master
  Post-install Artifact: https://github.com/jseqaert/iocage-plugin-mineos.git
  These pkgs will be installed:
...

...
Running post_install.sh
Command output:
...

...
Admin Portal:
http://10.231.1.37:8443
[root@freenas ~]#
This plugin appears in the
and
screens as mineos and can be tested with the FreeNAS® system.
14.5. Asigra Plugin
The Asigra plugin connects FreeNAS® to a third party service and is subject to licensing. Please read the Asigra Software License Agreement before using this plugin.
To begin using Asigra services after installing the plugin, open the plugin options and click Register. A new browser tab opens to register a user with Asigra.
The FreeNAS® system must have a public static IP address for Asigra services to function.
Refer to the Asigra documentation for details about using the Asigra platform:
- DS-Operator Management Guide:
Using the
DS-Operatorinterface to manage the pluginDS-Systemservice. Click Management in the plugin options to open theDS-Operatorinterface. - DS-Client Installation Guide:
How to install the
DS-Clientsystem.DS-Clientaggregates backup content from endpoints and transmits it to theDS-System service. - DS-Client Management Guide:
Managing the
DS-Clientsystem after it has been successfully installed at one or more locations.