15. Jails
Jails are a lightweight, operating-system-level virtualization. One or multiple services can run in a jail, isolating those services from the host FreeNAS® system. FreeNAS® uses iocage for jail and plugin management. The main differences between a user-created jail and a plugin are that plugins are preconfigured and usually provide only a single service.
By default, jails run the FreeBSD operating system. These jails are independent instances of FreeBSD. The jail uses the host hardware and runs on the host kernel, avoiding most of the overhead usually associated with virtualization. The jail installs FreeBSD software management utilities so FreeBSD packages or ports can be installed from the jail command line. This allows for FreeBSD ports to be compiled and FreeBSD packages to be installed from the command line of the jail.
It is important to understand that users, groups, installed software, and configurations within a jail are isolated from both the FreeNAS® host operating system and any other jails running on that system.
The ability to create multiple jails offers flexibility regarding software management. For example, an administrator can choose to provide application separation by installing different applications in each jail, to create one jail for all installed applications, or to mix and match how software is installed into each jail.
15.1. Jail Storage
A pool must be created before using jails or Plugins. Make sure the pool has enough storage for all the intended jails and plugins. The screen displays a message and button to CREATE POOL if no pools exist on the FreeNAS® system.
Multiple pools can be activated to store iocage jails and plugins. After a pool is created, the page displays an Activated Pool section. This shows which pool and iocage dataset is active with FreeNAS®. Click CONFIG to view the option to choose another pool or dataset to activate with iocage. ACTIVATE another pool to refresh the list with any jails that exist on the chosen pool or dataset.
Jails and downloaded FreeBSD release files are stored in a dataset named
iocage/.
Notes about the iocage/ dataset:
- At least 10 GiB of free space is recommended.
- Cannot be located on a Share.
- iocage automatically uses the first pool that is not a root pool for the FreeNAS® system.
- A
defaults.jsonfile contains default settings used when a new jail is created. The file is created automatically if not already present. If the file is present but corrupted, iocage shows a warning and uses default settings from memory. - Each new jail installs into a new child dataset of
iocage/. For example, with theiocage/jailsdataset inpool1, a new jail called jail1 installs into a new dataset namedpool1/iocage/jails/jail1. - FreeBSD releases are fetched as a child dataset into the
/iocage/downloaddataset. This datset is then extracted into the/iocage/releasesdataset to be used in jail creation. The dataset in/iocage/downloadcan then be removed without affecting the availability of fetched releases or an existing jail. iocage/datasets on activated pools are independent of each other and do not share any data.
15.2. Creating Jails
FreeNAS® has two options to create a jail. The Jail Wizard makes it easy to quickly create a jail. ADVANCED JAIL CREATION is an alternate method, where every possible jail option is configurable. There are numerous options spread across four different primary sections. This form is recommended for advanced users with very specific requirements for a jail.
15.2.1. Jail Wizard
New jails can be created quickly by going to ADD. This opens the wizard screen shown in Figure 15.2.1.

Fig. 15.2.1 Jail Creation Wizard
The wizard provides the simplest process to create and configure a new jail.
Enter a Jail Name. Jail names can only contain alphanumeric
characters (Aa-Zz, 123), dashes (-),
underscores (_), and periods (.).
Choose a Jail Type: Default (Clone Jail) or Basejail. Clone jails are clones of the specified FreeBSD RELEASE. They are linked to that RELEASE, even if they are upgraded. Basejails mount the specified RELEASE directories as nullfs mounts over the jail directories. Basejails are not linked to the original RELEASE when upgraded.
Jails can run FreeBSD versions up to the same version as the host FreeNAS® system. Newer releases are not shown.
Tip
Versions of FreeBSD are downloaded the first time they are used in a jail. Additional jails created with the same version of FreeBSD are created faster because the download has already been completed.
Click NEXT to see a simplified list of networking options.
Jails support several different networking solutions:
- VNET can be set to add a virtual network interface to the jail. This interface can be used to set NAT, DHCP, or static jail network configurations. Since VNET provides the jail with an independent networking stack, it can broadcast an IP address, which is required by some applications.
- The jail can use Network Address Translation (NAT), which uses the FreeNAS® IP address and sets a unique port for the jail to use. VNET is required when NAT is selected.
- Configure the jail to receive its IP address from a DHCP server by setting DHCP Autoconfigure IPv4.
- Networking can be manually configured by entering values for the IPv4 Address or IPv6 Address fields. Any combination of these fields can be configured. Multiple interfaces are supported in the IPv4 Address and IPv6 Address fields by entering a comma-separated list. Leaving the IPv4 Default Router and IPv6 Default Router fields empty automatically configures these values.
- Leaving all checkboxes unset and fields empty initializes the jail without any networking abilities. Networking can be added to the jail after creation by going to (Expand) EDIT .
Setting a proxy in the FreeNAS® network settings also configures new jails to use the proxy settings, except when performing DNS lookups. Make sure a firewall is properly configured to maximize system security.
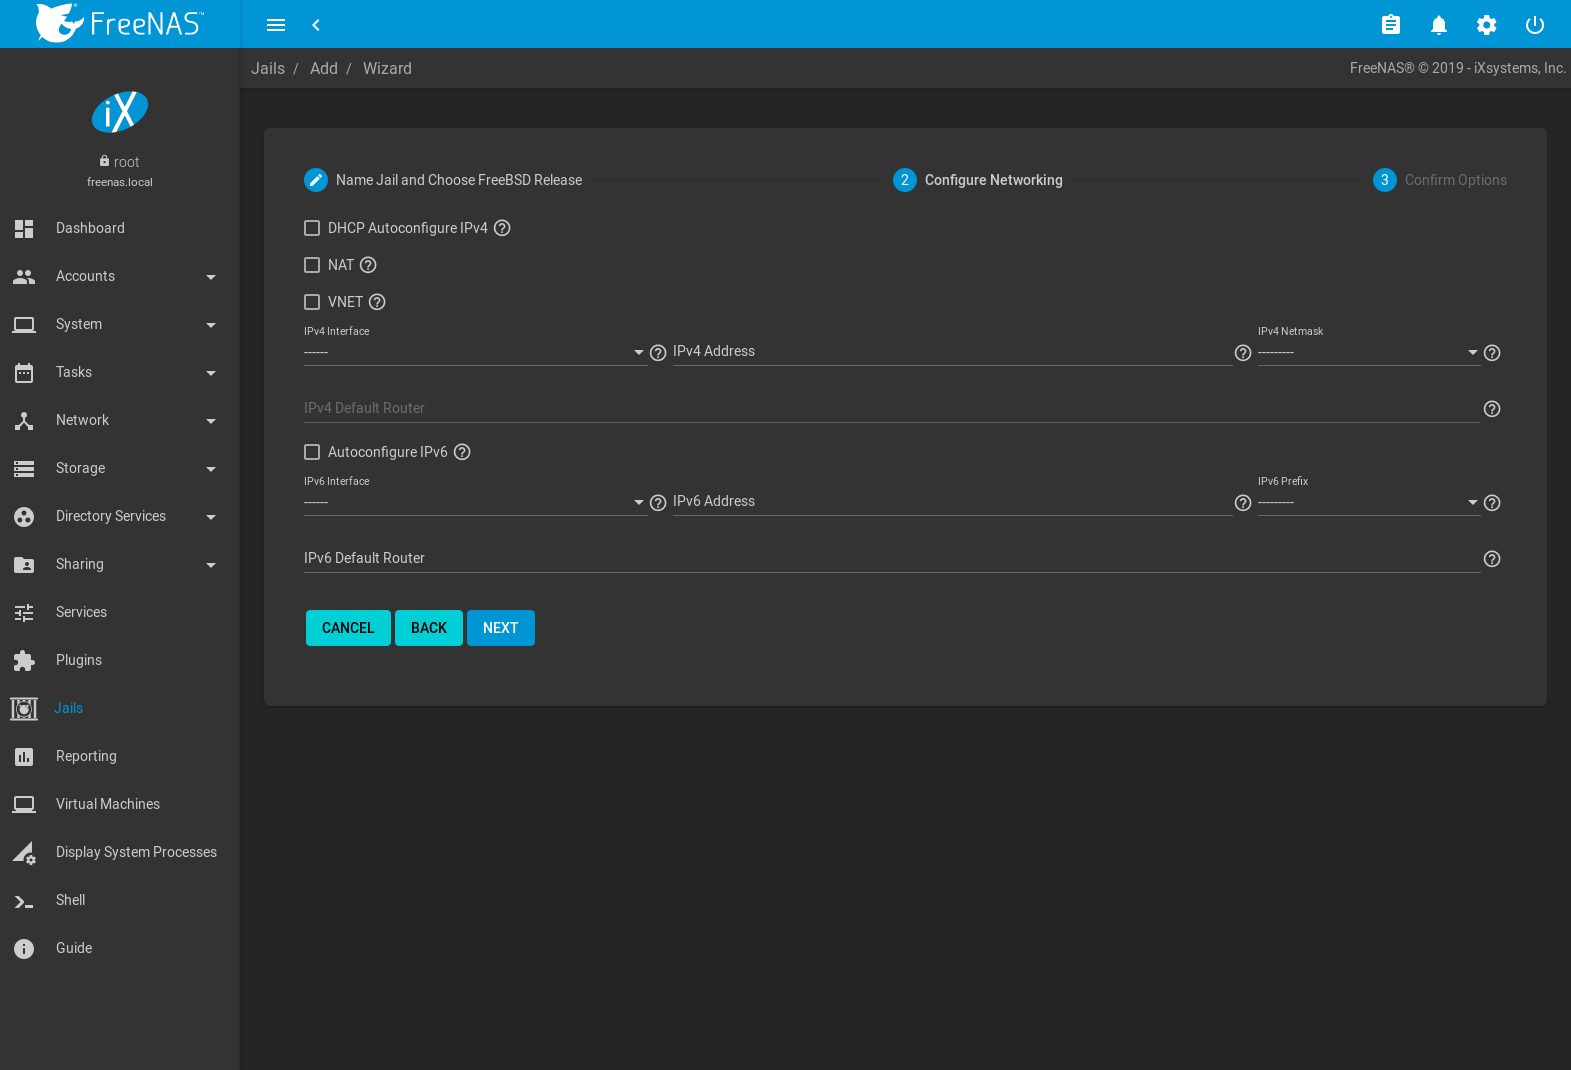
Fig. 15.2.2 Configure Jail Networking
Click NEXT to view a summary screen of the chosen jail options. Click SUBMIT to create the new jail. After a few moments, the new jail is added to the primary jails list.
15.2.2. Advanced Jail Creation
The advanced jail creation form is opened by clicking ADD then Advanced Jail Creation. The screen in Figure 15.2.3 is shown.
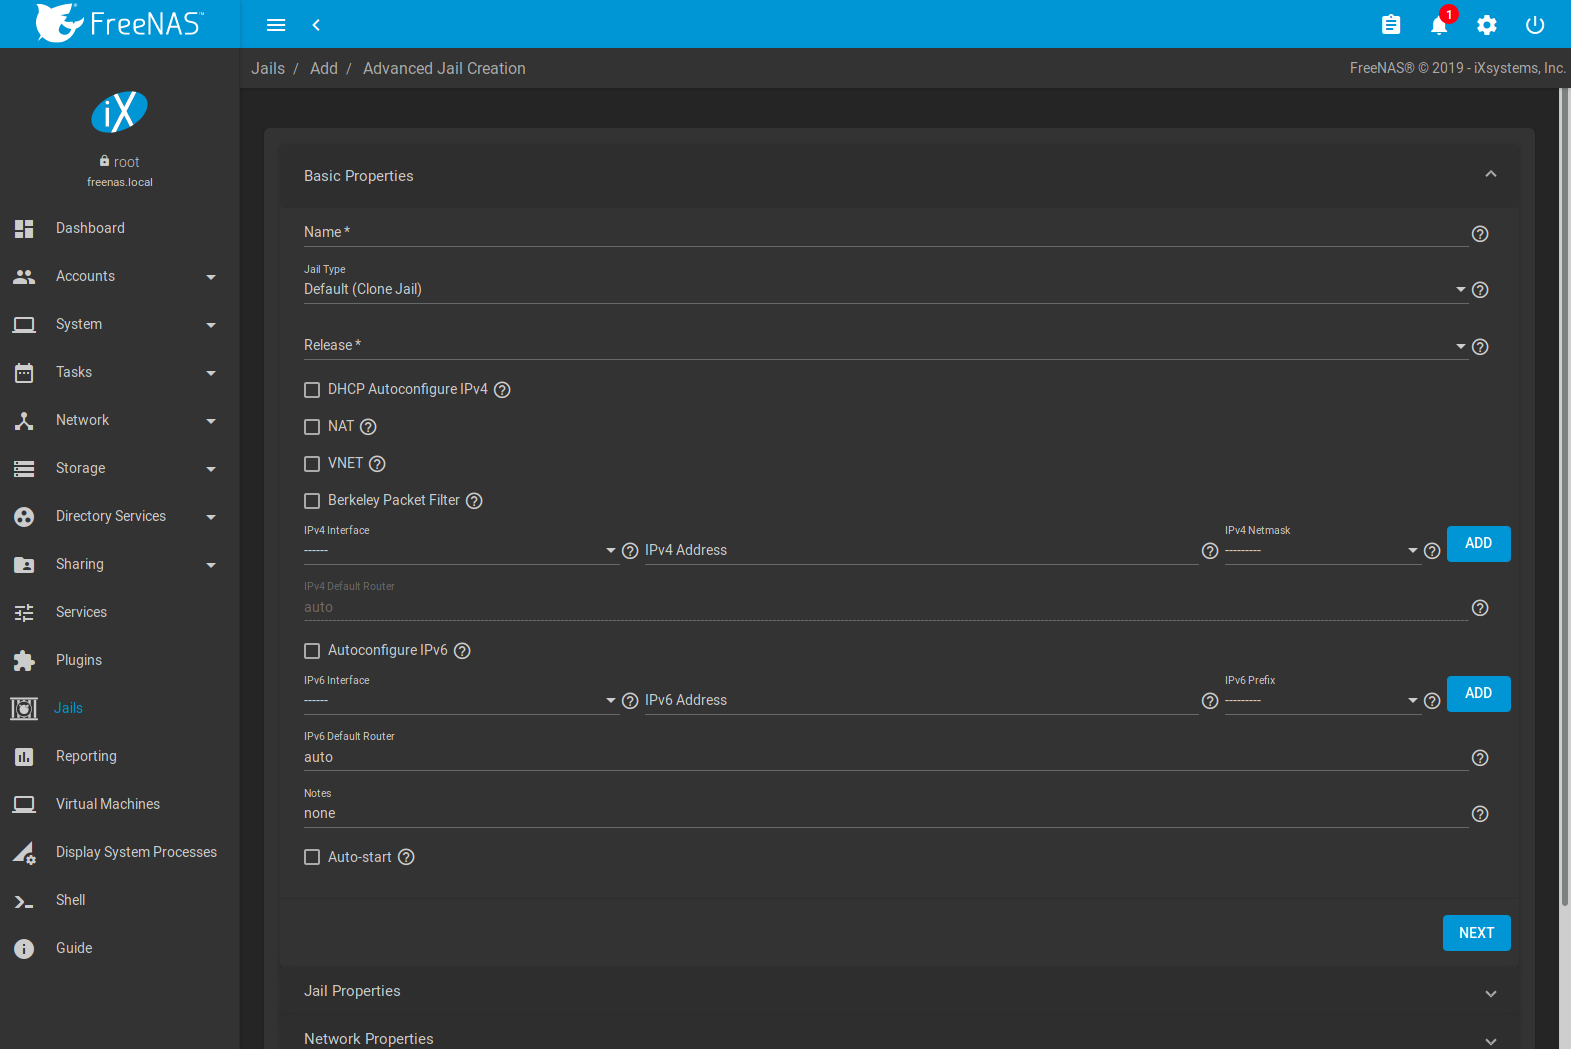
Fig. 15.2.3 Creating a Jail
A usable jail can be quickly created by setting only the required values, the Jail Name and Release. Additional settings are in the Jail Properties, Network Properties, and Custom Properties sections. Table 15.2.1 shows the available options of the Basic Properties of a new jail.
| Setting | Value | Description |
|---|---|---|
| Name | string | Required. Jail names can only contain alphanumeric characters (Aa-Zz, 123),
dashes (-), underscores (_), and periods (.). |
| Release | drop-down menu | Required. Jails can run FreeBSD versions up to the same version as the host FreeNAS® system. Newer releases are not shown. |
| DHCP Autoconfigure IPv4 | checkbox | Automatically configure IPv4 networking with an independent VNET stack. VNET and Berkeley Packet Filter must also be checked. If not set, ensure the defined address in IPv4 Address does not conflict with an existing address. |
| NAT | checkbox | Network Address Translation (NAT). When set, the jail is given an internal IP address and connections are forwarded from the host to the jail. When NAT is set, Berkeley Packet Filter cannot be set. Adds the NAT Port Forwarding options to the jail Network Properties. |
| VNET | checkbox | Use VNET to emulate network devices for this jail and a create a fully virtualized per-jail network stack. See VNET(9) for more details. |
| Berkeley Packet Filter | checkbox | Use the Berkeley Packet Filter to data link layers in a protocol independent fashion. Unset by default to avoid security vulnerabilities. See BPF(4) for more details. Cannot be set when NAT is set. |
| IPv4 Interface | drop-down menu | Choose a network interface to use for this IPv4 connection. See note to add more. |
| IPv4 Address | string | This and the other IPv4 settings are grayed out if DHCP autoconfigure IPv4 is set. Configures the interface to use for network or internet access for the jail. Enter an IPv4 address for this IP jail. Example: 192.168.0.10. See note to add more. |
| IPv4 Netmask | drop-down menu | Choose a subnet mask for this IPv4 Address. |
| IPv4 Default Router | string | Type none or a valid IP address. Setting this property to anything other than none
configures a default route inside a VNET jail. |
| Auto Configure IPv6 | checkbox | Set to use SLAAC (Stateless Address Auto Configuration) to autoconfigure IPv6 in the jail. |
| IPv6 Interface | drop-down menu | Choose a network interface to use for this IPv6 connection. See note to add more. |
| IPv6 Address | string | Configures network or internet access for the jail. Type the IPv6 address for VNET and shared IP jails. Example: 2001:0db8:85a3:0000:0000:8a2e:0370:7334. See note to add more. |
| IPv6 Prefix | drop-down menu | Choose a prefix for this IPv6 Address. |
| IPv6 Default Router | string | Type none or a valid IP address. Setting this property to anything other than none
configures a default route inside a VNET jail. |
| Notes | string | Enter any notes or comments about the jail. |
| Auto-start | checkbox | Start the jail at system startup. |
Note
For static configurations not using DHCP or NAT, multiple IPv4 and IPv6 addresses and interfaces can be added to the jail by clicking ADD.
Similar to the Jail Wizard, configuring the basic properties, then clicking SAVE is often all that is needed to quickly create a new jail. To continue configuring more settings, click NEXT to proceed to the Jail Properties section of the form. Table 15.2.2 describes each of these options.
| Setting | Value | Description |
|---|---|---|
| devfs_ruleset | integer | Number of the devfs(8) ruleset to enforce when mounting devfs in the jail. The default value of 0 means no ruleset is enforced. Mounting devfs inside a jail is only possible when the allow_mount and allow_mount_devfs permissions are enabled and enforce_statfs is set to a value lower than 2. |
| exec.start | string | Commands to run in the jail environment when a jail is created. Example: sh /etc/rc. See
jail(8)
for more details. |
| exec.stop | string | Commands to run in the jail environment before a jail is removed and after any exec_prestop commands
are complete. Example: sh /etc/rc.shutdown. |
| exec_prestart | string | Commands to run in the system environment before a jail is started. |
| exec_poststart | string | Commands to run in the system environment after a jail is started and after any exec_start commands are finished. |
| exec_prestop | string | Commands to run in the system environment before a jail is stopped. |
| exec_poststop | string | Commands to run in the system environment after a jail is started and after any exec_start commands are finished. |
| exec.clean | checkbox | Run commands in a clean environment. The current environment is discarded except for $HOME, $SHELL, $TERM and $USER. $HOME and $SHELL are set to the target login. $USER is set to the target login. $TERM is imported from the current environment. The environment variables from the login class capability database for the target login are also set. |
| exec_timeout | integer | The maximum amount of time in seconds to wait for a command to complete. If a command is still running after the allotted time, the jail is terminated. |
| stop_timeout | integer | The maximum amount of time in seconds to wait for the jail processes to exit after sending a SIGTERM signal. This happens after any exec_stop commands are complete. After the specified time, the jail is removed, killing any remaining processes. If set to 0, no SIGTERM is sent and the jail is immeadility removed. |
| exec_jail_user | string | Enter either root or a valid username. Inside the jail, commands run as this user. |
| exec_system_jail_user | string | Set to True to look for the exec.jail_user in the system
passwd(5)
file instead of the jail passwd. |
| exec_system_user | string | Run commands in the jail as this user. By default, commands are run as the current user. |
| mount_devfs | checkbox | Mount a
devfs(5)
filesystem on the chrooted /dev directory and apply the ruleset in the devfs_ruleset
parameter to restrict the devices visible inside the jail. |
| mount_fdescfs | checkbox | Mount an
fdescfs(5)
filesystem in the jail /dev/fd directory. |
| enforce_statfs | drop-down | Determine which information processes in a jail are able to obtain about mount points. The behavior of multiple syscalls is affected: statfs(2), fstatfs(2), getfsstat(2), fhstatfs(2), and other similar compatibility syscalls. All mount points are available without any restrictions if this is set to 0. Only mount points below the jail chroot directory are available if this is set to 1. Set to 2, the default option only mount points where the jail chroot directory is located are available. |
| children_max | integer | Number of child jails allowed to be created by the jail or other jails under this jail. A limit of 0 restricts the jail from creating child jails. Hierarchical Jails in the jail(8) man page explains the finer details. |
| login_flags | string | Flags to pass to login(1) when logging in to the jail using the console function. |
| securelevel | integer | Value of the jail securelevel sysctl. A jail never has a lower securelevel than the host system. Setting this parameter allows a higher securelevel. If the host system securelevel is changed, jail securelevel will be at least as secure. Securelevel options are: 3, 2 (default), 1, 0, and -1. |
| sysvmsg | drop-down | Allow or deny access to SYSV IPC message primitives. Set to Inherit: All IPC objects on the system are visible to the jail. Set to New: Only objects the jail created using the private key namespace are visible. The system and parent jails have access to the jail objects but not private keys. Set to Disable: The jail cannot perform any sysvmsg related system calls. |
| sysvsem | drop-down | Allow or deny access to SYSV IPC semaphore primitives. Set to Inherit: All IPC objects on the system are visible to the jail. Set to New: Only objects the jail creates using the private key namespace are visible. The system and parent jails have access to the jail objects but not private keys. Set to Disable: The jail cannot perform any sysvmem related system calls. |
| sysvshm | drop-down | Allow or deny access to SYSV IPC shared memory primitives. Set to Inherit: All IPC objects on the system are visible to the jail. Set to New: Only objects the jail creates using the private key namespace are visible. The system and parent jails have access to the jail objects but not private keys. Set to Disable: The jail cannot perform any sysvshm related system calls. |
| allow_set_hostname | checkbox | Allow the jail hostname to be changed with hostname(1) or sethostname(3). |
| allow_sysvipc | checkbox | Choose whether a process in the jail has access to System V IPC primitives. Equivalent to setting sysvmsg, sysvsem, and sysvshm to Inherit. Deprecated in FreeBSD 11.0 and later! Use sysvmsg, sysvsem,and sysvshm instead. |
| allow_raw_sockets | checkbox | Allow the jail to use raw sockets. When set, the jail has access to lower-level network layers. This allows utilities like ping(8) and traceroute(8) to work in the jail, but has security implications and should only be used on jails running trusted software. |
| allow_chflags | checkbox | Treat jail users as privileged and allow the manipulation of system file flags. securelevel constraints are still enforced. |
| allow_mlock | checkbox | Allow jail to run services that use mlock(2) to lock physical pages in memory. |
| allow_mount | checkbox | Allow privileged users inside the jail to mount and unmount filesystem types marked as jail-friendly. |
| allow_mount_devfs | checkbox | Allow privileged users inside the jail to mount and unmount the devfs(5) device filesystem. This permission is only effective when allow_mount is set and enforce_statfs is set to a value lower than 2. |
| allout_mount_fusefs | checkbox | Allow privileged users inside the jail to mount and unmount fusefs. The jail must have FreeBSD 12.0 or newer installed. This permission is only effective when allow_mount is set and enforce_statfs is set to a value lower than 2. |
| allow_mount_nullfs | checkbox | Allow privileged users inside the jail to mount and unmount the nullfs(5) file system. This permission is only effective when allow_mount is set and enforce_statfs is set to a value lower than 2. |
| allow_mount_procfs | checkbox | Allow privileged users inside the jail to mount and unmount the procfs(5) file system. This permission is only effective when allow_mount is set and enforce_statfs is set to a value lower than 2. |
| allow_mount_tmpfs | checkbox | Allow privileged users inside the jail to mount and unmount the tmpfs(5) file system. This permission is only effective when allow_mount is set and enforce_statfs is set to a value lower than 2. |
| allow_mount_zfs | checkbox | Allow privileged users inside the jail to mount and unmount the ZFS file system. This permission is only effective when allow_mount is set and enforce_statfs is set to a value lower than 2. The ZFS(8) man page has information on how to configure the ZFS filesystem to operate from within a jail. |
| allow_vmm | checkbox | Grants the jail access to the Bhyve Virtual Machine Monitor (VMM). The jail must have FreeBSD 12.0 or newer installed with the vmm(4) kernel module loaded. |
| allow_quotas | checkbox | Allow the jail root to administer quotas on the jail filesystems. This includes filesystems the jail shares with other jails or with non-jailed parts of the system. |
| allow_socket_af | checkbox | Allow access to other protocol stacks beyond IPv4, IPv6, local (UNIX), and route. Warning: jail functionality does not exist for all protocal stacks. |
| vnet_interfaces | string | Space-delimited list of network interfaces to attach to a VNET-enabled jail after it is created. Interfaces are automatically released when the jail is removed. |
Click NEXT to view all jail Network Properties. These are shown in Table 15.2.3:
| Setting | Value | Description |
|---|---|---|
| interfaces | string | Enter up to four interface configurations in the format interface:bridge, separated by a comma
(,). The left value is the virtual VNET interface name and the right value is the bridge name
where the virtual interface is attached. |
| host_domainname | string | Enter an NIS Domain name for the jail. |
| host_hostname | string | Enter a hostname for the jail. By default, the system uses the jail NAME/UUID. |
| exec_fib | integer | Enter a number to define the routing table (FIB) to set when running commands inside the jail. |
| ip4.saddrsel | checkbox | Disables IPv4 source address selection for the jail in favor of the primary IPv4 address of the jail. Only available when the jail is not configured to use VNET. |
| ip4 | drop-down | Control the availability of IPv4 addresses. Set to Inherit: allow unrestricted access to all system addresses. Set to New: restrict addresses with ip4_addr. Set to Disable: stop the jail from using IPv4 entirely. |
| ip6.saddrsel | string | Disable IPv6 source address selection for the jail in favor of the primary IPv6 address of the jail. Only available when the jail is not configured to use VNET. |
| ip6 | drop-down | Control the availability of IPv6 addresses. Set to Inherit: allow unrestricted access to all system addresses. Set to New: restrict addresses with ip6_addr. Set to Disable: stop the jail from using IPv6 entirely. |
| resolver | string | Add lines to resolv.conf in file. Example: nameserver IP;search domain.local.
Fields must be delimited with a semicolon (;), this is translated as new lines in
resolv.conf. Enter none to inherit resolv.conf from the host. |
| mac_prefix | string | Optional. Enter a valid MAC address vendor prefix. Example: E4F4C6 |
| vnet_default_interface | drop-down | Set the default VNET interface. Only takes effect when VNET is set. Choose a specific interface, or set to auto to use the interface that has the default route. Choose none to not set a default VNET interface. |
| vnet0_mac | string | Leave this blank to generate random MAC addresses for the host and jail. To assign fixed MAC addresses, enter the host MAC address and the jail MAC address separated by a space. |
| vnet1_mac | string | Leave this blank to generate random MAC addresses for the host and jail. To assign fixed MAC addresses, enter the host MAC address and the jail MAC address separated by a space. |
| vnet2_mac | string | Leave this blank to generate random MAC addresses for the host and jail. To assign fixed MAC addresses, enter the host MAC address and the jail MAC address separated by a space. |
| vnet3_mac | string | Leave this blank to generate random MAC addresses for the host and jail. To assign fixed MAC addresses, enter the host MAC address and the jail MAC address separated by a space. |
| NAT Port Forwarding | checkbox | Configure the ports that allow remote access to the jail. To override the default port settings for a plugin, set this checkbox and configure a Protocol, Jail Port Number, and Host Port Number. |
| Protocol | string | The type of connection the port uses. Choose TCP for a reliable two-way transmission of data or UDP for an unreliable and unordered one-way data transmission. |
| Jail Port Number | integer | Port to assign to this jail. Avoid using a port that is already in use by another jail or system service. For a list of commonly-used ports, see this Internet Assigned Numbers Authority (IANA) registry. |
| Host Port Number | integer | The port on the host system that forwards data to the jail. Avoid using a port that is already in use by another system service. For a list of commonly-used ports, see this Internet Assigned Numbers Authority (IANA) registry. |
The final set of jail properties are contained in the Custom Properties section. Table 15.2.4 describes these options.
| Setting | Value | Description |
|---|---|---|
| owner | string | The owner of the jail. Can be any string. |
| priority | integer | The numeric start priority for the jail at boot time. Smaller values mean a higher priority. At system shutdown, the priority is reversed. Example: 99 |
| hostid | string | A new a jail hostid, if necessary. Example hostid: 1a2bc345-678d-90e1-23fa-4b56c78901de. |
| hostid_strict_check | checkbox | Check the jail hostid property. Prevents the jail from starting if the hostid does not match the host. |
| comment | string | Comments about the jail. |
| depends | string | Specify any jails the jail depends on. Child jails must already exist before the parent jail can be created. |
| mount_procfs | checkbox | Allow mounting of a
procfs(5)
filesystems in the jail /dev/proc directory. |
| mount_linprocfs | checkbox | Allow mounting of a linprocfs(5) filesystem in the jail. |
| template | checkbox | Convert the jail into a template. Template jails can be used to quickly create jails with the same configuration. |
| host_time | checkbox | Synchronize the time between jail and host. |
| jail_zfs | checkbox | Enable automatic ZFS jailing inside the jail. The assigned ZFS dataset is fully controlled by the jail. Note: allow_mount, enforce_statfs, and allow_mount_zfs must all be set for ZFS management inside the jail to work correctly. |
| jail_zfs_dataset | string | Define the dataset to be jailed and fully handed over to a jail. Enter a ZFS filesystem name without a pool name. jail_zfs must be set for this option to work. |
| jail_zfs_mountpoint | string | The mountpoint for the jail_zfs_dataset. Example: /data/example-dataset-name |
| allow_tun | checkbox | Expose host tun(4) devices in the jail. Allow the jail to create tun devices. |
| Autoconfigure IPv6 with rtsold | checkbox | Use rtsold(8) as part of IPv6 autoconfiguration. Send ICMPv6 Router Solicitation messages to interfaces to discover new routers. |
| ip_hostname | checkbox | Use DNS records during jail IP configuration to search the resolver and apply the first open IPv4 and IPv6 addresses. See jail(8). |
| assign_localhost | checkbox | Add network interface lo0 to the jail and assign it the first available localhost address, starting with 127.0.0.2. VNET cannot be set. Jails using VNET configure a localhost as part of their virtualized network stack. |
Click SAVE when the desired jail properties have been set. New jails are added to the primary list in the Jails menu.
15.2.2.1. Creating Template Jails
Template jails are basejails that can be used as a template to efficiently create jails with the same configuration. These steps create a template jail:
- Go to .
- Select Basejail as the Jail Type. Configure the jail with desired options.
- Set template in the Custom Properties tab.
- Click Save.
- Click ADD.
- Enter a name for the template jail. Leave Jail Type as Default (Clone Jail). Set Release to basejailname(template), where basejailname is the name of the base jail created earlier.
- Complete the jail creation wizard.
15.3. Managing Jails
Clicking shows a list of installed jails. An example is shown in Figure 15.3.1.
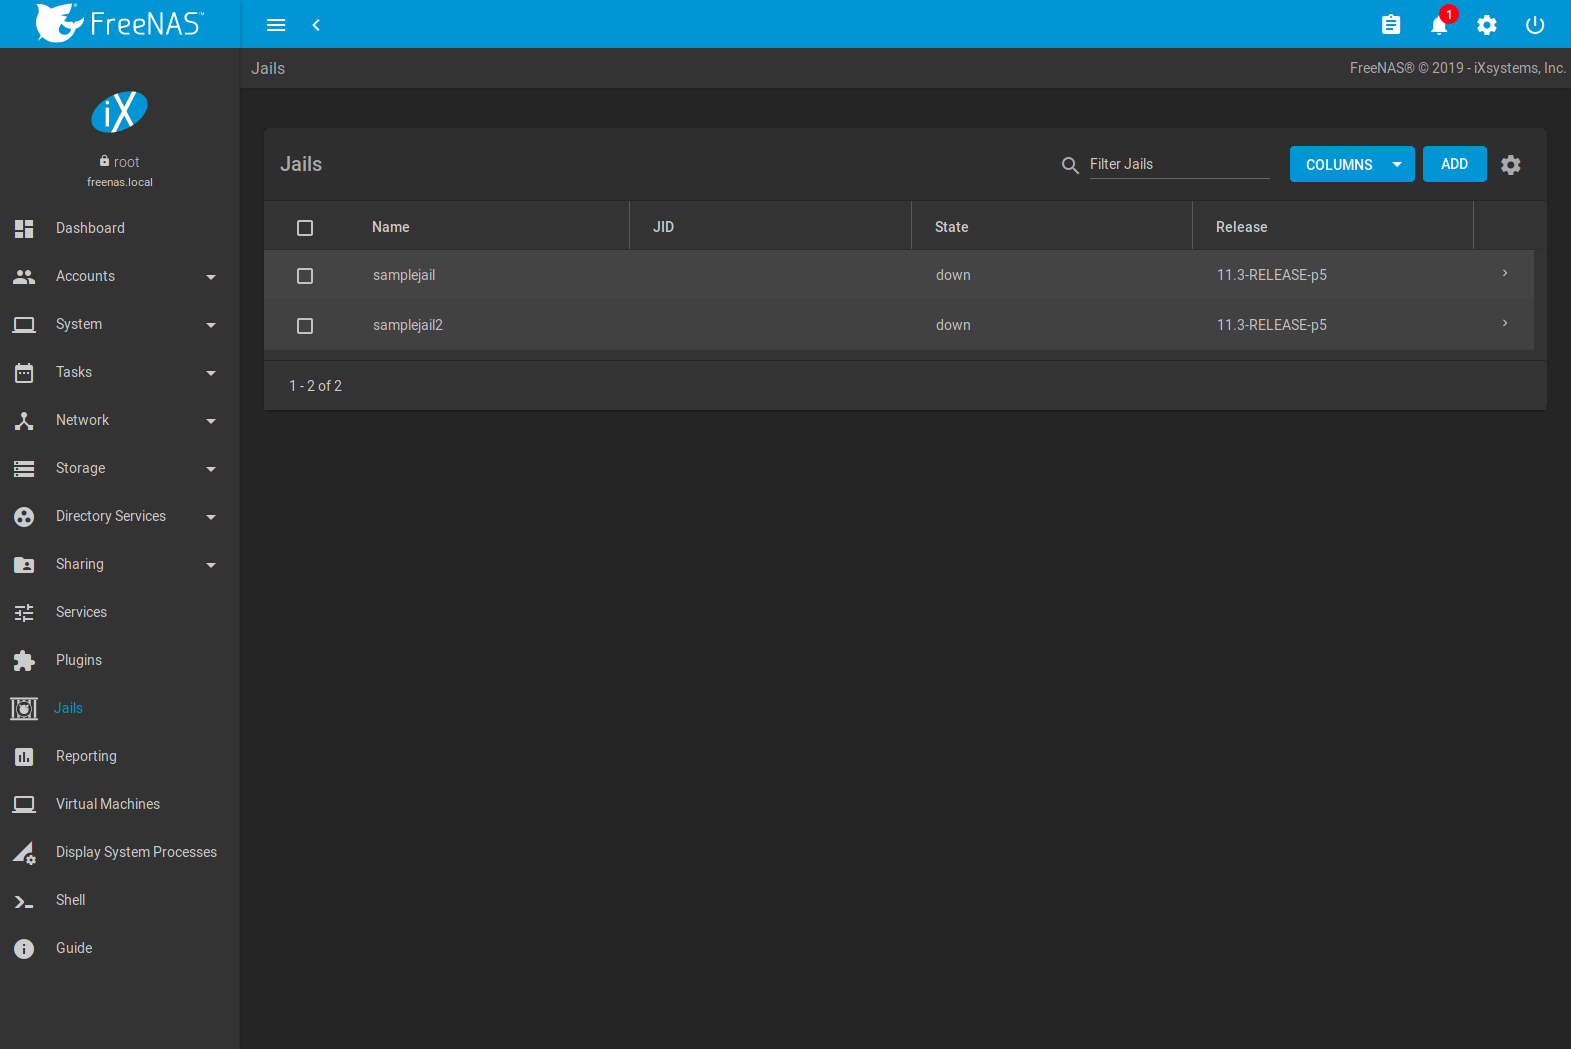
Fig. 15.3.1 Jail Overview Section
Operations can be applied to multiple jails by selecting those jails with the checkboxes on the left. After selecting one or more jails, icons appear which can be used to ▶ (Start), (Stop), 🕓 (Update), or (Delete) those jails.
More information such as IPV4, IPV6, TYPE of jail, and whether it is a TEMPLATE jail or BASEJAIL can be shown by clicking (Expand). Additional options for that jail are also displayed. These are described in Table 15.3.1.
Figure 15.3.2 shows the menu that appears.
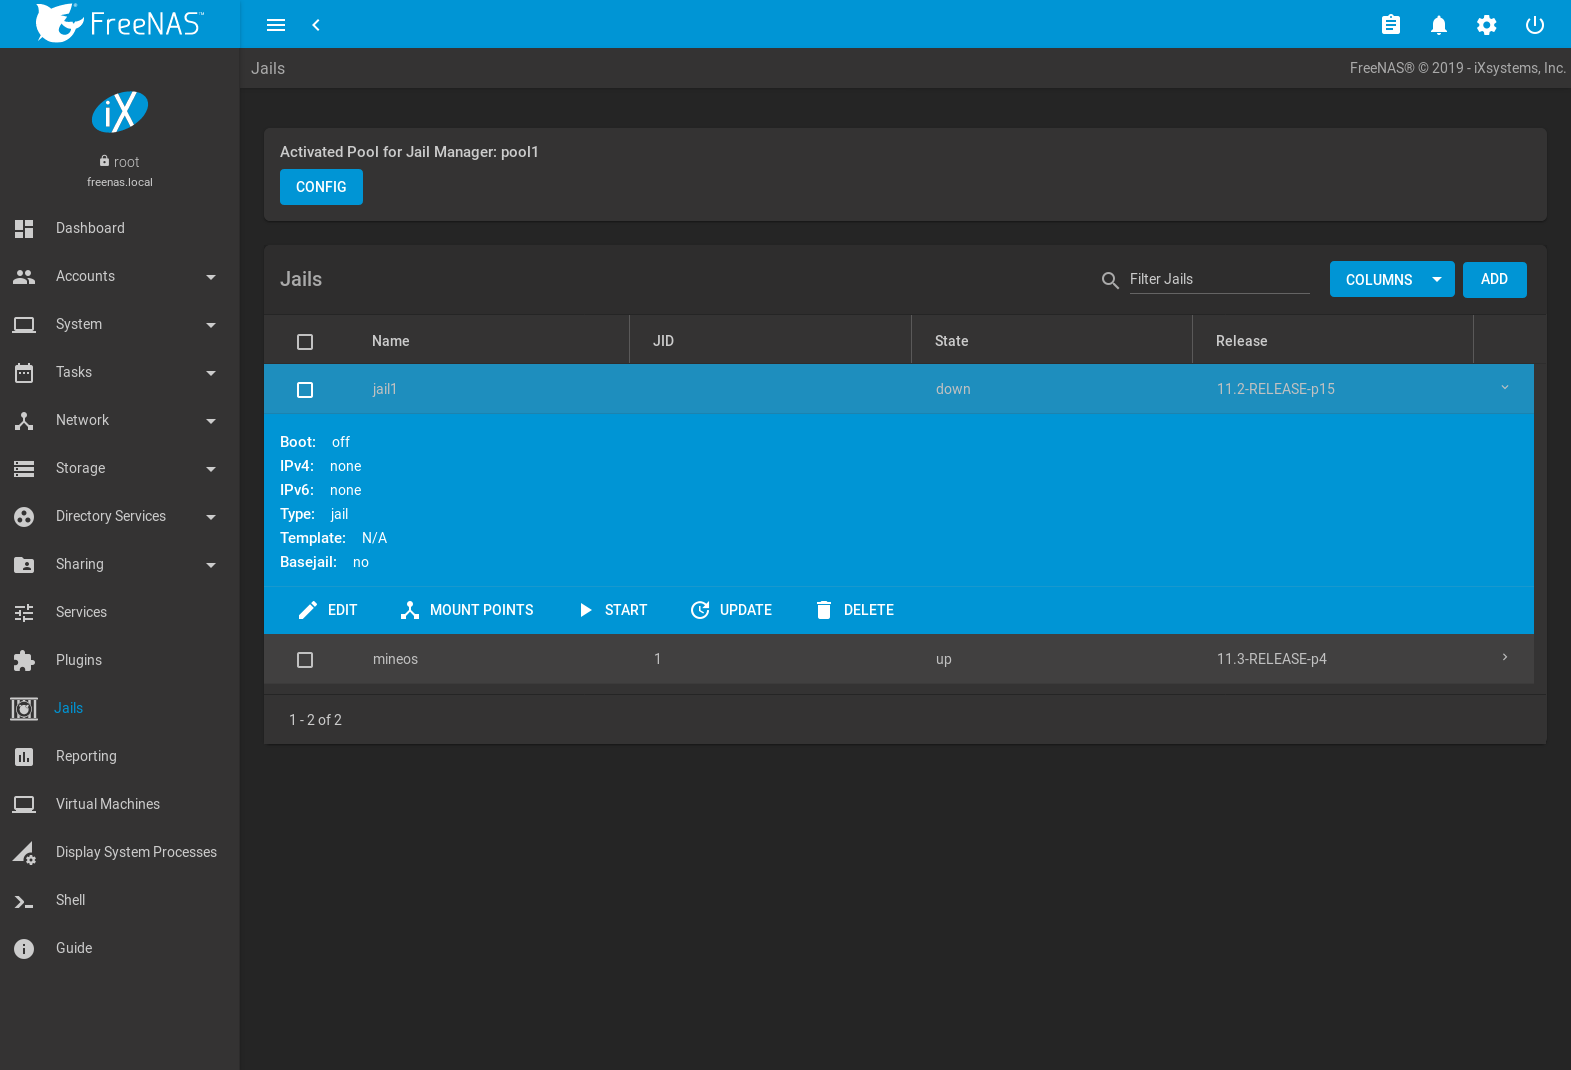
Fig. 15.3.2 Jail Options Menu
Warning
Modify the IP address information for a jail by clicking (Expand) instead of issuing the networking commands directly from the command line of the jail. This ensures the changes are saved and will survive a jail or FreeNAS® reboot.
| Option | Description |
|---|---|
| EDIT | Used to modify the settings described in Advanced Jail Creation. A jail cannot be edited while it is running. The settings can be viewed, but are read only. |
| MOUNT POINTS | Select an existing mount point to EDIT or click to create a mount point for the jail. A mount point gives a jail access to storage located elsewhere on the system. A jail must be stopped before adding, editing, or deleting a mount point. See Additional Storage for more details. |
| RESTART | Stop and immediately start an up jail. |
| START | Start a jail that has a current STATE of down. |
| STOP | Stop a jail that has a current STATE of up. |
| UPDATE | Runs freebsd-update to update the jail to the latest patch level of the installed FreeBSD release. |
| SHELL | Access a root command prompt to interact with a jail directly from the command line. Type exit to leave the command prompt. |
| DELETE | Caution: deleting the jail also deletes all of the jail contents and all associated snapshots. Back up the jail data, configuration, and programs first. There is no way to recover the contents of a jail after deletion! |
Note
Menu entries change depending on the jail state. For example, a stopped jail does not have a STOP or SHELL option.
Jail status messages and command output are stored in
/var/log/iocage.log.
15.3.1. Jail Updates and Upgrades
Click (Expand) to update a jail to the most current patch level of the installed FreeBSD release. This does not change the release.
A jail upgrade replaces the jail FreeBSD operating system with a new
release of FreeBSD. Upgrade a jail by stopping it, opening the
Shell and entering iocage upgrade name, where name is
the plugin jail name.
Tip
It is possible to
manually remove unused releases from
the /iocage/releases/ dataset after upgrading a jail. The
release must not be in use by any jail on the system!
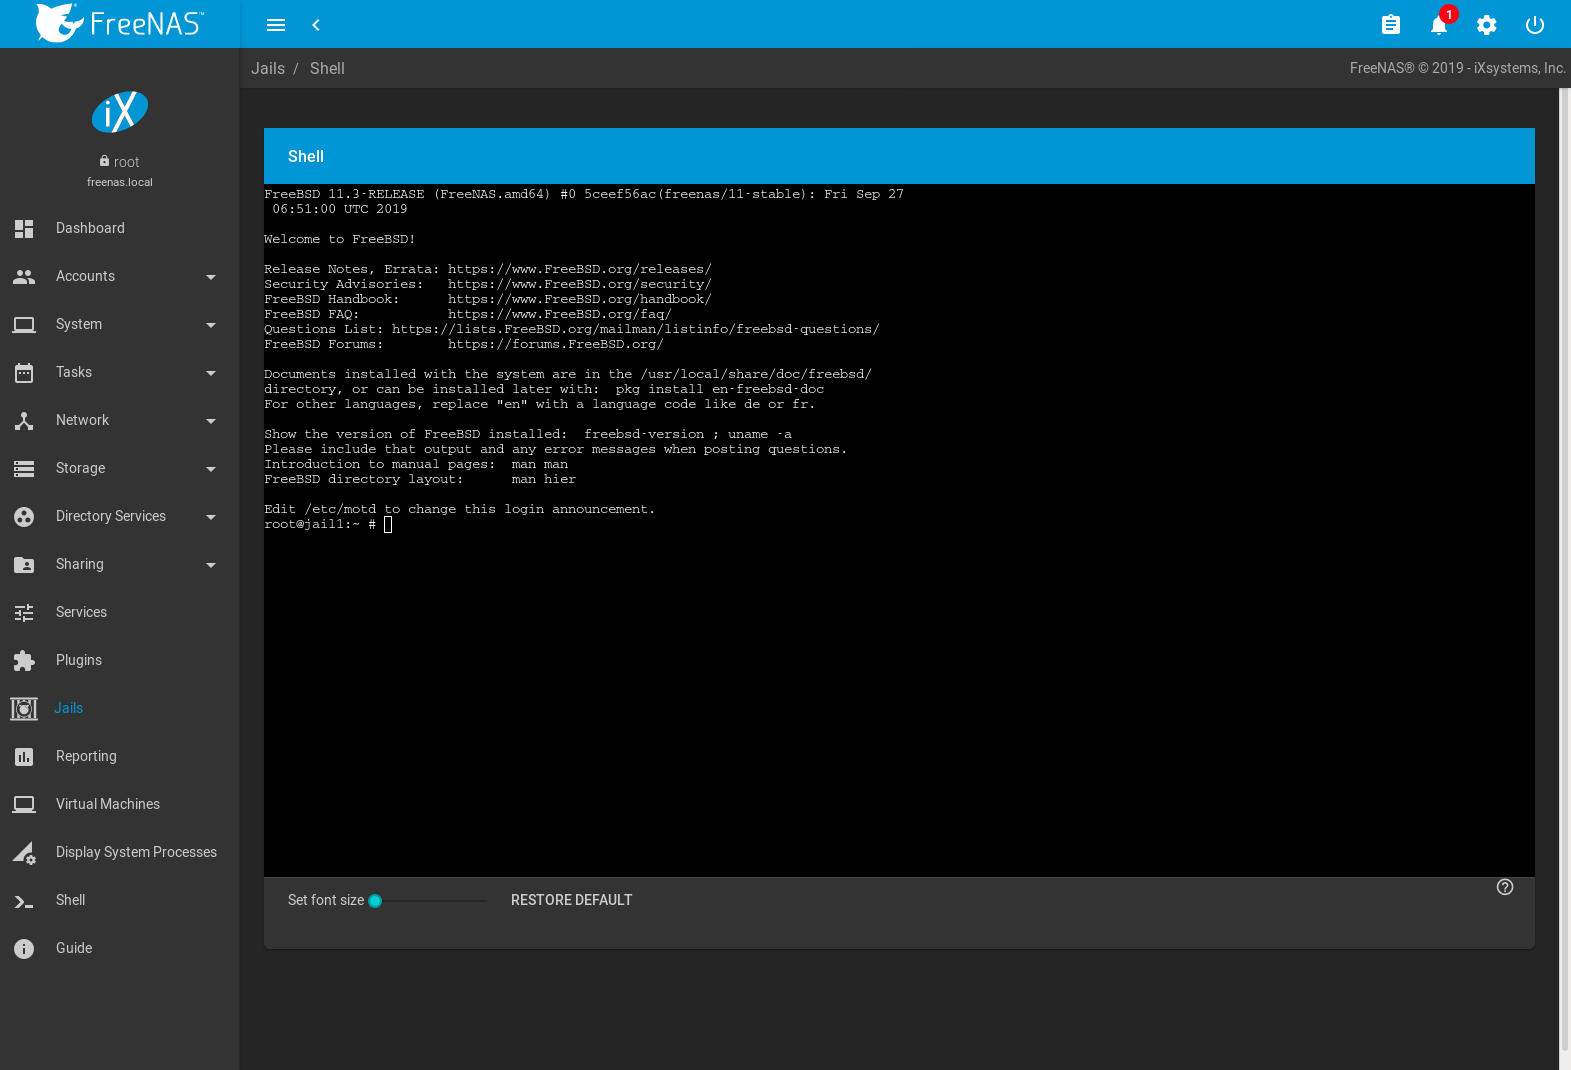
15.3.2. Accessing a Jail Using SSH
The ssh daemon sshd(8) must be enabled in a jail to allow SSH access to that jail from another system.
The jail STATE must be up before the SHELL option is available. If the jail is not up, start it by clicking (Expand) for the desired jail. Click (Expand) to open a shell in the jail. A jail root shell is shown in this example:
Last login: Fri Apr 6 07:57:04 on pts/12
FreeBSD 11.1-STABLE (FreeNAS.amd64) #0 0ale9f753(freenas/11-stable): FriApr 6 04:46:31 UTC 2018

Welcome to FreeBSD!

Release Notes, Errata: https://www.FreeBSD.org/releases/
Security Advisories:   https://www.FreeBSD.org/security/
FreeBSD Handbook:      https://www.FreeBSD.org/handbook/
FreeBSD FAQ:           https://www.FreeBSD.org/faq/
Questions List: https://lists.FreeBSD.org/mailman/listinfo/freebsd-questions/
FreeBSD Forums:        https://forums.FreeBSD.org/

Documents installed with the system are in the /usr/local/share/doc/freebsd/
directory, or can be installed later with: pkg install en-freebsd-doc
For other languages, replace "en" with a language code like de or fr.

Show the version of FreeBSD installed: freebsd-version ; uname -a
Please include that output and any error messages when posting questions.
Introduction to manual pages: man man
FreeBSD directory layout:     man hier

Edit /etc/motd to change this login announcement.
root@jailexamp:~ #
Tip
A root shell can also be opened for a jail using the FreeNAS® UI
Shell. Open the Shell, then type
iocage console jailname.
Enable sshd:
sysrc sshd_enable="YES"
sshd_enable: NO -> YES
Tip
Using sysrc to enable sshd verifies that sshd is enabled.
Start the SSH daemon: service sshd start
The first time the service runs, the jail RSA key pair is generated and the key fingerprint is displayed.
Add a user account with adduser. Follow the prompts,
Enter will accept the default value offered. Users that require
root access must also be a member of the wheel group. Enter
wheel when prompted to invite user into other groups? []:
root@jailexamp:~ # adduser
Username: jailuser
Full name: Jail User
Uid (Leave empty for default):
Login group [jailuser]:
Login group is jailuser. Invite jailuser into other groups? []: wheel
Login class [default]:
Shell (sh csh tcsh git-shell zsh rzsh nologin) [sh]: csh
Home directory [/home/jailuser]:
Home directory permissions (Leave empty for default):
Use password-based authentication? [yes]:
Use an empty password? (yes/no) [no]:
Use a random password? (yes/no) [no]:
Enter password:
Enter password again:
Lock out the account after creation? [no]:
Username   : jailuser
Password   : *****
Full Name  : Jail User
Uid        : 1002
Class      :
Groups     : jailuser wheel
Home       : /home/jailuser
Home Mode  :
Shell      : /bin/csh
Locked     : no
OK? (yes/no): yes
adduser: INFO: Successfully added (jailuser) to the user database.
Add another user? (yes/no): no
Goodbye!
root@jailexamp:~
After creating the user, set the jail root password to allow users to use su to gain superuser privileges. To set the jail root password, use passwd. Nothing is echoed back when using passwd
root@jailexamp:~ # passwd
Changing local password for root
New Password:
Retype New Password:
root@jailexamp:~ #
Finally, test that the user can successfully ssh into the jail from another system and gain superuser privileges. In the example, a user named jailuser uses ssh to access the jail at 192.168.2.3. The host RSA key fingerprint must be verified the first time a user logs in.
ssh jailuser@192.168.2.3
The authenticity of host '192.168.2.3 (192.168.2.3)' can't be established.
RSA key fingerprint is 6f:93:e5:36:4f:54:ed:4b:9c:c8:c2:71:89:c1:58:f0.
Are you sure you want to continue connecting (yes/no)? yes
Warning: Permanently added '192.168.2.3' (RSA) to the list of known hosts.
Password:
Note
Every jail has its own user accounts and service configuration. These steps must be repeated for each jail that requires SSH access.
15.3.3. Additional Storage
Jails can be given access to an area of storage outside of the jail that is configured on the FreeNAS® system. It is possible to give a FreeBSD jail access to an area of storage on the FreeNAS® system. This is useful for applications or plugins that store large amounts of data or if an application in a jail needs access to data stored on the FreeNAS® system. For example, Transmission is a plugin that stores data using BitTorrent. The %brand$ external storage is added using the mount_nullfs(8) mechanism, which links data that resides outside of the jail as a storage area within a jail.
(Expand) shows any added storage and allows adding more storage.
Note
A jail must have a STATE of down before adding a new mount point. Click (Expand) and STOP for a jail to change the jail STATE to down.
Storage can be added by clicking (Expand) for the desired jail. The MOUNT POINT section is a list of all of the currently defined mount points.
Go to to add storage to a jail. This opens the screen shown in Figure 15.3.3.

Fig. 15.3.3 Adding Storage to a Jail
Browse to the Source and Destination, where:
- Source: is the directory or dataset on the FreeNAS® system which will be accessed by the jail. FreeNAS® creates the directory if it does not exist. This directory must reside outside of the pool or dataset being used by the jail. This is why it is recommended to create a separate dataset to store jails, so the dataset holding the jails is always separate from any datasets used for storage on the FreeNAS® system.
- Destination: Browse to an existing and empty directory
within the jail to link to the Source storage area. It is
also possible to add
/and a name to the end of the path and FreeNAS® automatically creates a new directory. New directories created must be within the jail directory structure. Example:/mnt/iocage/jails/samplejail/root/new-destination-directory.
Storage is typically added because the user and group account associated with an application installed inside of a jail needs to access data stored on the FreeNAS® system. Before selecting the Source, it is important to first ensure that the permissions of the selected directory or dataset grant permission to the user/group account inside of the jail. This is not the default, as the users and groups created inside of a jail are totally separate from the users and groups of the FreeNAS® system.
The workflow for adding storage usually goes like this:
Determine the name of the user and group account used by the application. For example, the installation of the transmission application automatically creates a user account named transmission and a group account also named transmission. When in doubt, check the files
/etc/passwd(to find the user account) and/etc/group(to find the group account) inside the jail. Typically, the user and group names are similar to the application name. Also, the UID and GID are usually the same as the port number used by the service.A media user and group (GID 8675309) are part of the base system. Having applications run as this group or user makes it possible to share storage between multiple applications in a single jail, between multiple jails, or even between the host and jails.
On the FreeNAS® system, create a user account and group account that match the user and group names used by the application in the jail.
Decide whether the jail will be given access to existing data or a new storage area will be allocated.
If the jail accesses existing data, edit the permissions of the pool or dataset so the user and group accounts have the desired read and write access. If multiple applications or jails are to have access to the same data, create a new group and add each needed user account to that group.
If an area of storage is being set aside for that jail or individual application, create a dataset. Edit the permissions of that dataset so the user and group account has the desired read and write access.
Use the jail (Expand) to select the Source of the data and the Destination where it will be mounted in the jail.
To prevent writes to the storage, click Read-Only.
After storage has been added or created, it appears in the
MOUNT POINTS for that jail. In the example shown in
Figure 15.3.4,
a dataset named pool1/smb-storage has been chosen as the
Source as it contains the files stored on the FreeNAS®
system. The user entered
/mnt/iocage/jails/samplejail/root/mounted as the directory
to be mounted in the Destination field. To users inside
the jail, this data appears in the /root/mounted
directory.
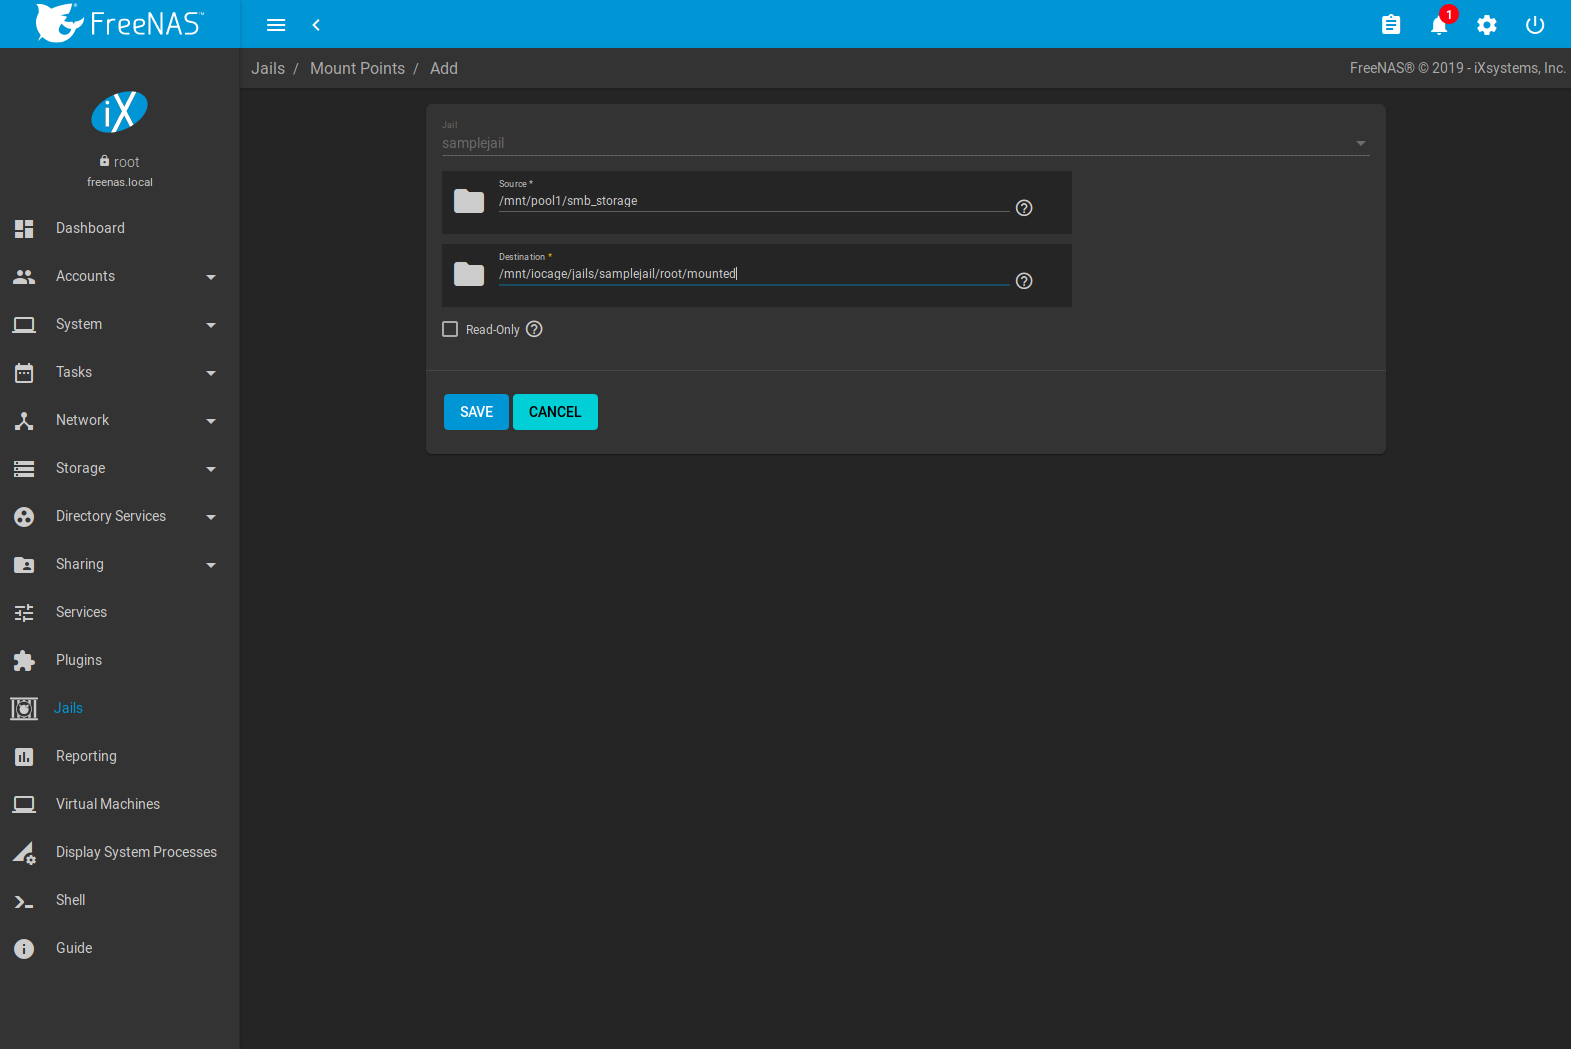
Fig. 15.3.4 Example Storage
Storage is automatically mounted as it is created.
Note
Mounting a dataset does not automatically mount any child datasets inside it. Each dataset is a separate filesystem, so child datasets must each have separate mount points.
Click (Options) to delete the storage.
Warning
Remember that added storage is just a pointer to the selected storage directory on the FreeNAS® system. It does not copy that data to the jail. Files that are deleted from the Destination directory in the jail are really deleted from the Source directory on the FreeNAS® system. However, removing the jail storage entry only removes the pointer. This leaves the data intact but not accessible from the jail.
15.4. Jail Software
A jail is created with no software aside from the core packages installed as part of the selected version of FreeBSD. To install more software, start the jail and click 塞 SHELL.
15.4.1. Installing FreeBSD Packages
The quickest and easiest way to install software inside the jail is to install a FreeBSD package. FreeBSD packages are precompiled and contain all the binaries and a list of dependencies required for the software to run on a FreeBSD system.
A huge amount of software has been ported to FreeBSD. Most of that software is available as packages. One way to find FreeBSD software is to use the search bar at FreshPorts.org.
After finding the name of the desired package, use the pkg install command to install it. For example, to install the audiotag package, use the command pkg install audiotag
When prompted, press y to complete the installation. Messages
will show the download and installation status.
A successful installation can be confirmed by querying the package database:
pkg info -f audiotag
audiotag-0.19_1
Name:           audiotag
Version:        0.19_1
Installed on:   Fri Nov 21 10:10:34 PST 2014
Origin:         audio/audiotag
Architecture:   freebsd:9:x86:64
Prefix:         /usr/local
Categories:     multimedia audio
Licenses:       GPLv2
Maintainer:     ports@FreeBSD.org
WWW:            http://github.com/Daenyth/audiotag
Comment:        Command-line tool for mass tagging/renaming of audio files
Options:
  DOCS:         on
  FLAC:         on
  ID3:          on
  MP4:          on
  VORBIS:       on
Annotations:
  repo_type:    binary
  repository:   FreeBSD
Flat size:      62.8KiB
Description:   Audiotag is a command-line tool for mass tagging/renaming of audio files
               it supports the vorbis comment, id3 tags, and MP4 tags.
WWW:           http://github.com/Daenyth/audiotag
To show what was installed by the package:
pkg info -l audiotag
audiotag-0.19_1:
/usr/local/bin/audiotag
/usr/local/share/doc/audiotag/COPYING
/usr/local/share/doc/audiotag/ChangeLog
/usr/local/share/doc/audiotag/README
/usr/local/share/licenses/audiotag-0.19_1/GPLv2
/usr/local/share/licenses/audiotag-0.19_1/LICENSE
/usr/local/share/licenses/audiotag-0.19_1/catalog.mk
In FreeBSD, third-party software is always stored in
/usr/local to differentiate it from the software that came
with the operating system. Binaries are almost always located in a
subdirectory called bin or sbin and configuration
files in a subdirectory called etc.
15.4.2. Compiling FreeBSD Ports
Compiling a port is another option. Compiling ports offer these advantages:
- Not every port has an available package. This is usually due to licensing restrictions or known, unaddressed security vulnerabilities.
- Sometimes the package is out-of-date and a feature is needed that only became available in the newer version.
- Some ports provide compile options that are not available in the pre-compiled package. These options are used to add or remove features or options.
Compiling a port has these disadvantages:
- It takes time. Depending upon the size of the application, the amount of dependencies, the speed of the CPU, the amount of RAM available, and the current load on the FreeNAS® system, the time needed can range from a few minutes to a few hours or even to a few days.
Note
If the port does not provide any compile options, it saves time and preserves the FreeNAS® system resources to use the pkg install command instead.
The FreshPorts.org listing shows whether a port has any configurable compile options. Figure 15.4.2 shows the Configuration Options for audiotag, a utility for renaming multiple audio files.
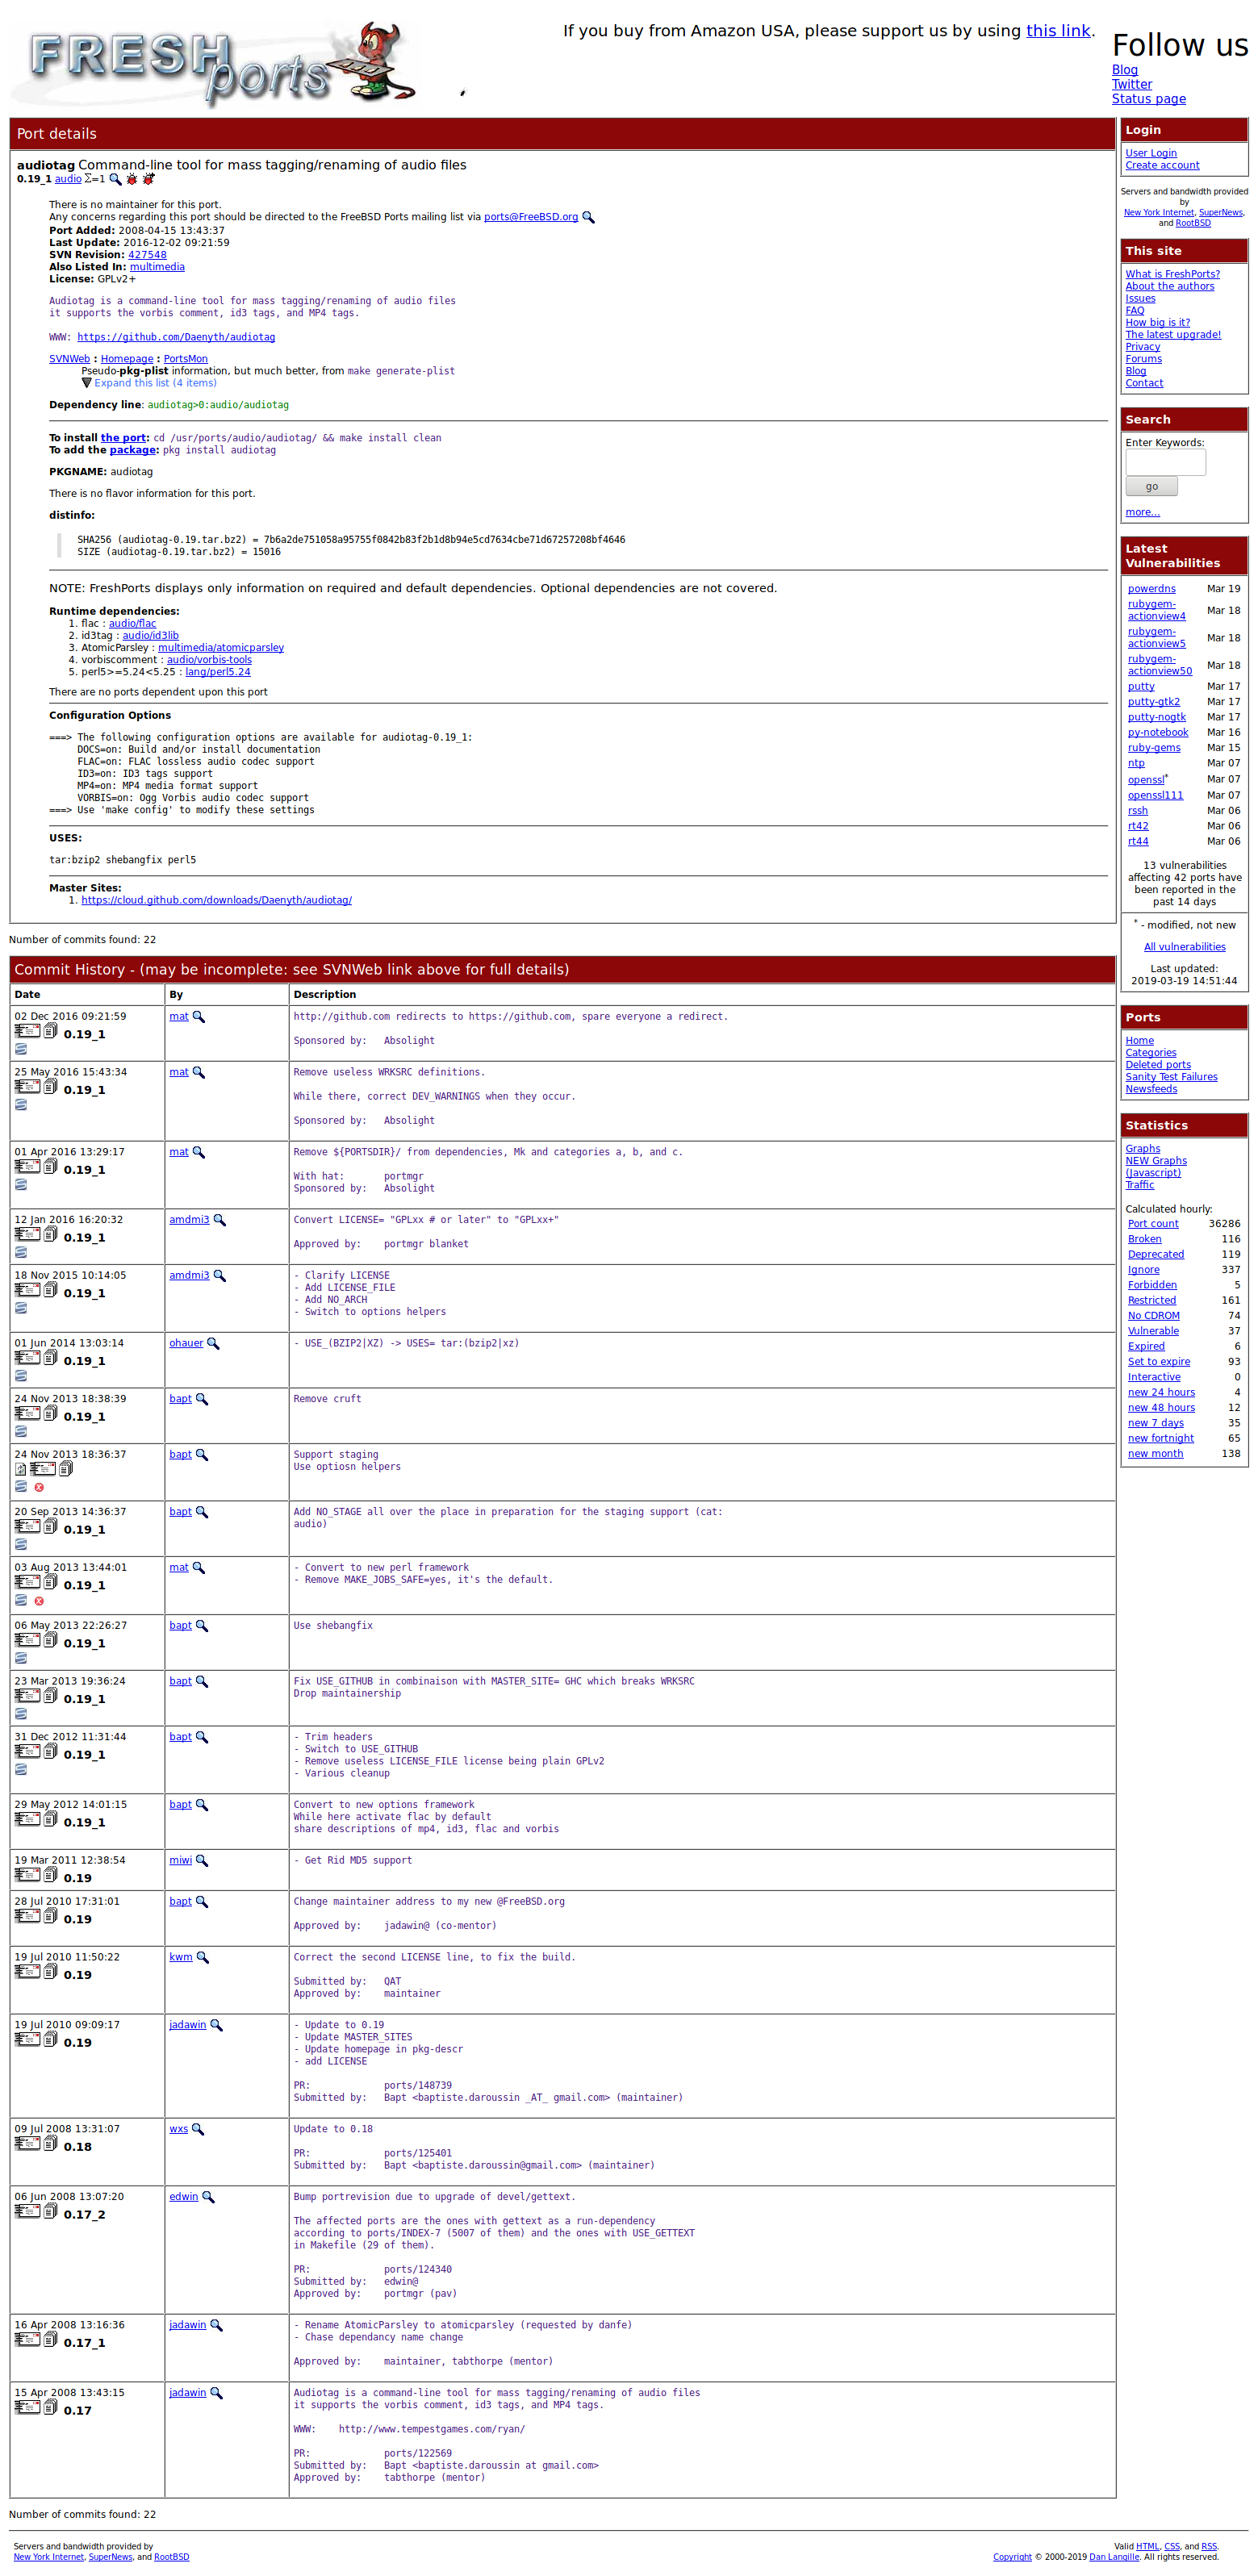
Fig. 15.4.2 Audiotag Port Information
Packages are built with default options. Ports let the user select options.
The Ports Collection must be installed in the jail before ports can be
compiled. Inside the jail, use the portsnap
utility. This command downloads the ports collection and extracts
it to the /usr/ports/ directory of the jail:
portsnap fetch extract
Note
To install additional software at a later date, make sure the ports collection is updated with portsnap fetch update.
To compile a port, cd into a subdirectory of
/usr/ports/. The entry for the port at FreshPorts provides the
location to cd into and the make command to run.
This example compiles and installs the audiotag port:
cd /usr/ports/audio/audiotag
make install clean
The first time this command is run, the configure screen shown in Figure 15.4.3 is displayed:
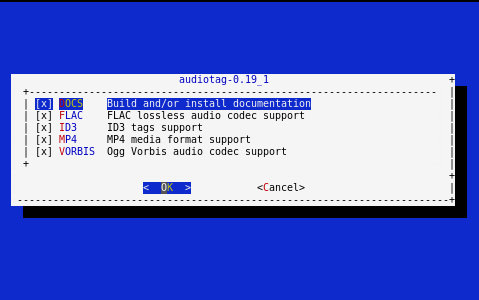
Fig. 15.4.3 Configuration Options for Audiotag Port
This port has several configurable options: DOCS, FLAC, ID3,
MP4, and VORBIS. Selected options are shown with a *.
Use the arrow keys to select an option and press spacebar to
toggle the value. Press Enter when satisfied with the options.
The port begins to compile and install.
Note
After options have been set, the configuration screen is normally not shown again. Use make config to display the screen and change options before rebuilding the port with make clean install clean.
Many ports depend on other ports. Those other ports also have configuration screens that are shown before compiling begins. It is a good idea to watch the compile until it finishes and the command prompt returns.
Installed ports are registered in the same package database that manages packages. The pkg info can be used to determine which ports were installed.
15.4.3. Starting Installed Software
After packages or ports are installed, they must be configured and
started. Configuration files are usually in /usr/local/etc or a
subdirectory of it. Many FreeBSD packages contain a sample configuration
file as a reference. Take some time to read the software documentation
to learn which configuration options are available and which
configuration files require editing.
Most FreeBSD packages that contain a startable service include a
startup script which is automatically installed to
/usr/local/etc/rc.d/. After the configuration is complete, test
starting the service by running the script with the onestart
option. For example, with openvpn installed in the jail, these
commands are run to verify that the service started:
/usr/local/etc/rc.d/openvpn onestart
Starting openvpn.

/usr/local/etc/rc.d/openvpn onestatus
openvpn is running as pid 45560.

sockstat -4
USER COMMAND         PID     FD      PROTO   LOCAL ADDRESS   FOREIGN ADDRESS
root openvpn         48386   4       udp4    *:54789         *:*
If it produces an error:
/usr/local/etc/rc.d/openvpn onestart
Starting openvpn.
/usr/local/etc/rc.d/openvpn: WARNING: failed to start openvpn
Run tail /var/log/messages to see any error messages if an issue is found. Most startup failures are related to a misconfiguration in a configuration file.
After verifying that the service starts and is working as intended,
add a line to /etc/rc.conf to start the
service automatically when the jail is started. The line to
start a service always ends in _enable=”YES” and typically starts
with the name of the software. For example, this is the entry for the
openvpn service:
openvpn_enable="YES"
When in doubt, the startup script shows the line to put in
/etc/rc.conf. This is the description in
/usr/local/etc/rc.d/openvpn:
# This script supports running multiple instances of openvpn.
# To run additional instances link this script to something like
# % ln -s openvpn openvpn_foo

# and define additional openvpn_foo_* variables in one of
# /etc/rc.conf, /etc/rc.conf.local or /etc/rc.conf.d /openvpn_foo

#
# Below NAME should be substituted with the name of this script. By default
# it is openvpn, so read as openvpn_enable. If you linked the script to
# openvpn_foo, then read as openvpn_foo_enable etc.
#
# The following variables are supported (defaults are shown).
# You can place them in any of
# /etc/rc.conf, /etc/rc.conf.local or /etc/rc.conf.d/NAME
#
# NAME_enable="NO"
# set to YES to enable openvpn
The startup script also indicates if any additional parameters are available:
# NAME_if=
# driver(s) to load, set to "tun", "tap" or "tun tap"
#
# it is OK to specify the if_ prefix.
#
# # optional:
# NAME_flags=
# additional command line arguments
# NAME_configfile="/usr/local/etc/openvpn/NAME.conf"
# --config file
# NAME_dir="/usr/local/etc/openvpn"
# --cd directory