
-
Important Announcement for the TrueNAS Community.
The TrueNAS Community has now been moved. This forum has become READ-ONLY for historical purposes. Please feel free to join us on the new TrueNAS Community Forums
You are using an out of date browser. It may not display this or other websites correctly.
You should upgrade or use an alternative browser.
You should upgrade or use an alternative browser.
Win 10 virtual machine TrueNAS
- Thread starter Bureaua
- Start date
- Joined
- Nov 25, 2013
- Messages
- 7,776
remove the static IPv4 address
enable DHCP
change default vnet interface from "auto" to the one your NAS uses to connect to the LAN or "bridge0" if that exists
select "vnet0:..." in the IPv4 interface setting
That should do it. If not we need to do some bridge magic to make the jail and the Windows VM play nicely together.
enable DHCP
change default vnet interface from "auto" to the one your NAS uses to connect to the LAN or "bridge0" if that exists
select "vnet0:..." in the IPv4 interface setting
That should do it. If not we need to do some bridge magic to make the jail and the Windows VM play nicely together.
- Joined
- Nov 25, 2013
- Messages
- 7,776
P.S. Use your Mac's terminal and connect to your NAS via SSH. The "shell" inside the UI is broken. And we need the terminal later, anyway.
Bureaua
Explorer
- Joined
- Nov 28, 2020
- Messages
- 75
Patrick--did all that and Im still getting DHCP not running in the jailremove the static IPv4 address
enable DHCP
change default vnet interface from "auto" to the one your NAS uses to connect to the LAN or "bridge0" if that exists
select "vnet0:..." in the IPv4 interface setting
That should do it. If not we need to do some bridge magic to make the jail and the Windows VM play nicely together.
- Joined
- Nov 25, 2013
- Messages
- 7,776
Ok. See you tomorrow then  Meanwhile you could enable and configure the SSH service for the NAS itself (permit root login with password) - it's under "Services".
And then provide the output of these two commands:
ifconfig -a
iocage get all <jailname>
Bedtime for me ...
Meanwhile you could enable and configure the SSH service for the NAS itself (permit root login with password) - it's under "Services".And then provide the output of these two commands:
ifconfig -a
iocage get all <jailname>
Bedtime for me ...
Bureaua
Explorer
- Joined
- Nov 28, 2020
- Messages
- 75
Many Thanks--Appreciate your timeOk. See you tomorrow then
And then provide the output of these two commands:
ifconfig -a
iocage get all <jailname>
Bedtime for me ...
Bureaua
Explorer
- Joined
- Nov 28, 2020
- Messages
- 75
Patrick-- attached is the outputOk. See you tomorrow then
And then provide the output of these two commands:
ifconfig -a
iocage get all <jailname>
Bedtime for me ...
Attachments
- Joined
- Nov 25, 2013
- Messages
- 7,776
That is only fractions. You must open the Mac Terminal.app, type
Then you can copy&paste text instead of pictures.
ssh root@<your NAS IP>, confirm with "yes" once, the give your password. And then use that command line instead of the one in the UI.Then you can copy&paste text instead of pictures.
Bureaua
Explorer
- Joined
- Nov 28, 2020
- Messages
- 75
Ok--I will do it tonight. :) Have a nice evening and thanks againThat is only fractions. You must open the Mac Terminal.app, typessh root@<your NAS IP>, confirm with "yes" once, the give your password. And then use that command line instead of the one in the UI.
Then you can copy&paste text instead of pictures.
Bureaua
Explorer
- Joined
- Nov 28, 2020
- Messages
- 75
Patrick-I managed to SSH using my Mac terminal by using my user name. I could not do it at the root.Ok--I will do it tonight. :) Have a nice evening and thanks again
ssh root@192.168.0.154 ask for the password but would not accept it?? Therefore I did the following
ssh bureaua@192.168.0.154 and it accepted the password. I can guarantee the password at the root is in place and I entered all right, but would not accept it ?? I really don't know why.
in the accounts/Users I have the following:
username: root
UID 0
Builtin yes
Full Name: root
Shell/usr/local/bin/zsh
Password Disabled: false
Lock User: false
Microsoft Account: false
Samba Authentification: false.
The 2 files attached were obtained from my Mac terminal by running the commands you gave me ifconfig -a and iocage get all
I ran those commands when I was logged as my user name bureaua
Attachments
- Joined
- Nov 25, 2013
- Messages
- 7,776
Hi!
That's great. Sorry about the wasted hours. I'll look into the files later today and try to figure out what's wrong with your network connection for the jail. As for the root login, the deciding hint was hidden in this comment of mine:

But now that you have another user to logon, you don't need to change that setting. We can go the next step with the private/public key pair and set up a more secure way of logging in as root.
You can find instructions on how to generate a key pair here:
Then in the section Importing your SSH key simply ignore all the stuff about the Joyent portal. Instead open up the menu "Accounts -> Users" on your NAS and edit the "root" user. Then paste the public key that you copied to the clipboard with that

You should now be able to
That's great. Sorry about the wasted hours. I'll look into the files later today and try to figure out what's wrong with your network connection for the jail. As for the root login, the deciding hint was hidden in this comment of mine:
See you tomorrow then
But now that you have another user to logon, you don't need to change that setting. We can go the next step with the private/public key pair and set up a more secure way of logging in as root.
You can find instructions on how to generate a key pair here:
Manually generating your SSH key in macOS
docs.joyent.com
Then in the section Importing your SSH key simply ignore all the stuff about the Joyent portal. Instead open up the menu "Accounts -> Users" on your NAS and edit the "root" user. Then paste the public key that you copied to the clipboard with that
pbcopy command in the instructions into the corresponding field of the root account. Save - done.
You should now be able to
ssh root@192.168.0.154 without a password but still reasonably secure for a system on an isolated private network. Never hand out that private key!Bureaua
Explorer
- Joined
- Nov 28, 2020
- Messages
- 75
Excellent Thank you - I will do thatHi!
That's great. Sorry about the wasted hours. I'll look into the files later today and try to figure out what's wrong with your network connection for the jail. As for the root login, the deciding hint was hidden in this comment of mine:
View attachment 43260
But now that you have another user to logon, you don't need to change that setting. We can go the next step with the private/public key pair and set up a more secure way of logging in as root.
You can find instructions on how to generate a key pair here:
Manually generating your SSH key in macOS
docs.joyent.com
Then in the section Importing your SSH key simply ignore all the stuff about the Joyent portal. Instead open up the menu "Accounts -> Users" on your NAS and edit the "root" user. Then paste the public key that you copied to the clipboard with thatpbcopycommand in the instructions into the corresponding field of the root account. Save - done.
View attachment 43262
You should now be able tossh root@192.168.0.154without a password but still reasonably secure for a system on an isolated private network. Never hand out that private key!
Bureaua
Explorer
- Joined
- Nov 28, 2020
- Messages
- 75
Private/Public key pair done and working ! :)Hi!
That's great. Sorry about the wasted hours. I'll look into the files later today and try to figure out what's wrong with your network connection for the jail. As for the root login, the deciding hint was hidden in this comment of mine:
View attachment 43260
But now that you have another user to logon, you don't need to change that setting. We can go the next step with the private/public key pair and set up a more secure way of logging in as root.
You can find instructions on how to generate a key pair here:
Manually generating your SSH key in macOS
docs.joyent.com
Then in the section Importing your SSH key simply ignore all the stuff about the Joyent portal. Instead open up the menu "Accounts -> Users" on your NAS and edit the "root" user. Then paste the public key that you copied to the clipboard with thatpbcopycommand in the instructions into the corresponding field of the root account. Save - done.
View attachment 43262
You should now be able tossh root@192.168.0.154without a password but still reasonably secure for a system on an isolated private network. Never hand out that private key!
Bureaua
Explorer
- Joined
- Nov 28, 2020
- Messages
- 75
Patrick,Excellent Thank you - I will do that
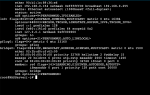
I deleted the iocage dataset and re-created a new base jail. I re-booted the server and tried to run the jail using DHCP configuration. Im getting the same error. DHCP not running. Attached are 5 files
Jail creation from the shell
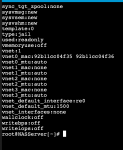
ifconfig -a from Mac terminal to the root
iocage get all from Mac Terminal to the root
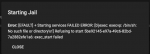
Error message when I start the Jail
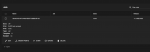
Jail configuration
Thank You very much for your time
Attachments
Last edited:
- Joined
- Nov 25, 2013
- Messages
- 7,776
Hi!
How did you produce these text files? They contain a lot of unecessary gibberish that is hard to read. Simply select a piece of text in the terminal, type Cmd-C, then paste it into a "code" container here in the forum like this:
Your jail still looks somewhat odd. First, 11.2 is a release way too old to use productively. You will not even be able to install packages in 11.2, anymore. Plus it doesn't have a name which is rather inconvenient.
So I suggest to start over.
Then:
Then let's configure this DHCP thingy correctly:
And fire up:
Good luck!
How did you produce these text files? They contain a lot of unecessary gibberish that is hard to read. Simply select a piece of text in the terminal, type Cmd-C, then paste it into a "code" container here in the forum like this:
Code:
$ echo "this is something I did in the terminal"
this is something I did in the terminal
$ ls
Applications            Hacking                Nextcloud Privat        VirtualBox VMs
Desktop                Library                Pictures            bin
Documents            Movies                Privat
Downloads            Music                Public
Favorite            Nextcloud Firma            Virtual Machines.localized
Your jail still looks somewhat odd. First, 11.2 is a release way too old to use productively. You will not even be able to install packages in 11.2, anymore. Plus it doesn't have a name which is rather inconvenient.
So I suggest to start over.
Then:
Code:
iocage fetch
# pick 12.2-RELEASE

iocage create -b -r 12.2-RELEASE -n mycloud
Then let's configure this DHCP thingy correctly:
Code:
iocage set dhcp=on mycloud
iocage set bpf=on mycloud
iocage set vnet=on mycloud
iocage set nat=off mycloud
iocage set interfaces=vnet0:bridge0 mycloud
And fire up:
Code:
iocage start mycloud
iocage list
+-----+---------+-------+--------------+---------------+
| JID |  NAME   | STATE |   RELEASE    |      IP4      |
+=====+=========+=======+==============+===============+
| 1   | mycloud | up    | 12.2-RELEASE | DHCP          |
+-----+---------+-------+--------------+---------------+
Good luck!
Last edited:
Bureaua
Explorer
- Joined
- Nov 28, 2020
- Messages
- 75
OK - I worked at it all day and I managed to get the jail up with a static ivp4 IP. DHCP does not work. then I enabled ssh on that jail and assign a password. However, I can't edit the ssd_config. it tells me I don't have permission? anyhow. Im learning and will start all over again with your instructions. Thanks for keeping me working hard :)Hi!
How did you produce these text files? They contain a lot of unecessary gibberish that is hard to read. Simply select a piece of text in the terminal, type Cmd-C, then past it into a "code" container here in the forum like this:
Code:$ echo "this is something I did in the terminal" this is something I did in the terminal $ ls Applications Hacking Nextcloud Privat VirtualBox VMs Desktop Library Pictures bin Documents Movies Privat Downloads Music Public Favorite Nextcloud Firma Virtual Machines.localized
Your jail still looks somewhat odd. First, 11.2 is a release way too old to use productively. You will not even be able to install packages in 11.2, anymore. Plus it doesn't have a name which is rather inconvenient.
So I suggest to start over.
Then:
Code:iocage fetch # pick 12.2-RELEASE iocage create -b -r 12.2-RELEASE -n mycloud
Then let's configure this DHCP thingy correctly:
Code:iocage set dhcp=on mycloud iocage set bpf=on mycloud iocage set vnet=on mycloud iocage set nat=off mycloud iocage set interfaces=vnet0:bridge0 mycloud
And fire up:
Code:iocage start mycloud iocage list +-----+---------+-------+--------------+---------------+ | JID | NAME | STATE | RELEASE | IP4 | +=====+=========+=======+==============+===============+ | 1 | mycloud | up | 12.2-RELEASE | DHCP | +-----+---------+-------+--------------+---------------+
Good luck!
- Joined
- Nov 25, 2013
- Messages
- 7,776
Static IP will do fine. We will need that later, anyway, when Nextcloud is up and running. Still a long way to go ...
OK, when the jail is already running you can SSH as root into your NAS and then use
To enable SSH you probably found that you had to put something like
If you cannot login as root to that jail it is for the same reason we found with your NAS - by default root login is prohibited. So you need to change that line in
Pay attention to removing that '#' - that character means the rest of the line is just a comment. So the statement is actually never effective, but 'no' is the default, anyway. If you change that to 'yes', you need to remove that comment sign.
Then restart sshd:
You should then be able to log in to your jail with 'root' and the password you set with the
OK, when the jail is already running you can SSH as root into your NAS and then use
iocage console myjail. And presto - you have a shell inside your jail. With root permissions.To enable SSH you probably found that you had to put something like
sshd_enable="YES" into the file /etc/rc.conf or you used the sysrc command I mentioned earlier. That just does the same. You can use a text editor if you prefer.If you cannot login as root to that jail it is for the same reason we found with your NAS - by default root login is prohibited. So you need to change that line in
/etc/ssh/sshd_config:Code:
Before:

# PermitRootLogin no

After:

PermitRootLogin yes
Pay attention to removing that '#' - that character means the rest of the line is just a comment. So the statement is actually never effective, but 'no' is the default, anyway. If you change that to 'yes', you need to remove that comment sign.
Then restart sshd:
service sshd restartYou should then be able to log in to your jail with 'root' and the password you set with the
passwd command.Bureaua
Explorer
- Joined
- Nov 28, 2020
- Messages
- 75
I will get back to you when Im done with this part. Lot of work ahead of me :). thanksStatic IP will do fine. We will need that later, anyway, when Nextcloud is up and running. Still a long way to go ...
OK, when the jail is already running you can SSH as root into your NAS and then useiocage console myjail. And presto - you have a shell inside your jail. With root permissions.
To enable SSH you probably found that you had to put something likesshd_enable="YES"into the file/etc/rc.confor you used thesysrccommand I mentioned earlier. That just does the same. You can use a text editor if you prefer.
If you cannot login as root to that jail it is for the same reason we found with your NAS - by default root login is prohibited. So you need to change that line in/etc/ssh/sshd_config:
Code:Before: # PermitRootLogin no After: PermitRootLogin yes
Pay attention to removing that '#' - that character means the rest of the line is just a comment. So the statement is actually never effective, but 'no' is the default, anyway. If you change that to 'yes', you need to remove that comment sign.
Then restart sshd:service sshd restart
You should then be able to log in to your jail with 'root' and the password you set with thepasswdcommand.
Bureaua
Explorer
- Joined
- Nov 28, 2020
- Messages
- 75
Patrick everything worked up toHi!
How did you produce these text files? They contain a lot of unecessary gibberish that is hard to read. Simply select a piece of text in the terminal, type Cmd-C, then paste it into a "code" container here in the forum like this:
Code:$ echo "this is something I did in the terminal" this is something I did in the terminal $ ls Applications Hacking Nextcloud Privat VirtualBox VMs Desktop Library Pictures bin Documents Movies Privat Downloads Music Public Favorite Nextcloud Firma Virtual Machines.localized
Your jail still looks somewhat odd. First, 11.2 is a release way too old to use productively. You will not even be able to install packages in 11.2, anymore. Plus it doesn't have a name which is rather inconvenient.
So I suggest to start over.
Then:
Code:iocage fetch # pick 12.2-RELEASE iocage create -b -r 12.2-RELEASE -n mycloud
Then let's configure this DHCP thingy correctly:
Code:iocage set dhcp=on mycloud iocage set bpf=on mycloud iocage set vnet=on mycloud iocage set nat=off mycloud iocage set interfaces=vnet0:bridge0 mycloud
And fire up:
Code:iocage start mycloud iocage list +-----+---------+-------+--------------+---------------+ | JID | NAME | STATE | RELEASE | IP4 | +=====+=========+=======+==============+===============+ | 1 | mycloud | up | 12.2-RELEASE | DHCP | +-----+---------+-------+--------------+---------------+
Good luck!
iocage start mycloud
it says: Refusing to start mycloud: exec_start failed
Similar threads
- Replies
- 3
- Views
- 3K
- Replies
- 7
- Views
- 5K