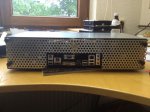
BUILD My Case ... 19" DIY

Status
Not open for further replies.

seggerman

Dabbler
Joined
Jun 8, 2011
Messages
34
All,

just wanted to share my setup with everybody ... There have already been multiple threads on the used hardware, so I will not go into that detail. What I use the FreeNAS server for is as a big timecapsule (for 3 macs - one is my media server) and as a backup for files. So nothing spectacular regarding performance etc is needed.

I wanted to share my DIY 19" case ... Since I wanted to put my server into my rack and I didn't find any adequate case I decided to build my own. My requirements were that it should fit on a 19" tray and have a 2U hight. So after designing it I had the sheet metal (1.5mm thickness) cut to size. Here are the parts:
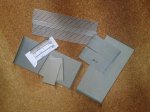
IMG_0290_1.jpg

Step 1:
build two cages for three drives each. The space between the drives is around 2mm (similar to backplanes):
IMG_0291_1.jpg

Step 2:
Now attach the two cages to the base and put the board between them. I put the drives on the edge just for balance and symmetry reasons:
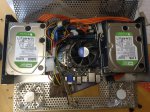
IMG_0318_1.jpg

Step 3:
Put the lid on ...
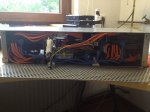
the back (yes its all a tight fit): IMG_0316_1.jpg
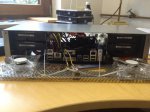
the front (both fans sit in front of the drive cages) : IMG_0317_1.jpg
Step 4:
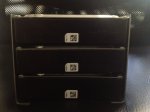
Closed front: IMG_0320_1.jpg

Since the front an the back are metal mesh there is no issue regarding cooling and airflow. Since the case will be in a closed rack dust isn't an issue (thats what I hope).

Step 5:
In action (I like blue lights ....) : IMG_0322_1.jpg
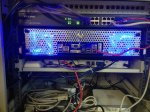
The server has been in action now for 2 days and the drives are running at around a temperature of 35C and the CPU at 45C. So nothing to worry about.

Hope this inspires :smile:

Alexander
 

jgreco

Resident Grinch
Joined
May 29, 2011
Messages
18,680
Wow, nice, impressive even. Too bad about the external power brick but still very nicely designed.
 

Starpulkka

Contributor
Joined
Apr 9, 2013
Messages
179
Nice and good consept, i really like those thumbscrews that it's easy to take off back plate. On next desing perhaps make those hdds quick mountable rails, for easier removal.

But also i see one important recommendation, you should put that back plate shield onplace and ground it on case (physically or just wiring it) when you blow some dust on that case and perhaps take usb stick off and put it back on esd shielding might fail. At 1990's we saw how important that backplate is to be on same ground as a case, also if i remember correctly in 2011 there was a pc case that front panel was not grounded to rest of the case and when user touched front panel bum, computer restarted or bluecreened. It might work ungrounded ok for some time when everything is nice and dust free, but in a long run that back plate is made for a reason.
Also remember to keep enough distance from hdd and fan, some brand fans have a strong magnet on middle of fan, and if its too close on hdd zfs starts seeing checksum errors (i also build a custom case and fan was too close on 2 hdds, moved fan 4cm away and no more checksum errors)
 

cyberjock

Inactive Account
Joined
Mar 25, 2012
Messages
19,526
35-45C is bad for hard drives. Per Google's whitepaper on hard drives titled "Failure Trends in a Large Disk Drive Population(page 6 shows the cool graph), you should try to keep the hard drive temperatures between 30 and 40C at all times. Above 40C and failure rates skyrocket to 10%+ per year.

I'm actually dealing with my own heat issues and have had 4 drives fail in the last 2 weeks and I just spent money on fans to get temps down to about 30-35C. If you want to read my thread-in-progress go here.

Edit: OOPs. Just realized you said hard drives were 35C and CPU was 45C. I'll leave this info here but I guess it's not applicable to you.

Personally, I like one thing about external power bricks. If they fail they are easy to replace. For instance, the PicoPSUs have 2 parts to the PSU. The external and the internal. The internal should see fairly clean DC while the external brick sees the nastiness that is generator interference, etc. The external is far more likely to fail as it sees the dirty A/C from the grid. When it fails you just replace it...without having to open the computer.
 

cyberjock

Inactive Account
Joined
Mar 25, 2012
Messages
19,526
I edited my post.. but yeah. I realized after I posted that you are fine and I misread your initial post. I do like that case very much and I wondered what it would be like to build a small server with it.

One thing I thought I mentioned but didn't...

I'd use the wdidle3.exe to change the head parking setting from the default (5-8 seconds) to 300 seconds or disable. 5-8 seconds is far to fast and you can hit the 300k designed limit is very short order in a server environment. I have 24 of these drives in my NAS and I highly recommend you change the setting if you haven't already. If you don't change it and you have to RMA the drive WD may deny your RMA claim if you have an excessively high cycle value(value stored in SMART data).

The latest version is 1.05, but here's a video for 1.03 that shows you how to do it. It can only be done from DOS :( .

https://www.youtube.com/watch?v=gqY5zlCXQmU
 

seggerman

Dabbler
Joined
Jun 8, 2011
Messages
34
I'd use the wdidle3.exe to change the head parking setting from the default (5-8 seconds) to 300 seconds or disable. 5-8 seconds is far to fast and you can hit the 300k designed limit is very short order in a server environment. I have 24 of these drives in my NAS and I highly recommend you change the setting if you haven't already. If you don't change it and you have to RMA the drive WD may deny your RMA claim if you have an excessively high cycle value(value stored in SMART data).

The latest version is 1.05, but here's a video for 1.03 that shows you how to do it. It can only be done from DOS :( .

https://www.youtube.com/watch?v=gqY5zlCXQmU

Thanks for the information ... this is something that I've already done. This was mentioned multiple times in the forum. I've set my WDIDLE to 5min.
 
Status
Not open for further replies.
Top