5hepherd
Dabbler
- Joined
- Feb 24, 2023
- Messages
- 23
Your criticisms, tips, recommendations, clarifications are MORE than welcome! :)
After four days of trial and error, and frustration, I am going to chronicle my quest to make peace with the "Arrs"and get my media server humming. I don't know what I'm doing. I started teaching myself linux, and networking, and the like just a little while ago, and am now ballz-deep in hypervisors, nodes, and containers.
I successfully integrated five of the Arrs with sabnzbd and had media content spitting out of jellyfin on three TVs and four phones. Then I messed with it... and worse, I didn't document my install.
FOUR unsuccessful attempts later, days of all-nighters, and I still can't get things to cooperate.
I should've left it alone on the testbed, and never tried to migrate it. At the price of time, it would've been cheaper to just buy another testing rig, and let the Arrs play happily with my jellyfin. Live and learn.
So, now, the goal here is to document (over-document?) each step of my install process, not only for myself, but so it makes it easier for those who come later. Additionally, this documentation makes it easier to answer "what'd you do?" when I go ask others for help.
I want to build a "box-of-stovetop" recipe to follow, with lotsa pics and whatnot, and then, eventually, make a screencast recording of the whole shebang, so hopefully anyone as dumb as I can follow along.
Here's what I tried that didn't work: 1) Installing all the ARRs in one jail with sabnzbd, on TrueNAS. 2) Installing all in seperate jails, with their own IP addresses, on TrueNAS 3) Running everything in docker, via Portainer, and 4) running it all on docker on their own isolated network.
I am running ProxMox, and TrueNAS on a VM in ProxMox. I am running a separate Jellyfin VM, also on proxmox.
Because I was simultaneously testing different set-ups, I can't remember which actually worked. I think it was portainer, but I can't remember. But because I'm a glutton for frustration, let's do it like this...
The following is the course I took for attempt number five (*%$!*!!!) - installing all on TrueNAS, each in their own jail, and with NAT.
*** Installing TrueNAS is outside the scope of this write-up, and we will proceed with the assumption that you have already set up some sort of disk array, and have TrueNAS fired up.
My aim is to make things simple, with few moving parts. Ideally, if I can figure it out, I want to use SABnzbd to download usenet content to my TrueNAS disk pool, have one folder for incomplete, and another for Complete, and in that folder have categories for that media.
In a perfect world, they would just stay there, and the rest of the ARRs and JellyFin would just know where to look, point at, and do their thing without trafficking a bunch of data around. [Note to self: Keep wading through insufficient explanations on how to hard-link, and find out WTF an "atomic link is". Actually, I don't even know if a hard link is what I think it is. If it means the stuff stays where it is, and just acts like it is accessible locally to each program, then that's what I want.]
Pools and DataSets
PART 1 - Creating datasets, users, groups, and setting up Windows and Linux Shares
I want to keep this super simplistic, so we're going with a very basic dataset structure.
If you click on the left-hand side menu, the first option under "STORAGE", is "POOLS"
This is how mine looks:

Then I set up the windows and linux share permissions
On the left-hand menu bar, click "SHARING" and then select "Windows Shares SMB" and that will open the SMB/Add configuration menu.

At the very top, where there is a folder with a "plus" sign, it says "Path". This is the location you wish to specify in your Pool/Dataset that you wish to be shared.
Mine looks like this:
I have specified sharing the dataset "arr" under my pool "naspool1"
By clicking the folder, it populates the bath, or alternatively, you can just type it in.

Again, I barely know what I'm doing, so above you can see I went with "Default share parameters" and added, the "Browsable To Network Clients" checkbox. I don't know if you need to, but it seemed like a good idea.
I repeated this process and also shared "naspool1" in the same manner
I did the same thing for the Unix /NFS shares
Click on the left-hand menu and select "SHARING", then select "UNIX Shares (NFS)"

Same as with the SMB share, I specified the path to the datasets I wished to share. I did this once for "arr", and again for "naspool1".
The options are a bit different, but I checked "All Dirs" because I want the different programs to be able to reach different folders in the directory. Again, not sure if this is necessary, because I'm sharing at the higher level, but I wasn't sure.
What I definitely don't know about is "Maproot User" or "Maproot Group" or "Mapall User/Group". I have no idea what that's for, so I didn't play with it. If I had to guess, it would be to allow others access to the map's root directory file? I just clicked "ADD" and crossed my fingers.

What I end up with is this:

With both my Windows SMB (CIFS / SaMBa) and my Unix shares specified, it now looks like this:

Now, open up Windows Explorer, or the file browser of your choice. Under "This PC" or "My Computer" or in the "Network" tabs, because we are going to look for the newly shared file.
In my case, a network location popped up and gave me an error.
I get a picture of the network shares. For some reason, when I click on one, I get an error message.

In my case, I think this is because I had a previously mapped network drive to the share we just messed with.
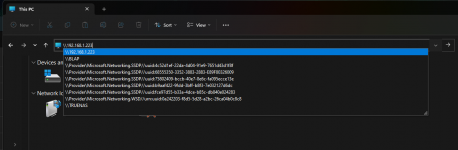
So anyway, type the location of your shared dataset. For me, in Windows Explorer, I click on the address bar where it says "This PC" and type two backslashes \\ and then the IP address of the computer where my TrueNAS is running, where I set up the dataset shares.
In my case, it looks like this:
\\192.168.1.223

When I hit "ENTER" it takes me to my newly minted network shares from TrueNAS. ... but first, I have to log in. Double-Click one of the folders, and a login form should pop up.

I use the credentials of a User I made in TrueNAS. For those who have not yet set up users, it's coming up, so for now log in as "root" with your TrueNAS password.

While we're testing the share we set up, Windows makes it pretty easy to install the directory structure we wish to set up for the ARRs and our media server.
I am only going to use UseNet, no torrents or anything, so I'm gonna keep it pretty simple. Ignore "longjohn". He's a pirate character User I made that is a member of all the groups of the ARRs and SabNzbd as a precaution in case I have trouble accessing things. Do it, don't, your mileage may vary.
Essentially, I have a "downloads" folder that branches to "complete" and "incomplete". This is where I intend to have sabnzbd dump my downloads. While downloading, they are in "incomplete". When they finish, they move to "downloads" and, hopefully, via the magic of the cooperating ARRs, they get tagged and sorted to their respective locations. So within the "complete" folder, I have a folder for "books" "movies" "music" "other" and "tv"

Then, outside of the downloads folder, just under the "arr" directory, I set up some more folders "MISC" "MOVIES" "MUSIC" "TV"
Again, I don't know if this is necessary, but I figured I may need it for some of the functionality of the ARRs or my media server, Jellyfin
As I'm unfamiliar with the workings of their inner-mechanisms, I just did it for a "just in case" scenario, as it may make library organization or access easier. I also went with ALL CAPS so I can distinguish them from the others, just to make it less confusing when in a Command Line Interface (CLI) or something.

Okay, we have our shares set up, let's go back to TrueNAS and make some users and groups. On the left-hand menu bar, just under "Dashboard", click on "Accounts" and then click on "Groups"
I created a group for each of the ARRs applications I am installing, plus one for SABnzbd.
When the ARRs get installed, they create user IDs. When one of the ARRs asks TrueNAS to access data, they present that ID number (this is my primitive understanding of it anyway) and unless you set them up each as a user or a group, TrueNAS doesn't know what to do with that ID number.
Below are the ID numbers associated with each application, and I made a group for each one. The below photo can act as reference for the ID numbers.
my groups:

To add a group, click in the upper right corner where the button says "ADD"
Here's the one I made for SABnzbd. I named it "SabaNews-Group" because my dyslexia makes saying / typing s-a-b-n-z-b-d miserable. Name it whatever you like, as long as you can remember to what it pertains, and give it the appropriate GID number, per the pic above.

Repeat this process for each of the ARRs you wish to install.
Is this necessary? I have no idea. Correct me, please.
When that's done, let's head back over to "ACCOUNTS" and click on "USERS"
If you're just setting this up, you should only have one user, "root". If you see a bunch, and you didn't make them, click on the GEAR icon in the upper right corner and select "HIDE Built-In Users"
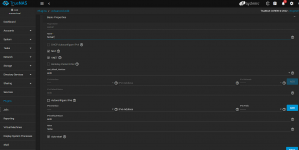
Click the blue tab in the upper right-hand corner "ADD"
Fill it out and add your first user. Again, not being a computer surgeon, I winged it. Here's what mine looks like for "longjohn". I also added a user "Shepherd" that I use for my day-to-day access and such, so I'm not using "root".
Here's the configuration for "longjohn": (I assigned the arbitrary UID (user id) of 555)

Under "Directories and Permissions", I gave "longjohn" a home directory at /mnt/naspool/arr/longjohn I don't know that he'll ever need it, but it's there, and that's why we saw it earlier in the Windows Explorer directory display. Like user "Shepherd", I clicked the boxes as you see aboveabove. Full Read Write Execute access at the user and group level, and Read and Execute under "other".
I checked "Samba Authentication" for both users. I don't know if I needed to, but I did. I figured removing any sharing obstacles, as I've had issues with those in the past installations, would be a good call - perhaps not from a security standpoint.
Here's what it looks like for user "Shepherd":

and for user "root":

when we're done, a quick check of user "longjohn" shows us the following:

while we're here at this point, let's go back and check the share security and permissions settings as seen by Windows. Go back to Windows Explorer and locate your shared locations, like we did before. Right-click on the folder you shared and select "Properties"

In the pop-up dialogue that appears, we can select the "Security" tab and check the permissions I installed on "arr", the shared location we set up in the TrueNas dataset

By selecting "Edit..." we can add permissions for user "Shepherd" and check the permissions of the various groups we created earlier. I gave "Shepherd" full control

Back to TrueNAS
Then, I went back to our groups tab and added the users to the various groups created earlier. It'[s a matter of choosing the "who" on the left, and moving them to the right. I will add "Shepherd" and "longjohn" to each of the groups: Radarr-group, Lidarr-group, etc...

The theory here is that I use the login for "Shepherd", so I want access to all the jails and apps with that one login.
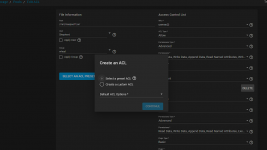
Next, I modified the permissions for the shares by editing the ACL - Access Control List (that's in PART 2)
After four days of trial and error, and frustration, I am going to chronicle my quest to make peace with the "Arrs"and get my media server humming. I don't know what I'm doing. I started teaching myself linux, and networking, and the like just a little while ago, and am now ballz-deep in hypervisors, nodes, and containers.
I successfully integrated five of the Arrs with sabnzbd and had media content spitting out of jellyfin on three TVs and four phones. Then I messed with it... and worse, I didn't document my install.
FOUR unsuccessful attempts later, days of all-nighters, and I still can't get things to cooperate.
I should've left it alone on the testbed, and never tried to migrate it. At the price of time, it would've been cheaper to just buy another testing rig, and let the Arrs play happily with my jellyfin. Live and learn.
So, now, the goal here is to document (over-document?) each step of my install process, not only for myself, but so it makes it easier for those who come later. Additionally, this documentation makes it easier to answer "what'd you do?" when I go ask others for help.
I want to build a "box-of-stovetop" recipe to follow, with lotsa pics and whatnot, and then, eventually, make a screencast recording of the whole shebang, so hopefully anyone as dumb as I can follow along.
Here's what I tried that didn't work: 1) Installing all the ARRs in one jail with sabnzbd, on TrueNAS. 2) Installing all in seperate jails, with their own IP addresses, on TrueNAS 3) Running everything in docker, via Portainer, and 4) running it all on docker on their own isolated network.
I am running ProxMox, and TrueNAS on a VM in ProxMox. I am running a separate Jellyfin VM, also on proxmox.
Because I was simultaneously testing different set-ups, I can't remember which actually worked. I think it was portainer, but I can't remember. But because I'm a glutton for frustration, let's do it like this...
The following is the course I took for attempt number five (*%$!*!!!) - installing all on TrueNAS, each in their own jail, and with NAT.
*** Installing TrueNAS is outside the scope of this write-up, and we will proceed with the assumption that you have already set up some sort of disk array, and have TrueNAS fired up.
My aim is to make things simple, with few moving parts. Ideally, if I can figure it out, I want to use SABnzbd to download usenet content to my TrueNAS disk pool, have one folder for incomplete, and another for Complete, and in that folder have categories for that media.
In a perfect world, they would just stay there, and the rest of the ARRs and JellyFin would just know where to look, point at, and do their thing without trafficking a bunch of data around. [Note to self: Keep wading through insufficient explanations on how to hard-link, and find out WTF an "atomic link is". Actually, I don't even know if a hard link is what I think it is. If it means the stuff stays where it is, and just acts like it is accessible locally to each program, then that's what I want.]
Pools and DataSets
PART 1 - Creating datasets, users, groups, and setting up Windows and Linux Shares
I want to keep this super simplistic, so we're going with a very basic dataset structure.
If you click on the left-hand side menu, the first option under "STORAGE", is "POOLS"
This is how mine looks:
Then I set up the windows and linux share permissions
On the left-hand menu bar, click "SHARING" and then select "Windows Shares SMB" and that will open the SMB/Add configuration menu.
At the very top, where there is a folder with a "plus" sign, it says "Path". This is the location you wish to specify in your Pool/Dataset that you wish to be shared.
Mine looks like this:
I have specified sharing the dataset "arr" under my pool "naspool1"
By clicking the folder, it populates the bath, or alternatively, you can just type it in.
Again, I barely know what I'm doing, so above you can see I went with "Default share parameters" and added, the "Browsable To Network Clients" checkbox. I don't know if you need to, but it seemed like a good idea.
I repeated this process and also shared "naspool1" in the same manner
I did the same thing for the Unix /NFS shares
Click on the left-hand menu and select "SHARING", then select "UNIX Shares (NFS)"
Same as with the SMB share, I specified the path to the datasets I wished to share. I did this once for "arr", and again for "naspool1".
The options are a bit different, but I checked "All Dirs" because I want the different programs to be able to reach different folders in the directory. Again, not sure if this is necessary, because I'm sharing at the higher level, but I wasn't sure.
What I definitely don't know about is "Maproot User" or "Maproot Group" or "Mapall User/Group". I have no idea what that's for, so I didn't play with it. If I had to guess, it would be to allow others access to the map's root directory file? I just clicked "ADD" and crossed my fingers.
What I end up with is this:
With both my Windows SMB (CIFS / SaMBa) and my Unix shares specified, it now looks like this:
Now, open up Windows Explorer, or the file browser of your choice. Under "This PC" or "My Computer" or in the "Network" tabs, because we are going to look for the newly shared file.
In my case, a network location popped up and gave me an error.
I get a picture of the network shares. For some reason, when I click on one, I get an error message.
In my case, I think this is because I had a previously mapped network drive to the share we just messed with.
So anyway, type the location of your shared dataset. For me, in Windows Explorer, I click on the address bar where it says "This PC" and type two backslashes \\ and then the IP address of the computer where my TrueNAS is running, where I set up the dataset shares.
In my case, it looks like this:
\\192.168.1.223
When I hit "ENTER" it takes me to my newly minted network shares from TrueNAS. ... but first, I have to log in. Double-Click one of the folders, and a login form should pop up.
I use the credentials of a User I made in TrueNAS. For those who have not yet set up users, it's coming up, so for now log in as "root" with your TrueNAS password.
While we're testing the share we set up, Windows makes it pretty easy to install the directory structure we wish to set up for the ARRs and our media server.
I am only going to use UseNet, no torrents or anything, so I'm gonna keep it pretty simple. Ignore "longjohn". He's a pirate character User I made that is a member of all the groups of the ARRs and SabNzbd as a precaution in case I have trouble accessing things. Do it, don't, your mileage may vary.
Essentially, I have a "downloads" folder that branches to "complete" and "incomplete". This is where I intend to have sabnzbd dump my downloads. While downloading, they are in "incomplete". When they finish, they move to "downloads" and, hopefully, via the magic of the cooperating ARRs, they get tagged and sorted to their respective locations. So within the "complete" folder, I have a folder for "books" "movies" "music" "other" and "tv"
Then, outside of the downloads folder, just under the "arr" directory, I set up some more folders "MISC" "MOVIES" "MUSIC" "TV"
Again, I don't know if this is necessary, but I figured I may need it for some of the functionality of the ARRs or my media server, Jellyfin
As I'm unfamiliar with the workings of their inner-mechanisms, I just did it for a "just in case" scenario, as it may make library organization or access easier. I also went with ALL CAPS so I can distinguish them from the others, just to make it less confusing when in a Command Line Interface (CLI) or something.
Okay, we have our shares set up, let's go back to TrueNAS and make some users and groups. On the left-hand menu bar, just under "Dashboard", click on "Accounts" and then click on "Groups"
I created a group for each of the ARRs applications I am installing, plus one for SABnzbd.
When the ARRs get installed, they create user IDs. When one of the ARRs asks TrueNAS to access data, they present that ID number (this is my primitive understanding of it anyway) and unless you set them up each as a user or a group, TrueNAS doesn't know what to do with that ID number.
Below are the ID numbers associated with each application, and I made a group for each one. The below photo can act as reference for the ID numbers.
my groups:
To add a group, click in the upper right corner where the button says "ADD"
Here's the one I made for SABnzbd. I named it "SabaNews-Group" because my dyslexia makes saying / typing s-a-b-n-z-b-d miserable. Name it whatever you like, as long as you can remember to what it pertains, and give it the appropriate GID number, per the pic above.
Repeat this process for each of the ARRs you wish to install.
Is this necessary? I have no idea. Correct me, please.
When that's done, let's head back over to "ACCOUNTS" and click on "USERS"
If you're just setting this up, you should only have one user, "root". If you see a bunch, and you didn't make them, click on the GEAR icon in the upper right corner and select "HIDE Built-In Users"
Click the blue tab in the upper right-hand corner "ADD"
Fill it out and add your first user. Again, not being a computer surgeon, I winged it. Here's what mine looks like for "longjohn". I also added a user "Shepherd" that I use for my day-to-day access and such, so I'm not using "root".
Here's the configuration for "longjohn": (I assigned the arbitrary UID (user id) of 555)
Under "Directories and Permissions", I gave "longjohn" a home directory at /mnt/naspool/arr/longjohn I don't know that he'll ever need it, but it's there, and that's why we saw it earlier in the Windows Explorer directory display. Like user "Shepherd", I clicked the boxes as you see aboveabove. Full Read Write Execute access at the user and group level, and Read and Execute under "other".
I checked "Samba Authentication" for both users. I don't know if I needed to, but I did. I figured removing any sharing obstacles, as I've had issues with those in the past installations, would be a good call - perhaps not from a security standpoint.
Here's what it looks like for user "Shepherd":
and for user "root":
when we're done, a quick check of user "longjohn" shows us the following:
while we're here at this point, let's go back and check the share security and permissions settings as seen by Windows. Go back to Windows Explorer and locate your shared locations, like we did before. Right-click on the folder you shared and select "Properties"
In the pop-up dialogue that appears, we can select the "Security" tab and check the permissions I installed on "arr", the shared location we set up in the TrueNas dataset
By selecting "Edit..." we can add permissions for user "Shepherd" and check the permissions of the various groups we created earlier. I gave "Shepherd" full control
Back to TrueNAS
Then, I went back to our groups tab and added the users to the various groups created earlier. It'[s a matter of choosing the "who" on the left, and moving them to the right. I will add "Shepherd" and "longjohn" to each of the groups: Radarr-group, Lidarr-group, etc...
The theory here is that I use the login for "Shepherd", so I want access to all the jails and apps with that one login.
Next, I modified the permissions for the shares by editing the ACL - Access Control List (that's in PART 2)