13. Wizard
TrueNAS® provides a wizard which helps complete the steps needed to quickly configure TrueNAS® for serving data over a network. The wizard can be run at any time by clicking the Wizard icon.
Figure 13.1 shows the first wizard configuration screen.

Fig. 13.1 Configuration Wizard
Note
You can exit the wizard at any time by clicking the Exit button. However, exiting the wizard will not save any selections. The wizard can always be run again by clicking the Wizard icon. Alternately, the TrueNAS® GUI can be used to configure the system, as described in the rest of this Guide.
This first screen can be used to change the default language, keyboard map, and timezone. After making your selections, click Next.
Note
Typically, a TrueNAS® system ships with pre-configured volumes. The screens shown in Figure 13.2 and Figure 13.3 will only appear if unformatted disks are available or the system has been reinstalled.
Figure 13.2 shows the configuration screen that appears if the storage disks have not yet been formatted.
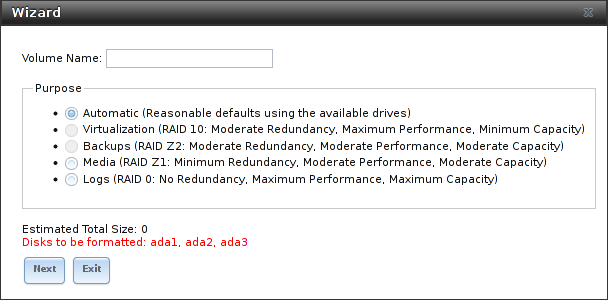
Fig. 13.2 Volume Creation Wizard
Note
The wizard will not recognize an encrypted ZFS pool. If your ZFS pool is GELI-encrypted, cancel the wizard and use the instructions in Importing an Encrypted Volume to import the encrypted volume. You can then rerun the wizard afterwards, if you wish to use it for post-configuration, and it will recognize that the volume has been imported and will not prompt to reformat the disks.
Enter a name for the ZFS pool that conforms to these
naming conventions.
It is recommended to choose a name that will stick out in the logs
(e.g. not data or truenas).
Decide if the pool should provide disk redundancy, and if so, which type. The ZFS Primer discusses RAIDZ redundancy in more detail. If you prefer to make a more complex configuration, click the Exit button to close the wizard and instead use Volume Manager.
These redundancy types are available:
- Automatic: automatically creates a mirrored, RAIDZ1, or RAIDZ2 pool, depending upon the number of disks. If you prefer to control the type of redundancy, select one of the other options.
- RAID 10: creates a striped mirror and requires a minimum of 4 disks.
- RAIDZ2: requires a minimum of 4 disks. Up to 2 disks can fail without data loss.
- RAIDZ1: requires a minimum of 3 disks. Up to 1 disk can fail without data loss.
- Stripe: requires a minimum of 1 disk. Provides no redundancy, meaning if any of the disks in the stripe fails, all data in the stripe is lost.
Once you have made your selection, click Next to continue.
If the system has been reinstalled and the disks are formatted as an unencrypted ZFS pool, a screen to import the volume will appear. This screen is shown in Figure 13.3.
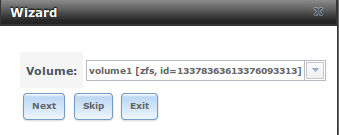
Fig. 13.3 Volume Import Screen
Select the existing volume from the drop-down menu and click Next to continue.
The next screen in the wizard is shown in Figure 13.4.
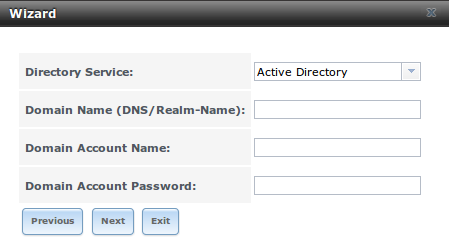
Fig. 13.4 Directory Service Selection
If the TrueNAS® system is on a network that does not contain an Active Directory, LDAP, or NIS server, click Next to skip to the next screen.
However, if the TrueNAS® system is on a network containing an Active Directory, LDAP, or NIS server and you wish to import the users and groups from that server, select the type of directory service in the Directory Service drop-down menu. The rest of the fields in this screen will vary, depending upon which directory service is selected. Available configuration options for each directory service are summarized in Tables 13.1 through 13.3.
Note
Additional configuration options are available for each directory service. The wizard can be used to set the initial values required to connect to that directory service. You can then review the other available options in Directory Services to determine if additional configuration is required.
| Setting | Value | Description |
|---|---|---|
| Domain Name | string | Enter the name of Active Directory domain (e.g. example.com) or child domain (e.g. sales.example.com). |
| Domain Account Name | string | Enter the name of the Active Directory administrator account. |
| Domain Account Password | string | Enter the password for the Active Directory administrator account. |
| Setting | Value | Description |
|---|---|---|
| Hostname | string | Hostname or IP address of LDAP server. |
| Base DN | string | Top level of the LDAP directory tree to be used when searching for resources. Example: dc=test,dc=org |
| Bind DN | string | Name of the administrative account on the LDAP server. Example: cn=Manager,dc=test,dc=org) |
| Base password | string | Password for the administrative account on the LDAP server. |
| Setting | Value | Description |
|---|---|---|
| NIS domain | string | Name of the NIS domain. |
| NIS servers | string | Enter a comma-delimited list of hostnames or IP addresses. |
| Secure mode | checkbox | Set for ypbind(8) to refuse to bind to any NIS server that is not running as root on a TCP port number over 1024. |
| Manycast | checkbox | Set for ypbind to bind to the server that responds the fastest. This is useful when no local NIS server is available on the same subnet. |
The next configuration screen, shown in Figure 13.5, is used to create network shares.
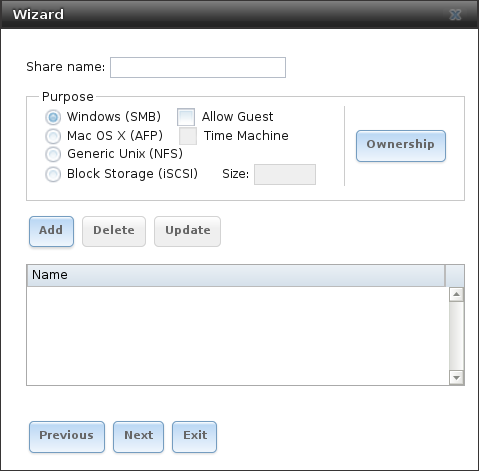
Fig. 13.5 Network Shares
TrueNAS® supports several types of shares for providing storage data to the clients in a network. The initial wizard can be used to quickly make shares using default permissions which should “just work” for common scenarios. For more complex scenarios, refer to the section on Sharing.
To create a share using the wizard, enter a name for the share, then select the Purpose of the share:
- Windows (SMB): this type of share can be accessed by any operating system using a SMB client. Check the box for Allow Guest to allow users to access the share without a password. SMB shares created with the wizard can be fine-tuned afterward with Windows (SMB) Shares.
- Mac OS X (AFP): this type of share can be accessed by Mac OS X users. Check the box for Time Machine if Mac users will be using the TrueNAS® system as a backup device. AFP shares created with the wizard can be fine-tuned afterward with Apple (AFP) Shares.
- Generic Unix (NFS): this type of share can be accessed by any operating system using a NFS client. NFS shares created using the wizard can be fine-tuned afterward with Unix (NFS) Shares.
- Block Storage (iSCSI): this type of share can be accessed by any operating system using iSCSI initiator software. Enter the size of the block storage to create in the format 20G (for 20 GiB). iSCSI shares created with the wizard can be fine-tuned afterward with iSCSI.
After selecting the Purpose, click the Ownership button to see the screen shown in Figure 13.6.
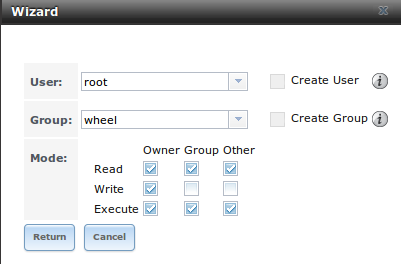
Fig. 13.6 Share Permissions
The default permissions for the share are displayed. To create a user or group, enter the desired name, then check the Create User box to create that user and the Create Group box to create the group. Check or uncheck the boxes in the Mode section to set the initial access permissions for the share. When finished, click the Return button to return to the share creation screen. Click the Add button to finish creating that share, which will then appear in the Name frame.
The Delete button can be used to remove the share highlighted in the Name frame. To edit a share, highlight it, make the change, then press the Update button.
When finished making shares, click the Next button to advance to the screen shown in Figure 13.7.
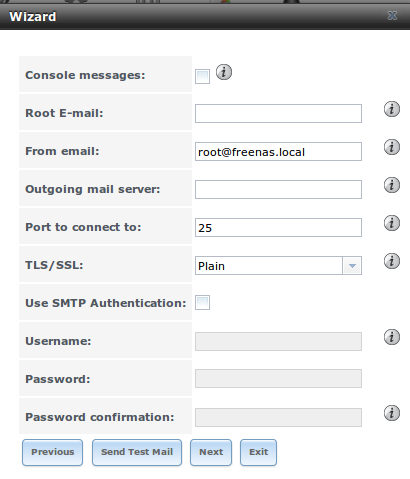
Fig. 13.7 Miscellaneous Settings
This screen can be used to configure these settings:
- Console messages: check this box if you would like to view system messages at the bottom of the graphical administrative interface. This can be handy when troubleshooting a service that will not start. When using the console message view, if you click the console messages area, it will pop-up as a window, allowing you to scroll through the output and to copy its contents.
- Root E-mail: TrueNAS® provides an “Alert” icon in the upper right corner to provide a visual indication of events that warrant administrative attention. The alert system automatically emails the root user account whenever an alert is issued. It is important to enter the email address of the person to receive these alerts and other administrative emails. The rest of the email settings in this screen should also be reviewed and edited as necessary. Before leaving this screen, click the “Send Test Mail” button to ensure that email notifications are working correctly.
- From email: the from email address to use when sending email notifications.
- Outgoing mail server: hostname or IP address of SMTP server.
- Port to connect to: port number used by the SMTP server.
- TLS/SSL: encryption type used by the SMTP server.
- Use SMTP Authentication: check this box if the SMTP server requires authentication.
- Username: enter the username if the SMTP server requires authentication.
- Password: enter the password if the SMTP server requires authentication.
When finished, click Next. A message will indicate that the wizard is ready to perform all of the saved actions. To make changes, click the Return to Wizard button to review your edits. If you click the Exit without saving button, none of your selections will be saved. To save your edits, click the Confirm button. A status bar will indicate when the wizard has completed applying the new settings.
In addition to the settings that you specify, the wizard will automatically enable S.M.A.R.T. Tests, create a boot environment, and add the new boot environment to the boot menu. If you also wish to save a backup of the configuration database to the system being used to access the administrative graphical interface, go to , click the Save Config button, and browse to the directory where the configuration will be saved. Always back up your configuration after making any configuration changes.