zufallsheld
Explorer
- Joined
- Dec 27, 2013
- Messages
- 54
I created a post on my personal blog that describes how to set up Freenas 9.2.0 with Transmission and Couchpotato as a DLNA-Server and I figured, I might post a link here to it.
Feel free to give some criticism and what to improve.
I'm going to describe how to set up Freenas with the popular plugins couchpotato, sickBeard or sickRage and transmission to use them for downloading movies or series and streaming them via DLNA as well as mounting the storage on Linux.
If you want to support me, you can now flattr the post (under the headline on the right site). This way you give micro donations to me. To read more about flattr, visit its homepage! I'd really appreciate it!
This post is also available in German!
I integrated SABnzbd! You'll find a how-to in my other blog post
If you want to know how to setup Headphones, look here
With this setup, I manage my movie collection and my wanted movies with couchpotato, which uses transmission to download them. I also use SickBeard to download TV series. Then I can stream them with the DLNA-server to my TV.
I'm running Freenas on a HP ProLiant G7 MicroServer N54L. Freenas itself is running on a micro-USB stick. I'm not going to describe how to download and install Freenas on the stick, as described in detail in the docs.
Table of contents
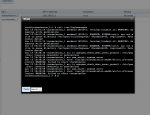
After starting the server and waiting some minutes, Freenas is available under a web-front end. The URL is a local IP-address, which is shown when Freenas has finished starting. After opening it, you're presented with the installation wizard.
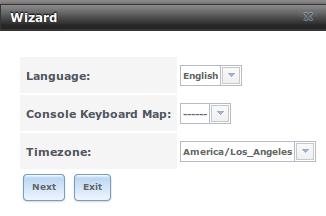
Choose your preferred language, timezone and key mapping, then press next. In the next step you can create a pool, but press exit, because we're going to create one later.
Network settings
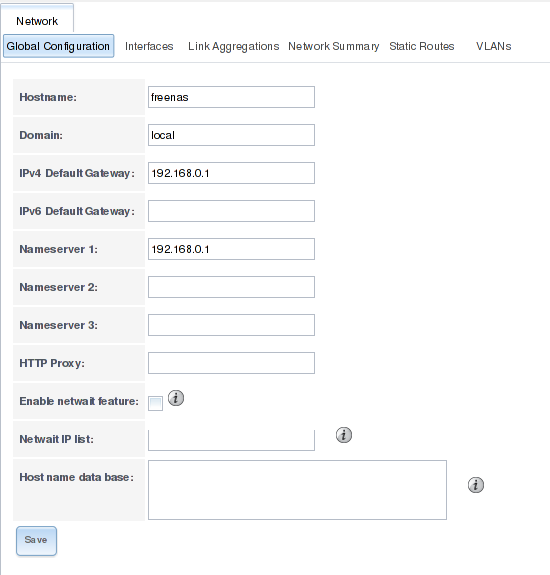
Next on we have to edit the network settings. Go to network > Global configuration. There you can change the name of your Freenas, set the default gateway, name server and so on. Since I use my server at home, I set the gateway and name server to the address of my router. If you want to, you can enable the netwait feature. If enabled, your server will ping the addresses in the IP list when it starts to check if a network connection is possible.
General settings
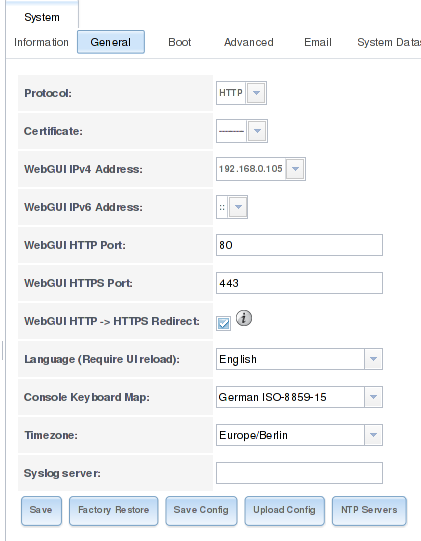
There are some more settings that you should know about and edit. Open the System > Settings tab.
If your network is secure and only authorized people join it, you may let the Protocol option set to HTTP. Generally it is recommended to set it to HTTPS.
The next option defines the address and port your Freenas-installation listens to; set it to the IP-address the Freenas currently listens on. Set the HTTP-port to 80 and the HTTPS port to 443. Next on there are specific settings for your language, keyboard map and timezone. Set it according to your preferences.
If you're not using a syslog server or directory service, leave the last two options empty.
Overview of storages and jails
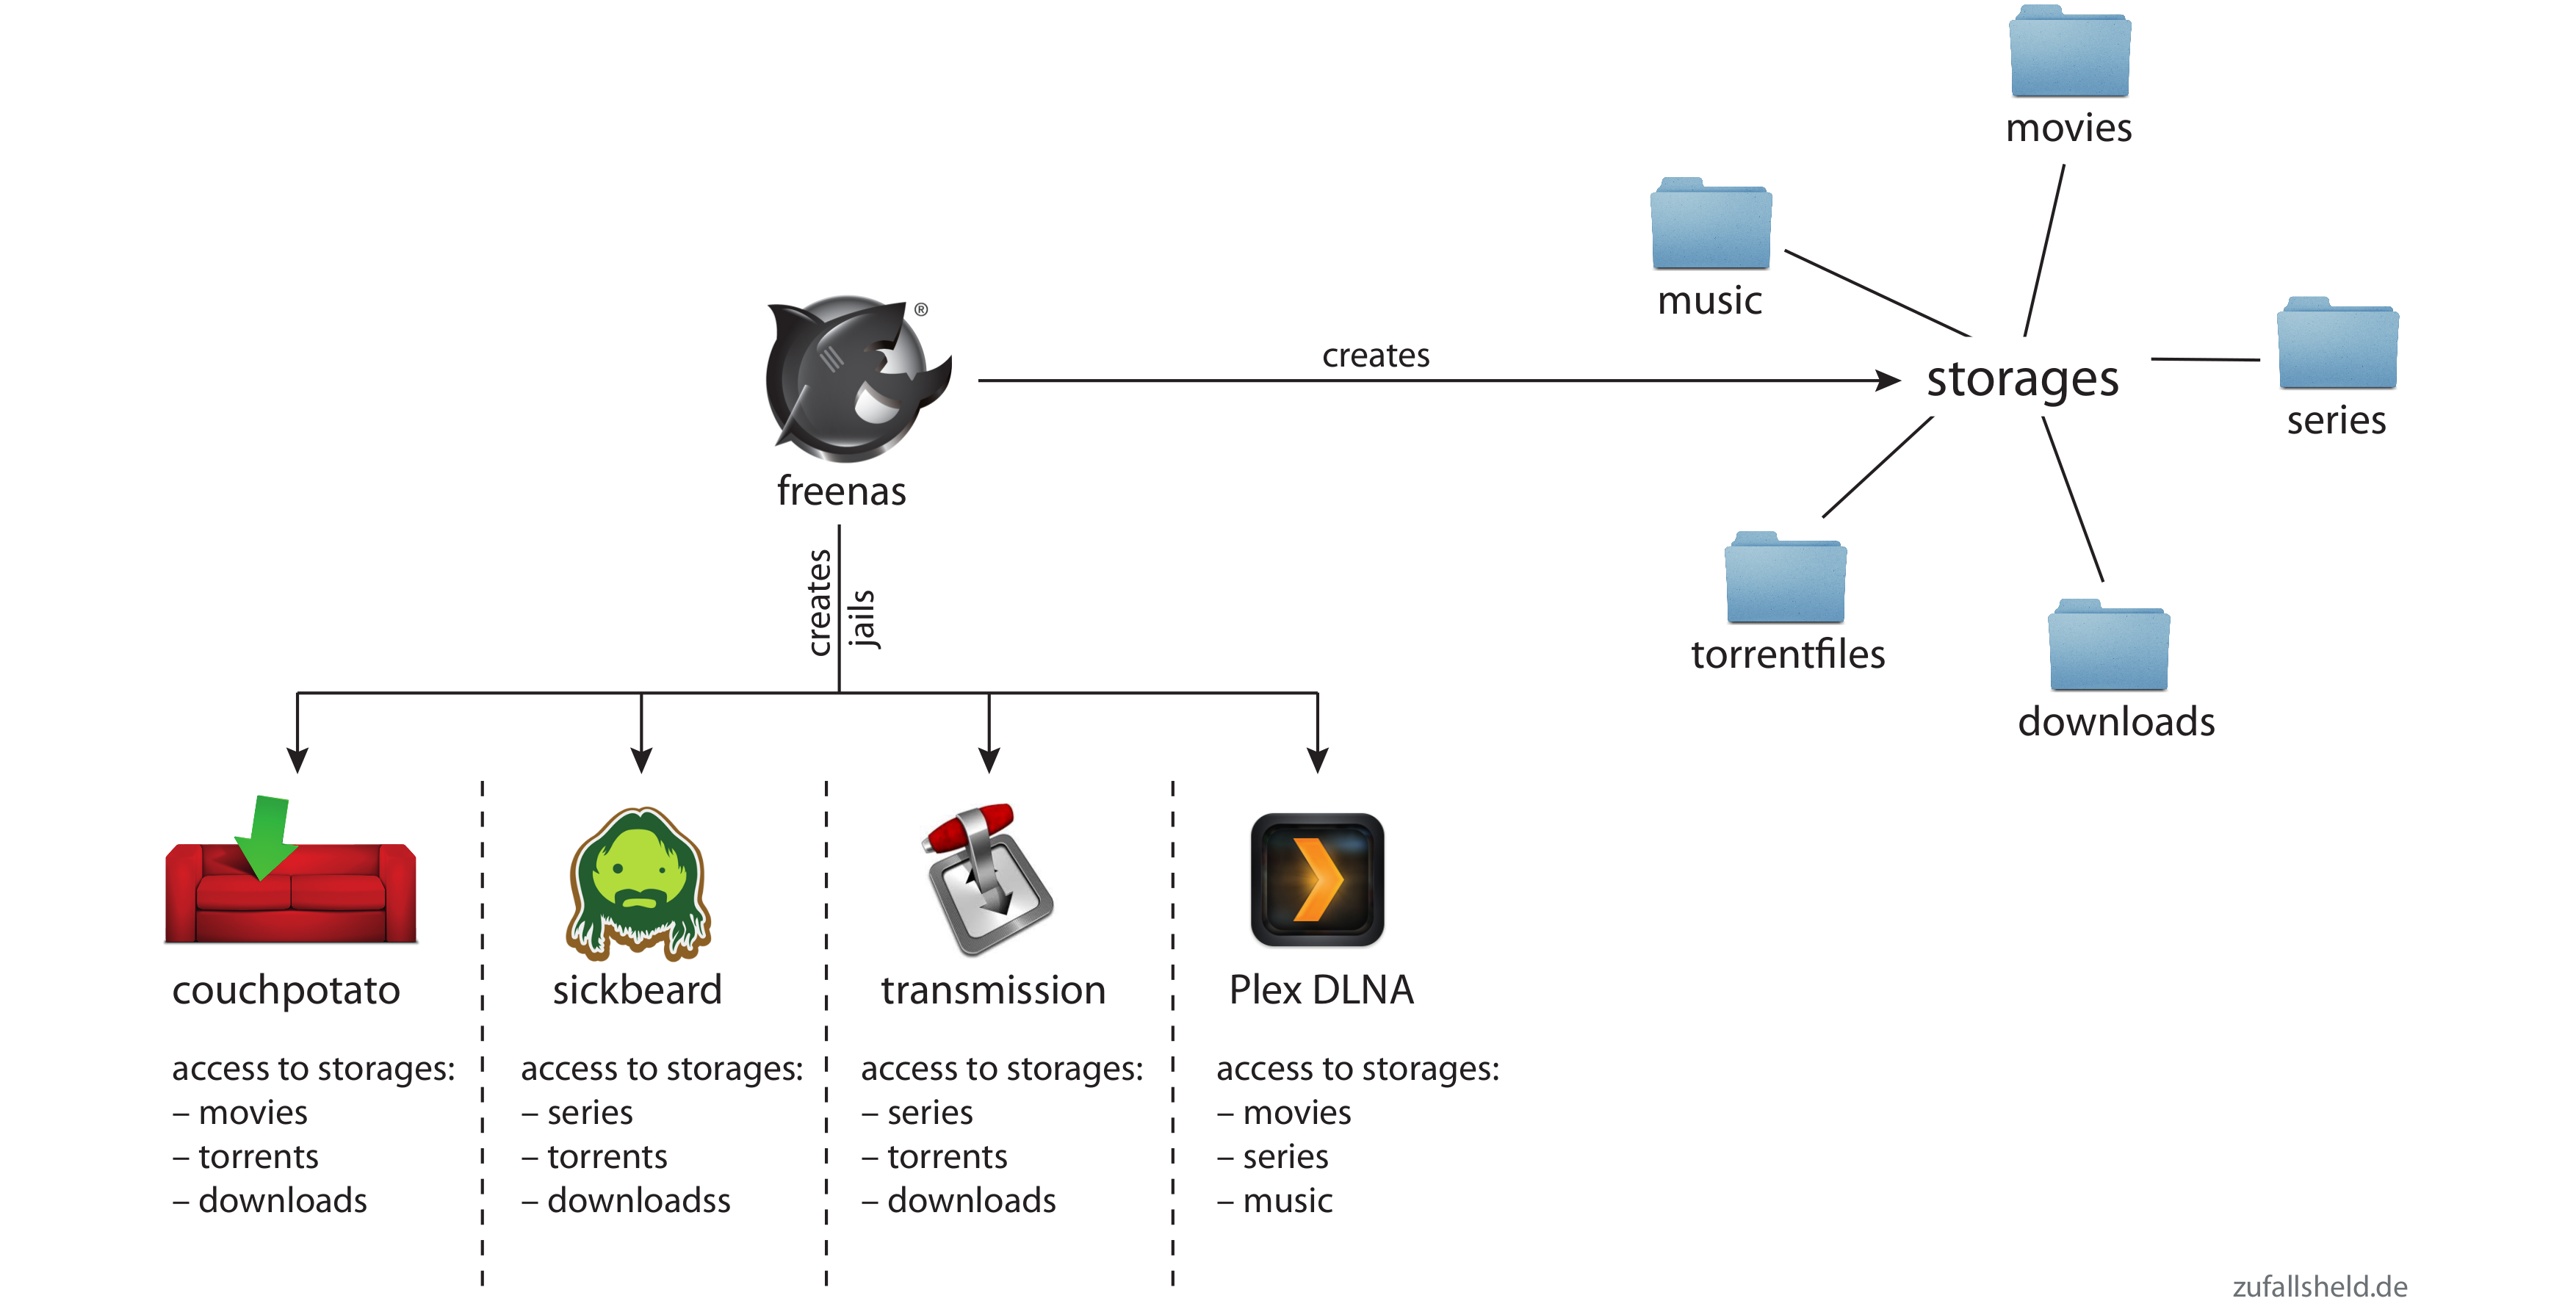
The next steps will include creating storages and jails. To get a better understanding on how these components will work together, my beautiful girlfriend created two diagrams that show how the magic happens.
The first image shows the storages and jails that I created and what jails can access which storages.
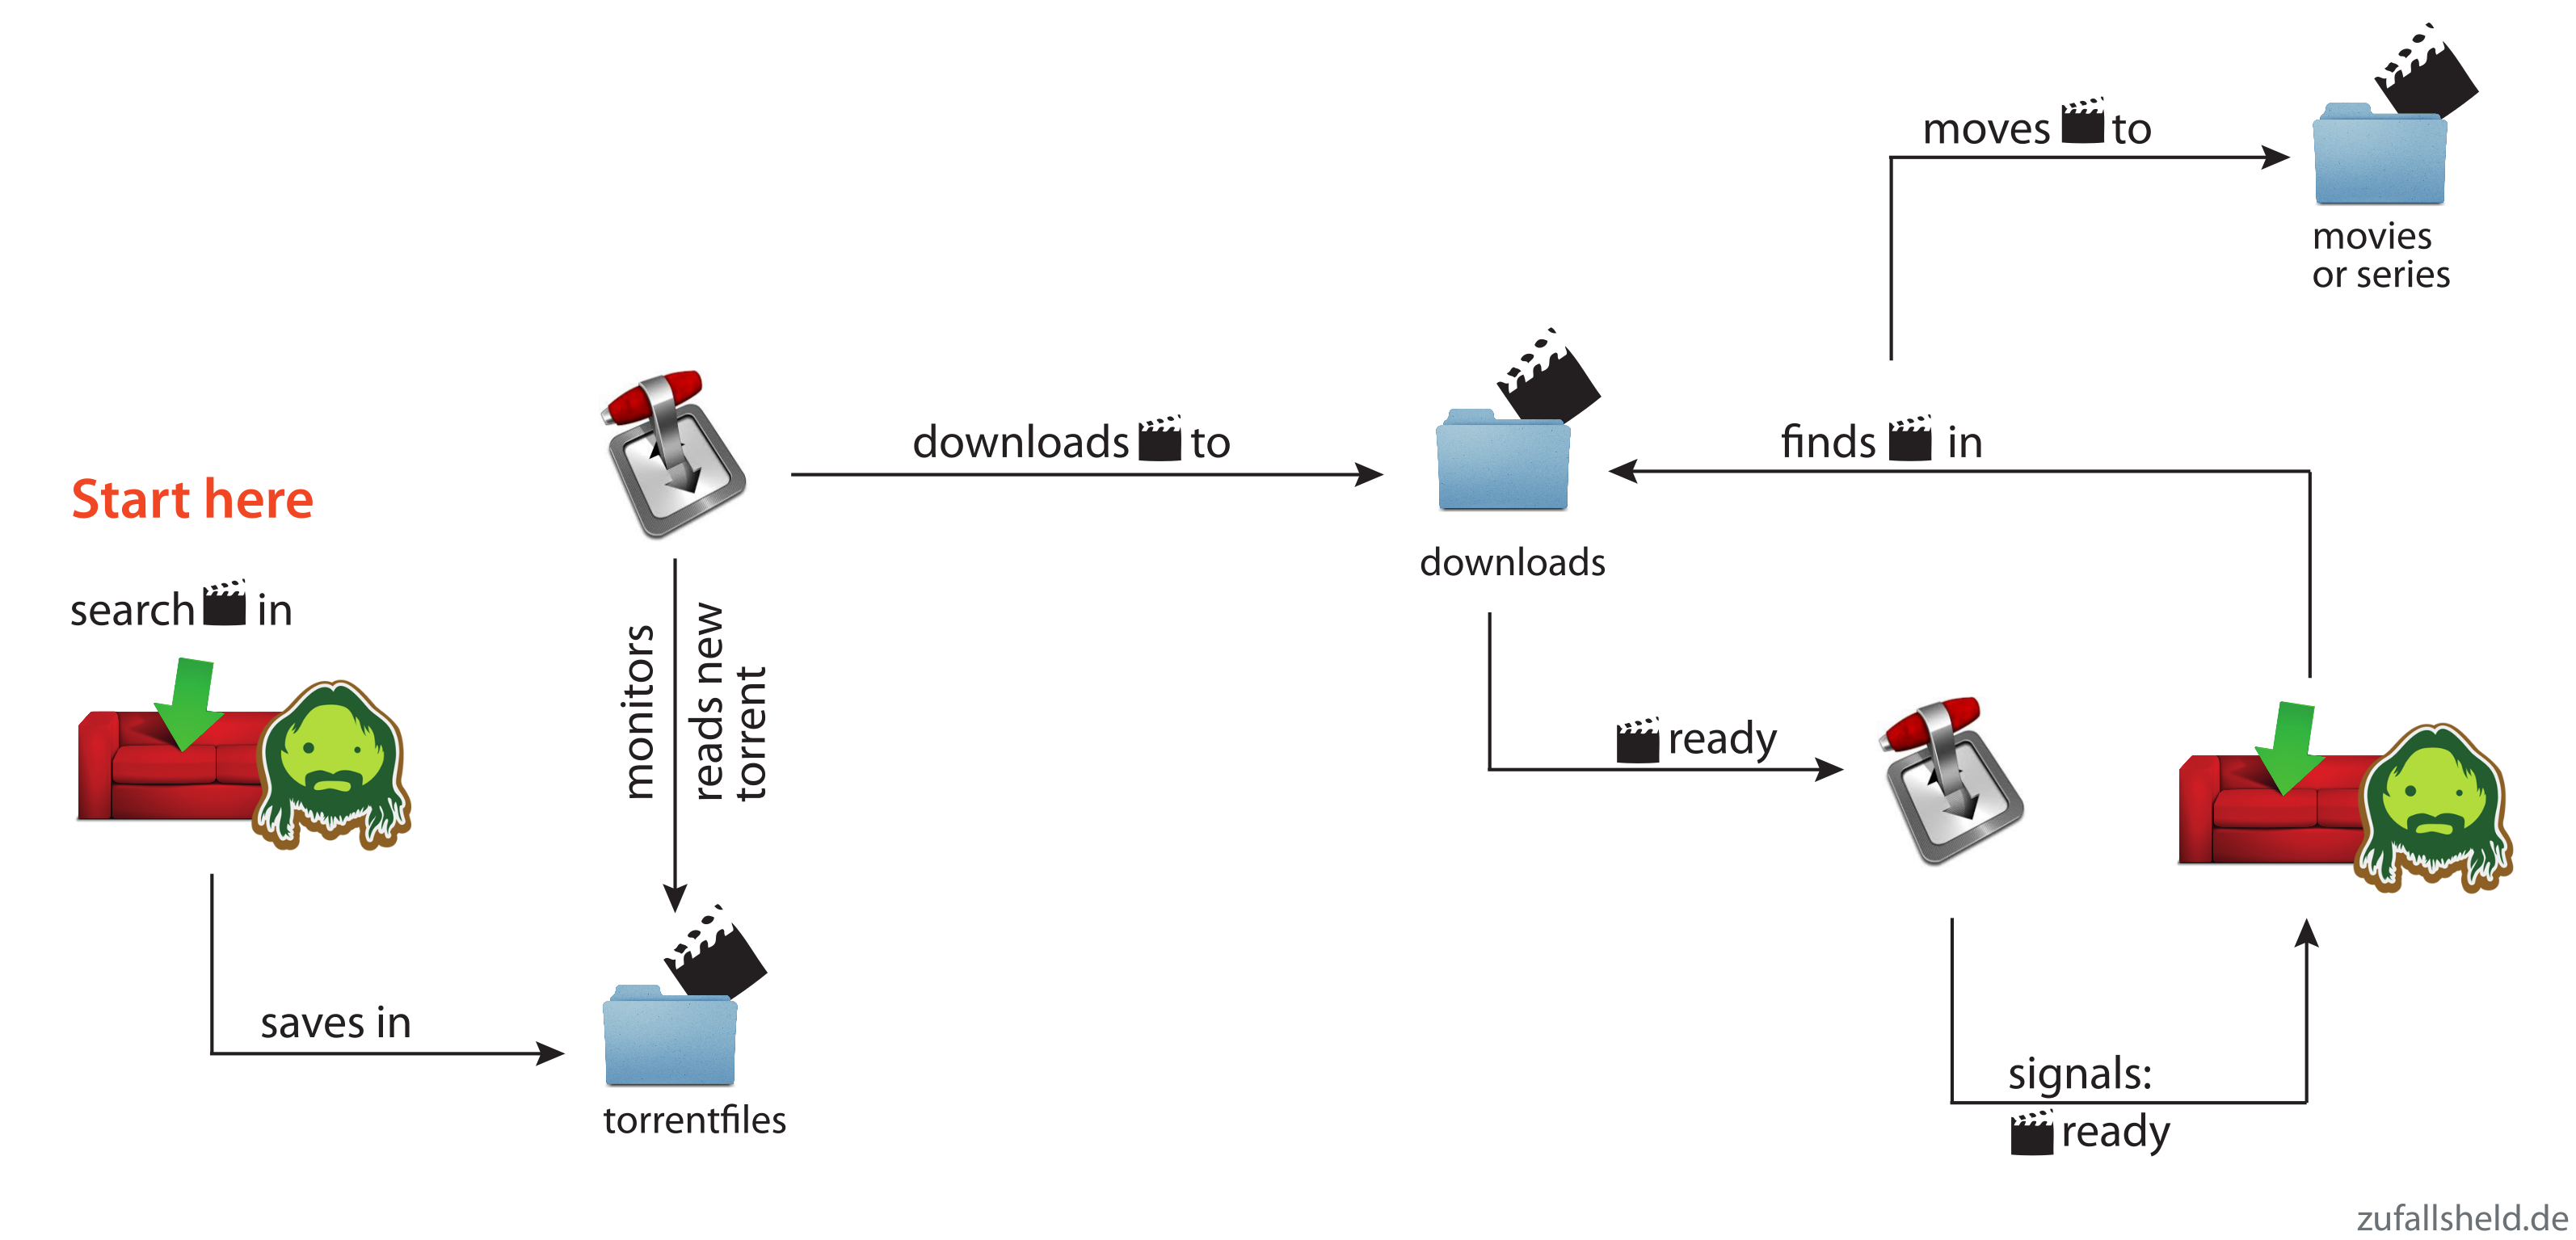
The second image shows the steps that happen, when you want to download a movie or series via Couchpotato/SickBeard.
Creating storage devices
Now is the time to add some storage to your server. That is the most important part and you should carefully read the documentation the Freenas community offers. I will not go into detail on what volumes or RAIDs to use. It mainly depends on your needs and what you've got hardware-wise.
My use-case is a simple movie- and music-streaming server with no personal or private information saved on it.
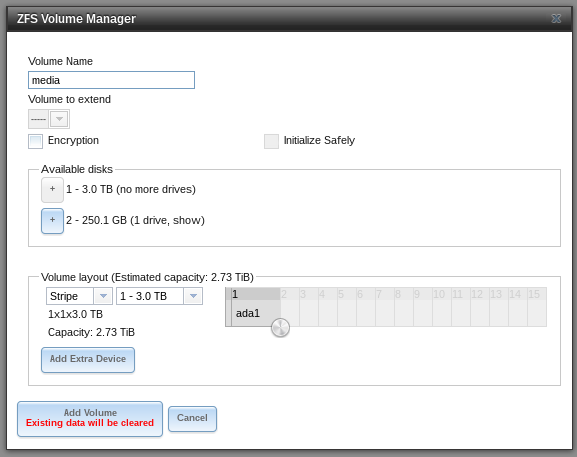
To simply create a new empty volume and attach disks to it, open Storage > Volumes > Volume Manager, give your new volume a name, add your disks and configure the layout.
Creating datasets
To logically separate your files, e.g. movies from music, you can create datasets. These datasets can have separate permissions, quotas, etc. allowing you more control over your data.
I created datasets for every kind of data I want to manage: movies, series, music, downloads and torrent-files. To create a dataset click on your created storage, then hit the Create dataset-button (the one that looks like an excel-document with a plus). There, set the name for the dataset. You can ignore all other options for now, as they are for advanced users.
Changing permissions of the storage
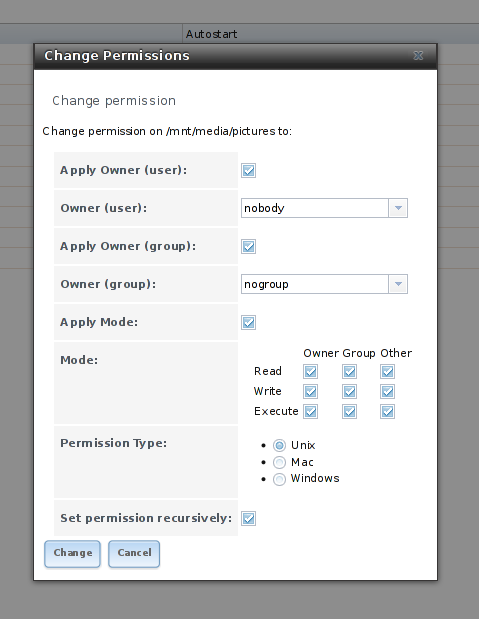
Since there are many plugins and users who want access to your storage, you'll have to configure the permissions for it. The best way is to set the ownership of the storage to nobody and give read/write/execute permissions to everybody. You should only do this, if you trust the users of your network. To change permissions, click on the Storage tab, select the volume you want to edit and click the first button in the bottom line that displays hard disks and a key. There, set the Owner (user) to nobody, the Owner (group) to nogroup and activate all buttons in the mode. Type of ACL should be set to Unix. Tick the box that says Set permission recursively so all other folders and files in the volume will have the same permissions.
Adding sharing options
Since I want to access my music and movie collection not only with my TV but also with the computers I'm using, I have to add sharing possibilities. Freenas offers NFS, CIFS and AFP out-of-the-box. I don't have an Apple-gadget or Windows machine at home, so I'll only need NFS.
NFS
To add a NFS-share click on Sharing > Unix (NFS) Shares > Add Unix (NFS) Share. There, set the options Mapall User and Mapall Group to nobody and nogroup respectively. In the path, add all the storages-directories you want to share. You'll have to create a separate share for every dataset. When you're done, you can mount the directories via NFS, the address is the IP-address of your freenas-installation plus the folder you shared, e.g.
192.168.0.102:/mnt/media/movies
Installing the plugins
Installing plugins is very easy, as long as you stick to the available ones provided by Freenas. In the Plugins-menu, click on the plugins and then on Install, to install them. Each plugin is installed into a jail, a separate "operating system" in Freenas itself, but we'll get to that in the next section.
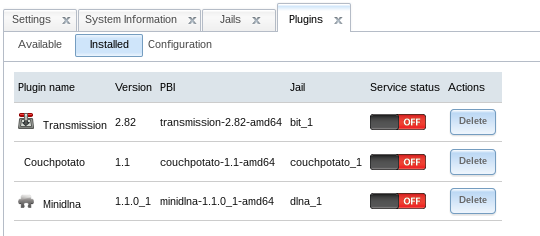
When you're done, your plugin-page should look like this:
Enabling access to the jails
SSH to your Freenas
You'll likely need command-line access to your Freenas installation and to the jails as well. To enable SSH access to Freenas, go to Services and click on the screwdriver next to SSH. Tick the Login as root with password box and save the settings. After that, enable the SSH-Service by clicking the red OFF-button. Now you're able to connect to your Freenas with SSH by entering the following line into your terminal-emulator of choice:
ssh root@192.168.0.14
(change the address to the address of your Freenas)
Then enter the admin-password and you should be connected to your box.
Using Putty to enter your Freenas
If you're on Windows and want to connect to your Freenas-installation using Putty, you have to enter the IP-address of Freenas into the Host Name-field, then press open.
If Putty cannot connect, you probably didn't use the correct IP-address or you forgot to enable SSH.
Entering the jails
To enter one of the installed jails, type jls on the command-line. There you'll see the available jails. To connect to them, enter jexec # tcsh where # is the number of the jail.
[root@freenas] ~# jls
JID IP Address Hostname Path
1 - bit_1 /mnt/media/jails/bit_1
2 - couchpotato_1 /mnt/media/jails/couchpotato_1
4 - ownbutt_1 /mnt/media/jails/ownbutt_1
8 - dlna_1 /mnt/media/jails/dlna_1
[root@freenas] ~# jexec 8 tcsh
root@dlna_1:/ #
Adding storage to the jails
Now we'll have to add the storage to the plugins, so Couchpotato, transmission and the DLNA-server can access the same storage and work together. Since jails are separate systems in the server-OS itself, they cannot by default access other parts of your system.
To add the storage, go to Jails, click the plus next to the plugin, open the Storage tab and click Add storage. You'll then have to enter the source and destination addresses.
The source is the storage or dataset you created in the first place. If you did not create datasets before, you either have to do this now or create normal directories as sources with mkdir on the server. The destinations are directories in the jails that get mapped to the storages outside the jails.
If the destination addresses in the jails do not exist, tick the Create directory-box.
To manually create the directories, enter the jail, then you can create directories with the following command:
mkdir -p /media/downloads
Then enter the following command the get the permissions right:
chmod -R 777 /media/downloads
The following part is really tricky as Transmission, Couchpotato and Sick Beard behave very differently with the directories they download data to. I had to edited the following configuration multiple times, so be sure to stay up to date.
Now that you have added the storage to the plugins, you can finally start them. Go to the Plugins-page and click the red OFF-button of all plugins. After that, they should be listed as on, except for miniDLNA, which we'll have to configure first, but not now.
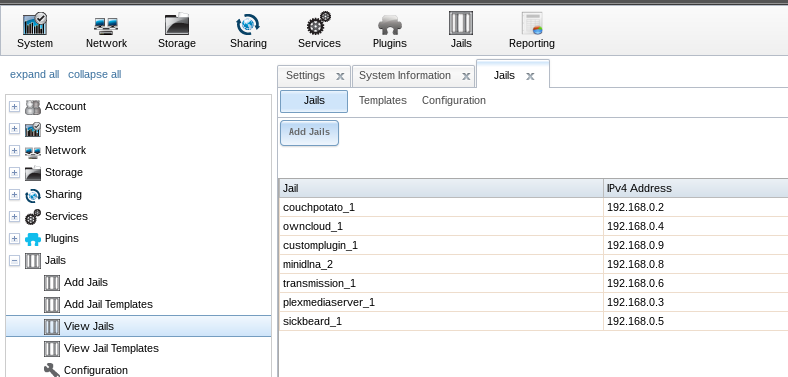
You can find the IP-addresses of the plugins here:
Transmission
The watch-directory where Transmission looks for torrent-files is normally:
/usr/pbi/transmission-amd64/etc/transmission/Downloads
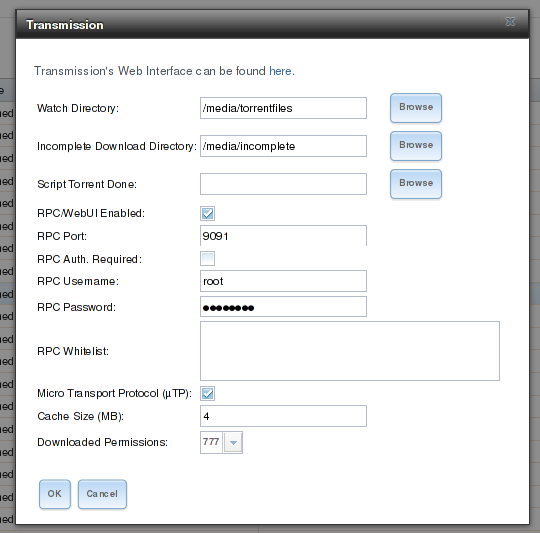
Thats 50 characters and if you add the jail-directory to it, it exceeds Freenas' directory-length limit of 88 characters, so you have to change this. Open up the Transmission-settings in the Plugins-tab of Freenas and edit the Watch Directory to /media/torrentfiles and the Download-Directory to /media/downloads. Incomplete downloads are put in a separate directory so other plugins do not interfere with the downloads. The Download-Permissions have to be 777 so every plugin has access to the downloads and can move them from there.
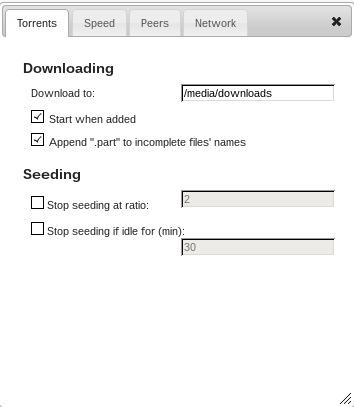
Next open the transmission-address in your browser. You'll see the main interface of Transmission. Click the screwdriver icon in the down left corner to edit the settings. There you'll see the download to option. There should be /media/downloads now, too.
Now we'll have to connect to the jail of transmission to manually create a directory.. Connect via SSH into your Freenas and connect to the jail as described in the chapter Entering the jails. Then you'll have to enter the following commands :
mkdir /media/incomplete/
chmod -R 777 /media/incomplete
UPDATE:
HolyK in the Freenas-forums mentioned a great front end for the remote transmission server, transgui. You can find it here or in your favorite package manager. It's a nice replacement for the rather featureless web front end of transmission. It's available for Linux and even Windows.
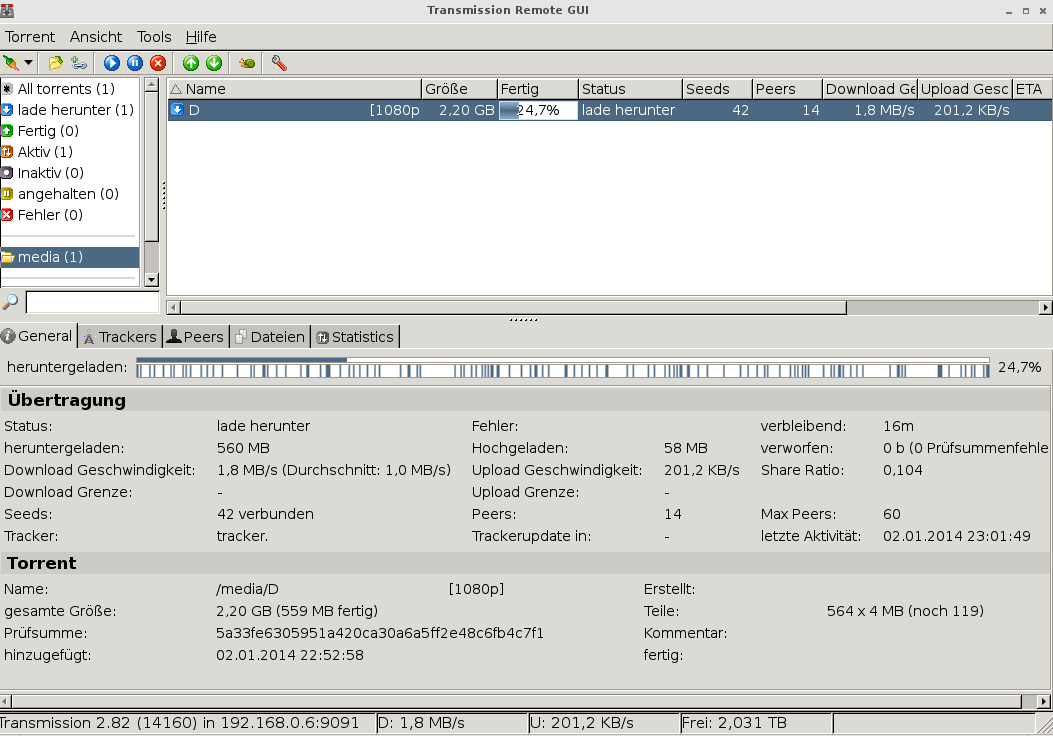
After you installed it, point it to the IP address of your transmission-server and then you can see the movies downloading and even add torrent- or magnet-links so they will be downloaded to you Freenas.
Couchpotato
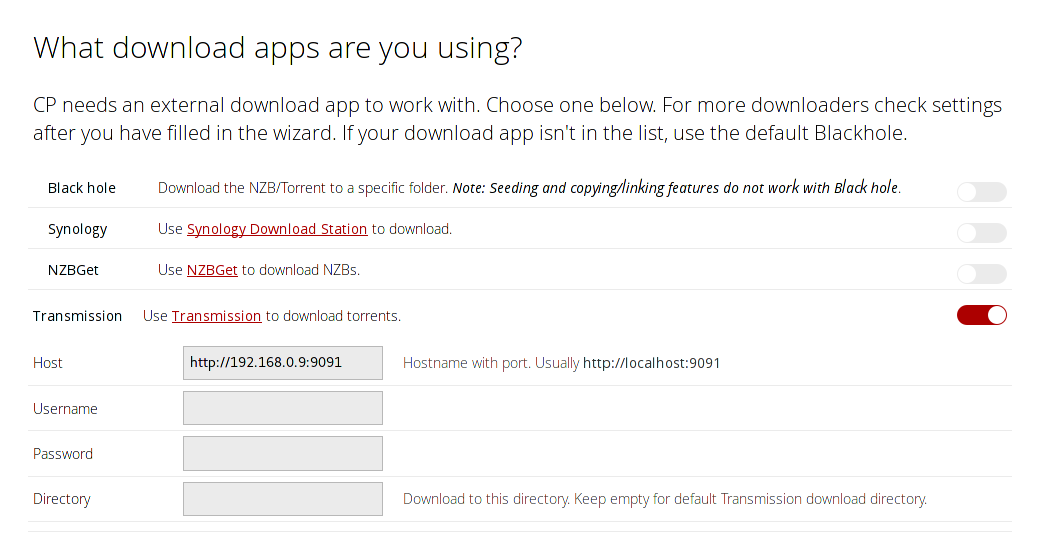
Open the couchpotato-address in your browser. You'll be greeted with the install wizard. Scroll down to advance in the wizard. Define a user name and password in the General section if you'd like and leave the port to 5050.
In the downloaders-section choose Transmission. As host enter the address of your Transmission jail (you can find the address in the jail-section of Freenas). Leave Directory empty so Couchpotato uses the transmission-default, which is /media/downloads.
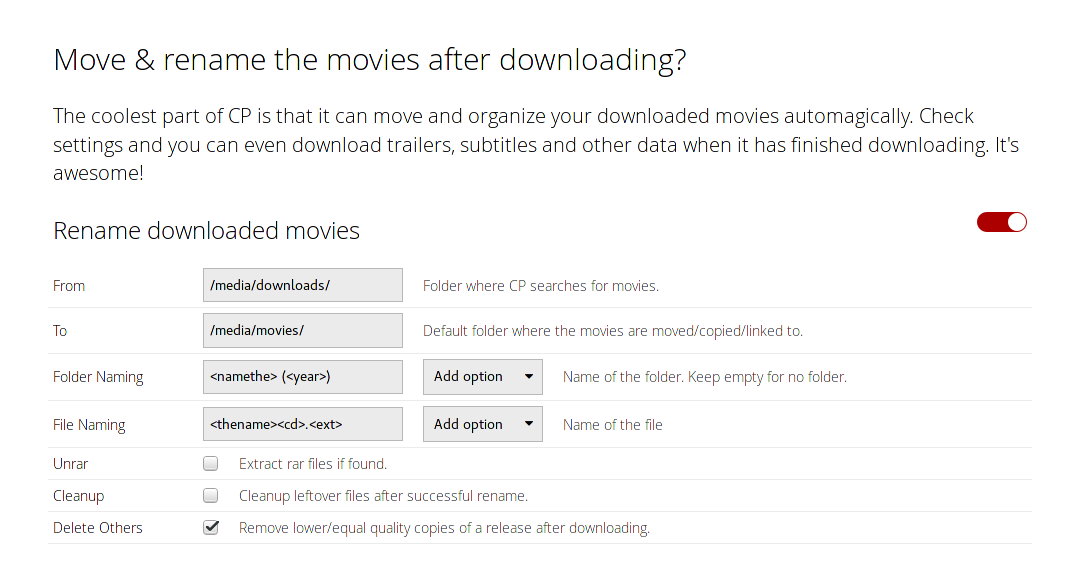
Scroll further down to Move & rename the movies after downloading? (skip the Are you registered at any of these sites?-part).
In the from-folder set the same folder you just used for the Transmission-directory. The to-directory is where the renamed movies will be stored. Set it to the movie-source configured in the chapter Adding storage to the jails. Tick the Cleanup-box so leftover files will be removed after renaming the movies.
After that, scroll further down and click the huge green button and you're done with the wizard.
On the main page of couchpotato, click the screw-icon in the upper right to get to the configuration-page. There are many things to tweak here, but I'm not going into detail about them. Right now you have to open the General Tab, click on Show advanced settings and then enter 0777 in the fields Folder CHMOD and File CHMOD as shown below. If you do not do this, you probably will be getting an error-message later in Transmission, when downloading files (the download stops at around 4MB)!
SickRage or SickBeard
Many people favor SickRage instead of SickBeard. When I initially wrote this guide, SickRage didn't exist so I added it now to the guide. You can choose between installing SickRage and SickBeard (or even both!). If you want a comparison between them, take a look here.
For long-term updates choose SickRage!
SickRage
Install SickRage as usual and add the storages to the jail. Then open the web interface. The first thing you've got to do is to update it. After updating SickRage it will restart (if it doesn't, restart by yourself from the freenas-frontend).
Back in the frontend again click the screws in the top right, in the drop-down menu on General. Here you'll find the main settings. The important setting to change is Show root directories. Click new and choose your series-directory (/media/series). Last save the changes.

Now its time to a add downloader to SickRage. Click on the screw-icon > Search settings, then click on the Torrent Search-tab. There tick the box that says enable torrent search providers. In the drop-down-field under that choose Transmission. Then insert the IP-address of your Transmission-jail (including port [by default: 9091]). In the Downloaded files location-field enter the Downloads-storage (/media/downloads/). Test the connection and save the changes.

The next step is to add providers for torrent-files, that we use to search for shows. Again, click on the screw, then Search Providers. The list shows all supported torrent-websites. At the time of writing the checked providers provide free access with no need to sign-up:
The last thing to configure is the post-processing of downloaded shows. Open the settings and in TV Download Dir enter /media/downloads:
Now searching and downloading shows should work with SickRage!
If you already have shows in your series-directories, you can now easily add them. Click on Shows in the upper menu, then Add shows and in the new windows, click Add existing shows:
If all your shows are in a separate subdirectory, then it should look like this. By pressing Submit and afterwards filling out some information on each of your shows, SickRage will process these.
SickBeard
Install SickBeard as usual and open the web interface. Since I currently only load movies with (free) torrents, there are some settings to make.
Open up the Search Settings tab in the config-tab. Disable the search for NZBs and enable the search for torrents. In the Torrent Black Hole enter the Torrent-Destination /media/torrentfiles* you configured in the jail-storage and save the changes. It should look like this:
Then go to the Search Providers tab. There, check the box for EZRSS as it is the only free torrent search for series. If you are a member of any other torrent sites listed there, check the boxes for them and enter your credentials for this site. Again save the changes.
Next, go to the Post Processing settings. In the TV Download Dir, enter your Series-Destination /media/downloads and check the Scan and Process-box. You can also edit additional settings on this page but they are not important right now. In the end your settings should probably look like this:
If you're done, you can add new or existing shows and let them download!
DLNA
Now you have the choice to either use MiniDLNA or the Plex MediaServer. If you want a nice interface to manage you music and movies, use Plex. If you only need a DLNA-server, use MiniDLNA as it is easy to configure. I'll describe the installation and configuration for both.
MiniDLNA
Open the Freenas-front end, go to plugins and open the MiniDLNA-configuration. There, set the name of the MiniDLNA-server to anything you like and the Media-directory to the destination set in chapter Adding storage to the jails. Leave the other options as they are.
The DLNA-server will only scan for new files in its directory on restart, so if you are adding a movie and do not restart the DLNA-server, it won't be available for streaming. To work around this issue, use the fix described here. After rebooting the DLNA-server should now scan for new files every 5 minutes.
Plex MediaServer
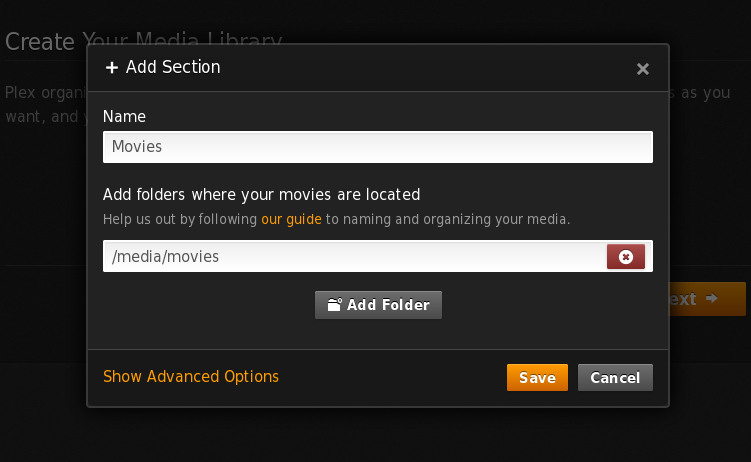
After installing the plugin, open the address of the Plexserver and you'll be greeted with the End User License Agreement. Agree to it and jump to the Get Started-section. You can skip the register as it's not needed. Leave the settings in Basic Setup as they are and go to the next step. There, you can add your music and movie-directories. Click on add section, then on Movies and insert into the second box your movies-directory. It should look like this:
Do this for your music and series, too.
If you have everything added, jump to the next section. There you can add some channels to use with Plex. I skipped them. Click Next and Done and your are it..done! Now you should see the dashboard of Plex filling with your movies and music.
DLNA is enabled by default, so you don't have to do anything in this regard.
Conclusion
Now you are able to download movies with couchpotato and transmission and once they're downloaded, they are automatically available on you DLNA-server for further streaming.
Related posts:
Feel free to give some criticism and what to improve.
I'm going to describe how to set up Freenas with the popular plugins couchpotato, sickBeard or sickRage and transmission to use them for downloading movies or series and streaming them via DLNA as well as mounting the storage on Linux.
If you want to support me, you can now flattr the post (under the headline on the right site). This way you give micro donations to me. To read more about flattr, visit its homepage! I'd really appreciate it!
This post is also available in German!
I integrated SABnzbd! You'll find a how-to in my other blog post
If you want to know how to setup Headphones, look here
With this setup, I manage my movie collection and my wanted movies with couchpotato, which uses transmission to download them. I also use SickBeard to download TV series. Then I can stream them with the DLNA-server to my TV.
I'm running Freenas on a HP ProLiant G7 MicroServer N54L. Freenas itself is running on a micro-USB stick. I'm not going to describe how to download and install Freenas on the stick, as described in detail in the docs.
Table of contents
- Table of contents
- Configuration
- Network settings
- General settings
- Overview of storages and jails
- Creating storage devices
- Adding sharing options
- Installing the plugins
- Enabling access to the jails
- Adding storage to the jails
- Conclusion
After starting the server and waiting some minutes, Freenas is available under a web-front end. The URL is a local IP-address, which is shown when Freenas has finished starting. After opening it, you're presented with the installation wizard.
Choose your preferred language, timezone and key mapping, then press next. In the next step you can create a pool, but press exit, because we're going to create one later.
Network settings
Next on we have to edit the network settings. Go to network > Global configuration. There you can change the name of your Freenas, set the default gateway, name server and so on. Since I use my server at home, I set the gateway and name server to the address of my router. If you want to, you can enable the netwait feature. If enabled, your server will ping the addresses in the IP list when it starts to check if a network connection is possible.
General settings
There are some more settings that you should know about and edit. Open the System > Settings tab.
If your network is secure and only authorized people join it, you may let the Protocol option set to HTTP. Generally it is recommended to set it to HTTPS.
The next option defines the address and port your Freenas-installation listens to; set it to the IP-address the Freenas currently listens on. Set the HTTP-port to 80 and the HTTPS port to 443. Next on there are specific settings for your language, keyboard map and timezone. Set it according to your preferences.
If you're not using a syslog server or directory service, leave the last two options empty.
Overview of storages and jails
The next steps will include creating storages and jails. To get a better understanding on how these components will work together, my beautiful girlfriend created two diagrams that show how the magic happens.
The first image shows the storages and jails that I created and what jails can access which storages.
The second image shows the steps that happen, when you want to download a movie or series via Couchpotato/SickBeard.
Creating storage devices
Now is the time to add some storage to your server. That is the most important part and you should carefully read the documentation the Freenas community offers. I will not go into detail on what volumes or RAIDs to use. It mainly depends on your needs and what you've got hardware-wise.
My use-case is a simple movie- and music-streaming server with no personal or private information saved on it.
To simply create a new empty volume and attach disks to it, open Storage > Volumes > Volume Manager, give your new volume a name, add your disks and configure the layout.
Creating datasets
To logically separate your files, e.g. movies from music, you can create datasets. These datasets can have separate permissions, quotas, etc. allowing you more control over your data.
I created datasets for every kind of data I want to manage: movies, series, music, downloads and torrent-files. To create a dataset click on your created storage, then hit the Create dataset-button (the one that looks like an excel-document with a plus). There, set the name for the dataset. You can ignore all other options for now, as they are for advanced users.
Changing permissions of the storage
Since there are many plugins and users who want access to your storage, you'll have to configure the permissions for it. The best way is to set the ownership of the storage to nobody and give read/write/execute permissions to everybody. You should only do this, if you trust the users of your network. To change permissions, click on the Storage tab, select the volume you want to edit and click the first button in the bottom line that displays hard disks and a key. There, set the Owner (user) to nobody, the Owner (group) to nogroup and activate all buttons in the mode. Type of ACL should be set to Unix. Tick the box that says Set permission recursively so all other folders and files in the volume will have the same permissions.
Adding sharing options
Since I want to access my music and movie collection not only with my TV but also with the computers I'm using, I have to add sharing possibilities. Freenas offers NFS, CIFS and AFP out-of-the-box. I don't have an Apple-gadget or Windows machine at home, so I'll only need NFS.
NFS
To add a NFS-share click on Sharing > Unix (NFS) Shares > Add Unix (NFS) Share. There, set the options Mapall User and Mapall Group to nobody and nogroup respectively. In the path, add all the storages-directories you want to share. You'll have to create a separate share for every dataset. When you're done, you can mount the directories via NFS, the address is the IP-address of your freenas-installation plus the folder you shared, e.g.
192.168.0.102:/mnt/media/movies
Installing the plugins
Installing plugins is very easy, as long as you stick to the available ones provided by Freenas. In the Plugins-menu, click on the plugins and then on Install, to install them. Each plugin is installed into a jail, a separate "operating system" in Freenas itself, but we'll get to that in the next section.
When you're done, your plugin-page should look like this:
Enabling access to the jails
SSH to your Freenas
You'll likely need command-line access to your Freenas installation and to the jails as well. To enable SSH access to Freenas, go to Services and click on the screwdriver next to SSH. Tick the Login as root with password box and save the settings. After that, enable the SSH-Service by clicking the red OFF-button. Now you're able to connect to your Freenas with SSH by entering the following line into your terminal-emulator of choice:
ssh root@192.168.0.14
(change the address to the address of your Freenas)
Then enter the admin-password and you should be connected to your box.
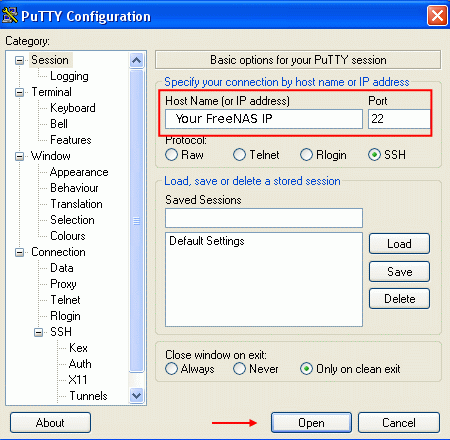
Using Putty to enter your Freenas
If you're on Windows and want to connect to your Freenas-installation using Putty, you have to enter the IP-address of Freenas into the Host Name-field, then press open.
If Putty cannot connect, you probably didn't use the correct IP-address or you forgot to enable SSH.
Entering the jails
To enter one of the installed jails, type jls on the command-line. There you'll see the available jails. To connect to them, enter jexec # tcsh where # is the number of the jail.
[root@freenas] ~# jls
JID IP Address Hostname Path
1 - bit_1 /mnt/media/jails/bit_1
2 - couchpotato_1 /mnt/media/jails/couchpotato_1
4 - ownbutt_1 /mnt/media/jails/ownbutt_1
8 - dlna_1 /mnt/media/jails/dlna_1
[root@freenas] ~# jexec 8 tcsh
root@dlna_1:/ #
Adding storage to the jails
Now we'll have to add the storage to the plugins, so Couchpotato, transmission and the DLNA-server can access the same storage and work together. Since jails are separate systems in the server-OS itself, they cannot by default access other parts of your system.
To add the storage, go to Jails, click the plus next to the plugin, open the Storage tab and click Add storage. You'll then have to enter the source and destination addresses.
The source is the storage or dataset you created in the first place. If you did not create datasets before, you either have to do this now or create normal directories as sources with mkdir on the server. The destinations are directories in the jails that get mapped to the storages outside the jails.
If the destination addresses in the jails do not exist, tick the Create directory-box.
To manually create the directories, enter the jail, then you can create directories with the following command:
mkdir -p /media/downloads
Then enter the following command the get the permissions right:
chmod -R 777 /media/downloads
The following part is really tricky as Transmission, Couchpotato and Sick Beard behave very differently with the directories they download data to. I had to edited the following configuration multiple times, so be sure to stay up to date.
- Transmission (bit_1): You need the torrent-directory, where Transmission looks for torrents and the download-directory where it downloads the data to.
- Download-Source: /mnt/media/downloads
- Download-Destination: /media/downloads
- Torrent-Source: /mnt/media/torrentfiles
- Torrent-Destination: /media/torrentfiles
- Series-Source: /mnt/media/series
- Series-Destination: /media/series
- Movie-Source: /mnt/media/movies
- Movie-Destination: /media/movies
- couchpotato: You need the downloads-directory where transmission puts its data into; you'll also need the movies-directory, where couchpotato moves the downloaded and renamed movies to.
- Download-Source: /mnt/media/downloads
- Download-Destination: /media/downloads
- Movie-Source: /mnt/media/movies
- Movie-Destination: /media/movies
- Sickbeard/SickRage: You need the series-directory where SickBeard puts its data into; you'll also need the torrents-directory, where SickBeard puts the torrent file for Transmission to download them.
- Series-Source: /mnt/media/series
- Series-Destination: /media/series
- Torrent-Source: /mnt/media/torrentfiles
- Torrent-Destination: /media/torrentfiles
- Download-Source: /mnt/media/downloads
- Download-Destination: /media/downloads
- MiniDLNA/Plex: You'll need every directory where files are located that you want to play using DLNA, e.g. movies and series.
- Movie/Series/Music-Source: /mnt/media/{movies|series|music}
- Movie/Series/Music-Destination: /media/{movies|series|music}
Now that you have added the storage to the plugins, you can finally start them. Go to the Plugins-page and click the red OFF-button of all plugins. After that, they should be listed as on, except for miniDLNA, which we'll have to configure first, but not now.
You can find the IP-addresses of the plugins here:
Transmission
The watch-directory where Transmission looks for torrent-files is normally:
/usr/pbi/transmission-amd64/etc/transmission/Downloads
Thats 50 characters and if you add the jail-directory to it, it exceeds Freenas' directory-length limit of 88 characters, so you have to change this. Open up the Transmission-settings in the Plugins-tab of Freenas and edit the Watch Directory to /media/torrentfiles and the Download-Directory to /media/downloads. Incomplete downloads are put in a separate directory so other plugins do not interfere with the downloads. The Download-Permissions have to be 777 so every plugin has access to the downloads and can move them from there.
Next open the transmission-address in your browser. You'll see the main interface of Transmission. Click the screwdriver icon in the down left corner to edit the settings. There you'll see the download to option. There should be /media/downloads now, too.
Now we'll have to connect to the jail of transmission to manually create a directory.. Connect via SSH into your Freenas and connect to the jail as described in the chapter Entering the jails. Then you'll have to enter the following commands :
mkdir /media/incomplete/
chmod -R 777 /media/incomplete
UPDATE:
HolyK in the Freenas-forums mentioned a great front end for the remote transmission server, transgui. You can find it here or in your favorite package manager. It's a nice replacement for the rather featureless web front end of transmission. It's available for Linux and even Windows.
After you installed it, point it to the IP address of your transmission-server and then you can see the movies downloading and even add torrent- or magnet-links so they will be downloaded to you Freenas.
Couchpotato
Open the couchpotato-address in your browser. You'll be greeted with the install wizard. Scroll down to advance in the wizard. Define a user name and password in the General section if you'd like and leave the port to 5050.
In the downloaders-section choose Transmission. As host enter the address of your Transmission jail (you can find the address in the jail-section of Freenas). Leave Directory empty so Couchpotato uses the transmission-default, which is /media/downloads.
Scroll further down to Move & rename the movies after downloading? (skip the Are you registered at any of these sites?-part).
In the from-folder set the same folder you just used for the Transmission-directory. The to-directory is where the renamed movies will be stored. Set it to the movie-source configured in the chapter Adding storage to the jails. Tick the Cleanup-box so leftover files will be removed after renaming the movies.
After that, scroll further down and click the huge green button and you're done with the wizard.
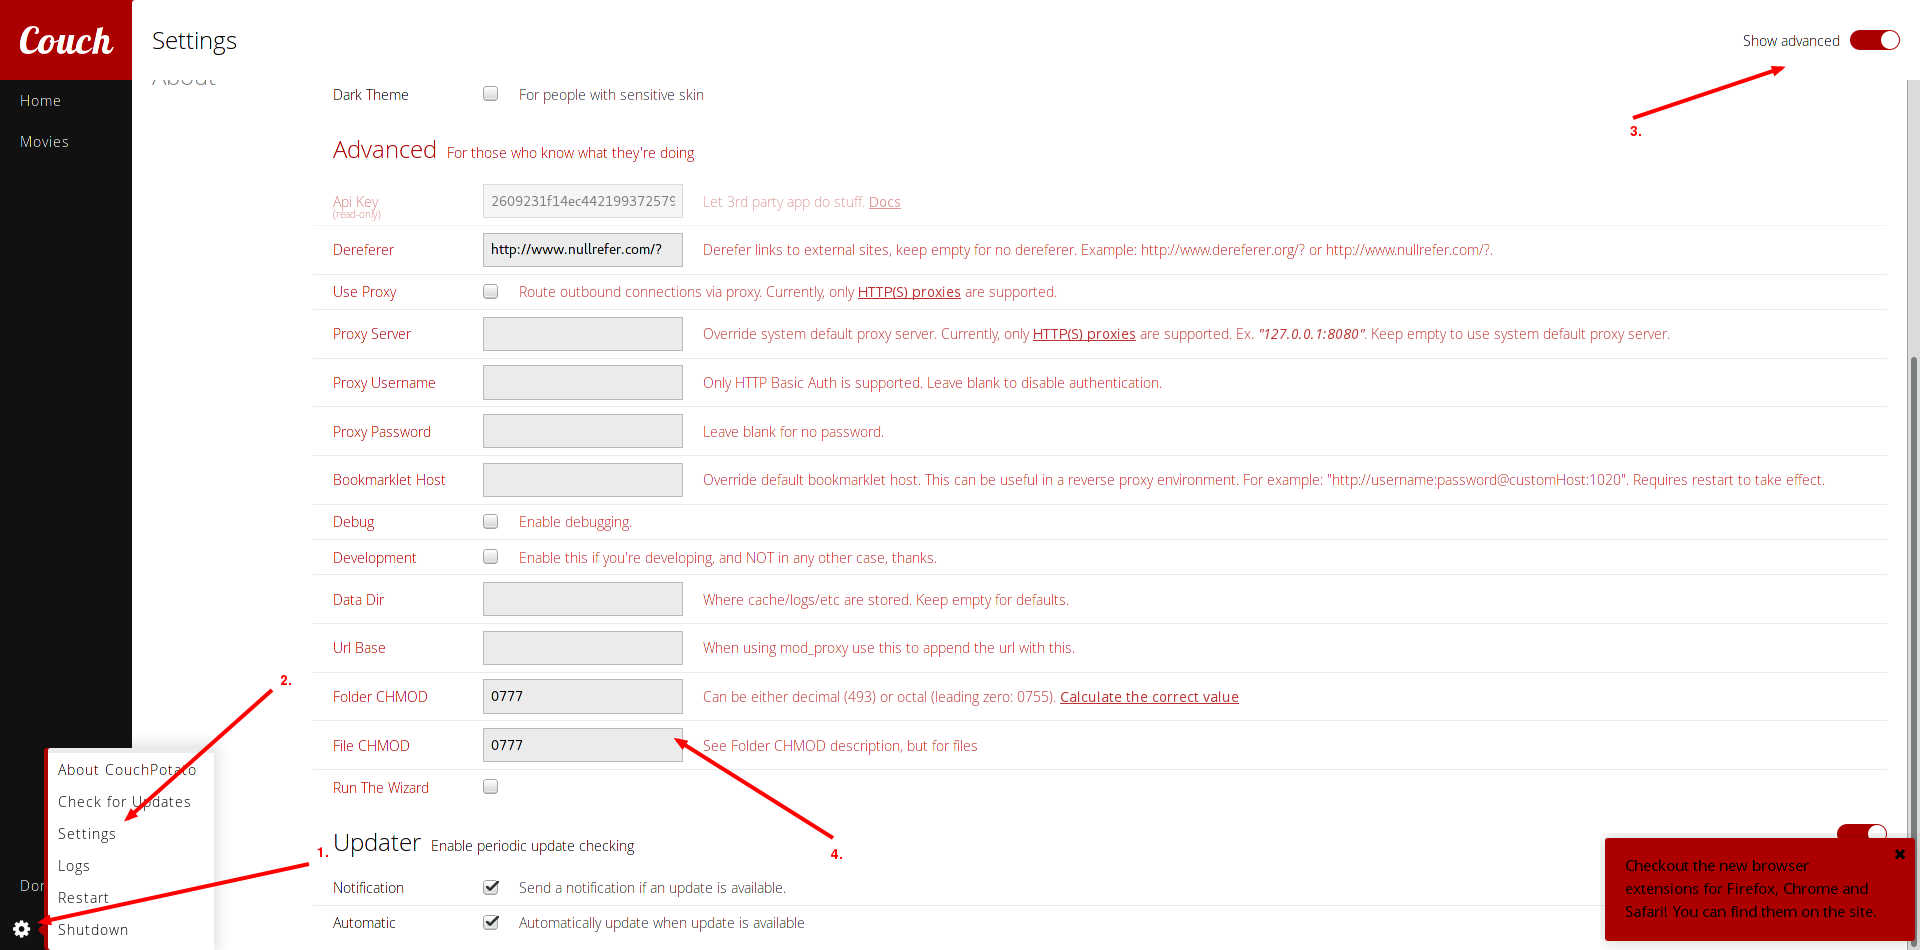
On the main page of couchpotato, click the screw-icon in the upper right to get to the configuration-page. There are many things to tweak here, but I'm not going into detail about them. Right now you have to open the General Tab, click on Show advanced settings and then enter 0777 in the fields Folder CHMOD and File CHMOD as shown below. If you do not do this, you probably will be getting an error-message later in Transmission, when downloading files (the download stops at around 4MB)!
SickRage or SickBeard
Many people favor SickRage instead of SickBeard. When I initially wrote this guide, SickRage didn't exist so I added it now to the guide. You can choose between installing SickRage and SickBeard (or even both!). If you want a comparison between them, take a look here.
For long-term updates choose SickRage!
SickRage
Install SickRage as usual and add the storages to the jail. Then open the web interface. The first thing you've got to do is to update it. After updating SickRage it will restart (if it doesn't, restart by yourself from the freenas-frontend).
Back in the frontend again click the screws in the top right, in the drop-down menu on General. Here you'll find the main settings. The important setting to change is Show root directories. Click new and choose your series-directory (/media/series). Last save the changes.
Now its time to a add downloader to SickRage. Click on the screw-icon > Search settings, then click on the Torrent Search-tab. There tick the box that says enable torrent search providers. In the drop-down-field under that choose Transmission. Then insert the IP-address of your Transmission-jail (including port [by default: 9091]). In the Downloaded files location-field enter the Downloads-storage (/media/downloads/). Test the connection and save the changes.
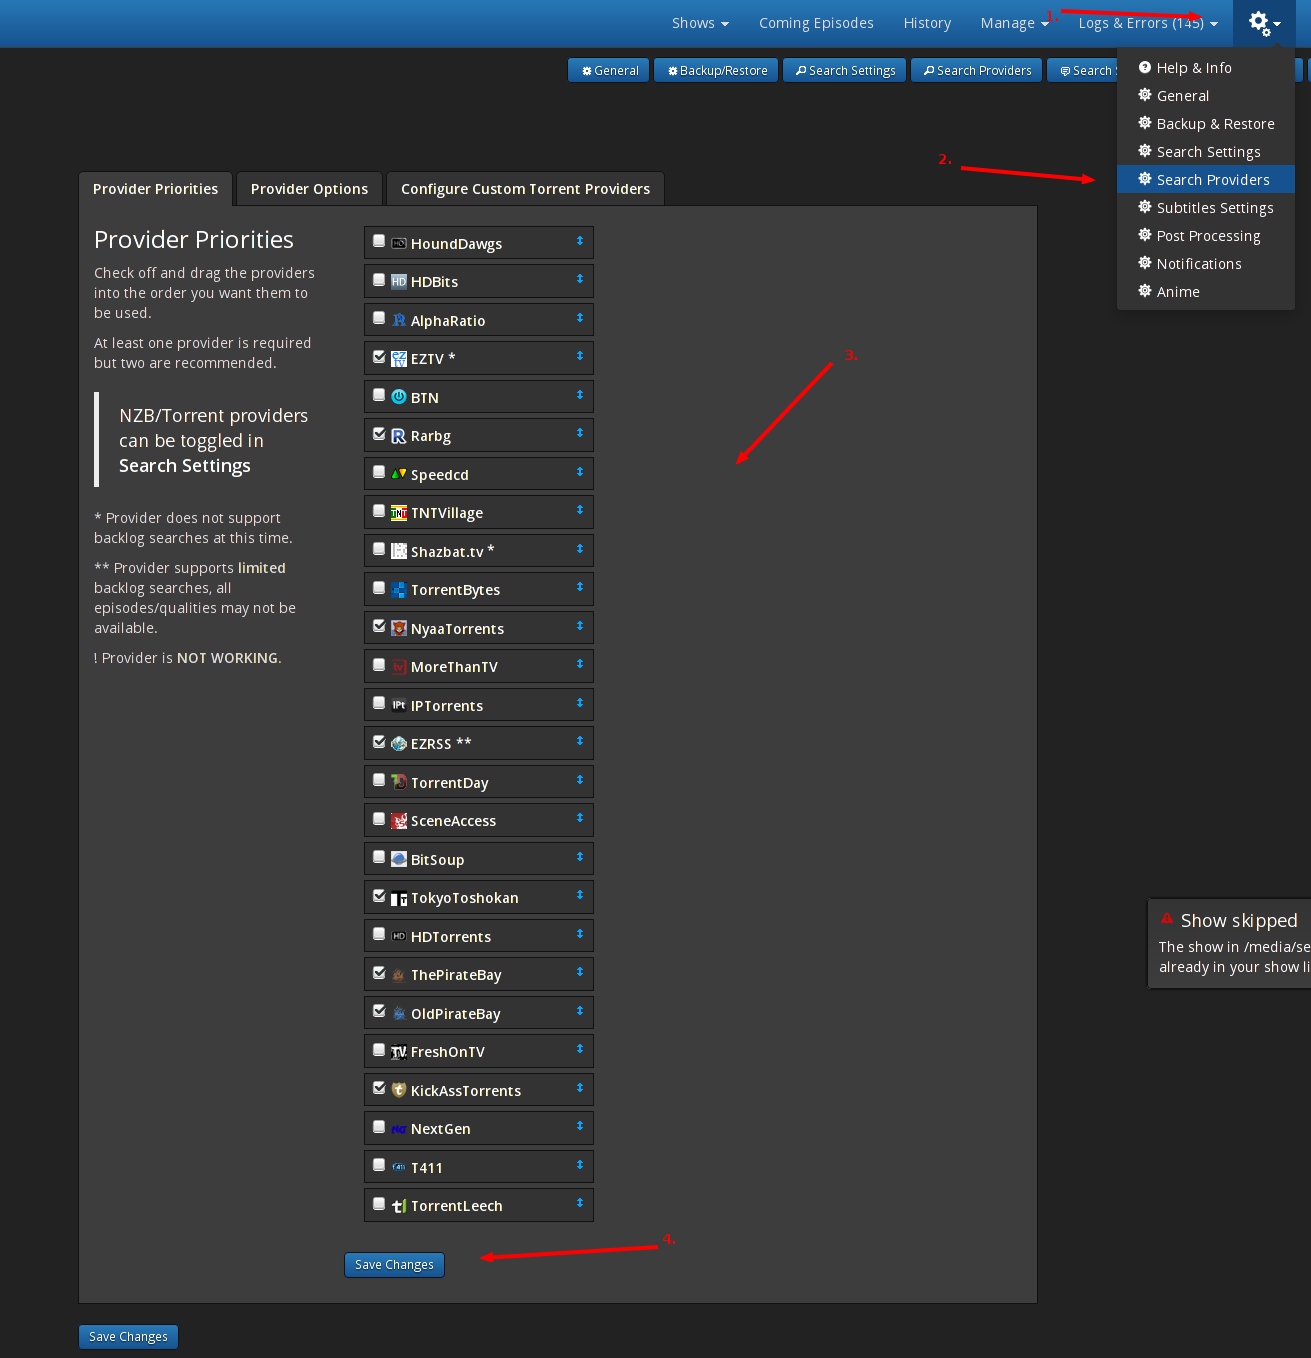
The next step is to add providers for torrent-files, that we use to search for shows. Again, click on the screw, then Search Providers. The list shows all supported torrent-websites. At the time of writing the checked providers provide free access with no need to sign-up:
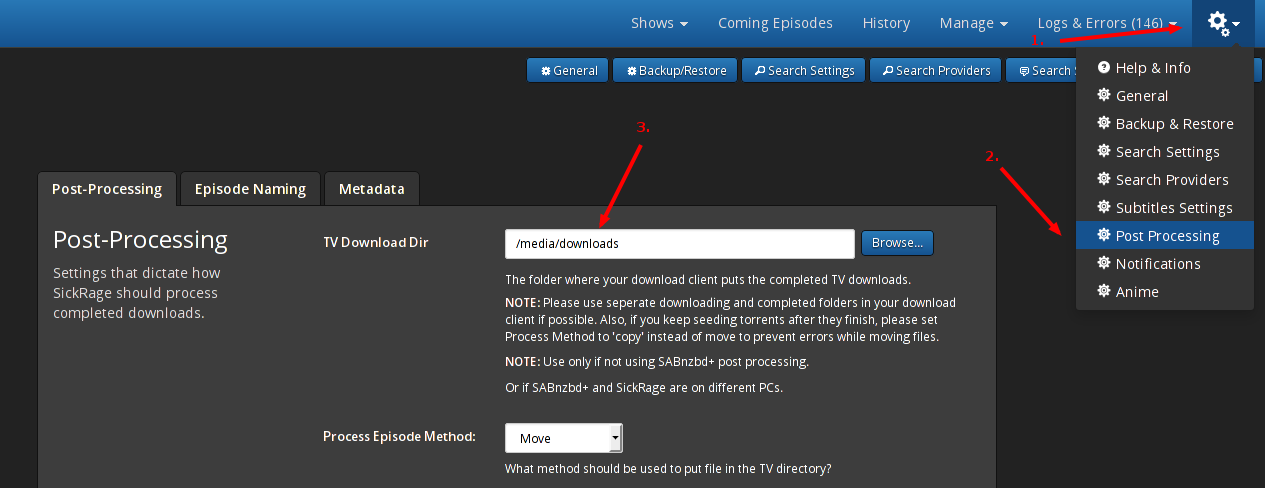
The last thing to configure is the post-processing of downloaded shows. Open the settings and in TV Download Dir enter /media/downloads:
Now searching and downloading shows should work with SickRage!
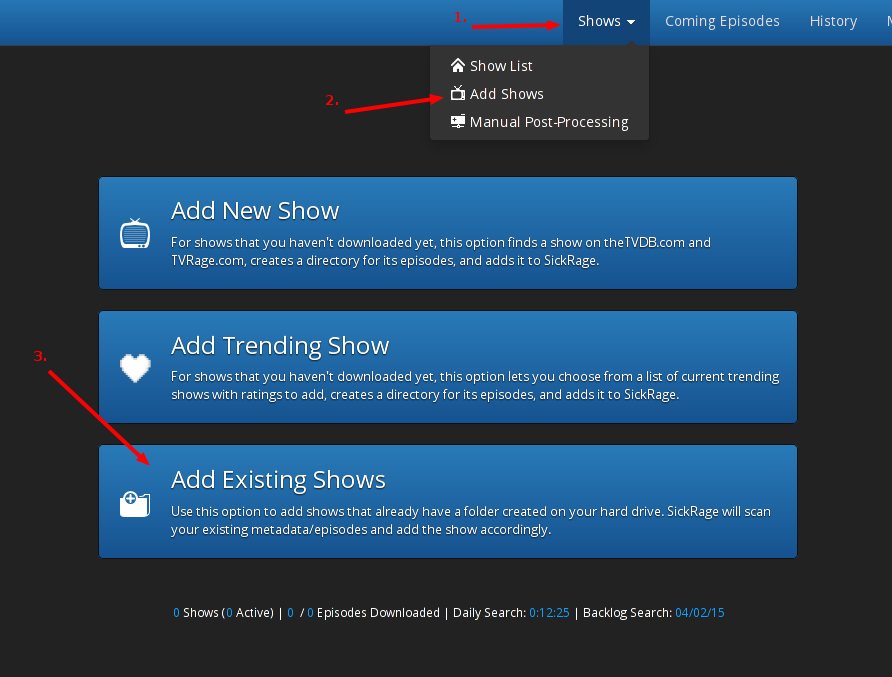
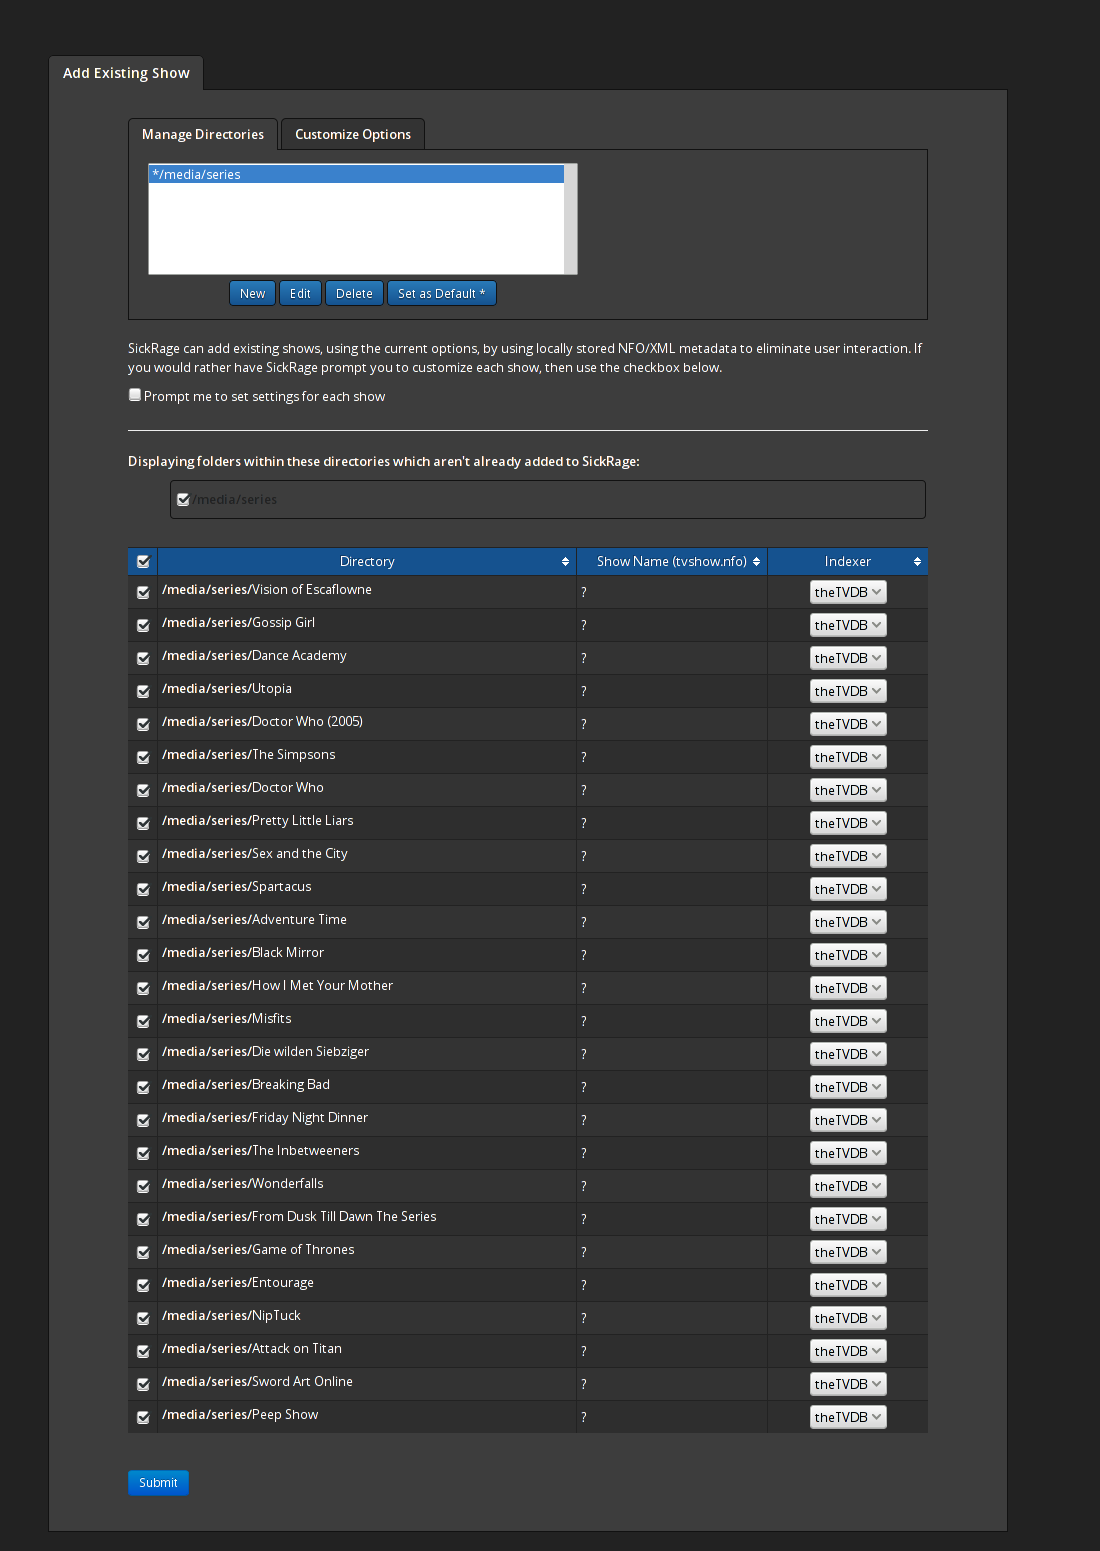
If you already have shows in your series-directories, you can now easily add them. Click on Shows in the upper menu, then Add shows and in the new windows, click Add existing shows:
If all your shows are in a separate subdirectory, then it should look like this. By pressing Submit and afterwards filling out some information on each of your shows, SickRage will process these.
SickBeard
Install SickBeard as usual and open the web interface. Since I currently only load movies with (free) torrents, there are some settings to make.
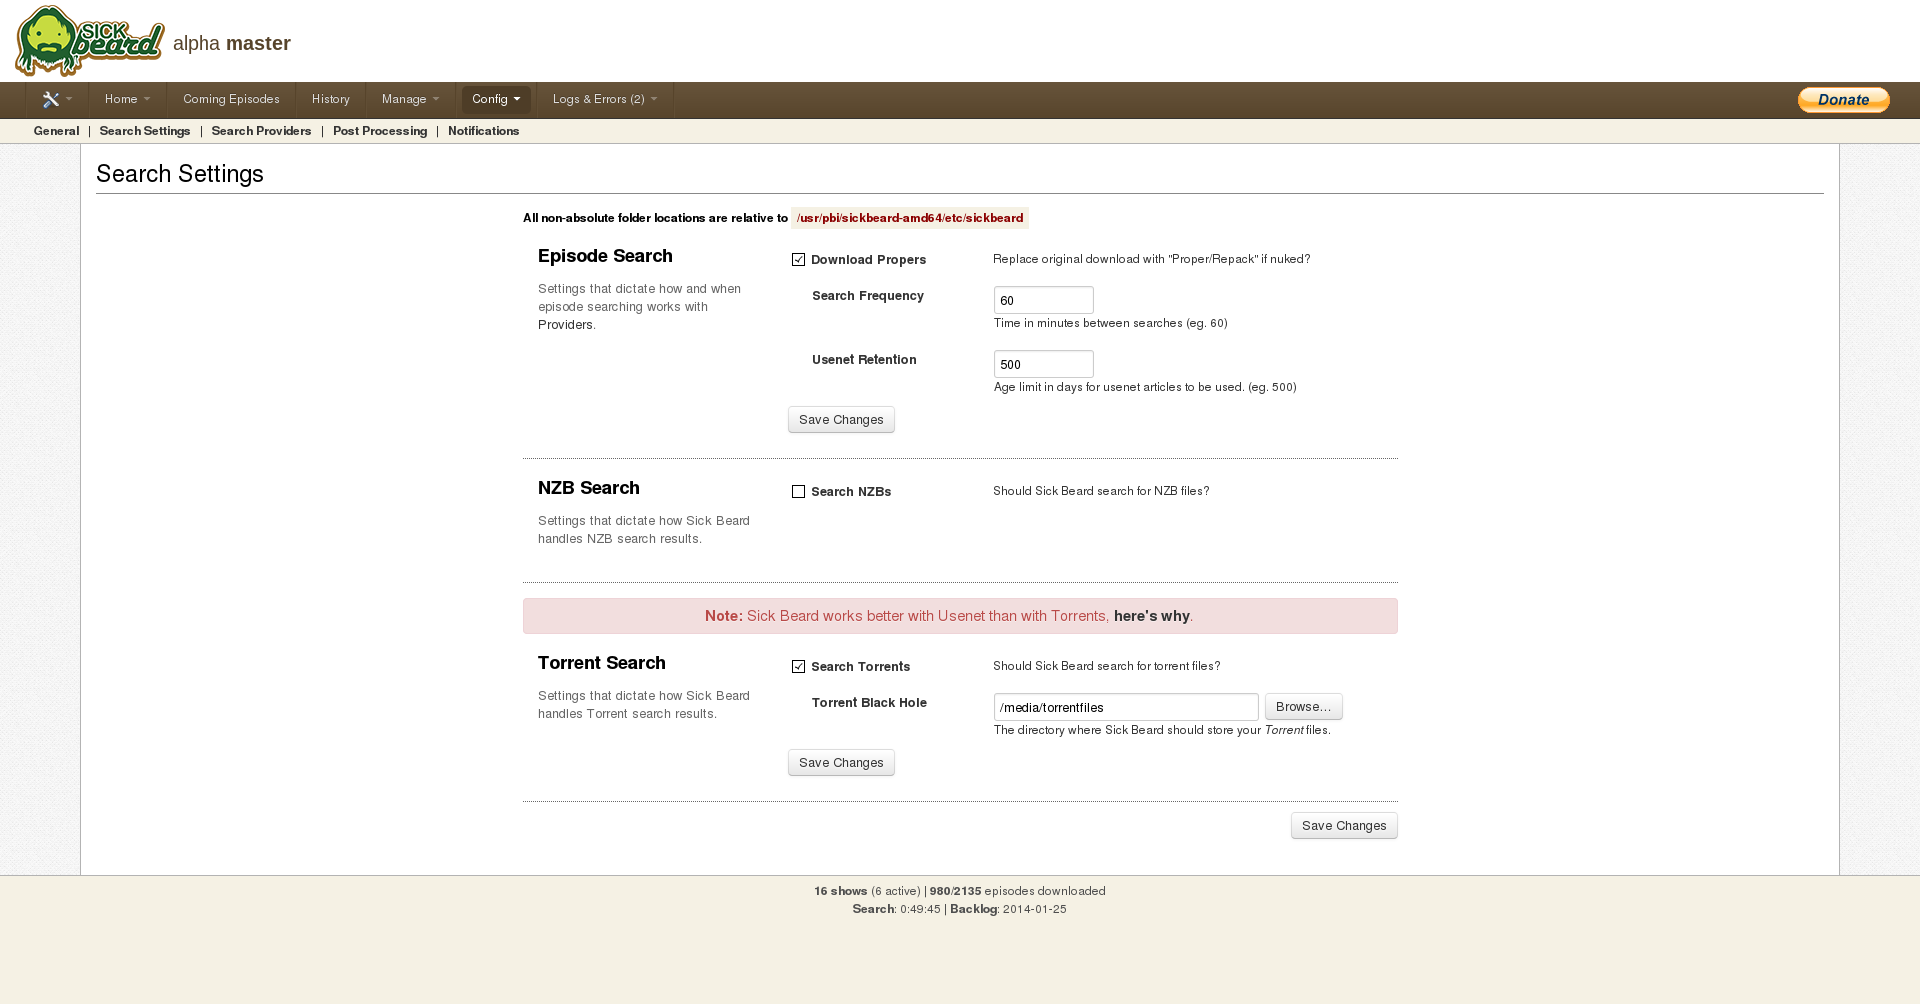
Open up the Search Settings tab in the config-tab. Disable the search for NZBs and enable the search for torrents. In the Torrent Black Hole enter the Torrent-Destination /media/torrentfiles* you configured in the jail-storage and save the changes. It should look like this:
Then go to the Search Providers tab. There, check the box for EZRSS as it is the only free torrent search for series. If you are a member of any other torrent sites listed there, check the boxes for them and enter your credentials for this site. Again save the changes.
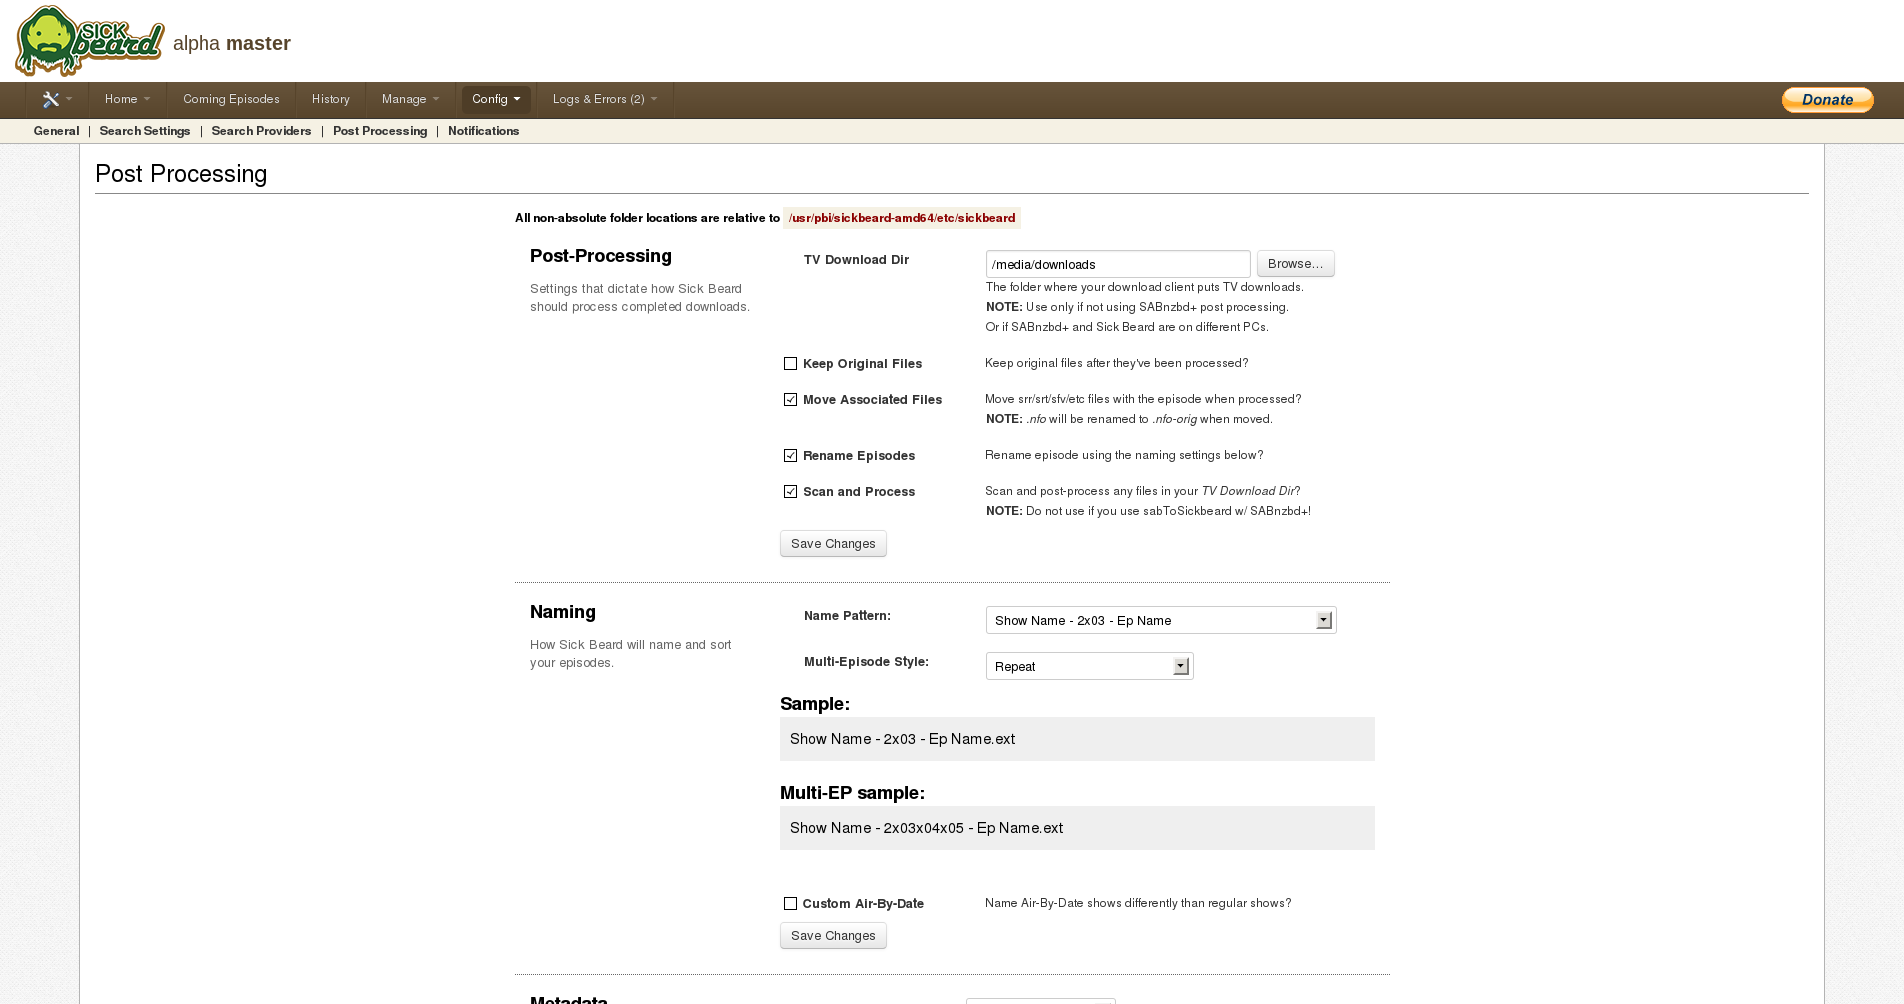
Next, go to the Post Processing settings. In the TV Download Dir, enter your Series-Destination /media/downloads and check the Scan and Process-box. You can also edit additional settings on this page but they are not important right now. In the end your settings should probably look like this:
If you're done, you can add new or existing shows and let them download!
DLNA
Now you have the choice to either use MiniDLNA or the Plex MediaServer. If you want a nice interface to manage you music and movies, use Plex. If you only need a DLNA-server, use MiniDLNA as it is easy to configure. I'll describe the installation and configuration for both.
MiniDLNA
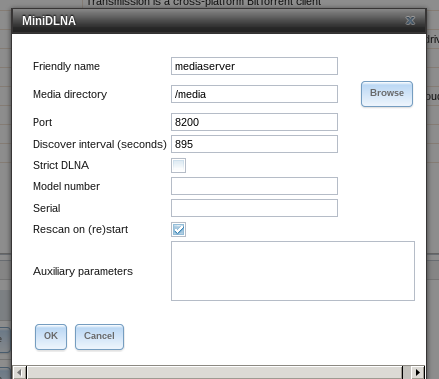
Open the Freenas-front end, go to plugins and open the MiniDLNA-configuration. There, set the name of the MiniDLNA-server to anything you like and the Media-directory to the destination set in chapter Adding storage to the jails. Leave the other options as they are.
The DLNA-server will only scan for new files in its directory on restart, so if you are adding a movie and do not restart the DLNA-server, it won't be available for streaming. To work around this issue, use the fix described here. After rebooting the DLNA-server should now scan for new files every 5 minutes.
Plex MediaServer
After installing the plugin, open the address of the Plexserver and you'll be greeted with the End User License Agreement. Agree to it and jump to the Get Started-section. You can skip the register as it's not needed. Leave the settings in Basic Setup as they are and go to the next step. There, you can add your music and movie-directories. Click on add section, then on Movies and insert into the second box your movies-directory. It should look like this:
Do this for your music and series, too.
If you have everything added, jump to the next section. There you can add some channels to use with Plex. I skipped them. Click Next and Done and your are it..done! Now you should see the dashboard of Plex filling with your movies and music.
DLNA is enabled by default, so you don't have to do anything in this regard.
Conclusion
Now you are able to download movies with couchpotato and transmission and once they're downloaded, they are automatically available on you DLNA-server for further streaming.
Related posts:
- Install Headphones and a Musicbrainz-server in your Freenas
- Integrating SABnzbd with Freenas, Couchpotato, Sickbeard and Headphones
- Freenas mit Transmission und Couchpotato/Sick(-Beard, -Rage) als DLNA-Server
- Installing and configuring the Freenas Syncthing-plugin
- Repairing a Microsoft ergonomic keyboard
Last edited: