
philiplu
Explorer
- Joined
- Aug 10, 2014
- Messages
- 58
[Edit: Oct 17, 2015. The original instructions from April 2015 apply to v1.1 of kmttg. Kmttg is now up to v2.0, and is using JavaFX instead of Java Swing (for the graphics presentation, apparently). That doesn't work for OpenJDK on FreeBSD. To use these instructions, grab the most recent version of kmttg v1.1, which right now is v1.1r.]
This is a guide to installing both kmttg and pyTivo together in a jail. There's a previous guide here describing pyTivo in a jail if you don't need kmttg. I use kmttg more than pyTivo, and the two work together nicely, so both in a single jail is useful.
I've got a Tivo Roamio Pro with a 3 TB drive, the latest in over a decade of using Tivos. I've had Tivo drives die over the years, and use kmttg as a way to back up the drive. I use it to copy shows from the Tivo to my NAS, with pyTivo letting the Tivo see those downloaded shows if I ever need to pull them back to the Tivo from the NAS. It doesn't let me copy non-transferable movies (think HBO), but it does mean no longer losing all the episodes of various kids programs we have stored.
pyTivo is accessed using a browser, so it's pretty simple to install. But kmttg's main interface is via a local graphical window, so it's more interesting to install. I'm using a VNC (Virtual Network Computing) server to expose a virtual screen that can be accessed remotely. The virtual screen will use Openbox as the window manager over X Windows. There are lots of window managers you can play around with; I ended up with Openbox pretty randomly, looking for a simple manager (I think I tried Fluxbox and twm as well while I was first setting this up several months ago).
Before Creating the Jail
The following steps are performed with a command shell in your jail. You can go to Jails → Jails and select the tivo jail, then click the Shell button at the bottom of the webpage. If you prefer working through ssh, ssh into your NAS, then run jexec tivo tcsh (with sudo if needed) to enter your jail.
This is a quick look at configuring pyTivo. Check out the wiki at http://pytivo.sourceforge.net/wiki/index.php/PyTivo for more details.
The kmttg docs are at https://sourceforge.net/p/kmttg/wiki/Home. Here's a quick run through my setup:
This is a guide to installing both kmttg and pyTivo together in a jail. There's a previous guide here describing pyTivo in a jail if you don't need kmttg. I use kmttg more than pyTivo, and the two work together nicely, so both in a single jail is useful.
I've got a Tivo Roamio Pro with a 3 TB drive, the latest in over a decade of using Tivos. I've had Tivo drives die over the years, and use kmttg as a way to back up the drive. I use it to copy shows from the Tivo to my NAS, with pyTivo letting the Tivo see those downloaded shows if I ever need to pull them back to the Tivo from the NAS. It doesn't let me copy non-transferable movies (think HBO), but it does mean no longer losing all the episodes of various kids programs we have stored.
pyTivo is accessed using a browser, so it's pretty simple to install. But kmttg's main interface is via a local graphical window, so it's more interesting to install. I'm using a VNC (Virtual Network Computing) server to expose a virtual screen that can be accessed remotely. The virtual screen will use Openbox as the window manager over X Windows. There are lots of window managers you can play around with; I ended up with Openbox pretty randomly, looking for a simple manager (I think I tried Fluxbox and twm as well while I was first setting this up several months ago).
Before Creating the Jail
- Install a VNC viewer (client) wherever you plan on remoting into your jail. I installed TightVNC for Win 7 64-bit, version 2.7.10, from http://tightvnc.com/download.php.
- Use the FreeNAS GUI to create a tivo group, via Account → Group → Add Group (default items not shown):
Group ID: Whatever you choose. I picked 2001 to keep it away from regular user IDs.
Group Name: tivo - Create a tivo user at Account → Users → Add User (default items not shown):
User ID: Same as the tivo group ID (2001 in my case)
Username: tivo
Create a new primary group for the user: Unchecked
Primary group: tivo
Shell: nologin
Full name: "Owner of files created in tivo jail"
Disable password login: Checked - You'll want to store downloaded shows outside the jail, via storage attached to the jail. Create a dataset using the Storage → Volumes page. I created the dataset pool/nbu/tivo (nbu stands for Not Backed Up, for datasets I don't back up to my secondary FreeNAS box).
- Use Jails → Jails → Add Jails to create a standard jail. I gave mine the name tivo.
- Use Jails → Storage → Add Storage to attach your media dataset (point 4 above) to your jail. In my case:
Jail: tivo
Source: /mnt/pool/nbu/tivo
Destination: /mnt/tivo
Read-only: Unchecked
Create directory: Checked
The following steps are performed with a command shell in your jail. You can go to Jails → Jails and select the tivo jail, then click the Shell button at the bottom of the webpage. If you prefer working through ssh, ssh into your NAS, then run jexec tivo tcsh (with sudo if needed) to enter your jail.
- Create a tivo group and user inside the jail to match those outside the jail. Change the number if you chose something other than 2001 above.
Code:pw groupadd tivo -g 2001 echo "tivo:2001:2001::::Account for running kmttg & pyTivo:/home/tivo:/usr/sbin/nologin:" | adduser -f -
- Install the necessary packages. I'm using TightVNC as the VNC server, Openbox as the window manager, PyPanel for the taskbar at the bottom of the screen, and several utilities used by kmttg and pyTivo to manipulate Tivo files.
Code:pkg update -f pkg upgrade -y pkg install -y tightvnc curl openjdk8-jre pkg install -y openbox obconf obmenu pypanel pkg install -y tivodecode ffmpeg handbrake mediainfo mencoder
- Create new file /etc/rc.d/pytivo, an rc script to run pytivo as user tivo when the jail is started. Use an editor like ee or vi to create the file with the following text:
Code:#!/bin/sh # $FreeBSD$ # # PROVIDE: pytivo # REQUIRE: LOGIN NETWORKING # KEYWORD: shutdown # Add the following line to /etc/rc.conf to enable pytivo at boot: # pytivo_enable="YES" . /etc/rc.subr name=pytivo rcvar=$(set_rcvar) pytivo_user=tivo eval homedir=~${pytivo_user} command=${homedir}/pytivo/pytivo-master/pyTivo.py command_args=">${homedir}/pytivo.log 2>&1 &" command_interpreter=python pidfile=/var/run/${name}.pid load_rc_config $name run_rc_command "$@" - Create new file /etc/rc.d/kmttg, an rc script to run vncserver as user tivo (which will start kmttg thanks to the xstartup created later on). Edit the file to have the following text:
Code:#!/bin/sh # $FreeBSD$ # # PROVIDE: kmttg # REQUIRE: LOGIN NETWORKING # KEYWORD: shutdown # Add the following line to /etc/rc.conf to enable kmttg at boot: # kmttg_enable="YES" . /etc/rc.subr name=kmttg rcvar=$(set_rcvar) kmttg_user=tivo eval homedir=~${kmttg_user} vnc_display=:1 # The command is vncserver, not kmttg, because the script is really just starting Xvnc. # kmttg is started using ${homedir}/.vnc/xstartup command=/usr/local/bin/vncserver command_args="${vnc_display} -geometry 1280x1024 -depth 24" procname=Xvnc pidfile=${homedir}/.vnc/$(hostname)${vnc_display}.pid start_cmd="su -m ${kmttg_user} -c \"sh -c \\\"HOME=${homedir} ${command} ${command_args}\\\"\"" stop_cmd="su -m ${kmttg_user} -c \"sh -c \\\"HOME=${homedir} ${command} -kill ${vnc_display}\\\"\"" load_rc_config $name run_rc_command "$@" - Make both rc scripts executable:
Code:chmod +x /etc/rc.d/pytivo /etc/rc.d/kmttg
- Use an editor to add the following two lines to the end of /etc/rc.conf, to enable running the two scripts on jail startup/shutdown:
Code:pytivo_enable="YES" kmttg_enable="YES"
- Change from user root to user tivo for the remaining steps in this section, which create files in the tivo user's home directory. Then create a couple directories we need for starting up the VNC session:
Code:su -m tivo cd ~tivo mkdir .vnc mkdir -p .config/openbox
- Use an editor to create new file /home/tivo/.vnc/xstartup with the following text, which instructs the VNC server to load the Openbox window manager and kmttg when starting up:
Code:#!/bin/sh openbox-session & (sleep 5 && /home/tivo/kmttg/kmttg) &
- Make xstartup executable with the following command:
Code:chmod +x ~tivo/.vnc/xstartup
- Create new file /home/tivo/.config/openbox/autostart so openbox loads the PyPanel taskbar. Since it's only a single line, I'm using an echo command to create the file, instead of an editor:
Code:echo '(sleep 5 && pypanel) &' > ~tivo/.config/openbox/autostart
- Tweak the PyPanel configuration. First, make it opaque instead of mostly transparent, since I'm not installing a desktop wallpaper app, and the default desktop pattern makes it impossible to see what's in a transparent taskbar. Also, bump up the font-size PyPanel uses:
Code:sed -e '/^SHADE *=/s/50/255/' -e '/^FONT *=/s/-8/-12/' /usr/local/share/pypanel/pypanelrc > ~tivo/.pypanelrc
- Install the kmttg software by downloading the .zip from sourceforge and unpacking it. Version 1.1n was current when I wrote this. Check at https://downloads.sourceforge.net/project/kmttg for the latest version. Once installed, it's trivial to update kmttg using the Help → Update kmttg... menu selection from within the app.
Code:mkdir ~tivo/kmttg cd ~tivo/kmttg fetch https://downloads.sourceforge.net/project/kmttg/kmttg_v1.1n.zip unzip kmttg_v1.1n.zip
- Install the pyTivo software by downloading the .zip from GitHub and unpacking it. You could alternately clone the repo as shown in the earlier guide.
Code:mkdir ~tivo/pytivo cd ~tivo/pytivo fetch https://github.com/wmcbrine/pytivo/archive/master.zip unzip master.zip
- Change from the tivo user back to the root user, then start up the pytivo and kmttg services. The first time you start up the kmttg service, it will ask you to supply a password to be used when connecting to the VNC server. Do so.
Code:exit service pytivo start service kmttg start
- Exit the jail, either by closing the console window within the FreeNAS GUI, or executing exit to leave the jail, then again to leave the ssh session.
This is a quick look at configuring pyTivo. Check out the wiki at http://pytivo.sourceforge.net/wiki/index.php/PyTivo for more details.
- Connect to pyTivo with a browser. It's available at port 9032 at the IP address shown in the Jails listing in the FreeNAS GUI. In my case, I browsed to 192.168.1.201:9032.
- Click on Settings, select Global Server Settings from the Sections box, then enter the following settings:
ffmpeg: /usr/local/bin/ffmpeg
tivodecode: /usr/local/bin/tivodecode
tdcat: /usr/local/bin/tdcat
tivo_username: Your login name at tivo.com
tivo_password: Your password at tivo.com (needed to push shows from the NAS to the Tivo box)
tivo_mak: The Media Access Key (MAK) for your Tivo.
togo_path: Somewhere in your jail's attached storage. In my case, that's somewhere under /mnt/tivo. - Click the Save Changes button
- If you want your Tivo to see pyTivo as a source of shows, click Add Section, then name the section (something like NAS Videos or My Downloaded Shows), and click Save Changes. Then select the new section and set the type and path as appropriate. I set type=video, path=/mnt/tivo/downloaded. Click Save Changes again.
- You should be able to see the new section as a Device in the Tivo My Shows menu. If not, check for errors in the log file at /home/tivo/pytivo.log in the tivo jail. You might also try setting the Global Server Setting beacon to something like 192.168.1.255, click Save Changes, then click Restart pyTivo.
- Start up whatever VNC viewer you installed in the first step. These instructions show TightVNC being used on Win 7.
- In the New TightVNC Connection dialog, type the IP address of your jail followed by ::5901. I typed 192.168.1.201::5901, then clicked Connect.
- You next need to supply the password you chose when you started up the kmttg service.
- If all goes well, you should see a remote desktop being presented by the VNC server in your tivo jail, with kmttg running and ready to be configured. It should look something like this:
- Click the floppy disk icon on TightVNC's toolbar to save your session to a .vnc file. That will allow you to reconnect to kmttg later without requiring your password every time.
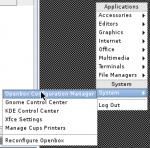
- You might want to configure the Openbox appearance next. Notice the window title bars are using a very small font. To tweak that, right-click the desktop to bring up the Openbox menu, hover over System, and click Openbox Configuration Manager:
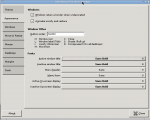
- In the configuration dialog, choose the Appearance tab, then click each of the Fonts buttons and change the font size (I bumped all of them to 12 point):
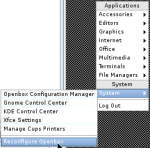
- After you close the configuration dialog, activate the changes by again right-clicking the desktop, hovering over System, and clicking "Reconfigure Openbox".
The kmttg docs are at https://sourceforge.net/p/kmttg/wiki/Home. Here's a quick run through my setup:
- Maximize the kmttg window in the VNC client, since you don't need to get at the underlying desktop any longer.
- Enter your Tivo's Media Access Key in the startup dialog.
- Select File → Configure... and proceed with configuration on the File Settings tab. In my case:
FILES Default Path: /mnt/tivo
.TiVo Output Dir: /mnt/tivo/downloaded
All other directories: /mnt/tivo/converted (I don't use these yet) - The Programs tab in the configuration dialog should automatically be filled in with the paths to whatever tools are installed.
- On the Web tab, set the Web server cache dir to somewhere in the attached storage. I'm using /mnt/tivo/webcache.
- On the pyTivo tab, set the path to the pytivo.conf file to /home/tivo/pytivo/pytivo-master/pytivo.conf.
- Press OK to dismiss the configuration dialog, and you should be ready to play. If kmttg isn't detecting your Tivo, play around with the Tivos tab of the configuration dialog. If necessary, manually add a name and IP address for the Tivo.
Attachments
Last edited: