There are many best practices guides for managing storage solutions out there, but a lot of how you administer your storage depends on your specific use case and what you’re trying to accomplish. While we have created a best practices for FreeNAS, we also decided to take a look at what you don’t want to do; things that will leave you hurting either immediately or down the road.
In that spirit, we’ve put together a worst practices guide for FreeNAS based on years of experience with systems in the field. The easiest way to avoid these pitfalls is to simply purchase a TrueNAS system from the experts at iXsystems, who can help set up your systems for optimal performance and functionality. For those who prefer the DIY approach, here are some things to look out for when setting up and managing your own FreeNAS system.
Using Hardware RAID with ZFS
When setting up a RAID array, common knowledge says that hardware RAID is preferable to software RAID. This is something of a misconception as all RAID is software RAID. If you’re using a hardware RAID controller, it has its own independent operating system that communicates with your disks and often has caches to improve read and write performance. This was a good idea in the distant past, and improved RAID performance substantially, but operating systems and the hardware they run on have come a long way since those days.
FreeNAS uses the ZFS file system and is designed to communicate directly with your disks using its own volume manager. ZFS includes a sophisticated yet efficient strategy for providing various levels of data redundancy, including the mirroring of disk and the “ZFS” equivalents of hardware RAID 5 and higher with the ability of losing up to three disks in an array. If a given set of disks is provided to ZFS using a hardware RAID card, ZFS will not be able to efficiently balance its reads and writes between them or rebuild only the data used by any given disk. Hardware RAID cards typically rebuild disks in a linear manner from beginning to end without any regard for their actual contents.
The “one big disk” that hardware RAID cards provide limits some of ZFS’s advantages, and the read and write caches found on many hardware RAID cards are how risk gets introduced. ZFS works carefully to guarantee that every write it receives from the operating systems is on disk and checksummed before reporting success. This strategy relies on each disk reporting that data has been successfully written, but if the data is written to a hardware cache on the RAID card, ZFS is constantly misinformed of write success. This can work fine for some time but in the case of a power outage, catastrophic damage can be done to the ZFS “pool” if key metadata was lost in transit. Such failures have been known to carry five-figure price tags for data recovery services. Unlike hardware RAID, you will not suffer from data loss that can occur from interrupted writes or corrupt data returned from a hardware cache with ZFS.
Finally, most hardware RAID cards will mask the S.M.A.R.T. disk health status information that each disk provides. Very simply, each disk is connected to the hardware RAID controller card and the disks become invisible to the standard S.M.A.R.T. monitoring utility “smartctl”. Without access to this information, the user is left unaware of classic warning signs of impending disk failure, like reallocated sector count or unusually high temperature. Even the time it takes to run smartctl can be indicative of an impending problem.
While some hardware RAID cards may have a “pass-through” or “JBOD” mode that simply presents each disk to ZFS, the combination of the potential masking of S.M.A.R.T. information, high controller cost, and anecdotal evidence that any RAID mode is about 5% slower than non-RAID “target” mode results in zero reasons for using a hardware RAID card with ZFS.
Long story short, using hardware RAID on FreeNAS can lead to anything from corrupted writes to fatal errors that require you to invest in costly data recovery services.
Setting up Deduplication without Adequate Planning
Deduplication is a much-desired feature for storage solutions. On any given system, more than half your data may be duplicates of data elsewhere in your storage pool, causing a greater storage consumption. Deduplication reduces capacity requirements significantly and improves performance by tracking duplicate data with a ‘deduplication table’, eliminating the need to write and store duplicate information. ZFS stores this table on disk, which means that, if the host has to refer to the on-disk tables regularly, performance will be substantially reduced because of the slower speeds of standard spinning disks.
This means you need to plan to fit your entire deduplication table in memory to avoid major performance and, potentially, data loss. This generally isn’t a problem when first setting up deduplication, but as the table grow over time, you may unexpectedly find its size exceeds memory. This splits the deduplication table between memory and hard disk, turning every write into multiple reads & writes, slowing your performance down to a crawl. In an enterprise environment, this can cause significant productivity decreases and angry staff workers. If this happens, the best solution is to add more system memory so that the pool will be able to import back to memory. Unfortunately, this can sometime take days to perform, and, if your hardware already has maxed out its memory capabilities, would require migrating the disks to a whole new system to access the data.
The general rule of thumb here is to have 5 GB of memory for every 1TB of deduplicated data. That said, there may be instances where more is required, but you will need to plan to meet the maximum potential memory requirements to avoid problems down the road. To get a more precise estimate of the required memory for deduplication do the following: run the ‘zdb -b (pool name)’ command for the desired pool to get an idea of the number of blocks required, then multiply the ‘bp count’ by 320 bytes to get your required memory. If it’s less than 5GB, still use the 5GB per terabyte of storage rule. If it’s higher, go with that number per terabyte.
For must use cases, it is recommended to just utilize lz4 compression for data consumption savings, as there’s no real processing cost. In fact, due to of the advances in CPU speeds, compression actually improves disk performance because writing uncompressed data to disk takes longer than compressed data. To be safe, always use compression instead of deduplication unless you know exactly what you are doing.
Striping Without Redundancy
ZFS offers all the typical forms of RAID redundancy and more, including ZFS striping (RAID 0), ZFS mirroring (RAID 1), RAID 10, and RAID-Z levels that allow for 1, 2 or 3 disk failures without affecting your storage pool. ZFS striping can speed up your performance by spreading out writes across multiple disks and combining all your disks into one large pool. This can seem appealing to the new user because of its maximum speed and capacity, but if any of your disks has a failure, your entire pool will be lost. While, with secondary storage or non-critical data, this may not prove to be a catastrophic loss, losing your storage pool is always a big deal and it’s always recommended to configure your storage pool with some level of redundancy.
Using a SLOG for asynchronous write scenarios
The ZFS filesystem can tier cached data to help achieve sizable performance increases over spinning disks. Users can set up flash-based L2ARC read cache and SLOG (Separate ZFS Intent Log, sometimes called a ZIL) ‘write cache’ devices. While an L2ARC read cache will speed up reads in most use cases, the SLOG only speeds up synchronous writes.
The ZIL caches writes to guarantee their completion in the case of a power failure or system crash. The ZIL normally exists as part of the ZFS pool, but with a SLOG, it resides on a separate, dedicated device. This speeds up performance by batching data together for synchronous writes for more efficiency. These performance gains help with database operations, NFS operations such as virtualization where the operating system explicitly requests synchronous writes. If you aren’t using something that is known to use synchronous writes like NFS or databases, chances are your SLOG will not help performance. A potential solution here is to set your pool to “sync=always”. This ensures that every write goes to the write cache, improving write performance.
Too Many Snapshots.
Snapshots give users the ability to rollback to previous system states to retrieve lost files or go back to a configuration that worked properly, while only saving the file system’s blocks that have changed since the last snapshot. This results in near instant snapshot tasks. Snapshot tasks can be set for regular intervals and stay stored as long as desired.
While ZFS generally boasts that you can save unlimited snapshots, there are some practical limits to this. Some users may decide to have periodic updates every few minutes for multiple datasets and make their lifetime indefinite. Taking one snapshot every five minutes will require over 100,000 snapshots each year, creating some substantial performance loss. If you have thousands of snapshots, this means you will have thousands of blocks accumulating. Depending on the capacity of the disk, this can cause slowdowns when you list snapshots, possibly across the entire ZFS pool.
Upgrading your FreeNAS version with a full boot device
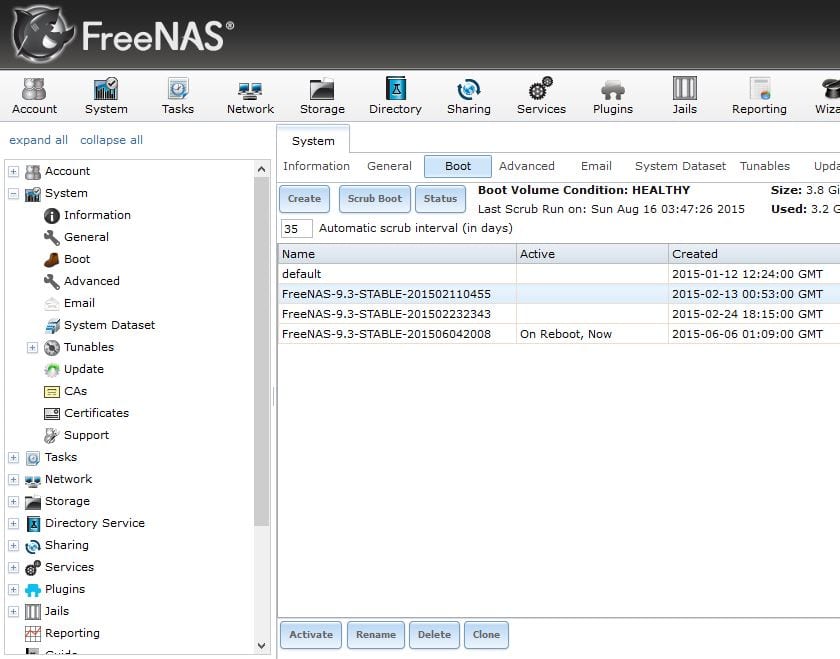
FreeNAS makes upgrading to the latest version, switching between nightly and release versions and rolling back to earlier versions very easy by storing snapshots of the OS on your boot device. However, if you fill your boot device beyond its capacity, updating your OS version may result in the upgrade process mysteriously failing. Fortunately, FreeNAS will give you an alert when your boot device exceeds 80% capacity, so you should know when your boot drive is getting full and deleting version snapshots is easy to do.
Just go into your System>>Boot tab and select the image you would like to delete and click on the delete button on the bottom of the page.
Rebuilding your ZFS array incorrectly
FreeNAS gives users the ability to set up ZFS arrays and resilver disks in the case of a drive failure. If you remove the wrong disk and try to rebuild, you can end up losing your entire pool. It is important to remember that the physical arrangement of the drives on your hardware may not correspond to your device numbers (ada0, ada1, ada2, etc). To counter this, we recommend writing down the serial numbers for each disk along with which slot they’re in, as the GUI will give you associated serial numbers in the case of a drive failure.
In addition, if you try to rebuild a ZFS array with a disk that is too small, your rebuild will fail. This can happen if you use a smaller capacity drive, say a 2TB instead of a 3TB, but it can also happen between different drives of the same listed capacity. Different drive manufacturers may create each drive with a slightly different total capacity, making the effective capacity of your replacement drive slightly higher or lower than the disk you replaced. If the capacity is slightly higher, your rebuild will succeed, but if it is slightly lower, it will not.
If a failure occurs on drives with the same listed capacities, there is a workaround available from the FreeNAS web user interface. Just access your system>>advanced menu and temporarily change your Swap Size to 0 before rebuilding. Once your rebuild is complete, make sure to change it back though (usually the default of 2GiB). The extra 2GiB should accommodate any small difference in drive capacity but do try to use identical drives whenever possible.

Other Issues to Watch For
There are a couple of common issues with Active Directory that can cause problems. The first is if the system clock is out of sync. Make sure you’re using a time server as AD/CIFS is very time sensitive. Second, having the domain name entered incorrectly can cause your Active Directory to have big problems. Ideally, your domain should have a reverse DNS entry, which you can determine easily enough:
https://www.google.com/search?q=dns+reverse+lookup&ie=utf-8&oe=utf-8#q=reverse+dns
Also, whenever possible, try not to mix sharing services on the same dataset. Differences in permissions between Unix (NFS) and Windows (CIFS) sharing formats can create some conflicts, so try and avoid this when you can. If you need users from multiple operating systems to have access to the same datasets, CIFS/SMB is your best choice. If you need to have multiple sharing protocols, you will want to separate your datasets between NFS & CIFS/SMB.
Finally, filling your storage pool over 80% of capacity will cause degraded performance. Try to plan your storage pool size to accommodate for this.
Conclusion
When deploying any server or storage system, setting up your system properly can help prevent headaches and even catastrophes down the road. As they say, an ounce of prevention is worth a pound of cure. While there are many aspects to setting up any given use case, this guide should avoid most of the major pitfalls people run into while setting up their FreeNAS storage. And if you’re looking for even greater assurance, visit www.ixsystems.com/truenas, call us at 1-855-GREP-4-IX or email us at sales@ixsystems.com, for information on our qualified, professionally supported TrueNAS appliances. We look forward to hearing from you!