Copyright iXsystems 2011-2020
TrueNAS® and the TrueNAS® logo are registered trademarks of iXsystems.
Welcome to the TrueNAS® User Guide.
TrueNAS® and the TrueNAS® logo are registered trademarks of iXsystems.
Active Directory® is a registered trademark or trademark of Microsoft Corporation in the United States and/or other countries.
Apple, Mac and Mac OS are trademarks of Apple Inc., registered in the U.S. and other countries.
Asigra Inc. Asigra, the Asigra logo, Asigra Cloud Backup, Recovery is Everything, Recovery Tracker and Attack-Loop are trademarks of Asigra Inc.
Chelsio® is a registered trademark of Chelsio Communications.
Cisco® is a registered trademark or trademark of Cisco Systems, Inc. and/or its affiliates in the United States and certain other countries.
FreeBSD® and the FreeBSD® logo are registered trademarks of the FreeBSD Foundation®.
Linux® is a registered trademark of Linus Torvalds.
Oracle is a registered trademark of Oracle Corporation and/or its affiliates.
UNIX® is a registered trademark of The Open Group.
VMware® is a registered trademark of VMware, Inc.
Wikipedia® is a registered trademark of the Wikimedia Foundation, Inc., a non-profit organization.
Windows® is a registered trademark of Microsoft Corporation in the United States and other countries.
Typographic Conventions
The TrueNAS® Administrator Guide uses these typographic conventions:
| Item | Visual Example |
|---|---|
| Graphical elements: buttons, icons, fields, columns, and boxes | Click the Import CA button. |
| Menu selections | Select . |
| Commands | Use the scp command. |
| File names and pool and dataset names | Locate the /etc/rc.conf file. |
| Keyboard keys | Press the Enter key. |
| Important points | This is important. |
| Values entered into fields, or device names | Enter 127.0.0.1 in the address field. |
| Icon | Usage |
|---|---|
| ADD | Add a new item. |
| (Settings) | Show a settings menu. |
| (Options) | Show an Options menu. |
| (Browse) | Shows an expandable view of system directories. |
| ⏻ (Power) | Show a power options menu. |
| (Show) | Reveal characters in a password field. |
| (Hide) | Hide characters in a password field. |
| (Configure) | Edit settings. |
| 襁 (Launch) | Launch a service. |
| ▶ (Start) | Start jails. |
| (Stop) | Stop jails. |
| 🕓 (Update) | Update jails. |
| (Delete) | Delete jails. |
| (Encryption Options) | Encryption options for a pool. |
| (Pin) | Pin a help box to the screen. |
| (Close) | Close a help box. |
1. Introduction
This Guide provides information about configuring and managing the TrueNAS® Unified Storage Array. Your iXsystems support engineer will assist with the initial setup and configuration of the array. After becoming familiar with the configuration workflow, this document can be used as a reference guide to the many features provided by TrueNAS®.
1.1. Contacting iXsystems
For assistance, please contact iX Support:
| Contact Method | Contact Options |
|---|---|
| Web | https://support.ixsystems.com |
support@iXsystems.com |
|
| Telephone | Monday - Friday, 6:00AM to 6:00PM Pacific Standard Time:
|
| Telephone | After Hours (24x7 Gold Level Support only):
|
1.2. Path and Name Lengths
Names of files, directories, and devices are subject to some limits imposed by the FreeBSD operating system. The limits shown here are for names using plain-text characters that each occupy one byte of space. Some UTF-8 characters take more than a single byte of space, and using those characters reduces these limits proportionally. System overhead can also reduce the length of these limits by one or more bytes.
| Type | Maximum Length | Description |
|---|---|---|
| File Paths | 1023 bytes | Total file path length (PATH_MAX). The full path includes directory
separator slash characters, subdirectory names, and the name of the
file itself. For example, the path
Using very long file or directory names can be problematic. If a path with long directory and file names exceeds the 1023-byte limit, it prevents direct access to that file until the directory names or filename are shortened or the file is moved into a directory with a shorter total path length. |
| File and Directory Names | 255 bytes | Individual directory or file name length (NAME_MAX). |
| Mounted Filesystem Paths | 88 bytes | Mounted filesystem path length (MNAMELEN). Longer paths can prevent a device from being mounted. |
| Device Filesystem Paths | 63 bytes | devfs(8) device path lengths (SPECNAMELEN). Longer paths can prevent a device from being created. |
Note
88 bytes is equal to 88 ASCII characters. The number of characters varies when using Unicode.
Warning
If the mounted path length for a snapshot exceeds 88 bytes, the data in the snapshot is safe but inaccessible. When the mounted path length of the snapshot is less than the 88 byte limit, the data will be accessible again.
The 88 byte limit affects automatic and manual snapshot mounts in slightly different ways:
- Automatic mount: ZFS temporarily mounts a snapshot whenever a
user attempts to view or search the files within the snapshot. The
mountpoint used will be in the hidden directory
.zfs/snapshot/namewithin the same ZFS dataset. For example, the snapshotmypool/dataset/snap1@snap2is mounted at/mnt/mypool/dataset/.zfs/snapshot/snap2/. If the length of this path exceeds 88 bytes the snapshot will not be automatically mounted by ZFS and the snapshot contents will not be visible or searchable. This can be resolved by renaming the ZFS pool or dataset containing the snapshot to shorter names (mypoolordataset), or by shortening the second part of the snapshot name (snap2), so that the total mounted path length does not exceed 88 bytes. ZFS will automatically perform any necessary unmount or remount of the file system as part of the rename operation. After renaming, the snapshot data will be visible and searchable again. - Manual mount: The same example snapshot is mounted manually
from the Shell with mount -t zfs
mypool/dataset/snap1@snap2 /mnt/mymountpoint. The path
/mnt/mountpoint/must not exceed 88 bytes, and the length of the snapshot name is irrelevant. When renaming a manual mountpoint, any object mounted on the mountpoint must be manually unmounted with the umount command before renaming the mountpoint. It can be remounted afterwards.
Note
A snapshot that cannot be mounted automatically by ZFS can still be mounted manually from the Shell with a shorter mountpoint path. This makes it possible to mount and access snapshots that cannot be accessed automatically in other ways, such as from the web interface or from features such as “File History” or “Versions”.
1.3. Using the Web Interface
1.3.1. Tables and Columns
Tables show a subset of all available columns. Additional columns can be shown or hidden with the COLUMNS button. Set a checkmark by the fields to be shown in the table. Column settings are remembered from session to session.
The original columns can be restored by clicking Reset to Defaults in the column list.
Each row in a table can be expanded to show all the information by clicking the (Expand) button.
1.3.2. Advanced Scheduler
When choosing a schedule for different TrueNAS® Tasks, clicking Custom opens the custom schedule dialog.
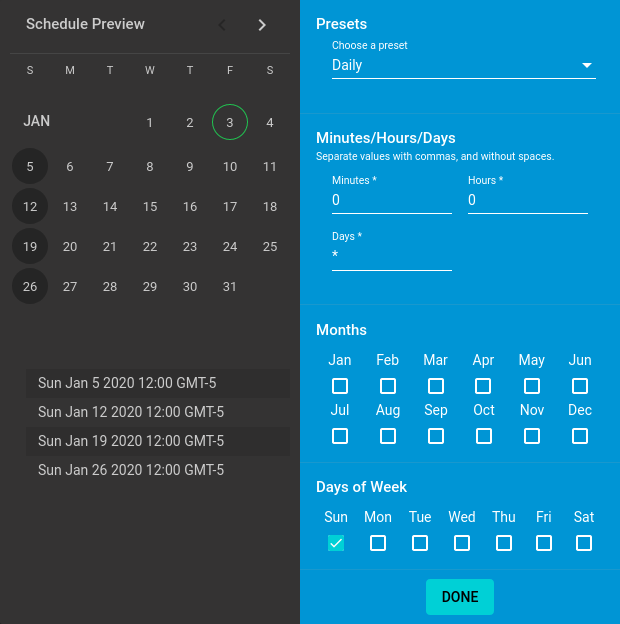
Fig. 1.3.1 Creating a Custom Schedule
Choosing a preset schedule fills in the rest of the fields. To customize a schedule, enter crontab values for the Minutes/Hours/Days.
These fields accept standard cron values. The simplest option
is to enter a single number in the field. The task runs when the time
value matches that number. For example, entering 10 means
that the job runs when the time is ten minutes past the hour.
An asterisk (*) means “match all values”.
Specific time ranges are set by entering hyphenated number values. For
example, entering 30-35 in the Minutes field sets
the task to run at minutes 30, 31, 32, 33, 34, and 35.
Lists of values can also be entered. Enter individual values separated
by a comma (,). For example, entering 1,14 in the
Hours field means the task runs at 1:00 AM (0100) and 2:00
PM (1400).
A slash (/) designates a step value. For example, while
entering * in Days means the task runs every day
of the month, */2 means the task runs every other day.
Combining all these examples together creates a schedule running a task each minute from 1:30-1:35 AM and 2:30-2:35 PM every other day.
There is an option to select which Months the task will run. Leaving each month unset is the same as selecting every month.
The Days of Week schedules the task to run on specific days.
This is in addition to any listed Days. For example,
entering 1 in Days and setting W for
Days of Week creates a schedule that starts a task on the
first day of the month and every Wednesday of the month.
Schedule Preview shows when the current schedule settings will cause the task to run.
1.3.3. Schedule Calendar
The Schedule column has a calendar icon (). Clicking this icon opens a dialog showing scheduled dates and times for the related task to run.
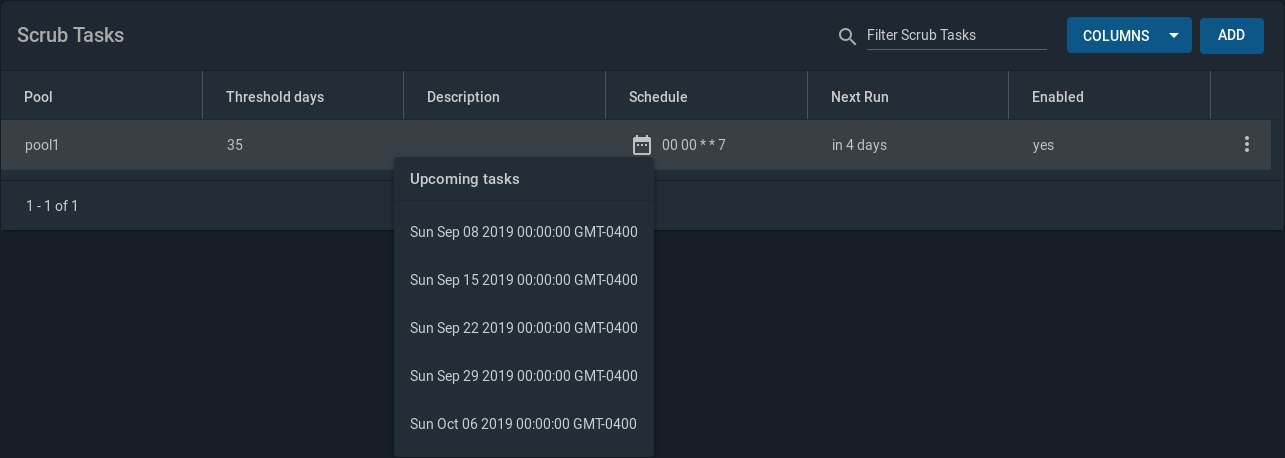
Fig. 1.3.2 Example Schedule Popup
Scrub Tasks can have a number of Threshold days set. The configured scrub task continues to follow the displayed calendar schedule, but it does not run until the configured number of threshold days have elapsed.
1.3.4. Changing TrueNAS® Settings
It is important to use the web interface or the Console Setup menu for all configuration changes. TrueNAS® stores configuration settings in a database. Commands entered at the command line do not modify the settings database. This means that changes made at the command line will be lost after a restart and overwritten by the values in the settings database.
1.3.5. Web Interface Troubleshooting
If the web interface is shown but seems unresponsive or incomplete:
- Make sure the browser allows cookies, Javascript, and custom fonts from the TrueNAS® system.
- Try a different browser. Firefox is recommended.
If a web browser cannot connect to the TrueNAS® system by IP address, DNS hostname, or mDNS name:
- Check or disable proxy settings in the browser.
- Verify the network connection by pinging the TrueNAS® system by IP
address from another computer on the same network. For example, if
the TrueNAS® system is at IP address 192.168.1.19, enter
ping 192.168.1.19on the command line of the other computer. If there is no response, check network configuration.
1.3.6. Help Text
Most fields and settings in the web interface have a (Help Text) icon. Additional information about the field or setting can be shown by clicking (Help Text). The help text window can be dragged to any location, and will remain there until (Close) or (Help Text) is clicked to close the window.
1.3.7. Humanized Fields
Some numeric value fields accept humanized values.
This means that the field accepts numbers or numbers
followed by a unit, like M or MiB for
megabytes or G or GiB for gigabytes.
Entering 1048576 or 1M are equivalent.
Units of KiB, MiB, GiB, TiB, and PiB are available, and
decimal values like 1.5 GiB are supported when
the field allows them. Some fields have minimum or
maximum limits on the values which can restrict the
units available.
1.3.8. File Browser
Certain sections of the web interface have a built in file browser. The file browser is used to traverse through directories and choose datasets on the system. Datasets that have complex ACL permissions are tagged so they can be distinguished from non-ACL datasets.