9. Storage
The Storage section of the web interface allows configuration of these options:
- Swap Space: Change the swap space size.
- Pools: create and manage storage pools.
- Snapshots: manage local snapshots.
- VMware-Snapshots: coordinate OpenZFS snapshots with a VMware datastore.
- Disks: view and manage disk options.
- Importing a Disk: import a single disk that is formatted with the UFS, NTFS, MSDOS, or EXT2 filesystem.
- Multipaths: View multipath information for systems with compatible hardware.
9.1. Swap Space
Swap is space on a disk set aside to be used as memory. When the FreeNAS® system runs low on memory, less-used data can be “swapped” onto the disk, freeing up main memory.
For reliability, FreeNAS® creates swap space as mirrors of swap partitions on pairs of individual disks. For example, if the system has three hard disks, a swap mirror is created from the swap partitions on two of the drives. The third drive is not used, because it does not have redundancy. On a system with four drives, two swap mirrors are created.
Swap space is allocated when drives are partitioned before being added to a vdev. A 2 GiB partition for swap space is created on each data drive by default. The size of space to allocate can be changed in in the Swap size in Gib field. Changing the value does not affect the amount of swap on existing disks, only disks added after the change. This does not affect log or cache devices, which are created without swap. Swap can be disabled by entering 0, but that is strongly discouraged.
9.2. Pools
is used to create and manage ZFS pools, datasets, and zvols.
Proper storage design is important for any NAS. Please read through this entire chapter before configuring storage disks. Features are described to help make it clear which are beneficial for particular uses, and caveats or hardware restrictions which limit usefulness.
9.2.1. Creating Pools
Before creating a pool, determine the level of required redundancy, how many disks will be added, and if any data exists on those disks. Creating a pool overwrites disk data, so save any required data to different media before adding disks to a pool.
Navigate to and click ADD to open the screen shown in Figure 9.2.1.
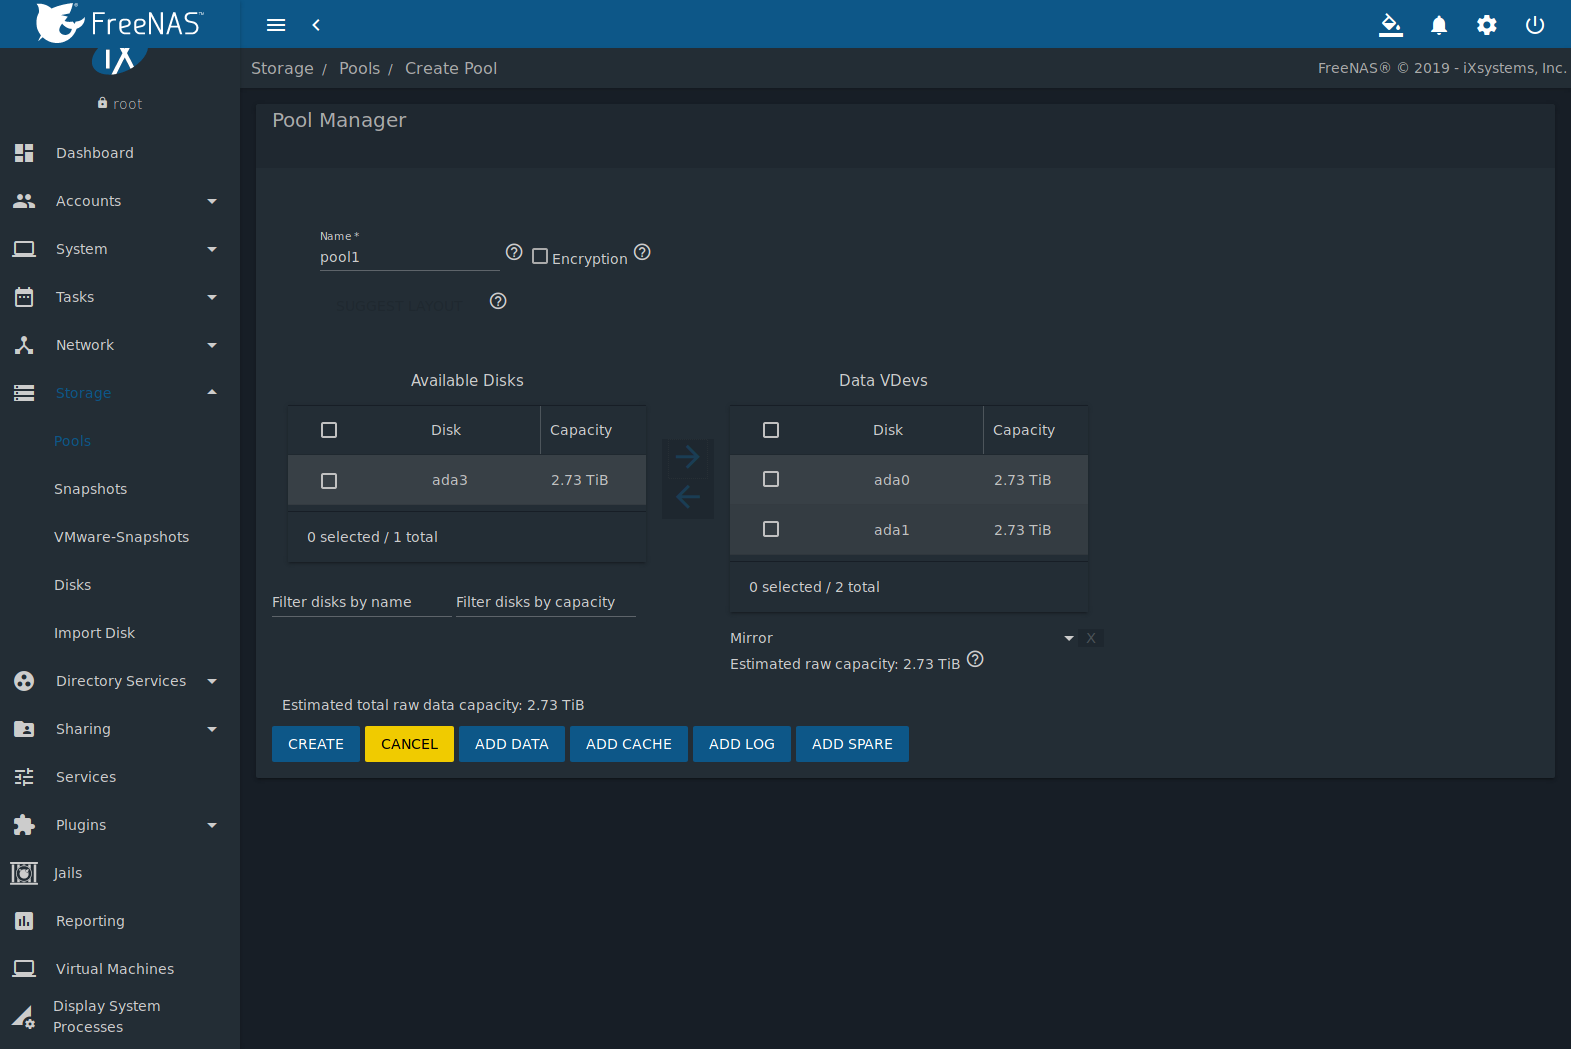
Fig. 9.2.1 Creating a Pool
Select Create new pool and click CREATE POOL to continue.
Enter a name for the pool in the Name field. Ensure that the chosen name conforms to these naming conventions. Choosing a name that will stick out in the logs is recommended, rather than generic names like “data” or “freenas”.
To encrypt data on the underlying disks as a protection against physical
theft, set the Encryption option. A pop-up message shows a
reminder to Always back up the key!. The data on the disks is
inaccessible without the key. Select Confirm then click
I UNDERSTAND.
Warning
Refer to the warnings in Managing Encrypted Pools before enabling encryption!
From the Available Disks section, select disks to add to the
pool. Enter a value in Filter disks by name or
Filter disks by capacity to change the displayed disk order.
These fields support
PCRE regular expressions
for filtering. For example, to show only da and nvd disks in
Available Disks, type ^(da)|(nvd) in
Filter disks by name.
After selecting disks, click the right arrow to add them to the Data VDevs section. The usable space of each disk in a pool is limited to the size of the smallest disk in the vdev. Because of this, creating pools with the same size disks is recommended.
Any disks that appear in Data VDevs are used to create the pool. To remove a disk from that section, select the disk and click the left arrow to return it to the Available Disks section.
To add multiple Data VDevs, click Add Data for each required additional vdev.
Alternately, click the SUGGEST LAYOUT button which will add all of the disks and suggest an optimal layout for both redundancy and capacity.
The pool layout is dependent upon the number of disks added to Data VDevs and the number of available layouts increases as disks are added. To view the available layouts, ensure that at least one disk appears in Data VDevs and select the drop-down menu under this section. The web interface will automatically update the Estimated total raw data capacity when a layout is selected. These layouts are supported:
- Stripe: requires at least one disk
- Mirror: requires at least two disks
- RAIDZ1: requires at least three disks
- RAIDZ2: requires at least four disks
- RAIDZ3: requires at least five disks
Warning
Refer to the ZFS Primer for more information on redundancy and disk layouts. When more than five disks are used, consideration must be given to the optimal layout for the best performance and scalability.It is important to realize that different layouts of virtual devices (vdevs) affect which operations can be performed on that pool later. For example, drives can be added to a mirror to increase redundancy, but that is not possible with RAIDZ arrays.
After the desired layout is configured, click CREATE. A pop-up warning serves as a reminder that all disk contents will be erased. Click Confirm, then CREATE POOL to create the pool.
Note
To instead preserve existing data, click the CANCEL button and refer to Importing a Disk and Importing a Pool to see if the existing format is supported. If so, perform that action instead. If the current storage format is not supported, it is necessary to back up the data to external media, create the pool, then restore the data to the new pool.
Depending on the size and number of disks, the type of controller, and whether encryption is selected, creating the pool may take some time. If the Encryption option was selected, a popup message provides a link to Download Recovery Key. Click the link and save the key to a safe location. When finished, click DONE.
Figure 9.2.2 shows the new pool1.
Click the down arrow to see more details about the pool. This second entry has the same name and represents the implicit or root dataset. The Used and Available entries show the amount of space used and available. Also shown are the type of compression, the compression ratio, whether it is mounted as read-only, whether deduplication has been enabled, the mountpoint path, and any comments entered for the pool.
There is an option to Upgrade Pool. This upgrades the pool to the latest ZFS Feature Flags. See the warnings in Upgrading a ZFS Pool before selecting this option. This button does not appear when the pool is running the latest version of the feature flags.
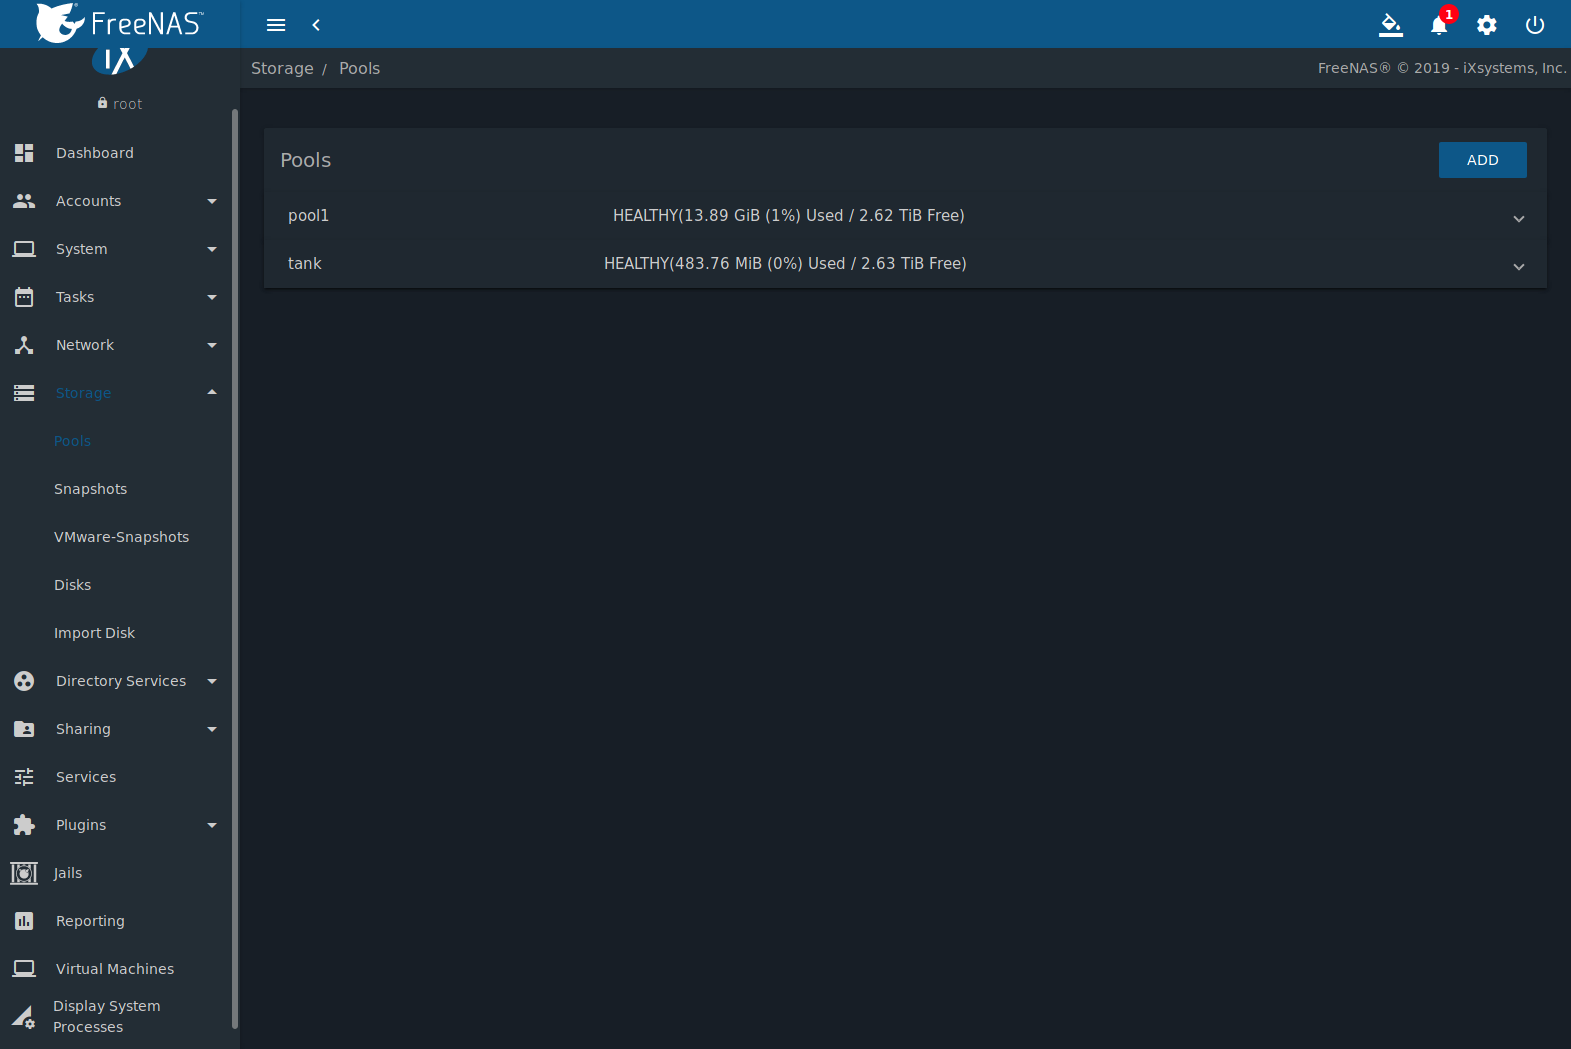
Fig. 9.2.2 Viewing Pools
Creating a pool adds a card to the . Available space, disk details, and pool status is shown on the card. The background color of the card indicates the pool status:
- Green: healthy or locked
- Yellow: unknown, offline, or degraded
- Red: faulted or removed
9.2.2. Managing Encrypted Pools
Note
FreeNAS® uses GELI full disk encryption for ZFS pools. This type of encryption is primarily intended to protect against the risks of data being read or copied when the system is powered down, when the pool is locked, or when disks are physically stolen.
Because data cannot be read without the key, encrypted disks containing sensitive data can be safely removed, reused, or discarded without secure wiping or physical destruction of the media.
This encryption method is not designed to protect against unauthorized access when the pool is already unlocked. Before sensitive data is stored on the system, ensure that only authorized users have access to the web interface and that permissions with appropriate restrictions are set on shares.
Understanding the details of FreeNAS® encryption is required to be able to use it effectively:
FreeNAS® encryption differs from the encryption used in Oracle’s proprietary version of ZFS. To convert between these formats, both pools must be unlocked, and the data copied between them.
FreeNAS® encrypts disks and pools, not individual filesystems. The partition table on each disk is not encrypted, but only identifies the location of partitions on the disk. On an encrypted pool, the data in each partition is encrypted. These are generally called “encrypted drives”, even though the partition table is not encrypted. To use the drive firmware to completely encrypt the drive, see Self-Encrypting Drives.
Encrypted pools which do not have a passphrase are unlocked at startup. Pools with a passphrase remain locked until the user enters the passphrase to unlock them.
Encrypted pools can be locked on demand by the user. They are automatically locked when the system is shut down.
This type of encryption is primarily useful for users wanting the ability to remove disks from the pool without having to first wipe the disks of any sensitive data.
When discarding disks that still contain encrypted sensitive data, the encryption key must also be destroyed or securely deleted. If the encryption key is not destroyed, it must be stored securely and kept physically separate from the discarded disks. If the encryption key is present on or with the discarded disks, or can be obtained by the same person who gains access to the disks, the data will be vulnerable to decryption.
Protect the key with a strong passphrase and store all key backups securely. If the encryption key is lost, the data on the disks is inaccessible. Always back up the key!
Each pool has a separate encryption key. Technical details about how encryption key use, storage, and management are described in this forum post.
Data in memory, including ARC, is not encrypted. ZFS data on disk, including ZIL and SLOG, are encrypted if the underlying disks are encrypted. Swap data on disk is always encrypted.
All drives in an encrypted pool are encrypted, including L2ARC (read cache) and SLOG (write cache). Drives added to an existing encrypted pool are encrypted with the same method specified when the pool was created. Data in memory, including ARC, is not encrypted.
At present, there is no one-step way to encrypt an existing pool. The data must be copied to an existing or new encrypted pool. After that, the original pool and any unencrypted backup should be destroyed to prevent unauthorized access and any disks that contained unencrypted data should be wiped.
Hybrid pools are not supported. Added vdevs must match the existing encryption scheme. Extending a Pool automatically encrypts a new vdev being added to an existing encrypted pool.
Encryption performance depends upon the number of disks encrypted. The more drives in an encrypted pool, the more encryption and decryption overhead, and the greater the impact on performance. Encrypted pools composed of more than eight drives can suffer severe performance penalties. If encryption is desired, please benchmark such pools before using them in production.
Note
Processors with support for the AES-NI instruction set are strongly recommended. These processors can handle encryption of a small number of disks with negligible performance impact. They also retain performance better as the number of disks increases. Older processors without the AES-NI instructions see significant performance impact with even a single encrypted disk. This forum post compares the performance of various processors.
FreeNAS® generates and stores a randomized encryption key whenever a new encrypted pool is created. This key is required to read and decrypt any data on the pool.
Encryption keys can also be downloaded as a safety measure, to allow decryption on a different system in the event of failure, or to allow the locally stored key to be deleted for extra security. Encryption keys can be optionally protected with a passphrase for additional security. The combination of encryption key location and whether a passphrase is used provide several different security scenarios:
- Key stored locally, no passphrase: the encrypted pool is decrypted and accessible when the system running. Protects “data at rest” only.
- Key stored locally, with passphrase: the encrypted pool is not accessible until the passphrase is entered by the FreeNAS® administrator.
- Key not stored locally: the encrypted pool is not accessible until the FreeNAS® administrator provides the key. If a passphrase is set on the key, it must also be entered before the encrypted pool can be accessed (two factor authentication).
Encrypted data cannot be accessed when the disks are removed or the system has been shut down. On a running system, encrypted data cannot be accessed when the pool is locked and the key is not available. If the key is protected with a passphrase, both the key and passphrase are required for decryption.
Encryption applies to a pool, not individual users. When a pool is unlocked, data is accessible to all users with permissions to access it.
Note
GELI uses two randomized encryption keys for each disk. The first has been discussed here. The second, the disk “master key”, is encrypted and stored in the on-disk GELI metadata. Loss of a disk master key due to disk corruption is equivalent to any other disk failure, and in a redundant pool, other disks will contain accessible copies of the uncorrupted data. While it is possible to separately back up disk master keys, it is usually not necessary or useful.
To manage the passphrase and keys on an encrypted pool, select the pool name in , click (Encryption Options), and select one of these operations:
Lock: Only appears after a passphrase has been created. When a pool is locked, the data is not accessible until the pool is unlocked by supplying the passphrase. For this reason, selecting this action prompts to confirm. When the pool is locked, the status changes to LOCKED (Locked Used / Locked Free). Pool Operations are limited to Export/Disconnect, and (Encryption Options) changes to (Unlock).
Unlock the pool by clicking the (Unlock) icon and entering the passphrase or use the Browse button to load the recovery key. Only the passphrase is used when both a passphrase and a recovery key are entered. The services listed in Restart Services will restart when the pool is unlocked. This allows them to see the new pool and share or access data on it. Individual services can be prevented from restarting by clicking the Restart Services drop-down and unselecting them. However, a service that is not restarted might not be able to access the unlocked pool.
Create Passphrase: set and confirm a passphrase associated with the GELI encryption key.
Unlike a password, a passphrase can contain spaces and is typically a series of words. A good passphrase is easy to remember (like the line to a song or piece of literature) but hard to guess (people you know should not be able to guess the passphrase). Remember this passphrase. An encrypted pool cannot be reimported without it. In other words, if the passphrase is forgotten, the data on the pool can become inaccessible if it becomes necessary to reimport the pool. Protect this passphrase, as anyone who knows it could reimport the encrypted pool, thwarting the reason for encrypting the disks in the first place.
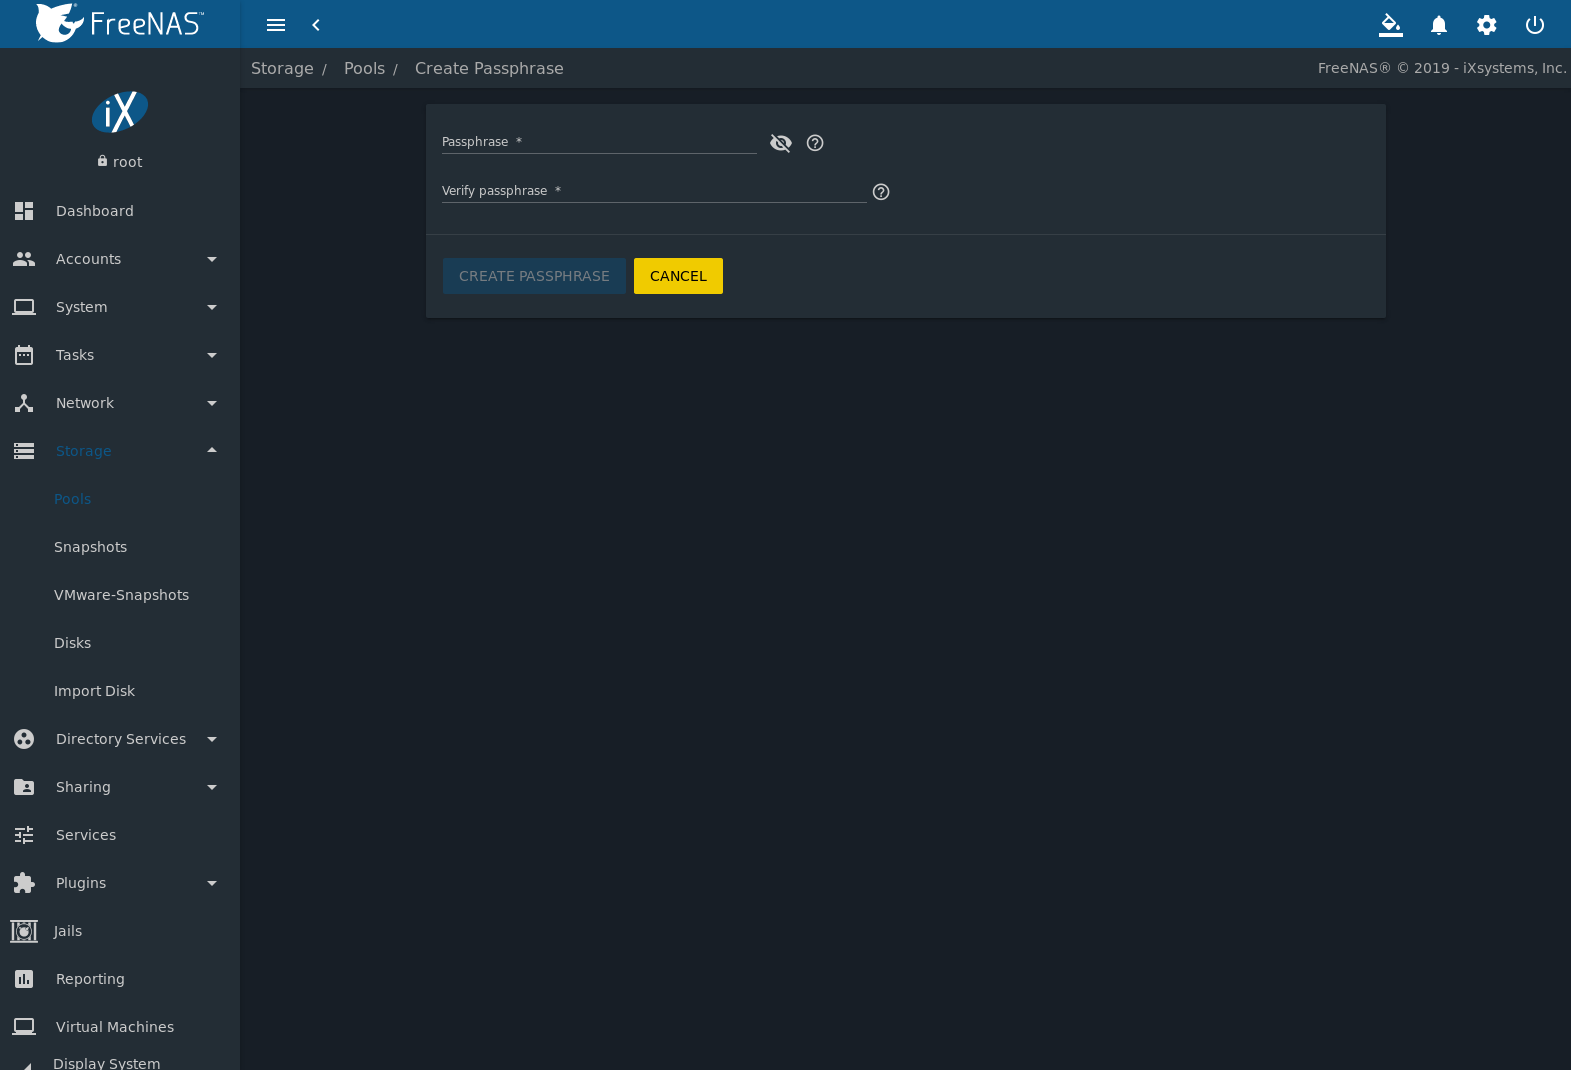
Fig. 9.2.3 Add a Passphrase to an Encrypted Pool
After the passphrase is set, the name of this button changes to Change Passphrase and the Root Password is also required to change the passphrase. After setting or changing the passphrase, it is important to immediately create a new recovery key by clicking the Add Recovery Key button. This way, if the passphrase is forgotten, the associated recovery key can be used instead.
Add Recovery Key: generate a new recovery key. This screen prompts for the FreeNAS® administrative password and then the directory in which to save the key. Note that the recovery key is saved to the client system, not on the FreeNAS® system. This recovery key can be used if the passphrase is forgotten. Always immediately add a recovery key whenever the passphrase is changed.
Delete Recovery Key: Typically this is only performed when the administrator suspects that the current recovery key may be compromised. Immediately create a new passphrase and recovery key.
Note
Protect the passphrase, recovery key, and encryption key. Do not reveal the passphrase to others. On the system containing the downloaded keys, take care that the system and its backups are protected. Anyone who has the keys has the ability to re-import the disks if they are discarded or stolen.
Warning
If a re-key fails on a multi-disk system, an alert is generated. Do not ignore this alert as doing so may result in the loss of data.
Encryption Rekey: generate a new GELI encryption key. Typically this is only performed when the administrator suspects that the current key may be compromised. This action also removes the current passphrase.
Download Encrypt Key: download a backup copy of the GELI encryption key. The encryption key is saved to the client system, not on the FreeNAS® system. The FreeNAS® administrative password must be entered, then the directory in which to store the key is chosen. Since the GELI encryption key is separate from the FreeNAS® configuration database, it is highly recommended to make a backup of the key. If the key is ever lost or destroyed and there is no backup key, the data on the disks is inaccessible.
9.2.3. Adding Cache or Log Devices
Pools can be used either during or after pool creation to add an SSD as a cache or log device to improve performance of the pool under specific use cases. Before adding a cache or log device, refer to the ZFS Primer to determine if the system will benefit or suffer from the addition of the device.
To add a Cache or Log device during pool creation, click the Add Cache or Add Log button. Select the disk from Available Disks and use the right arrow next to Cache VDev or Log VDev to add it to that section.
To add a device to an existing pool in , click the pool name, (Settings), then Extend. Click Confirm and CONTINUE to bypass the warning message. This will reopen the pool creation screen described in the previous paragraph, but with the pool name displayed as read-only.
9.2.4. Removing Cache or Log Devices
Cache or log devices can be removed by going to . Choose the desired pool and click (Settings) . Choose the log or cache device to remove, then click (Options) .
9.2.5. Adding Spare Devices
ZFS provides the ability to have “hot” spares. These are drives that are connected to a pool, but not in use. If the pool experiences the failure of a data drive, the system uses the hot spare as a temporary replacement. If the failed drive is replaced with a new drive, the hot spare drive is no longer needed and reverts to being a hot spare. If the failed drive is instead removed from the pool, the spare is promoted to a full member of the pool.
Hot spares can be added to a pool during or after creation. On FreeNAS®, hot spare actions are implemented by zfsd(8).
To add a spare during pool creation, click the Add Spare. button. Select the disk from Available Disks and use the right arrow next to Spare VDev to add it to the section.
To add a device to an existing pool, click the pool name, (Settings) icon, then Extend. Click Confirm and CONTINUE to bypass the warning message. This will reopen the pool creation screen described in the previous paragraph, but with the pool name displayed as read-only.
Danger
When adding a spare disk to an encrypted pool the passphrase and recovery key are reset. Click Download Recovery Key after adding the spare device. Then, create a new passphrase by clicking (Encryption Options) . Since creating a new passphrase invalidates the recovery key, click (Encryption Options) to add a new one.
9.2.6. Extending a Pool
To increase the capacity of an existing pool, click the pool name, (Settings), then Extend. A popup warning displays a reminder to stripe vdevs of the same size and type. Click Confirm and CONTINUE to continue.
Note
If the existing pool is encrypted, an additional warning message shows a reminder that extending a pool resets the passphrase and recovery key. After extending the pool, another popup message will provide a link to Download Recovery Key. Click the link and save the key to a safe location. When finished, click DONE.
When adding disks to increase the capacity of a pool, ZFS supports the addition of virtual devices, or vdevs, to an existing ZFS pool. A vdev can be a single disk, a stripe, a mirror, a RAIDZ1, RAIDZ2, or a RAIDZ3. After a vdev is created, more drives cannot be added to that vdev. However, a new vdev can be striped with another of the same type of existing vdev to increase the overall size of the pool. Extending a pool often involves striping similar vdevs. Here are some examples:
- to extend a ZFS stripe, add one or more disks. Since there is no redundancy, disks do not have to be added in the same quantity as the existing stripe.
- to extend a ZFS mirror, add the same number of drives. The resulting striped mirror is a RAID 10. For example, if ten new drives are available, a mirror of two drives could be created initially, then extended by creating another mirror of two drives, and repeating three more times until all ten drives have been added.
- to extend a three drive RAIDZ1, add three additional drives. The result is a RAIDZ+0, similar to RAID 50 on a hardware controller.
- to extend a RAIDZ2 requires a minimum of four additional drives. The result is a RAIDZ2+0, similar to RAID 60 on a hardware controller.
Warning
Make sure to select the same number of disks and disk layout when extending the pool!
9.2.7. Export/Disconnect a Pool
To export or destroy an existing pool, click the pool name, (Settings), then Export/Disconnect. Keep or erase the contents of the pool by setting the options shown in Figure 9.2.4.
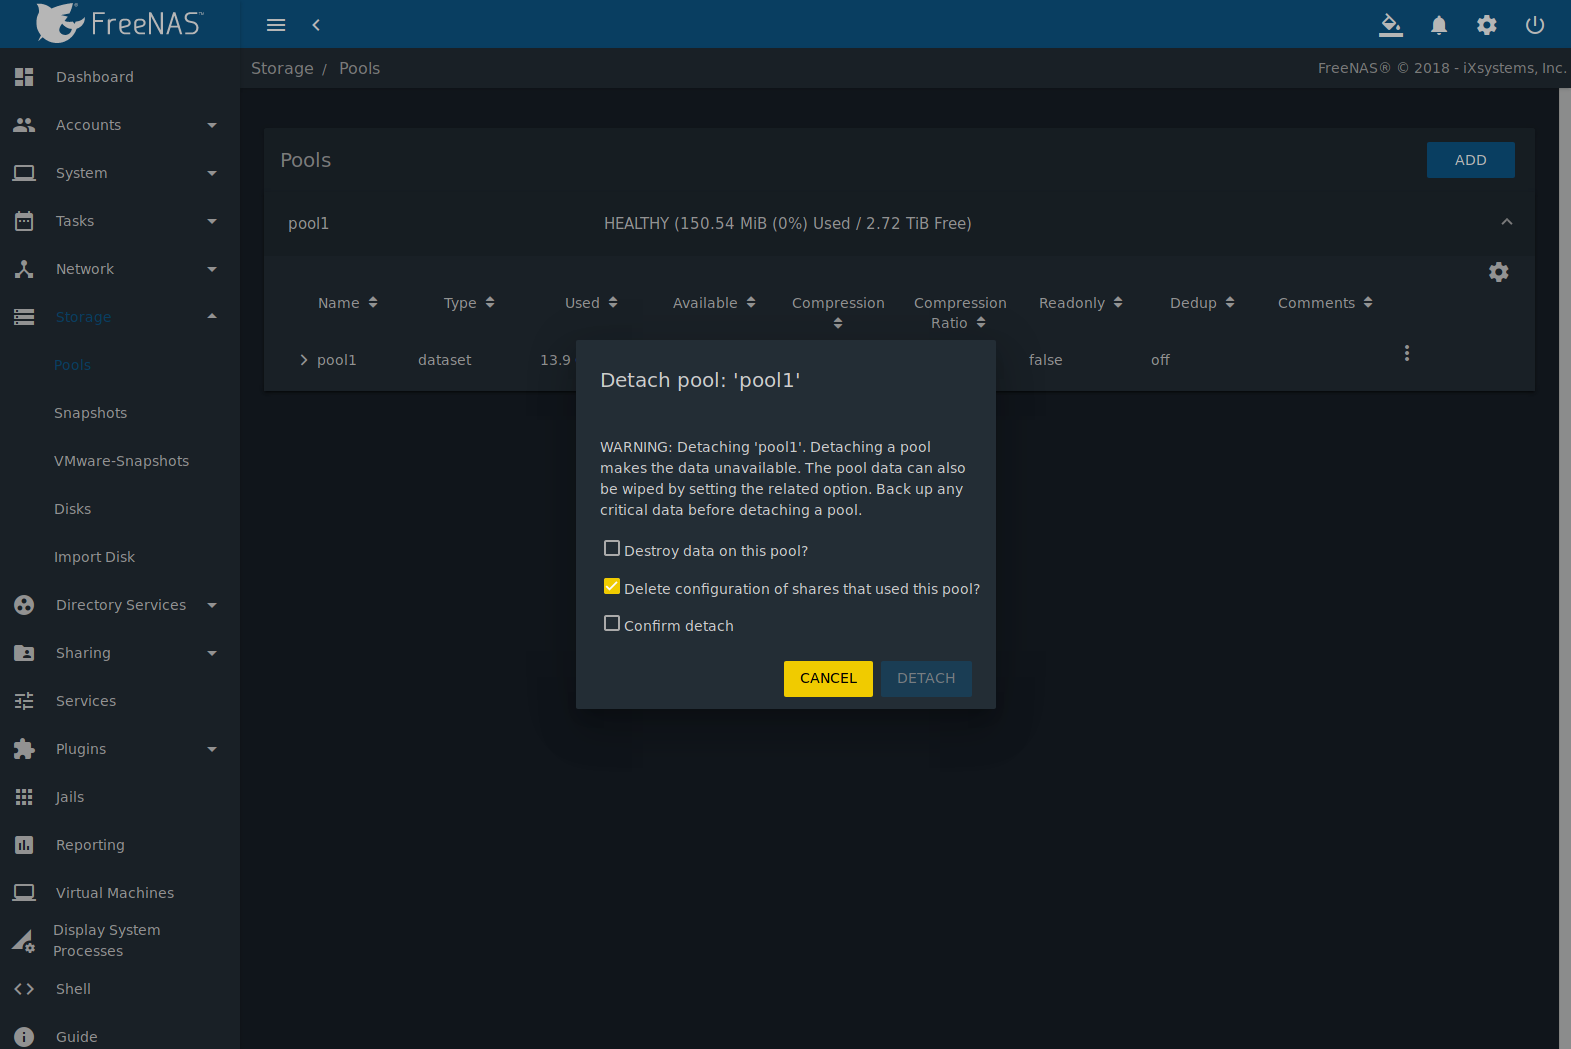
Fig. 9.2.4 Export/Disconnect a Pool
Warning
Do not export/disconnect an encrypted pool if the passphrase has not been set! An encrypted pool cannot be reimported without a passphrase! When in doubt, use the instructions in Managing Encrypted Pools to set a passphrase.
The Export/Disconnect Pool screen provides the options Destroy data on this pool?, Confirm export/disconnect, and Delete configuration of shares that used this pool?. An encrypted pool also displays a button to DOWNLOAD KEY for that pool.
| Setting | Description |
|---|---|
| Destroy data on this pool? | Leave unset to keep existing data stored on the pool. |
| Delete configuration of shares that used this pool? | Leave unset to save the settings of the shares on the pool. |
| Confirm export/disconnect | Confirm the export/disconnect process. |
To export/disconnect the pool and keep the data and configurations of shares, set only Confirm export/disconnect and click EXPORT/DISCONNECT. This makes it possible to re-import the pool at a later time. For example, when moving a pool from one system to another, perform this export/disconnect action first to flush any unwritten data to disk, write data to the disk indicating that the export was done, and remove all knowledge of the pool from this system.
To instead destroy the data and share configurations on the pool, also set the Destroy data on this pool? option. Data on the pool is destroyed, including share configuration, zvols, datasets, and the pool itself. The disk is returned to a raw state.
Danger
Before destroying a pool, ensure that any needed data has been backed up to a different pool or system.
9.2.8. Importing a Pool
A pool that has been exported and disconnected from the system can be reconnected with , then selecting Import an existing pool. This works for pools that were exported/disconnected from the current system, created on another system, or to reconnect a pool after reinstalling the FreeNAS® system.
When physically installing ZFS pool disks from another system, use the
zpool export poolname command or a web interface equivalent to export
the pool on that system. Then shut it down and connect the drives to
the FreeNAS® system. This prevents an “in use by another machine” error
during the import to FreeNAS®.
Existing ZFS pools can be imported by clicking and ADD. Select Import an existing pool, then click NEXT as shown in Figure 9.2.5.
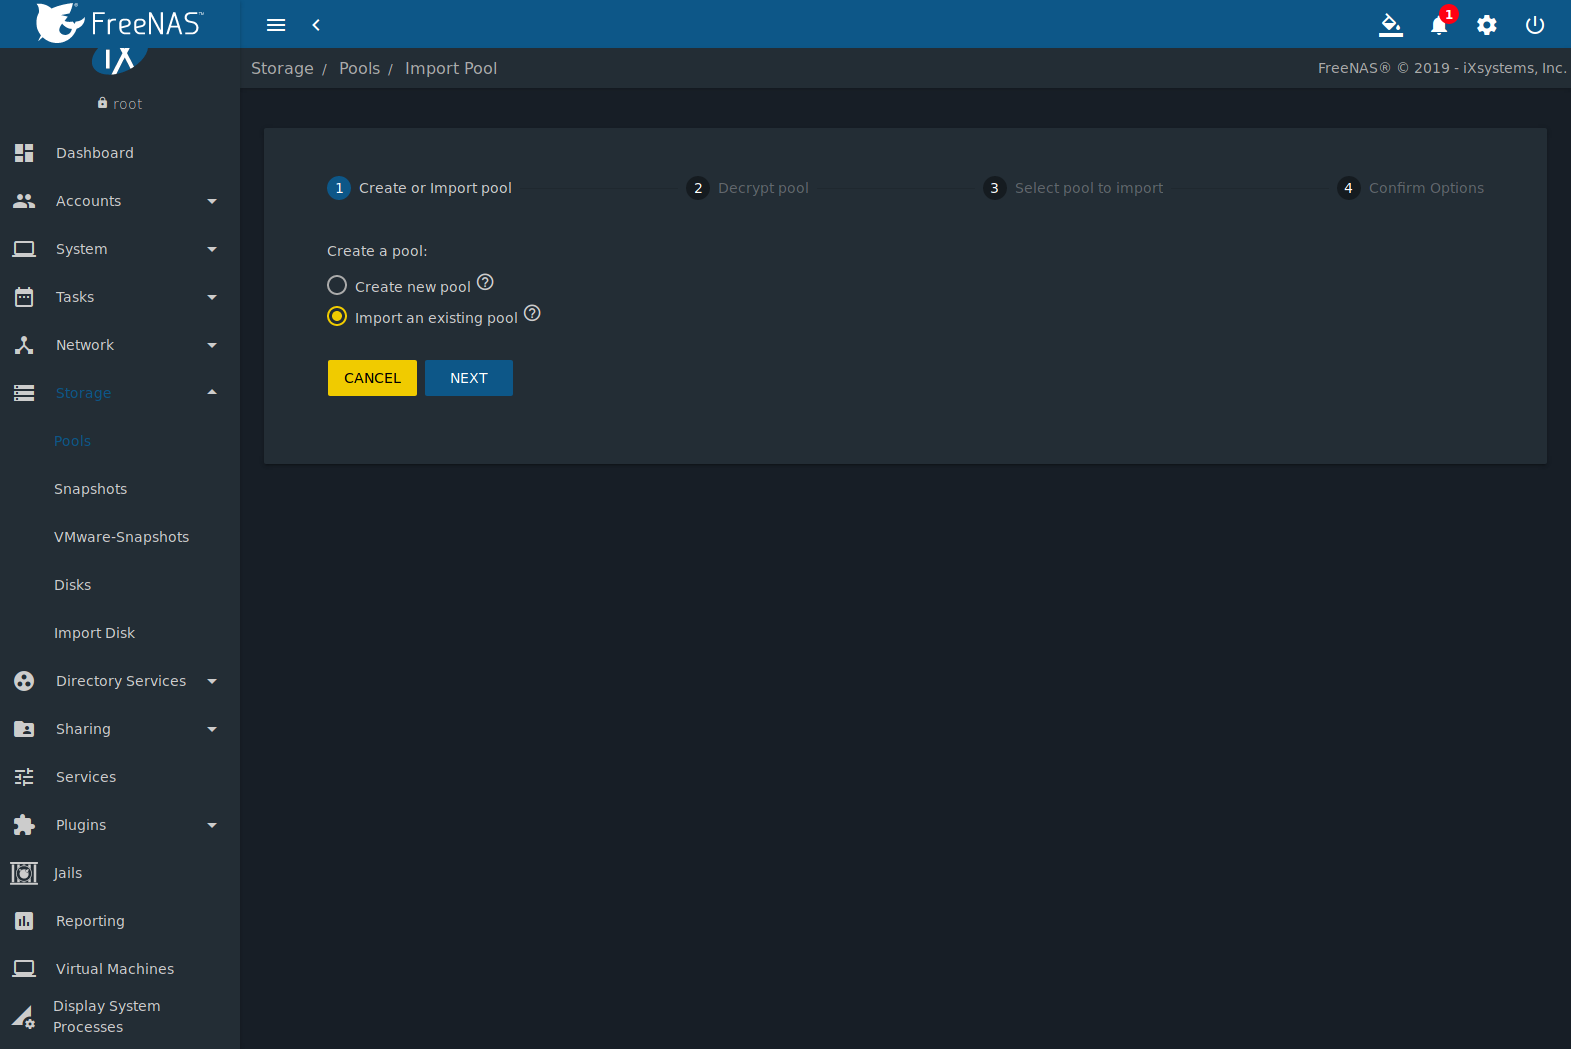
Fig. 9.2.5 Pool Import
To import a pool, click No, continue with import then NEXT as shown in Figure 9.2.6.
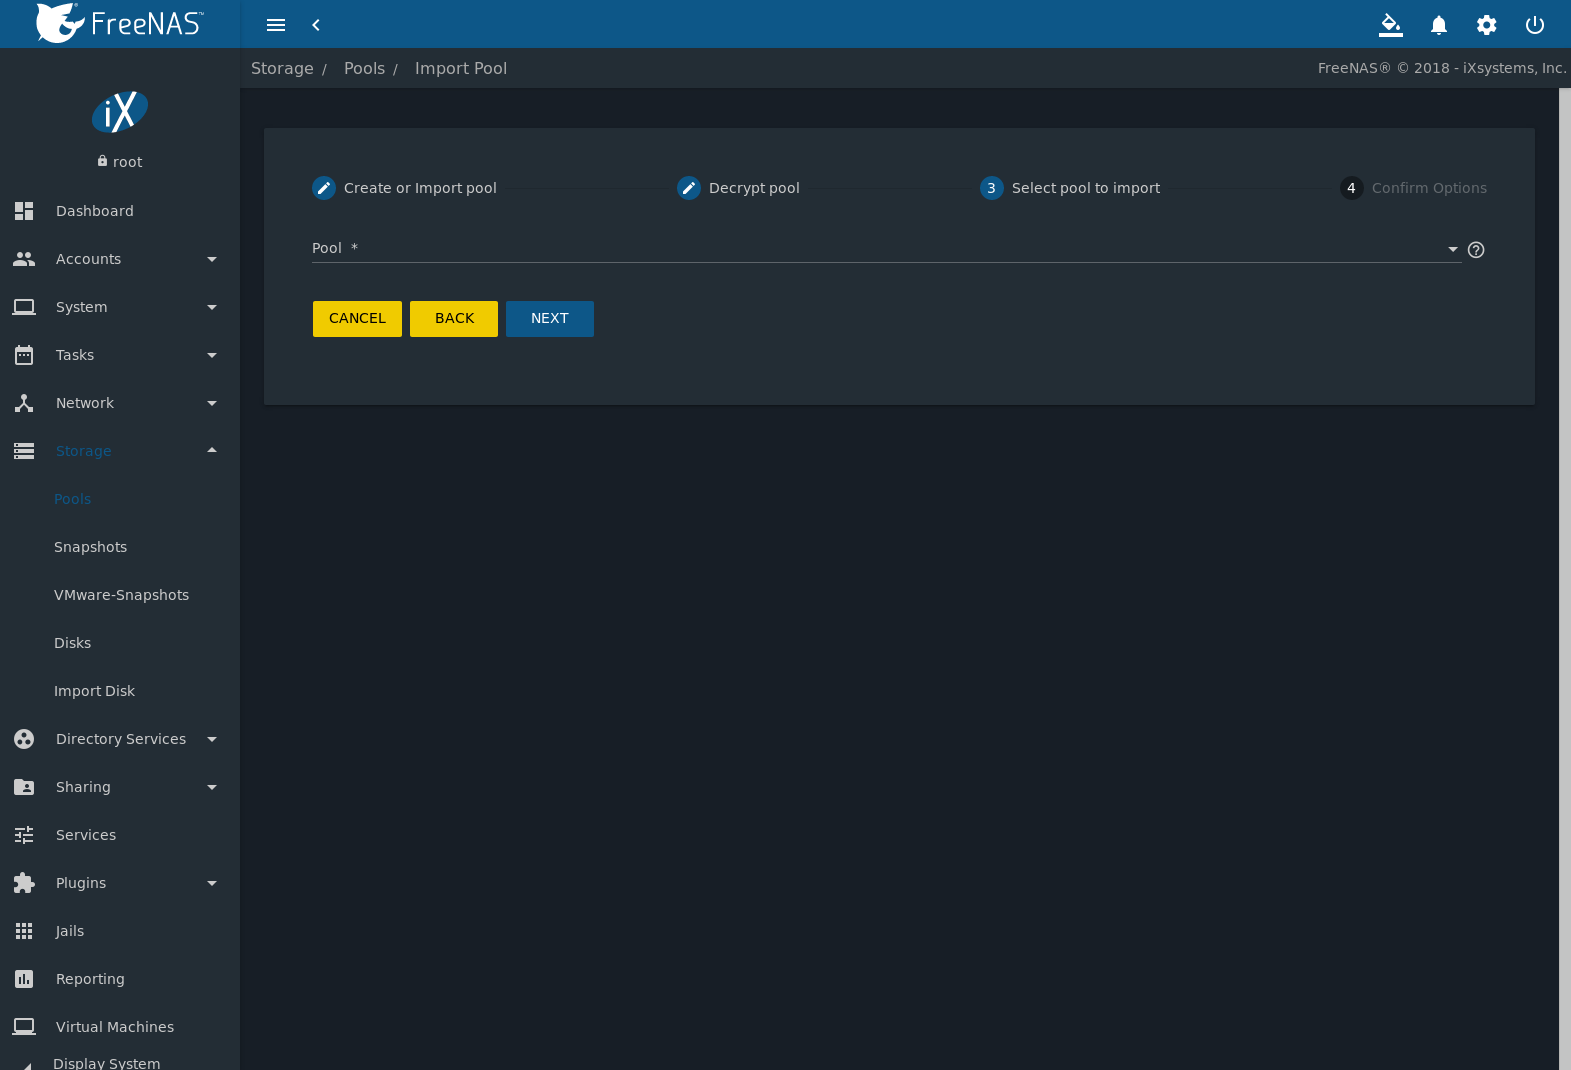
Fig. 9.2.6 Importing a Pool
Select the pool from the Pool * drop-down menu and click NEXT to confirm the options and IMPORT it.
If hardware is not being detected, run camcontrol devlist from Shell. If the disk does not appear in the output, check to see if the controller driver is supported or if it needs to be loaded using Tunables.
Before importing a GELI-encrypted pool, disks must first be decrypted. Click Yes, decrypt the disks. This is shown in Figure 9.2.7.
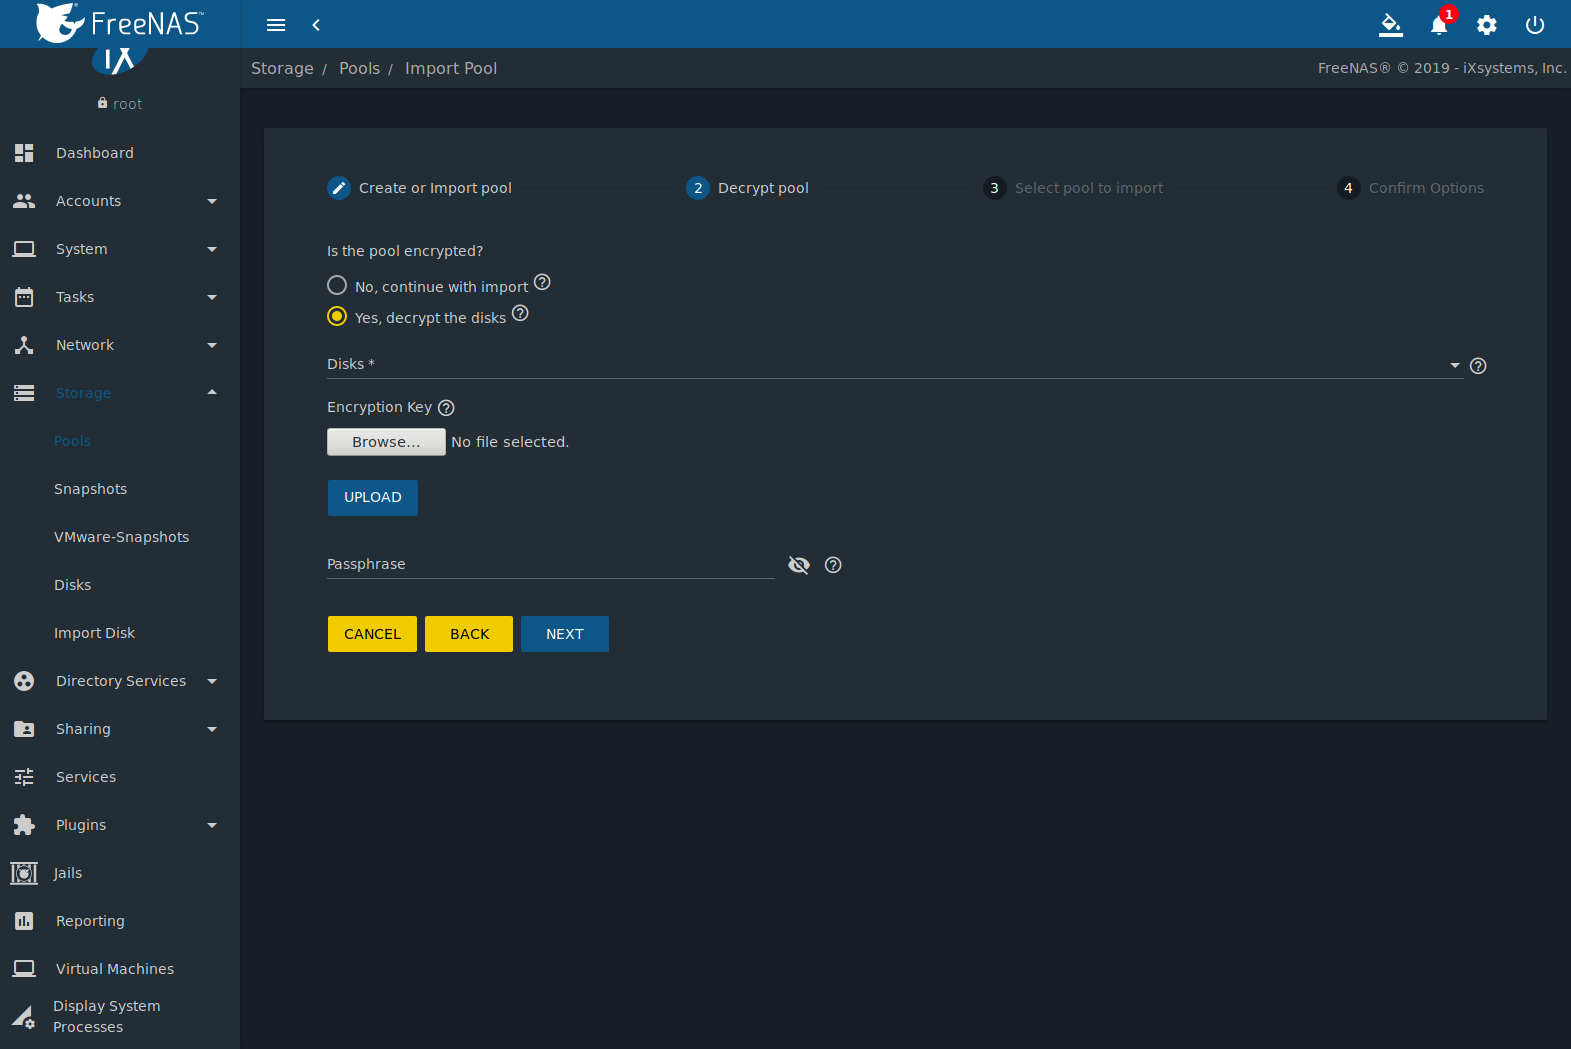
Fig. 9.2.7 Decrypting Disks Before Importing a Pool
Use the Disks dropdown menu to select the disks to decrypt. Click Browse to select an encryption key to upload. Enter the Passphrase associated with the key, then click NEXT to continue importing the pool.
Note
The encryption key is required to decrypt the pool. If the pool cannot be decrypted, it cannot be re-imported after a failed upgrade or lost configuration. This means that it is very important to save a copy of the key and to remember the passphrase that was configured for the key. Refer to Managing Encrypted Pools for instructions on managing keys.
Select the pool to import and confirm the settings. Click IMPORT to finish the process.
Note
For security reasons, GELI keys for encrypted pools are not saved in a configuration backup file. When FreeNAS® has been installed to a new device and a saved configuration file restored to it, the GELI keys for encrypted disks will not be present, and the system will not request them. To correct this, export the encrypted pool with (Configure) , making sure that Destroy data on this pool? is not set. Then import the pool again. During the import, the GELI keys can be entered as described above.
9.2.9. Viewing Pool Scrub Status
Scrubs and how to set their schedule are described in more detail in Scrub Tasks.
To view the scrub status of a pool, click the pool name, (Settings), then Status. The resulting screen will display the status of a running scrub or the statistics from the last completed scrub.
A CANCEL button is provided to cancel a scrub in progress. When a scrub is cancelled, it is abandoned. The next scrub to run starts from the beginning, not where the cancelled scrub left off.
9.2.10. Adding Datasets
An existing pool can be divided into datasets. Permissions, compression, deduplication, and quotas can be set on a per-dataset basis, allowing more granular control over access to storage data. Like a folder or directory, permissions can be set on dataset. Datasets are also similar to filesystems in that properties such as quotas and compression can be set, and snapshots created.
Note
ZFS provides thick provisioning using quotas and thin provisioning using reserved space.
To create a dataset, select an existing pool in , click (Options), then select Add Dataset This will display the screen shown in Figure 9.2.8.

Fig. 9.2.8 Creating a ZFS Dataset
Table 9.2.2 shows the options available when creating a dataset.
Some settings are only available in ADVANCED MODE. To see these settings, either click the ADVANCED MODE button, or configure the system to always display advanced settings by enabling the Show advanced fields by default option in .
| Setting | Value | Advanced Mode | Description |
|---|---|---|---|
| Name | string | This setting is mandatory. Enter a unique name for the dataset. | |
| Comments | string | Enter any additional comments or user notes about this dataset. | |
| Sync | drop-down menu | Sets the data write synchronization. Inherit inherits the sync settings from the parent dataset, Standard uses the sync settings that have been requested by the client software, Always waits for data writes to complete, and Disabled never waits for writes to complete. | |
| Compression Level | drop-down menu | Refer to the section on Compression for a description of the available algorithms. | |
| Share type | drop-down menu | Select the type of share that will be used on the dataset. Choices are UNIX for an NFS share, Windows for a SMB share, or Mac for an AFP share. | |
| Enable atime | Inherit, On, or Off | Choose On to update the access time for files when they are read. Choose Off to prevent producing log traffic when reading files. This can result in significant performance gains. | |
| Quota for this dataset | integer | ✓ | Default of 0 disables quotas. Specifying a value means to use no more than the specified size and is suitable for user datasets to prevent users from hogging available space. |
| Quota for this dataset and all children | integer | ✓ | A specified value applies to both this dataset and any child datasets. |
| Reserved space for this dataset | integer | ✓ | Default of 0 is unlimited. Specifying a value means to keep at least this much space free and is suitable for datasets containing logs which could otherwise take up all available free space. |
| Reserved space for this dataset and all children | integer | ✓ | A specified value applies to both this dataset and any child datasets. |
| ZFS Deduplication | drop-down menu | Read the section on Deduplication before making a change to this setting. | |
| Exec | drop-down menu | ✓ | Choices are Inherit (on), On, or Off. Setting to Off will prevent the installation of Plugins or Jails. |
| Read-only | drop-down menu | ✓ | Choices are Inherit (off), On, or Off. |
| Snapshot directory | drop-down menu | ✓ | Choose if the .zfs snapshot directory is Visible or Invisible on this dataset. |
| Copies | drop-down menu | ✓ | Set the number of data copies on this dataset. |
| Record Size | drop-down menu | ✓ | While ZFS automatically adapts the record size dynamically to adapt to data, if the data has a fixed size (such as database records), matching its size might result in better performance. Warning: choosing a smaller record size than the suggested value can reduce disk performance and space efficiency. |
| Case Sensitivity | drop-down menu | Choices are sensitive (default, assumes filenames are case sensitive), insensitive (assumes filenames are not case sensitive), or mixed (understands both types of filenames). |
After a dataset is created it appears in Click (Options) on an existing dataset to configure these options:
Add Dataset: create a nested dataset, or a dataset within a dataset.
Add Zvol: add a zvol to the dataset. Refer to Adding Zvols for more information about zvols.
Edit Options: edit the pool properties described in Table 9.2.8. Note that the Dataset Name, and Case Sensitivity are read-only as they cannot be edited after dataset creation.
Edit Permissions: refer to Setting Permissions for more information about permissions.
Delete Dataset: clicking this option will popup a warning as a reminder that this irreversible action will also delete all snapshots for the dataset. Set the Confirm option then click DELETE DATASET to destroy the dataset and all of its contents.
Promote Dataset: only appears on clones. When a clone is promoted, the origin filesystem becomes a clone of the clone making it possible to destroy the filesystem that the clone was created from. Otherwise, a clone cannot be deleted while the origin filesystem exists.
Create Snapshot: create a one-time snapshot. To schedule the regular creation of snapshots, instead use Periodic Snapshot Tasks.
9.2.10.1. Deduplication
Deduplication is the process of ZFS transparently reusing a single copy of duplicated data to save space. Depending on the amount of duplicate data, deduplicaton can improve storage capacity, as less data is written and stored. However, deduplication is RAM intensive. A general rule of thumb is 5 GiB of RAM per terabyte of deduplicated storage. In most cases, compression provides storage gains comparable to deduplication with less impact on performance.
In FreeNAS®, deduplication can be enabled during dataset creation. Be forewarned that there is no way to undedup the data within a dataset once deduplication is enabled, as disabling deduplication has NO EFFECT on existing data. The more data written to a deduplicated dataset, the more RAM it requires. When the system starts storing the DDTs (dedup tables) on disk because they no longer fit into RAM, performance craters. Further, importing an unclean pool can require between 3-5 GiB of RAM per terabyte of deduped data, and if the system does not have the needed RAM, it will panic. The only solution is to add more RAM or recreate the pool. Think carefully before enabling dedup! This article provides a good description of the value versus cost considerations for deduplication.
Unless a lot of RAM and a lot of duplicate data is available, do not change the default deduplication setting of “Off”. For performance reasons, consider using compression rather than turning this option on.
If deduplication is changed to On, duplicate data blocks are removed synchronously. The result is that only unique data is stored and common components are shared among files. If deduplication is changed to Verify, ZFS will do a byte-to-byte comparison when two blocks have the same signature to make sure that the block contents are identical. Since hash collisions are extremely rare, Verify is usually not worth the performance hit.
Note
After deduplication is enabled, the only way to disable it
is to use the zfs set dedup=off dataset_name command
from Shell. However, any data that has already been
deduplicated will not be un-deduplicated. Only newly stored data
after the property change will not be deduplicated. The only way to
remove existing deduplicated data is to copy all of the data off of
the dataset, set the property to off, then copy the data back in
again. Alternately, create a new dataset with
ZFS Deduplication left at Off, copy the data to the
new dataset, and destroy the original dataset.
Tip
Deduplication is often considered when using a group of very similar virtual machine images. However, other features of ZFS can provide dedup-like functionality more efficiently. For example, create a dataset for a standard VM, then clone a snapshot of that dataset for other VMs. Only the difference between each created VM and the main dataset are saved, giving the effect of deduplication without the overhead.
9.2.10.2. Compression
When selecting a compression type, balancing performance with the amount of disk space saved by compression is recommended. Compression is transparent to the client and applications as ZFS automatically compresses data as it is written to a compressed dataset or zvol and automatically decompresses that data as it is read. These compression algorithms are supported:
- LZ4: default and recommended compression method as it allows compressed datasets to operate at near real-time speed. This algorithm only compresses files that will benefit from compression.
- GZIP: levels 1, 6, and 9 where gzip fastest (level 1) gives the least compression and gzip maximum (level 9) provides the best compression but is discouraged due to its performance impact.
- ZLE: fast but simple algorithm which eliminates runs of zeroes.
If OFF is selected as the Compression level when creating a dataset or zvol, compression will not be used on that dataset/zvol. This is not recommended as using LZ4 has a negligible performance impact and allows for more storage capacity.
9.2.11. Adding Zvols
A zvol is a feature of ZFS that creates a raw block device over ZFS. The zvol can be used as an iSCSI device extent.
To create a zvol, select an existing ZFS pool or dataset, click (Options), then Add Zvol to open the screen shown in Figure 9.2.9.
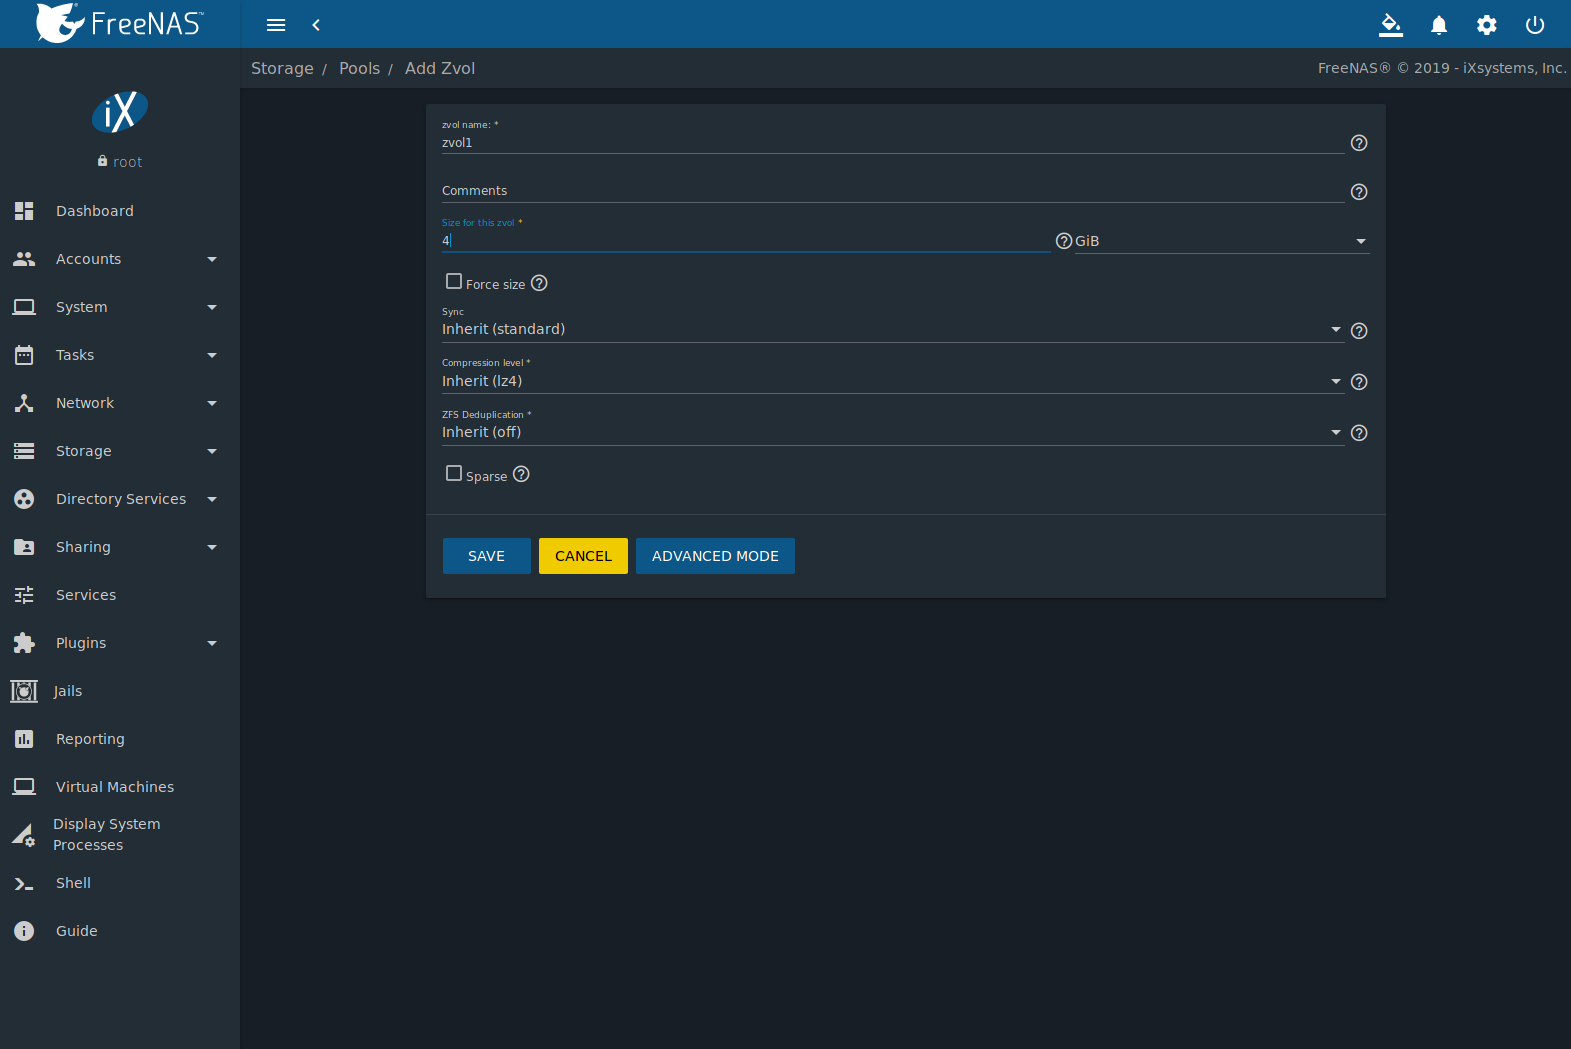
Fig. 9.2.9 Adding a Zvol
The configuration options are described in Table 9.2.3.
| Setting | Value | Advanced Mode | Description |
|---|---|---|---|
| zvol name | string | Enter a short name for the zvol. Using a zvol name longer than 63-characters can prevent accessing zvols as devices. For example, a zvol with a 70-character filename or path cannot be used as an iSCSI extent. This setting is mandatory. | |
| Comments | string | Enter any notes about this zvol. | |
| Size for this zvol | integer | Specify size and value such as 10 Gib. If the size is more than 80% of the available capacity, the creation will fail with an “out of space” error unless Force size is also enabled. | |
| Force size | checkbox | By default, the system will not create a zvol if that operation will bring the pool to over 80% capacity. While NOT recommended, enabling this option will force the creation of the zvol. | |
| Sync | drop-down menu | Sets the data write synchronization. Inherit inherits the sync settings from the parent dataset, Standard uses the sync settings that have been requested by the client software, Always waits for data writes to complete, and Disabled never waits for writes to complete. | |
| Compression level | drop-down menu | Compress data to save space. Refer to Compression for a description of the available algorithms. | |
| ZFS Deduplication | drop-down menu | ZFS feature to transparently reuse a single copy of duplicated data to save space. Warning: this option is RAM intensive. Read the section on Deduplication before making a change to this setting. | |
| Sparse | checkbox | Used to provide thin provisioning. Use with caution as writes will fail when the pool is low on space. | |
| Block size | drop-down menu | ✓ | The default is based on the number of disks in the pool. This can be set to match the block size of the filesystem which will be formatted onto the iSCSI target. Warning: Choosing a smaller record size than the suggested value can reduce disk performance and space efficiency. |
Click (Options) next to the desired zvol in to access the Delete zvol, Edit Zvol, Create Snapshot, and, for an existing zvol snapshot, Promote Dataset options.
Similar to datasets, a zvol name cannot be changed.
Choosing a zvol for deletion shows a warning that all snapshots of that zvol will also be deleted.
9.2.12. Setting Permissions
Setting permissions is an important aspect of managing data access. The web interface is meant to set the initial permissions for a pool or dataset to make it available as a share. Once a share is available, the client operating system is used to fine-tune the permissions of the files and directories that are created by the client.
Sharing contains configuration examples for several types of permission scenarios. This section provides an overview of the options available for configuring the initial set of permissions.
Note
For users and groups to be available, they must either be first created using the instructions in Accounts or imported from a directory service using the instructions in Directory Services. If more than 50 users or groups are available, the drop-down menus described in this section will automatically truncate their display to 50 for performance reasons. In this case, start to type in the desired user or group name so that the display narrows its search to matching results.
To set the permissions on a pool or dataset, select its entry in , click (Options), then Edit Permissions. This displays the screen shown in Figure 9.2.10. Table 9.2.4 lists the options in this screen.

Fig. 9.2.10 Changing Permissions on a Dataset
| Setting | Value | Description |
|---|---|---|
| Path | string | Displays the path to the dataset or zvol directory. |
| ACL Type | bullet selection | Select the type that matches the type of client accessing. Choices are Unix, Windows or Mac. See description below this table. |
| Apply User | checkbox | Deselect to prevent new permission change from being applied to User, as described in the Note below this table. |
| User | drop-down menu | Select the user to control the permissions. Users manually created or imported from a directory service will appear in the drop-down menu. |
| Apply Group | checkbox | Deselect to prevent new permission change from being applied to Group, as described in the Note below this table. |
| Group | drop-down menu | Select the group to own the pool or dataset. Groups manually created or imported from a directory service will appear in the drop-down menu. |
| Apply Mode | checkbox | Unset to prevent new permission change from being applied to Mode, as described in the Note below this table. |
| Mode | checkboxes | Only applies to the Unix or Mac ACL Type so does not appear if Windows is selected. Sets the Unix-style permissions for owner, group, and other. |
| Apply permissions recursively | checkbox | If set, permissions will also apply to subdirectories. If data is already present on the pool or dataset, changing the permissions on the client side is recommended to prevent a performance lag. |
Note
The Apply User, Apply Group, and Apply Mode options allow fine-tuning of the change permissions behavior. By default, all three options are enabled and FreeNAS® resets the User, Group, and Mode when the SAVE button is clicked. These options allow choosing which settings to change. For example, to change just the Group setting, unset the options for Apply User and Apply Mode.
The Windows ACL Type is used for Windows (SMB) Shares or when the FreeNAS® system is a member of an Active Directory domain. This type adds ACLs to traditional Unix permissions. When the Windows ACL Type is selected, ACLs are set to the Windows defaults for new files and directories. A Windows client can be used to further fine-tune permissions as needed.
Warning
Changing a pool or dataset with Windows permissions back to Unix permissions will overwrite and destroy some of the extended permissions provided by Windows ACLs.
The Unix ACL Type is usually used with Unix (NFS) Shares. Unix permissions are compatible with most network clients and generally work well with a mix of operating systems or clients. However, Unix permissions do not support Windows ACLs and should not be used with Windows (SMB) Shares.
The Mac ACL Type can be used with Apple (AFP) Shares.
9.3. Snapshots
Snapshots are scheduled using . To view and manage the listing of created snapshots, use . An example is shown in Figure 9.3.1.
Note
If snapshots do not appear, check that the current time
configured in Periodic Snapshot Tasks does not conflict with
the Begin, End, and Interval
settings. If the snapshot was attempted but failed, an entry is
added to /var/log/messages. This log file can be viewed in
Shell.
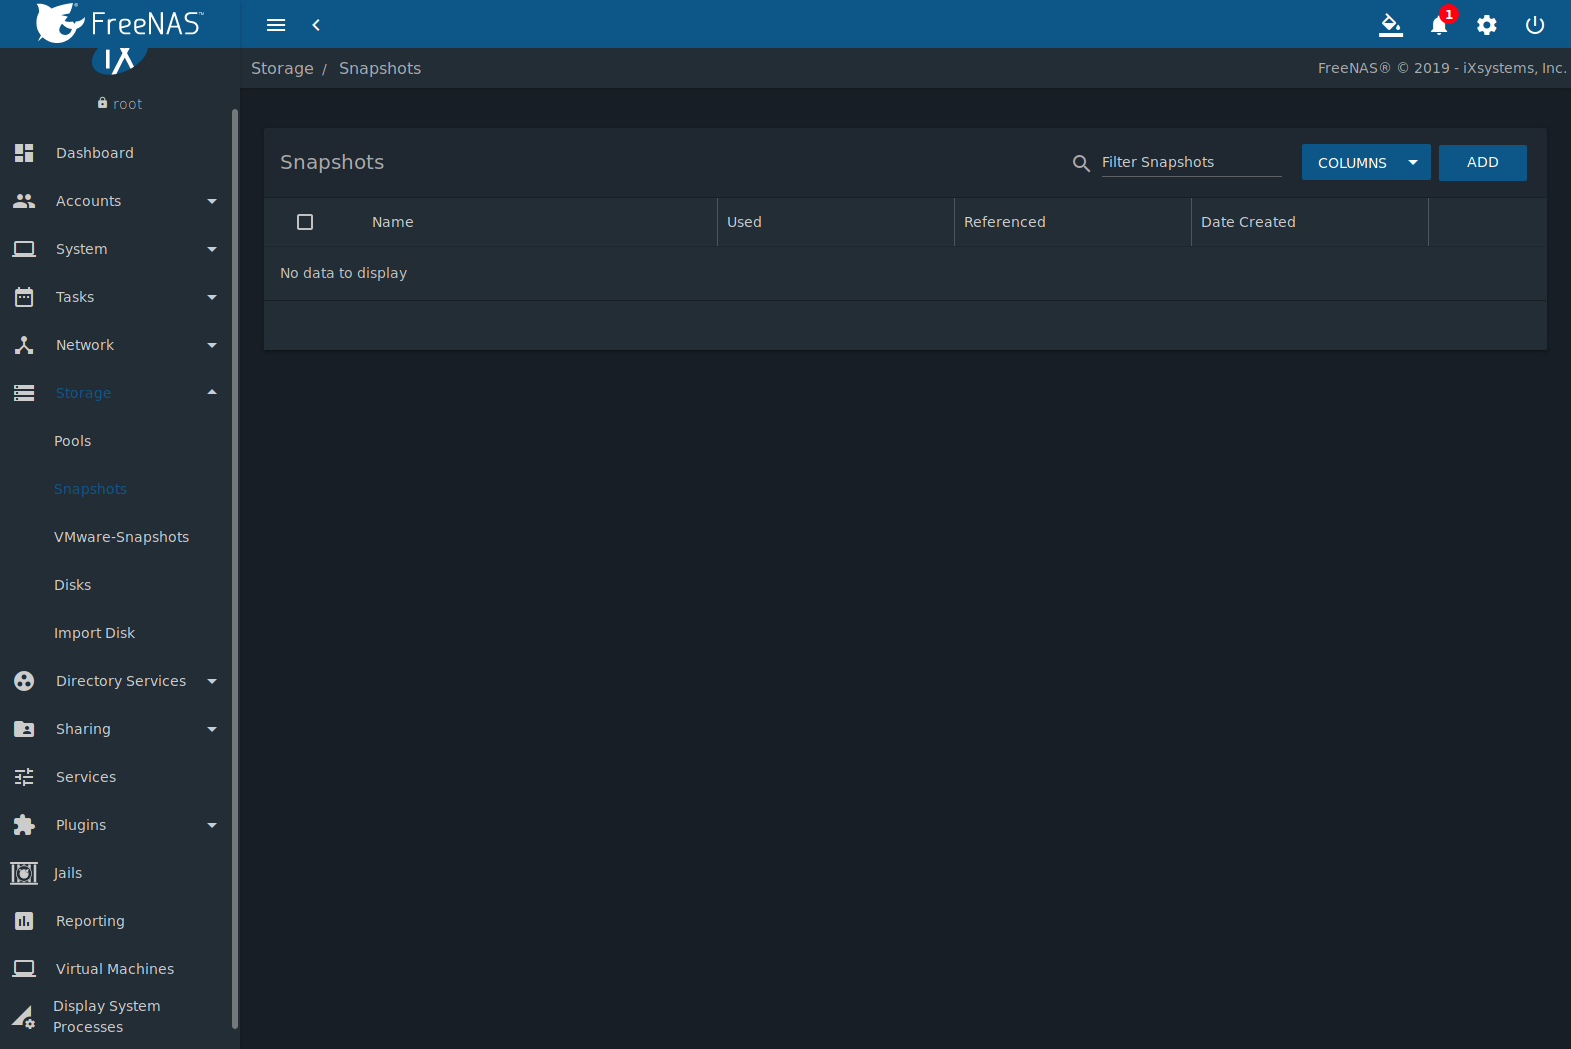
Fig. 9.3.1 Viewing Available Snapshots
Each entry in the listing includes the name of the snapshot, based on the pool/dataset name and time of the snapshot, the amount of used and referenced data, and the snapshot creation date.
Used is the amount of space consumed by this dataset and all of its descendants. This value is checked against the dataset quota and reservation. The space used does not include the dataset reservation, but does take into account the reservations of any descendent datasets. The amount of space that a dataset consumes from its parent, as well as the amount of space freed if this dataset is recursively deleted, is the greater of its space used and its reservation. When a snapshot is created, the space is initially shared between the snapshot and the filesystem, and possibly with previous snapshots. As the filesystem changes, space that was previously shared becomes unique to the snapshot, and is counted in the used space of the snapshot. Deleting a snapshot can increase the amount of space unique to, and used by, other snapshots. The amount of space used, available, or referenced does not take into account pending changes. While pending changes are generally accounted for within a few seconds, disk changes do not necessarily guarantee that the space usage information is updated immediately.
Tip
Space used by individual snapshots can be seen by running
zfs list -t snapshot from Shell.
Referenced indicates the amount of data accessible by this dataset, which may or may not be shared with other datasets in the pool. When a snapshot or clone is created, it initially references the same amount of space as the filesystem or snapshot it was created from, since its contents are identical.
Date Created shows the exact time and date of the snapshot creation.
To manage a snapshot, click (Options) next to its entry. These actions are available from that menu:
Delete a pop-up message asks for confirmation. Child clones must be deleted before their parent snapshot can be deleted. While creating a snapshot is instantaneous, deleting a snapshot can be I/O intensive and can take a long time, especially when deduplication is enabled. In order to delete a block in a snapshot, ZFS has to walk all the allocated blocks to see if that block is used anywhere else; if it is not, it can be freed.
Clone prompts for the name of the clone to create. A default name is provided that is based upon the name of the original snapshot but can be edited. Click the SAVE button to finish cloning the snapshot.
A clone is a writable copy of the snapshot. Since a clone is actually a
dataset which can be mounted, it appears in the Pools screen
rather than the Snapshots screen. By default,
-clone is added to the name of a snapshot when a clone is
created.
Rollback: Clicking (Options) asks for confirmation before rolling back to the chosen snapshot state. Clicking Yes causes all files in the dataset to revert to the state they were in when the snapshot was created.
Note
Rollback is a potentially dangerous operation and causes any configured replication tasks to fail as the replication system uses the existing snapshot when doing an incremental backup. To restore the data within a snapshot, the recommended steps are:
- Clone the desired snapshot.
- Share the clone with the share type or service running on the FreeNAS® system.
- After users have recovered the needed data, delete the clone in the Active Pools tab.
This approach does not destroy any on-disk data and has no impact on replication.
A range of snapshots can be deleted. Set the left column checkboxes for each snapshot and click the Delete icon above the table. Be careful when deleting multiple snapshots.
Periodic snapshots can be configured to appear as shadow copies in newer versions of Windows Explorer, as described in Configuring Shadow Copies. Users can access the files in the shadow copy using Explorer without requiring any interaction with the FreeNAS® web interface.
To quickly search through the snapshots list by name, type a matching criteria into the Filter Snapshots text area. The listing will change to only display the snapshot names that match the filter text.
The Items per page drop-down menu is used to reduce or increase the amount of entries per page. Use the left or right arrows to scroll through a multi-page listing.
Warning
A snapshot and any files it contains will not be accessible or searchable if the mount path of the snapshot is longer than 88 characters. The data within the snapshot will be safe, and the snapshot will become accessible again when the mount path is shortened. For details of this limitation, and how to shorten a long mount path, see Path and Name Lengths.
9.3.1. Browsing a Snapshot Collection
All snapshots for a dataset are accessible as an ordinary hierarchical
filesystem, which can be reached from a hidden .zfs file located
at the root of every dataset. A user with permission to access that file
can view and explore all snapshots for a dataset like any other files -
from the CLI or via services
such as
, and .
This is an advanced capability which requires some command line actions
to achieve. In summary, the main changes to settings that are required
are:
- Snapshot visibility must be manually enabled in the ZFS properties of the dataset.
- In Samba auxillary settings, the veto files command must be
modified to not hide the
.zfsfile, and the setting zfsacl:expose_snapdir=true must be added.
The effect will be that any user who can access the dataset contents
will be able to view the list of snapshots by navigating to the
.zfs directory of the dataset. They will also be able to browse
and search any files they have permission to access throughout the
entire snapshot collection of the dataset.
A user’s ability to view files within a snapshot will be limited by any permissions or ACLs set on the files when the snapshot was taken. Snapshots are fixed as “read-only”, so this access does not permit the user to change any files in the snapshots, or to modify or delete any snapshot, even if they had write permission at the time when the snapshot was taken.
Note
ZFS has a zfs diff command which can list the files that have changed between any two snapshot versions within a dataset, or between any snapshot and the current data.
9.4. VMware-Snapshots
is used to coordinate ZFS snapshots when using FreeNAS® as a VMware datastore. Once this type of snapshot is created, FreeNAS® will automatically snapshot any running VMware virtual machines before taking a scheduled or manual ZFS snapshot of the dataset or zvol backing that VMware datastore. The temporary VMware snapshots are then deleted on the VMware side but still exist in the ZFS snapshot and can be used as stable resurrection points in that snapshot. These coordinated snapshots will be listed in Snapshots.
Figure 9.4.1 shows the menu for adding a VMware snapshot and Table 9.4.1 summarizes the available options.
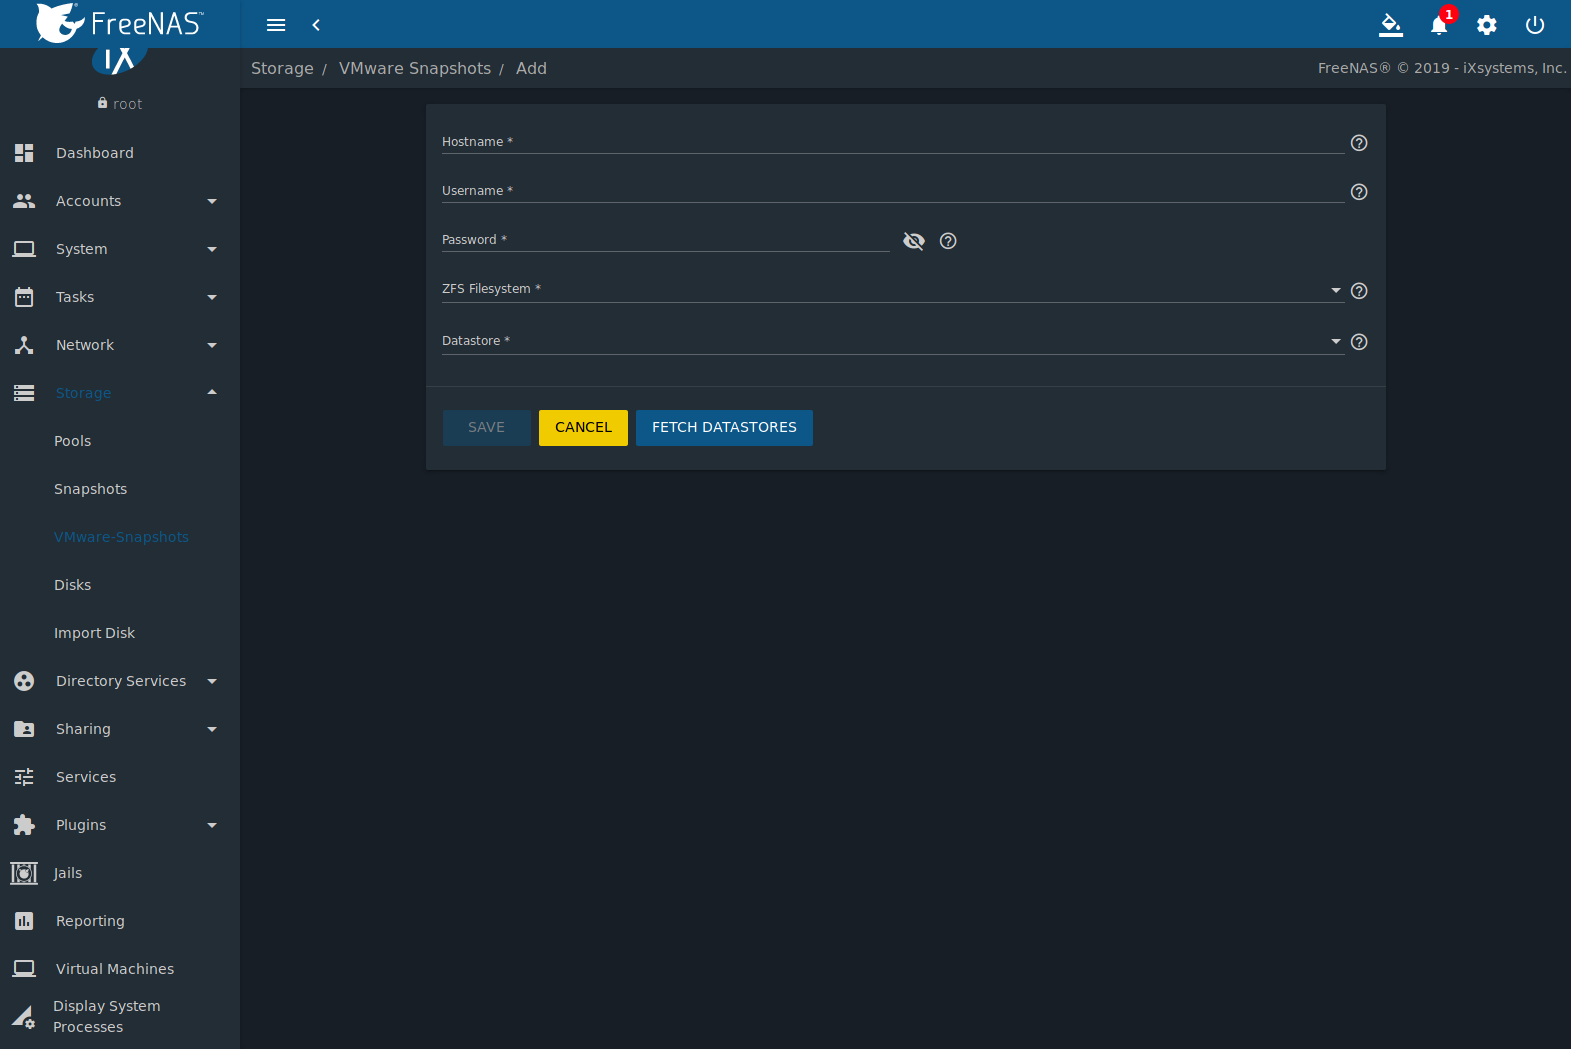
Fig. 9.4.1 Adding a VMware Snapshot
| Setting | Value | Description |
|---|---|---|
| Hostname | string | Enter the IP address or hostname of the VMware host. When clustering, use the IP of the vCenter server for the cluster. |
| Username | string | Enter the username on the VMware host with permission to snapshot virtual machines. |
| Password | string | Enter the password associated with Username. |
| ZFS Filesystem | browse button | Browse to the filesystem to snapshot. |
| Datastore | drop-down menu | After entering the Hostname, Username, and Password, click FETCH DATASTORES to populate the menu, then select the datastore to be synchronized. |
9.5. Disks
To view all of the disks recognized by the FreeNAS® system, use . As seen in the example in Figure 9.5.1, each disk entry displays its device name, serial number, size, advanced power management settings, acoustic level settings, and whether S.M.A.R.T. tests are enabled. Click COLUMNS to adjust the table.
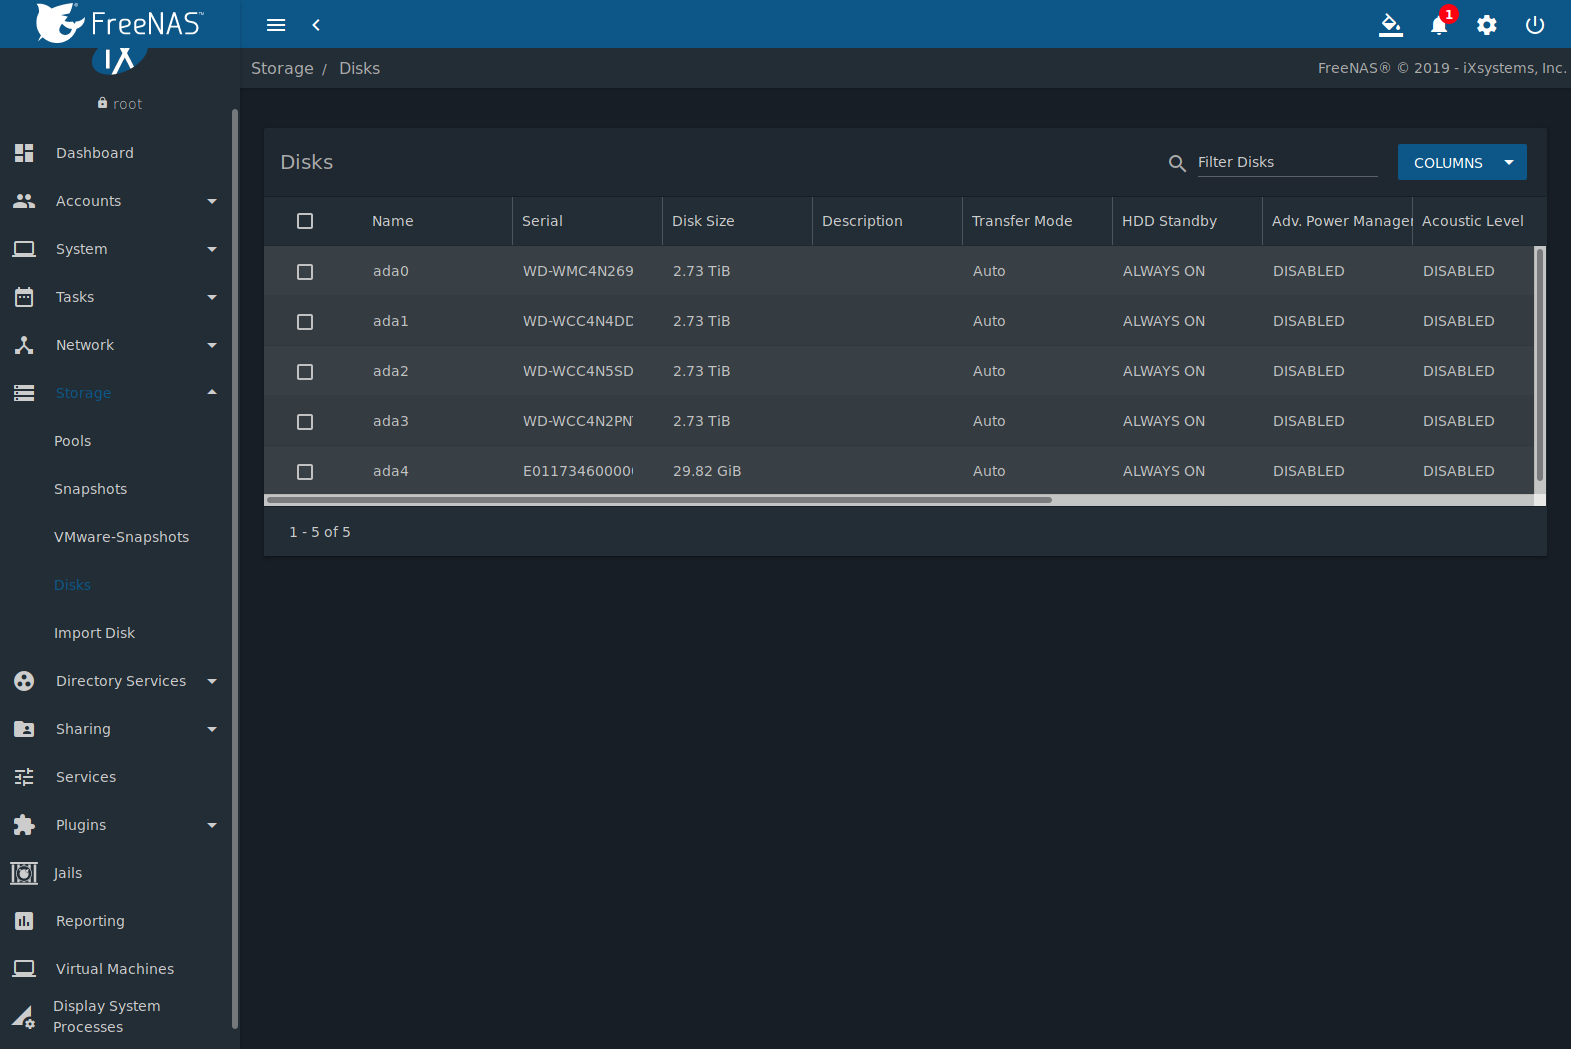
Fig. 9.5.1 Viewing Disks
To edit the options for a disk, click (Options) on a disk, then Edit to open the screen shown in Figure 9.5.2. Table 9.5.1 lists the configurable options.
To bulk edit disks, set the checkbox for each disk in the table then click (Edit Disks). The Bulk Edit Disks page displays which disks are being edited and a short list of configurable options. The Disk Options table indicates the options available when editing multiple disks.
To offline, online, or or replace the device, see Replacing a Failed Disk.
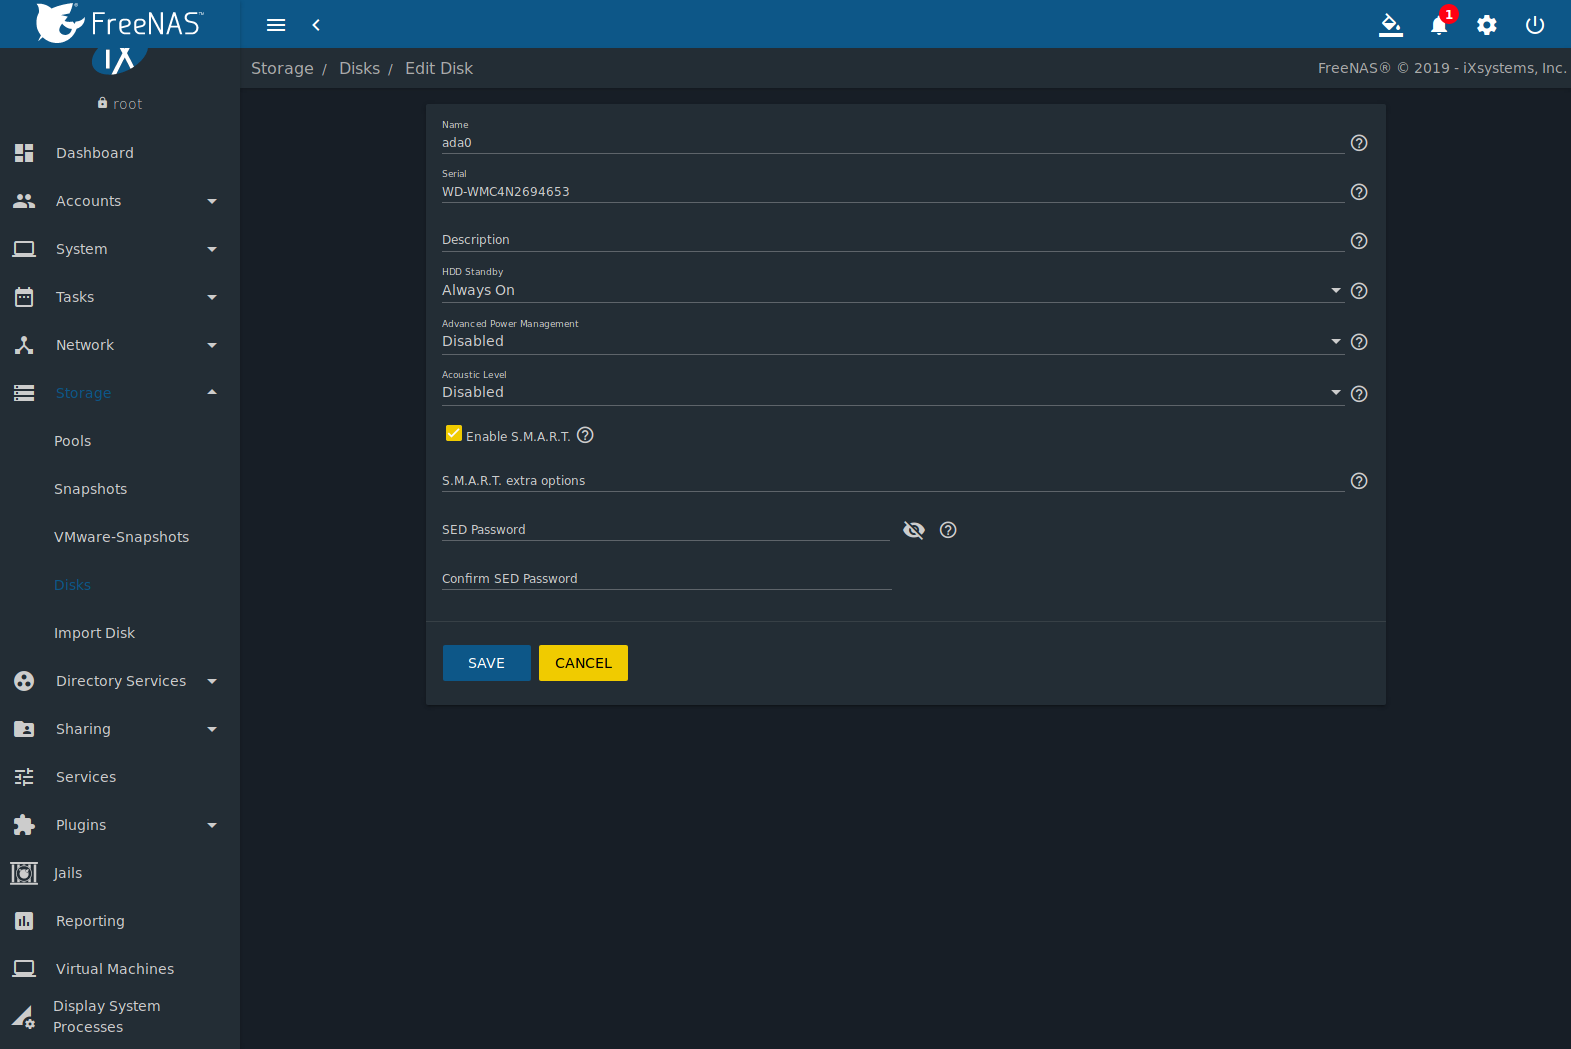
Fig. 9.5.2 Editing a Disk
| Setting | Value | Bulk Edit | Description |
|---|---|---|---|
| Name | string | This is the FreeBSD device name for the disk. | |
| Serial | string | This is the serial number of the disk. | |
| Description | string | Enter any notes about this disk. | |
| HDD Standby | drop-down menu | ✓ | Indicates the time of inactivity in minutes before the drive enters standby mode to conserve energy. This forum post demonstrates how to determine if a drive has spun down. |
| Advanced Power Management | drop-down menu | ✓ | Select a power management profile from the menu. The default value is Disabled. |
| Acoustic Level | drop-down menu | ✓ | Default is Disabled. Other values can be selected for disks that understand AAM. |
| Enable S.M.A.R.T. | checkbox | ✓ | Enabled by default when the disk supports S.M.A.R.T. Disabling S.M.A.R.T. tests prevents collecting new temperature data for this disk. Historical temperature data is still displayed in Reporting. |
| S.M.A.R.T. extra options | string | ✓ | Enter additional smartctl(8) options. |
| SED Password | string | Enter and confirm the password which will be used for this device instead of the global SED password. Refer to Self-Encrypting Drives for more information. |
Tip
If the serial number for a disk is not displayed in this screen, use the smartctl command from Shell. For example, to determine the serial number of disk ada0, type smartctl -a /dev/ada0 | grep Serial.
The Wipe function is used to discard an unused disk.
Warning
Ensure all data is backed up and the disk is no longer in use. Triple-check that the correct disk is being selected to be wiped, as recovering data from a wiped disk is usually impossible. If there is any doubt, physically remove the disk, verify that all data is still present on the FreeNAS® system, and wipe the disk in a separate computer.
Clicking Wipe offers several choices. Quick erases only the partitioning information on a disk, making it easy to reuse but without clearing other old data. For more security, Full with zeros overwrites the entire disk with zeros, while Full with random data overwrites the entire disk with random binary data.
Quick wipes take only a few seconds. A Full with zeros wipe of a large disk can take several hours, and a Full with random data takes longer. A progress bar is displayed during the wipe to track status.
9.5.1. Replacing a Failed Disk
With any form of redundant RAID, failed drives must be replaced as soon as possible to repair the degraded state of the RAID. Depending on the hardware capabilities, it might be necessary to reboot to replace the failed drive. Hardware that supports AHCI does not require a reboot.
Note
Striping (RAID0) does not provide redundancy. If a disk in a stripe fails, the pool will be destroyed and must be recreated and the data restored from backup.
Note
If the pool is encrypted with GELI, refer to Replacing an Encrypted Disk before proceeding.
Before physically removing the failed device, go to . Select the pool name then click (Settings). Select Status and locate the failed disk. Then perform these steps:
Click (Options) on the disk entry, then Offline to change the disk status to OFFLINE. This step removes the device from the pool and prevents swap issues. If the hardware supports hot-pluggable disks, click the disk Offline button and pull the disk, then skip to step 3. If there is no Offline button but only a Replace button, the disk is already offlined and this step can be skipped.
Note
If the process of changing the disk status to OFFLINE fails with a “disk offline failed - no valid replicas” message, the pool must be scrubbed first with the Scrub Pool button in . After the scrub completes, try Offline again before proceeding.
If the hardware is not AHCI capable, shut down the system to physically replace the disk. When finished, return to the web interface and locate the OFFLINE disk.
After the disk is replaced and is showing as OFFLINE, click (Options) on the disk again and then Replace. Select the replacement disk from the drop-down menu and click the REPLACE DISK button. After clicking the REPLACE DISK button, the pool begins resilvering.
After the drive replacement process is complete, re-add the replaced disk in the S.M.A.R.T. Tests screen.
In the example shown in
Figure 9.5.3,
a failed disk is being replaced by disk ada3 in the pool named
pool1.
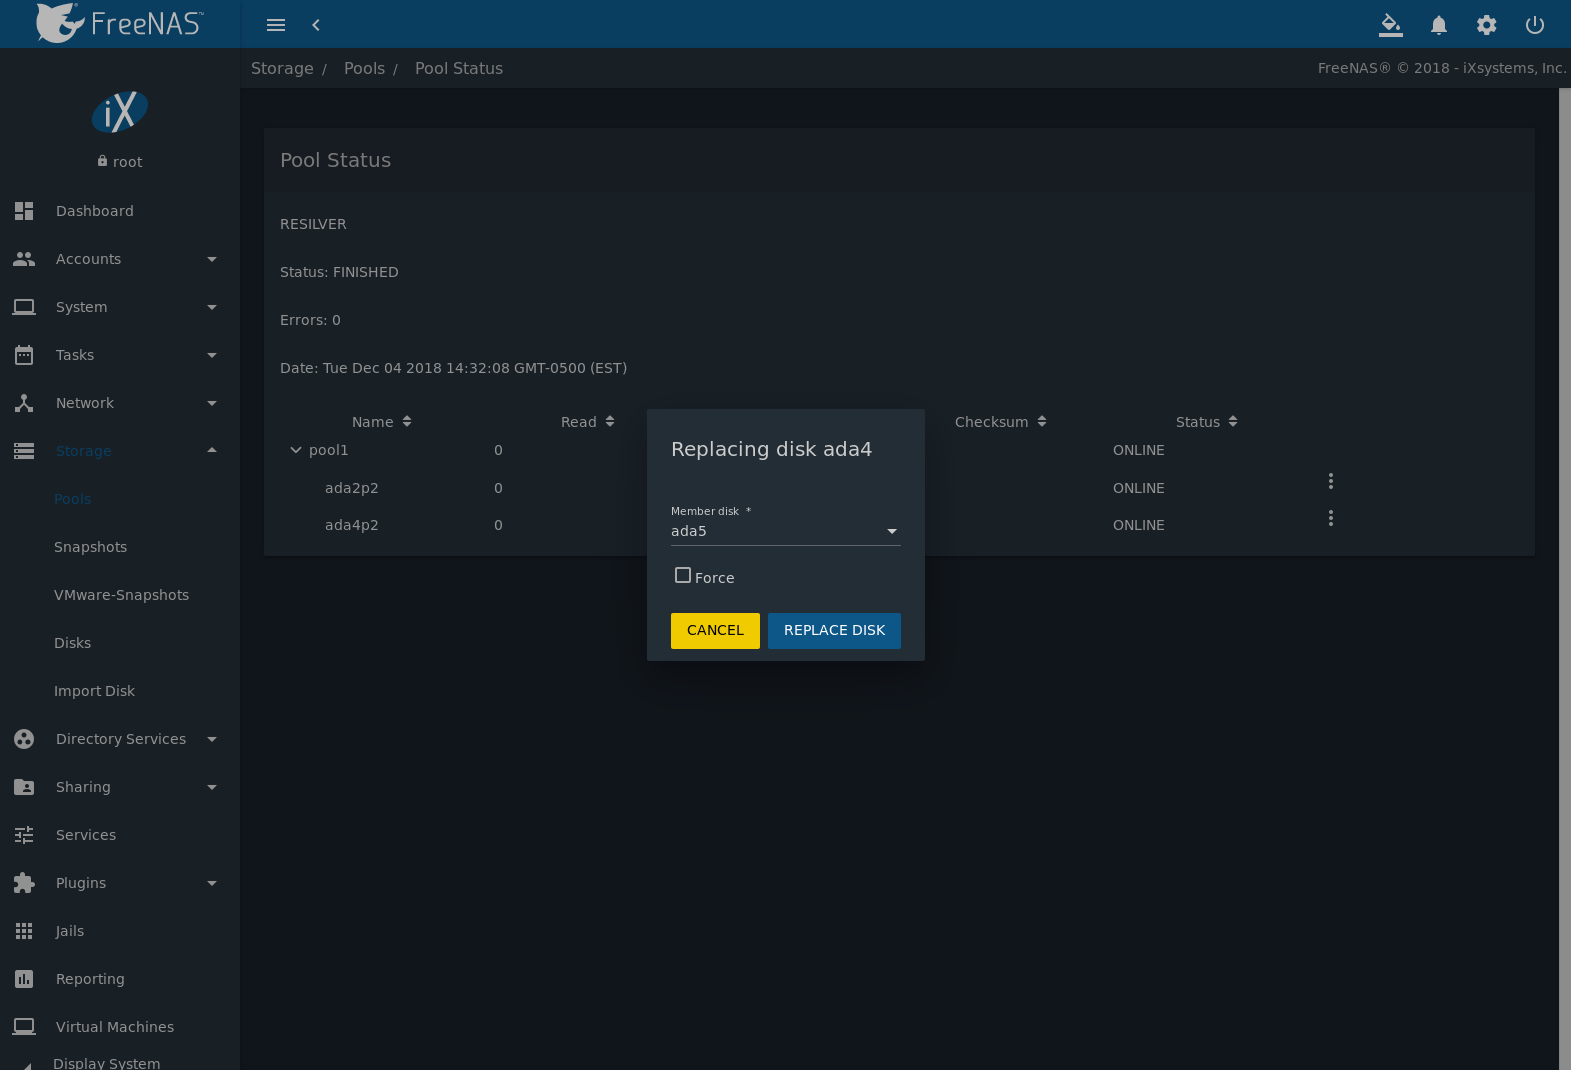
Fig. 9.5.3 Replacing a Failed Disk
After the resilver is complete, Pools shows a Completed resilver status and indicates any errors. Figure 9.5.4 indicates that the disk replacement was successful in this example.
Note
A disk that is failing but has not completely failed can be replaced in place, without first removing it. Whether this is a good idea depends on the overall condition of the failing disk. A disk with a few newly-bad blocks that is otherwise functional can be left in place during the replacement to provide data redundancy. A drive that is experiencing continuous errors can actually slow down the replacement. In extreme cases, a disk with serious problems might spend so much time retrying failures that it could prevent the replacement resilvering from completing before another drive fails.
Fig. 9.5.4 Disk Replacement is Complete
9.5.1.1. Replacing an Encrypted Disk
If the ZFS pool is encrypted, additional steps are needed when replacing a failed drive.
First, make sure that a passphrase has been set using the instructions in Managing Encrypted Pools before attempting to replace the failed drive. Then, follow steps 1 and 2 as described above. During step 3, there will be a prompt to enter and confirm the passphrase for the pool. Enter this information, then click REPLACE DISK. Immediately restore the encryption keys to the pool. If this additional step is not performed before the next reboot, access to the pool might be permanently lost.
- Highlight the pool that contains the recently replaced disk and click Add Recovery Key to save the new recovery key. The old recovery key will no longer function, so it can be safely discarded.
9.5.1.2. Removing a Log or Cache Device
Added log or cache devices appear in . Clicking the device enables the Replace and Remove buttons.
Log and cache devices can be safely removed or replaced with these buttons. Both types of devices improve performance, and throughput can be impacted by their removal.
9.5.2. Replacing Disks to Grow a Pool
The recommended method for expanding the size of a ZFS pool is to pre-plan the number of disks in a vdev and to stripe additional vdevs using Pools as additional capacity is needed.
However, this is not an option if there are no open drive ports and a SAS/SATA HBA card cannot be added. In this case, one disk at a time can be replaced with a larger disk, waiting for the resilvering process to incorporate the new disk into the pool, then repeating with another disk until all of the original disks have been replaced.
The safest way to perform this is to use a spare drive port or an eSATA port and a hard drive dock. The process follows these steps:
- Shut down the system.
- Install one new disk.
- Start up the system.
- Go to , and select the pool to expand. Click (Settings) and Status. Select a disk, click (Options), then Replace. Choose the new disk as the replacement.
- The status of the resilver process can be viewed by running zpool status. When the new disk has resilvered, the old one is automatically offlined. Shut the system down and physically remove the replaced disk. One advantage of this approach is that there is no loss of redundancy during the resilver.
If a spare drive port is not available, a drive can be replaced with a larger one using the instructions in Replacing a Failed Disk. This process is slow and puts the system in a degraded state. Since a failure at this point could be disastrous, do not attempt this method unless the system has a reliable backup. Replace one drive at a time and wait for the resilver process to complete on the replaced drive before replacing the next drive. After all the drives are replaced and the final resilver completes, the added space appears in the pool.
9.6. Importing a Disk
The screen, shown in Figure 9.6.1, is used to import disks that are formatted with UFS (BSD Unix), FAT(MSDOS) or NTFS (Windows), or EXT2 (Linux) filesystems. This is a designed to be used as a one-time import, copying the data from that disk into a dataset on the FreeNAS® system. Only one disk can be imported at a time.
Note
Imports of EXT3 or EXT4 filesystems are possible in some cases, although neither is fully supported. EXT3 journaling is not supported, so those filesystems must have an external fsck utility, like the one provided by E2fsprogs utilities, run on them before import. EXT4 filesystems with extended attributes or inodes greater than 128 bytes are not supported. EXT4 filesystems with EXT3 journaling must have an fsck run on them before import, as described above.
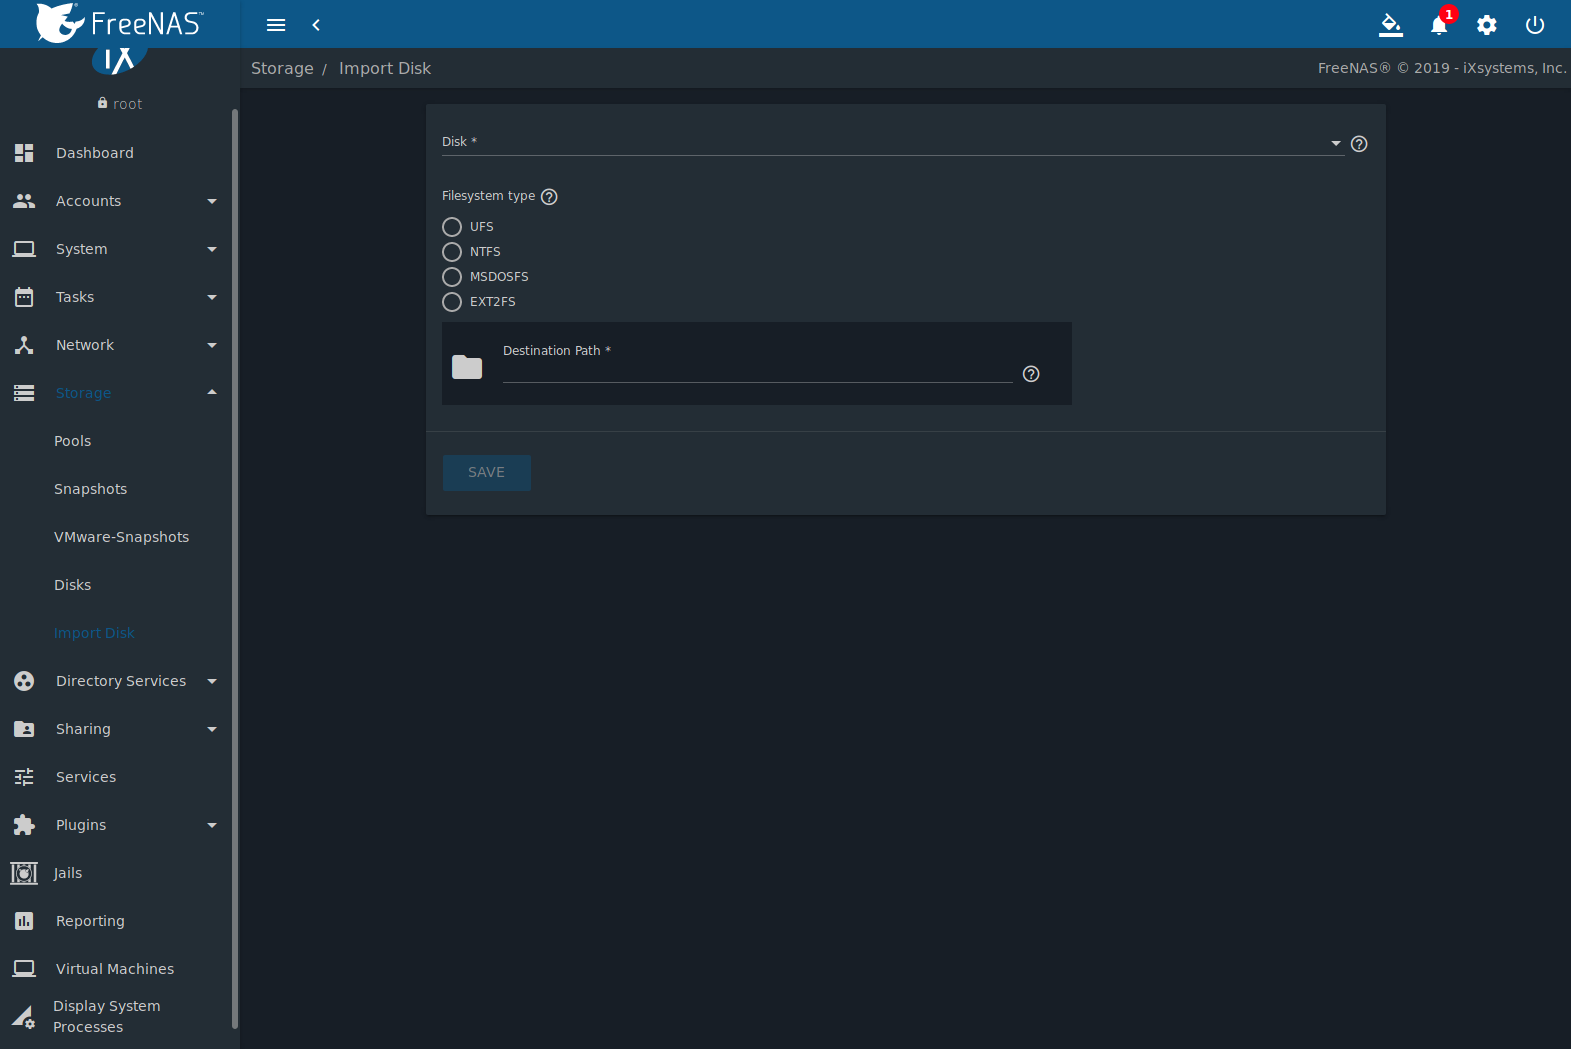
Fig. 9.6.1 Importing a Disk
Use the drop-down menu to select the disk to import, select the type of filesystem on the disk, and browse to the ZFS dataset that will hold the copied data. If the MSDOSFS filesystem is selected, an additional MSDOSFS locale drop-down menu will display. Use this menu to select the locale if non-ASCII characters are present on thedisk.
After clicking SAVE, the disk is mounted and its contents are copied to the specified dataset. The disk is unmounted after the copy operation completes.
9.7. Multipaths
This option is only displayed on systems that contain multipath-capable hardware like a chassis equipped with a dual SAS expander backplane or an external JBOD that is wired for multipath.
FreeNAS® uses gmultipath(8) to provide multipath I/O support on systems containing multipath-capable hardware.
Multipath hardware adds fault tolerance to a NAS as the data is still available even if one disk I/O path has a failure.
FreeNAS® automatically detects active/active and active/passive multipath-capable hardware. Discovered multipath-capable devices are placed in multipath units with the parent devices hidden. The configuration is displayed in .