13. Jails
This section describes how to use Jails, which allow users who are comfortable with the command line to have more control over software installation and management.
Warning
The jails infrastructure now uses uses the iocage backend and the warden backend has been deprecated and is no longer supported. Jail creation has been removed from the legacy UI but it can still be used to manage existing warden jails. It is recommended to recreate all legacy jails using the new UI, copy over any existing configurations, and delete the old jail datasets once the new jails are working as expected. To create new Jails, log into the new UI.
By default, a FreeBSD jail is created. This provides a very light-weight, operating system-level virtualization. Consider it as another independent instance of FreeBSD running on the same hardware, without all of the overhead usually associated with virtualization. The jail installs the FreeBSD software management utilities so FreeBSD ports can be compiled and FreeBSD packages can be installed from the command line of the jail.
It is important to understand that any users, groups, installed software, and configurations within a jail are isolated from both the FreeNAS® operating system and any other jails running on that system.
The rest of this section describes:
13.1. Jails Configuration
Jails are stored in a volume or dataset. Using a separate dataset for the Jail Root is strongly recommended. The volume or dataset to be used must already exist or can be created with Volume Manager.
Note
The Jail Root volume or dataset cannot be created on a Share.
Begin global jail configuration by choosing
to open the screen shown in
Figure 13.1.1.
Jails are automatically installed into their own dataset under the
specified path as they are created. For example, if the
Jail Root is set to /mnt/volume1/dataset1 and a
jail named jail1 is created, it is installed into its own dataset
named /mnt/volume1/dataset1/jail1.
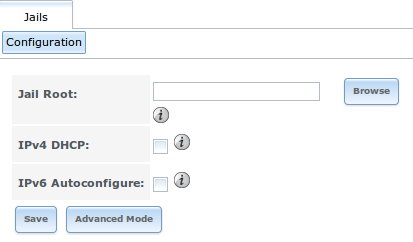
Fig. 13.1.1 Global Jail Configuration
Warning
If any Plugins are already installed, the Jail Root, IPv4 Network, IPv4 Network Start Address, and IPv4 Network End Address are automatically filled. Double-check that the pre-configured IP address values are appropriate for the jails and do not conflict with addresses used by other systems on the network.
Table 13.1.1 summarizes the fields in this configuration screen. Refer to the text below the table for more details on how to properly configure the Jail Root and network settings. Some settings are only available in Advanced Mode. To see these settings, either click the Advanced Mode button or configure the system to always display these settings by checking the box Show advanced fields by default in .
| Setting | Value | Advanced Mode | Description |
|---|---|---|---|
| Jail Root | browse button | Mandatory. Jails cannot be added until this is set. | |
| IPv4 DHCP | checkbox | Check this box if the network has a DHCP server. | |
| IPv4 Network | string | ✓ | The format is IP address of network/CIDR mask. |
| IPv4 Network Start Address | string | ✓ | Enter the first IP address in the reserved range in the format host/CIDR mask. |
| IPv4 Network End Address | string | ✓ | Enter the last IP address in the reserved range in the format host/CIDR mask. |
| IPv6 Autoconfigure | checkbox | Check this box if the network has a DHCPv6 server and IPv6 will be used to access jails. | |
| IPv6 Network | string | ✓ | Enter the network address for a properly configured IPv6 network. |
| IPv6 Network Start Address | string | ✓ | Enter the first IP address in the reserved range for a properly configured IPv6 network. |
| IPv6 Network End Address | string | ✓ | Enter the last IP address in the reserved range for a properly configured IPv6 network. |
| Collection URL | string | ✓ | Changing the default may break the ability to install jails. |
When selecting the Jail Root, ensure that the size of the selected volume or dataset is sufficient to hold the number of jails to be installed as well as any software, log files, and data to be stored within each jail. At a bare minimum, budget at least 2 GiB per jail and do not select a dataset that is less than 2 GiB in size.
Note
When adding storage to a jail, be aware that the path size is limited to 88 characters. Make sure that the length of the volume name plus the dataset name plus the jail name does not exceed this limit.
If the network contains a DHCP server, it is recommended to check the box IPv4 DHCP (or IPv6 Autoconfigure, for a properly configured IPv6 network). This prevents IP address conflicts on the network as the DHCP server automatically assigns the jail the next available lease and records the lease as in use.
If a static IP address is needed so that users always know the IP address of the jail, enter the start and end address for the IPv4 and/or IPv6 network. The range defined by the start and end addresses will be automatically assigned as jails are created. For example, when creating 5 jails on the 192.168.1.0 network, enter a IPv4 Network Start Address of 192.168.1.100 and a IPv4 Network End Address of 192.168.1.104.
When creating a start and end range on a network that contains a DHCP server, it is important to also reserve those addresses on the DHCP server. Otherwise, the DHCP server is not aware that those addresses are being used by jails. This lead to IP address conflicts and weird networking errors on the network.
FreeNAS® automatically detects and displays the IPv4 Network to which the administrative interface is connected. This setting is important. The IP addresses used by the jails must be pingable from the FreeNAS® system for the jails and any installed software to be accessible. If the network topology requires changing the default value, a default gateway and possibly a static route need to be added to the specified network. After changing this value, ensure that the subnet mask value is correct, as an incorrect mask can make the IP network unreachable. When in doubt, keep the default setting for IPv4 Network. With VMware, make sure that the vswitch is set to “promiscuous mode”. With VirtualBox, make sure is not set to “Deny”.
After clicking the Save button to save the configuration, the system is ready to create and manage jails as described in the rest of this chapter.
Table 13.1.2 summarizes the available options. Most settings are only available in Advanced Mode and are not needed if the intent is to create a FreeBSD jail. To see these settings, either click the Advanced Mode button or configure the system to always display these settings by checking the box Show advanced fields by default in .
| Setting | Value | Advanced Mode | Description |
|---|---|---|---|
| Jail Name | string | Mandatory. Can only contain letters, numbers, dashes, or the underscore character. | |
| Template | drop-down menu | ✓ | Contains any created custom templates. |
| IPv4 DHCP | checkbox | ✓ | If unchecked, make sure that the defined address does not conflict with the DHCP server’s pool of available addresses. |
| IPv4 address | integer | ✓ | This and the other IPv4 settings are grayed out if IPv4 DHCP is checked. Enter a unique IP address that is in the local network and not already used by anyother computer. |
| IPv4 netmask | drop-down menu | ✓ | Select the subnet mask associated with IPv4 address. |
| IPv4 bridge address | integer | ✓ | Grayed out unless VIMAGE is checked. See NOTE below. |
| IPv4 bridge netmask | drop-down menu | ✓ | Select the subnet mask associated with IPv4 bridge address. Grayed out unless VIMAGE is checked. |
| IPv4 default gateway | string | ✓ | Grayed out unless VIMAGE is checked. |
| IPv6 Autoconfigure | checkbox | ✓ | If unchecked, make sure that the defined address does not conflict with the DHCP server’s pool of available addresses. |
| IPv6 address | integer | ✓ | This and other IPv6 settings are grayed out if IPv6 Autoconfigure is checked. Enter a unique IPv6 address that is in the local network and not already used by any other computer. |
| IPv6 prefix length | drop-down menu | ✓ | Select the prefix length associated with IPv6 address. |
| IPv6 bridge address | integer | ✓ | Grayed out unless VIMAGE is checked. See NOTE below. |
| IPv6 bridge prefix length | drop-down menu | ✓ | Grayed out unless VIMAGE is checked. Select the prefix length associated with IPv6 address. |
| IPv6 default gateway | string | ✓ | Grayed out unless VIMAGE is checked. Used to set the jail’s default gateway IPv6 address. |
| MAC | string | ✓ | Grayed out unless VIMAGE is checked. Unique static MAC addresses must be entered for every jail created if a static MAC address is entered. |
| NIC | drop-down menu | ✓ | Grayed out if VIMAGE is checked. Can be used to specify the interface to use for jail connections. |
| Sysctls | string | ✓ | Comma-delimited list of sysctls to set inside jail (like allow.sysvipc=1,allow.raw_sockets=1) |
| Autostart | checkbox | ✓ | Uncheck if the jail will be started manually. |
| VIMAGE | checkbox | ✓ | Gives a jail its own virtualized network stack. Requires promiscuous mode be enabled on the interface. |
| NAT | checkbox | ✓ | Grayed out for Linux jails or if VIMAGE is unchecked. Enables Network Address Translation for the jail. |
Note
The IPv4 and IPv6 bridge interface is used to bridge the epair(4) device, which is automatically created for each started jail, to a physical network device. The default network device is the one that is configured with a default gateway. So, if em0 is the FreeBSD name of the physical interface and three jails are running, these virtual interfaces are automatically created: bridge0, epair0a, epair1a, and epair2a. The physical interface em0 will be added to the bridge, as well as each epair device. The other half of the epair is placed inside the jail and is assigned the IP address specified for that jail. The bridge interface is assigned an alias of the default gateway for that jail or the bridge IP, if configured; either is correct.
13.2. Managing Jails
Click Jails to view and configure the added jails. In the example shown in Figure 13.2.1, the list entry for the jail named xdm_1 has been clicked to enable that jail’s configuration options. The entry indicates the jail name, IP address, whether it will start automatically at system boot, if it is currently running, and jail type: standard for a FreeBSD jail, or pluginjail if it was installed using Plugins.
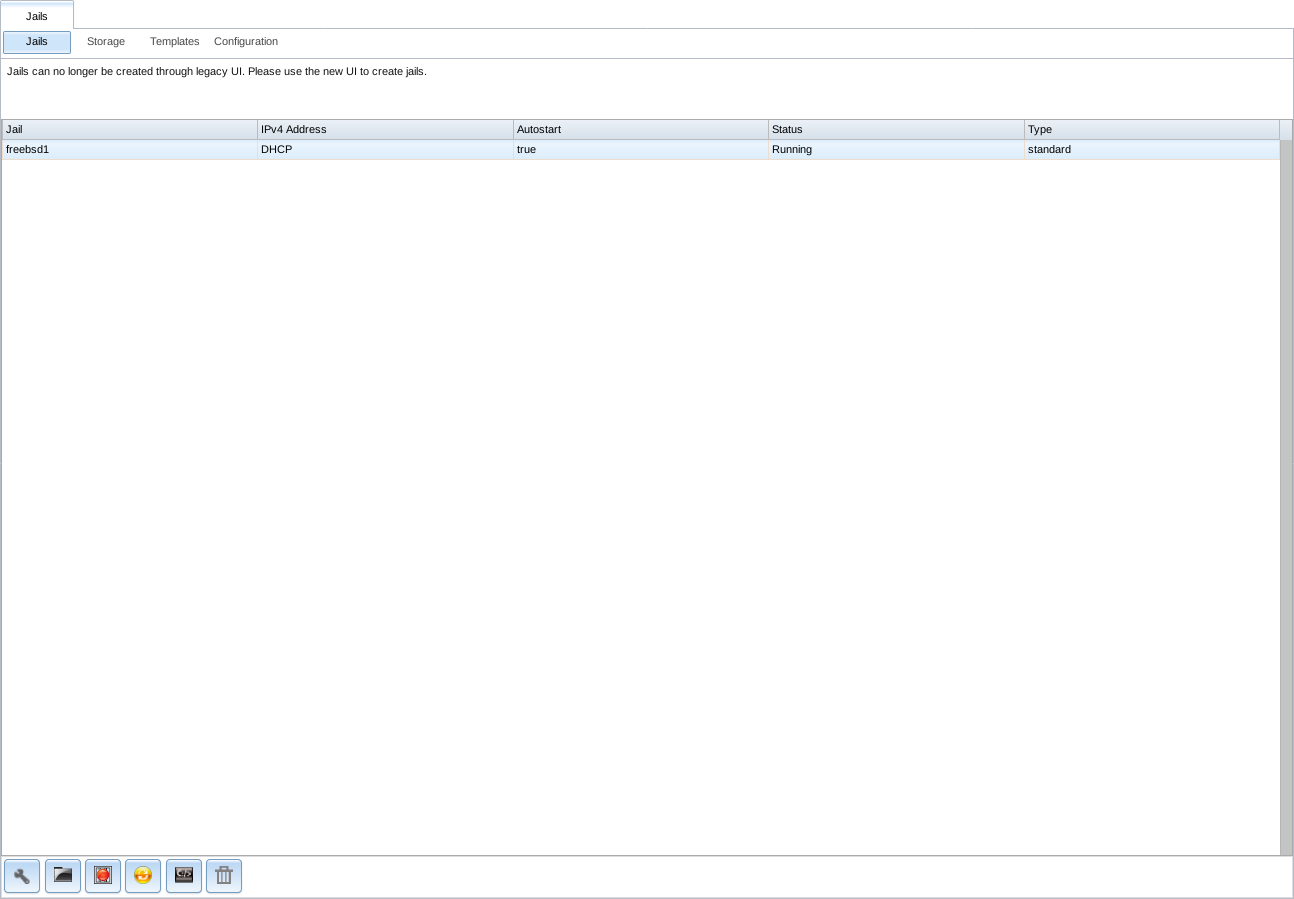
Fig. 13.2.1 Viewing Jails
From left to right, these configuration icons are available:
Edit Jail: edit the jail settings which were described in Table 13.1.2.
After a jail has been created, the jail name and type cannot be changed. These fields are grayed out.
Note
To modify the IP address information for a jail, use the Edit Jail button instead of the associated networking commands from the command line of the jail.
Add Storage: configure the jail to access an area of storage as described in Add Storage.
Start/Stop: this icon changes appearance depending on the current Status of the jail. When the jail is not running, the icon is green and clicking it starts the jail. When the jail is already running, the icon is red and clicking it stops the jail. A stopped jail and its applications are inaccessible until it is restarted.
Restart: restart the jail.
Shell: access a root command prompt to configure the selected jail from the command line. When finished, type exit to close the shell.
Delete: delete the jail and any periodic snapshots of it. The contents of the jail are entirely removed.
Warning
Back up data and programs in the jail before deleting it. There is no way to recover the contents of a jail after deletion.
13.2.1. Accessing a Jail Using SSH
ssh can be used to access a jail instead of the jail’s Shell icon. This requires starting the ssh service and creating a user account for ssh access. Start by clicking the Shell icon for the desired jail.
Find the sshd_enable= line in the jail’s
/etc/rc.conf and set it to “YES”:
sshd_enable="YES"
Then start the SSH daemon:
service sshd start
The first time the service runs, the jail’s RSA key pair is generated and the key fingerprint and random art image displayed.
Add a user account by typing adduser and following the prompts. If the user needs superuser privileges, they must be added to the wheel group. For those users, enter wheel at this prompt:
Login group is user1. Invite user1 into other groups? []: wheel
After creating the user, set the root password so that the new user will be able to use the su command to gain superuser privilege. To set the password, type passwd then enter and confirm the desired password.
Finally, test from another system that the user can successfully ssh in and become the superuser. In this example, a user named user1 uses ssh to access the jail at 192.168.2.3. The first time the user logs in, they will be asked to verify the fingerprint of the host:
ssh user1@192.168.2.3
The authenticity of host '192.168.2.3 (192.168.2.3)' can't be established.
RSA key fingerprint is 6f:93:e5:36:4f:54:ed:4b:9c:c8:c2:71:89:c1:58:f0.
Are you sure you want to continue connecting (yes/no)? yes
Warning: Permanently added '192.168.2.3' (RSA) to the list of known hosts.
Password: type_password_here
Note
Each jail has its own user accounts and service configuration. These steps must be repeated for each jail that requires SSH access.
13.2.2. Add Storage
It is possible to give a FreeBSD jail access to an area of storage on the FreeNAS® system. This is useful for applications that store a large amount of data or if an application in a jail needs access to the data stored on the FreeNAS® system. One example is transmission, which stores torrents. The storage is added using the mount_nullfs(8) mechanism, which links data that resides outside of the jail as a storage area within the jail.
To add storage, click the Add Storage button for a highlighted jail entry to open the screen shown in Figure 13.2.2. This screen can also be accessed by expanding the jail name in the tree view and clicking .
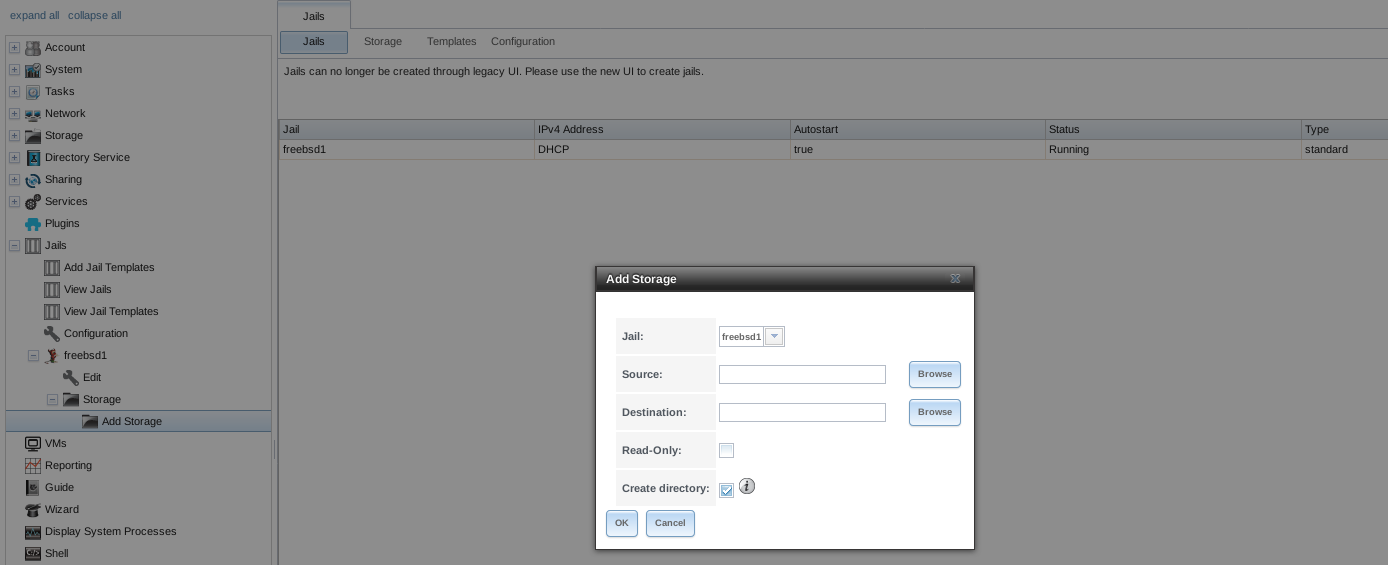
Fig. 13.2.2 Adding Storage to a Jail
Browse to the Source and Destination, where:
- Source: is the directory or dataset on the FreeNAS® system which will be accessed by the jail. This directory must reside outside of the volume or dataset being used by the jail. This is why it is recommended to create a separate dataset to store jails, so the dataset holding the jails is always separate from any datasets used for storage on the FreeNAS® system.
- Destination: select an existing, empty directory within the jail to link to the Source storage area. If that directory does not exist yet, enter the desired directory name and check the Create directory box.
Storage is typically added because the user and group account associated with an application installed inside of a jail needs to access data stored on the FreeNAS® system. Before selecting the Source, it is important to first ensure that the permissions of the selected directory or dataset grant permission to the user/group account inside of the jail. This is not the default, as the users and groups created inside of a jail are totally separate from the users and groups of the FreeNAS® system.
The workflow for adding storage usually goes like this:
Determine the name of the user and group account used by the application. For example, the installation of the transmission application automatically creates a user account named transmission and a group account also named transmission. When in doubt, check the files
/etc/passwd(to find the user account) and/etc/group(to find the group account) inside the jail. Typically, the user and group names are similar to the application name. Also, the UID and GID are usually the same as the port number used by the service.A media user and group (GID 8675309) are part of the base system. Having applications run as this group or user makes it possible to share storage between multiple applications in a single jail, between multiple jails, or even between the host and jails.
On the FreeNAS® system, create a user account and group account that match the user and group names used by the application in the jail.
Decide whether the jail should have access to existing data or if a new area of storage will be set aside for the jail to use.
If the jail will access existing data, edit the permissions of the volume or dataset so the user and group accounts have the desired read and write access. If multiple applications or jails are to have access to the same data, create a new group and add each needed user account to that group.
If an area of storage is being set aside for that jail or individual application, create a dataset. Edit the permissions of that dataset so the user and group account has the desired read and write access.
Use the Add Storage button of the jail and select the configured volume/dataset as the Source.
To prevent writes to the storage, check the box Read-Only.
By default, the Create directory box is checked. This means that the directory will automatically be created under the specified Destination path if the directory does not already exist.
After storage has been added or created, it appears in the tree under the
specified jail. In the example shown in
Figure 13.2.3, a dataset named
tank/data has been chosen as the Source as it contains
the files stored on the FreeNAS® system. When the storage was created, the
user browsed to /usr/local/ in the Destination field,
then entered test as the directory. Since this directory did not already
exist, it was created, because the Create directory box was
left checked. The resulting storage was added to the freebsd1 entry in
the tree as /usr/local/test. The user has clicked this
/usr/local/test entry to access the Edit screen.
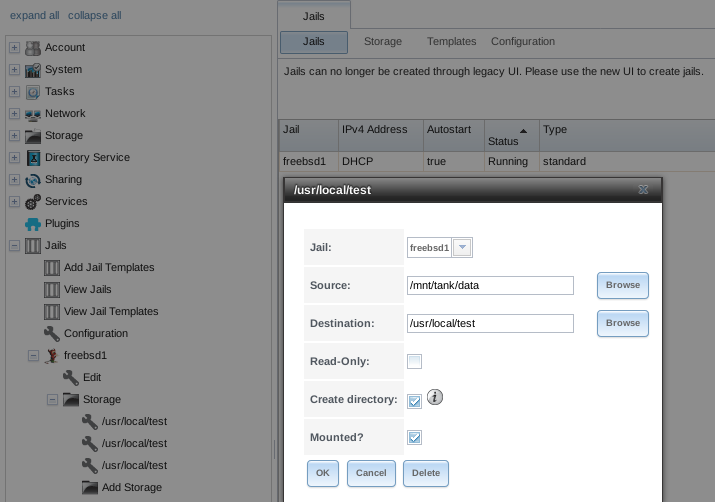
Fig. 13.2.3 Example Storage
Storage is normally mounted as it is created. To unmount the storage, uncheck the Mounted? box.
Note
A mounted dataset does not automatically mount any of its child datasets. While the child datasets may appear to be browsable inside the jail, any changes are not visible. Since each dataset is considered to be its own filesystem, each child dataset must have its own mount point. Separate storage must be created for any child datasets which need to be mounted.
To delete the storage, click the Delete button.
Warning
It is important to realize that added storage is really just a pointer to the selected storage directory on the FreeNAS® system. It does not copy that data to the jail. Files that are deleted from the Destination directory in the jail are really deleted from the Source directory on the FreeNAS® system. However, removing the jail storage entry only removes the pointer, leaving the data intact but not accessible from the jail.
13.3. Starting Installed Software
After packages or ports are installed, they need to be configured and
started. If you are familiar with the software, look for the
configuration file in /usr/local/etc or a subdirectory of it.
Many FreeBSD packages contain a sample configuration file as a
reference. If you are unfamiliar with the software, you will need to
spend some time at the software’s website to learn which configuration
options are available and which configuration files require editing.
Most FreeBSD packages that contain a startable service include a
startup script which is automatically installed to
/usr/local/etc/rc.d/. After the configuration is complete, the
starting of the service can be tested by running the script with the
onestart option. As an example, if openvpn is installed
into the jail, these commands run its startup script and verify that
the service started:
/usr/local/etc/rc.d/openvpn onestart
Starting openvpn.

/usr/local/etc/rc.d/openvpn onestatus
openvpn is running as pid 45560.

sockstat -4
USER COMMAND         PID     FD      PROTO   LOCAL ADDRESS   FOREIGN ADDRESS
root openvpn         48386   4       udp4    *:54789         *:*
If it produces an error:
/usr/local/etc/rc.d/openvpn onestart
Starting openvpn.
/usr/local/etc/rc.d/openvpn: WARNING: failed to start openvpn
Run tail /var/log/messages to see if any error messages hint at the problem. Most startup failures are related to a misconfiguration: either a typo or a missing option in a configuration file.
After verifying that the service starts and is working as intended,
add a line to /etc/rc.conf to start the
service automatically when the jail is started. The line to
start a service always ends in _enable=”YES” and typically starts
with the name of the software. For example, this is the entry for the
openvpn service:
openvpn_enable="YES"
When in doubt, the startup script shows the line to put in
/etc/rc.conf. This is the description in
/usr/local/etc/rc.d/openvpn:
# This script supports running multiple instances of openvpn.
# To run additional instances link this script to something like
# % ln -s openvpn openvpn_foo

# and define additional openvpn_foo_* variables in one of
# /etc/rc.conf, /etc/rc.conf.local or /etc/rc.conf.d /openvpn_foo

#
# Below NAME should be substituted with the name of this script. By default
# it is openvpn, so read as openvpn_enable. If you linked the script to
# openvpn_foo, then read as openvpn_foo_enable etc.
#
# The following variables are supported (defaults are shown).
# You can place them in any of
# /etc/rc.conf, /etc/rc.conf.local or /etc/rc.conf.d/NAME
#
# NAME_enable="NO"
# set to YES to enable openvpn
The startup script also indicates if any additional parameters are available:
# NAME_if=
# driver(s) to load, set to "tun", "tap" or "tun tap"
#
# it is OK to specify the if_ prefix.
#
# # optional:
# NAME_flags=
# additional command line arguments
# NAME_configfile="/usr/local/etc/openvpn/NAME.conf"
# --config file
# NAME_dir="/usr/local/etc/openvpn"
# --cd directory