Note
TrueCommand documentation has moved to the unified TrueNAS Documentation Hub! TrueCommand 1.3 and newer has installation and usage articles available at https://www.truenas.com/docs/hub/truecommand/
Version 1.2
1. Introduction
Welcome to TrueCommand™!
TrueCommand™ is a top-level management solution for managing multiple FreeNAS and TrueNAS systems. This is sometimes called a “single pane of glass” appliance and provides a unified administration for multiple users and multiple systems on networks.
TrueCommand™ can monitor an entire network of FreeNAS® and TrueNAS® systems. This includes showing system statistics on storage usage, network activity, active services, and more. Even more, TrueCommand™ has the ability to create custom reports about individual systems or a combination of many systems.
1.1. Typography
These typographic conventions are referenced throughout the docs:
| Icon | Name | Usage |
|---|---|---|
| Configure | Configurable options. | |
| Administration | Administration page. Only visible to admin accounts. | |
| Systems | Systems page. | |
| Teams | Teams page. | |
| Delete | Delete item. | |
| Alert Error | Critical alert. | |
| Alert Warning | Warning alert. | |
| Alert Information | Information alert. | |
| Alert Resolve | Resolve alert. | |
| Alert Rules | Alert rules page. | |
| Report Share | Share report with other users. | |
| Show | Show item. | |
| Expand | Expand item. | |
| Calendar | Choose a date. | |
| Edit | Edit item. | |
| Help | Display additional help text for items. | |
| Metrics | Show item metrics. | |
| Offline | Offline status. | |
| Plus | Add item. | |
| Minus | Remove item. | |
| Power | Shut down TrueCommand™. | |
| Restart | Shut down and restart the system. | |
| TrueCommand™ Update | Update TrueCommand™. | |
| System Update | Update the desired system. | |
| All Alerts | All alerts page. | |
| Database Backup | Back up the system database. | |
| Database Restore | Restore system databases. | |
| System web interface | View the system web interface. | |
| Download | Download data. |
2. Migrating and Installing
2.1. Migrating from TrueCommand™ 1.1 or Older
Starting in TrueCommand™ 1.2, TrueCommand™ is built and offered as a docker container. To avoid losing saved configuration settings, existing installations of TrueCommand™ 1.1 or earlier need to follow these migration steps:
Create a local system directory. This directory will contain all the TrueCommand™ docker container data, including configuration files. This host directory must be used during the Installation when running the
docker runcommand.In the existing TrueCommand™ installation, copy any existing TrueCommand™ configuration files to the new local system directory using a command like ssh or rsync. This will reapply the existing TrueCommand™ configuration when the TrueCommand™ docker container is installed. Table 2.1.1 lists the location and destination for all the different configuration files TrueCommand™ can create. Only files that already exist need to be copied to the new TrueCommand™ container configuration directory.
Table 2.1.1 Files to Copy¶ Files from TrueCommand™ 1.1 and older Copy Destination in local host directory Description /usr/local/etc/truecommand/server.[crt | key].customlocalhostdirectory/truecommand/Custom SSL certificate or key that was imported into TrueCommand™. /var/nas-db-backuplocalhostdirectory/Directory tree of NAS configuration backups. /var/db/.tv_license.sha512localhostdirectory/License and signature for the license. For the TrueCommand™ 1.1
/var/db/ixdb/database, use pg_dump ixdb > ixdb.sql to transform the 1.1 TrueCommand™ database into a single.sql. Then, moveixdb.sqlto the new local database directory for the TrueCommand™ docker version.Note
Make sure to migrate all files to the new host directory before starting the TrueCommand™ docker container.
Follow the Installation instructions.
2.2. Installation
TrueCommand™ is built as a docker container. This has the benefit of a smaller footprint and simpler upgrades. Use the appropriate Operating System docker installation instructions and install docker. Ensure the docker service is started if it did not start.
Warning
Docker Desktop for Windows uses Hyper-V. This interferes with other virtualization applications. For example, you cannot use Docker Desktop and VMware Workstation Player simultaneously.
Before fetching the TrueCommand™ docker image, create a local directory for the image
to mount to for storage. This can be done by running
mkdir nameOfDirectory where nameOfDirectory is the name of choice
for the new directory.
After creating the new directory, fetch and run the docker image. This can be
done in the Command Line Interface (CLI) by typing
docker run --detach -v "/hostdirectory:/data" -p portnumber:80 -p sslport:443 ixsystems/truecommand:latest
where hostdirectory is the new directory that was created for the image to
mount to, portnumber is the
desired port number to access the web interface, and sslportnumber is the
desired port number to securely access the web interface through SSL. Do not forget
to use
Windows compatible syntax
when specifying paths in the Windows file system. For example, if the created
directory for the TrueCommand™ image was created in the Documents folder in the
Windows file system, the docker command would look like:
docker run --detach -v driveLetter:\Users\username\Documents\directoryName.
In this command driveLetter is the letter associated with the drive that
contains the new directory, username is the username of the current user, and
directoryName is the name of the directory created for the TrueCommand™ image.
Although there are different ways to run a docker container,
make sure to use
-v/hostdirectory:/data in the command.
Note
Previous versions of TrueCommand™ can be fetched by replacing latest with the desired version tag name.
After fetching the TrueCommand™ docker image, run
docker ps to see details about the currently running containers.
Warning
Do not try to start two containers that are pointed at the same host directory! This can result in file conflicts and database corruption.

Fig. 2.2.1 Container List
Use the port assigned to the container to access the web interface.
The list from docker ps contains a PORTS column.
Find the port associated with the ixsystems/truecommand:latest
IMAGE. The PORTS entry is listed as
0.0.0.0:port->80/tcp, 0.0.0.0:sslport->443/tcp where port
and sslport are the ports that were specified earlier. To access
the web interface with no encryption, enter
hostsystemIPaddress:port in a browser address bar where
hostsystemIPaddress is the IP address of the host system that is
running the TrueCommand™ docker container. To access the web interface with
standard SSL encryption, enter
https://hostsystemIPaddress:sslport in a browser address
bar. If a connection to the web interface cannot be established, add
the container ports as an exception to the host system firewall.
Note
When connecting through SSL, TrueCommand™ may need to be added as an exception.
3. Starting
Please see the Installation chapter for instructions on installing TrueCommand™.
3.1. Adding TrueCommand™ as an Exception
TrueCommand™ uses a self signed certificate for a secure connection. Because of this, most internet browsers consider the IP address or DNS hostname untrustworthy. The IP address or DNS hostname must be added as an exception to connect.
3.1.1. Adding an Exception in Firefox
Click Advanced to view information about the error code.
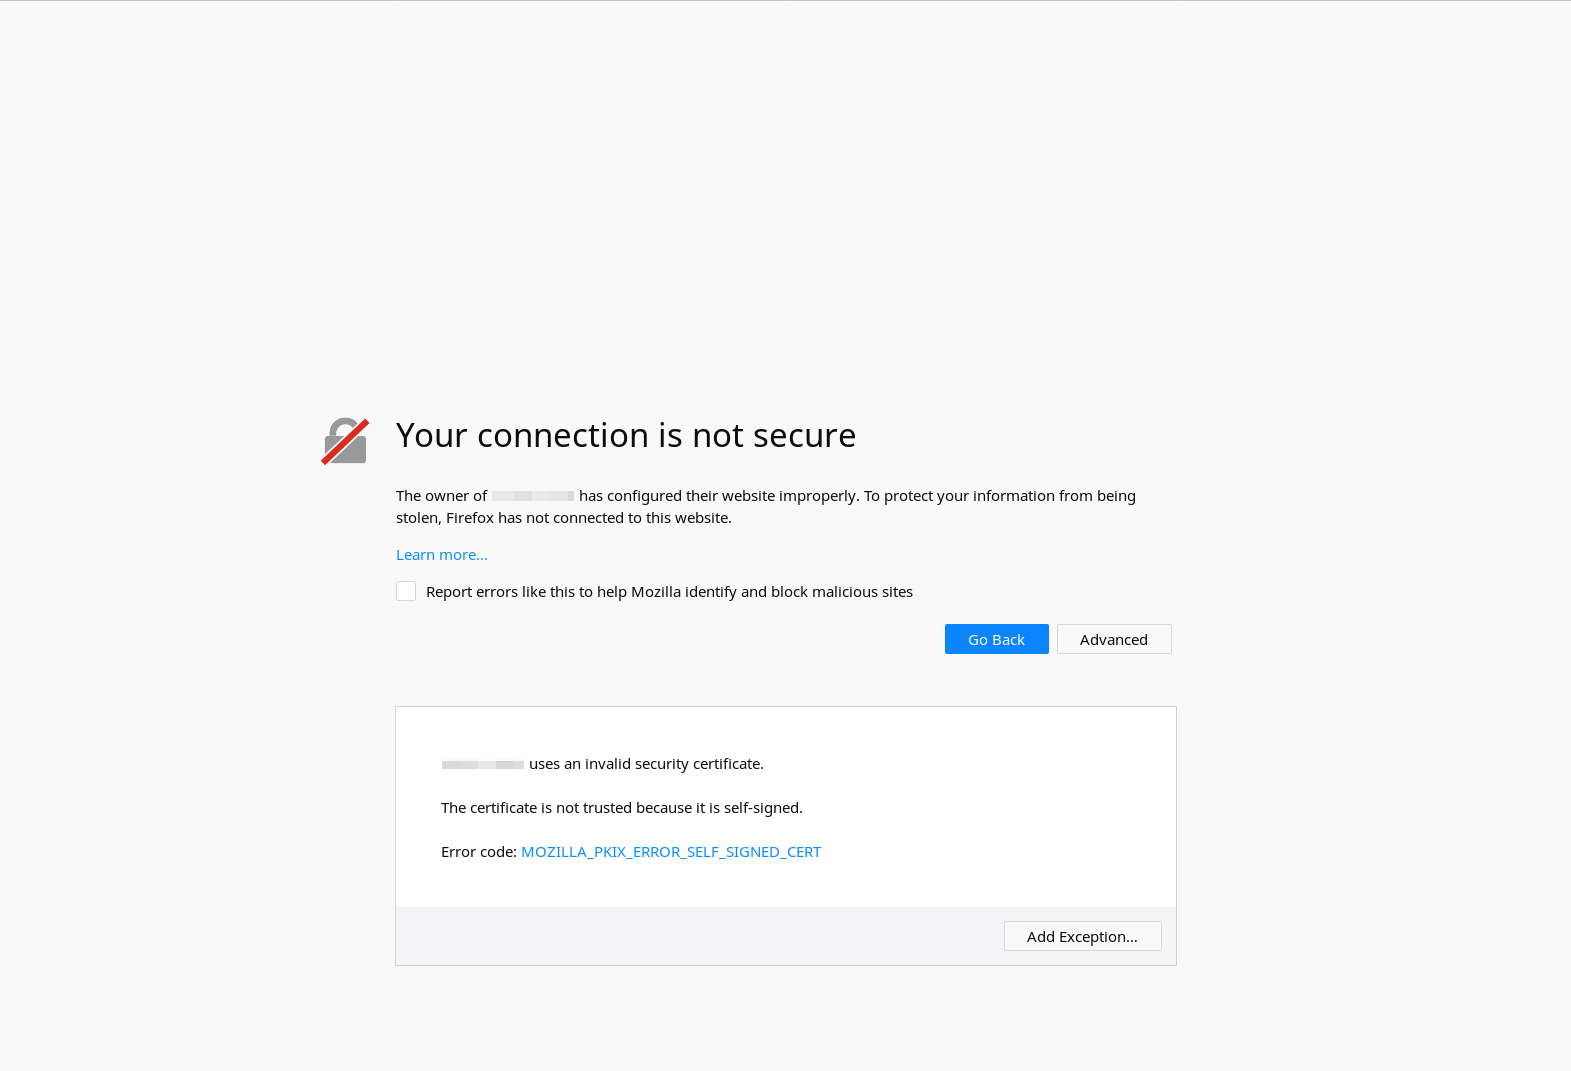
Fig. 3.1.1 Firefox Connection Warning
Click Add Exception…. Set Permanently store this exception to keep the IP address or DNS hostname permanently stored in Firefox.
Click Confirm Security Exception.

Fig. 3.1.2 Firefox Add Exception
3.1.2. Adding an Exception in Chrome
Click Advanced to view information about the error code.
Click Proceed to hostname (unsafe).

Fig. 3.1.3 Chrome Connection Warning
3.2. Signing Up for TrueCommand™
Follow these steps to create a new admin user:
Log in using the default username (
admin) and password (admin). This username is only present when there are no actual users defined in the database.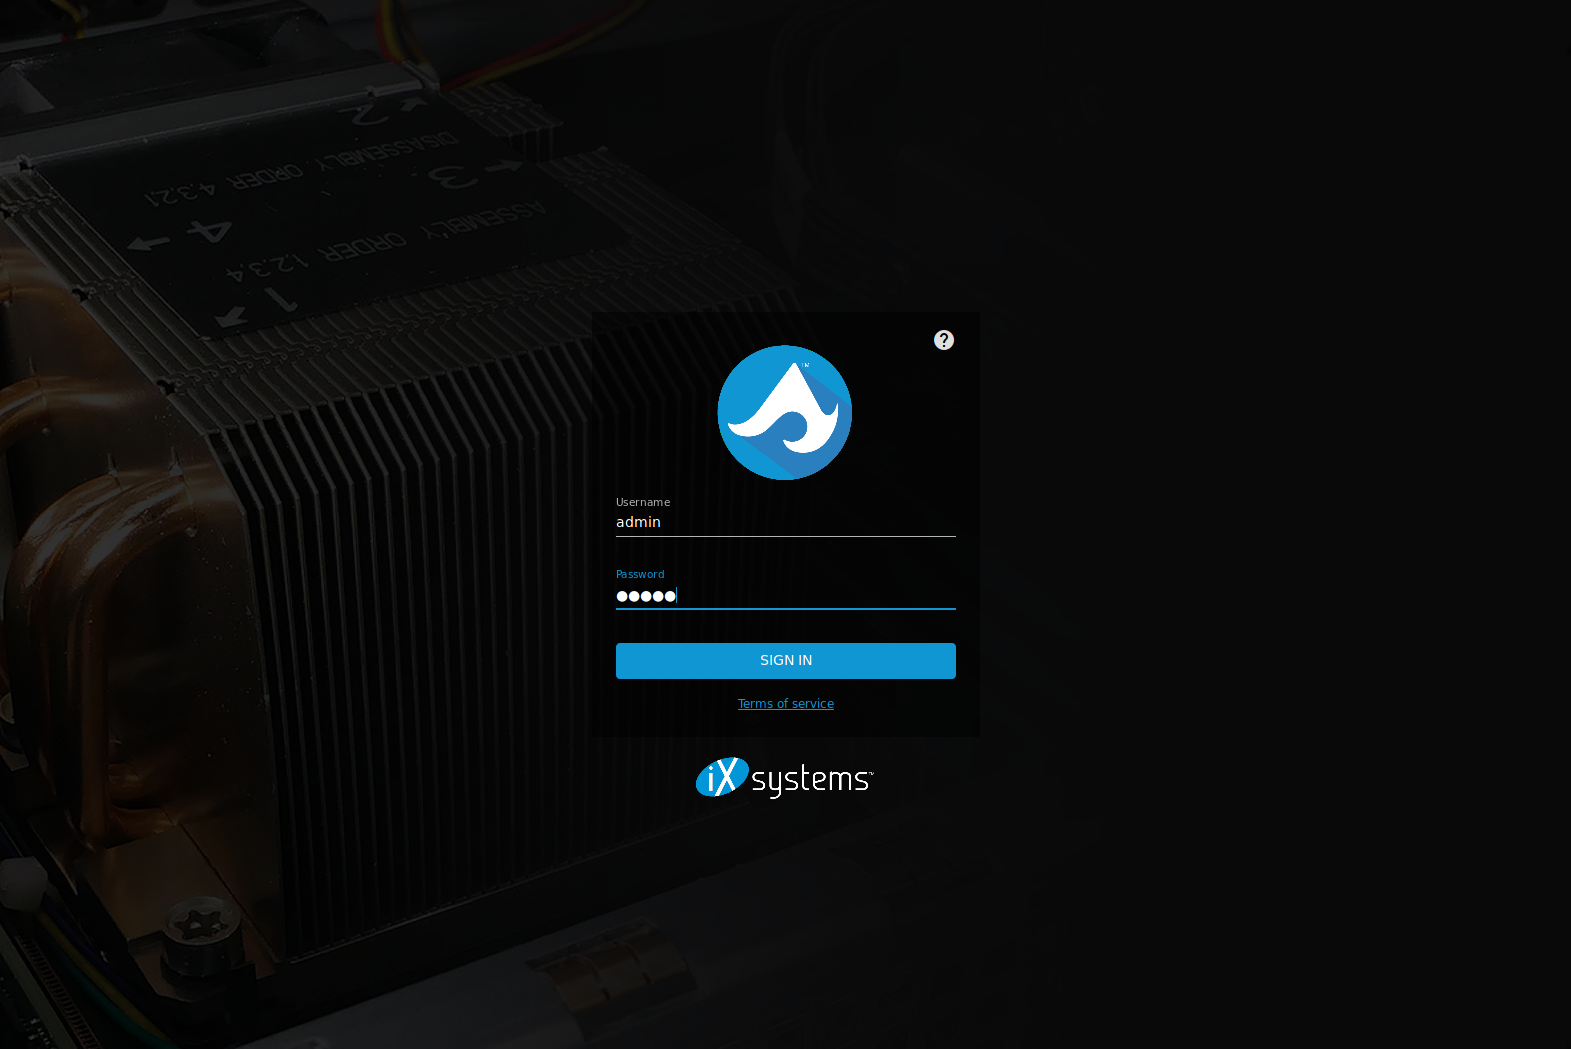
Fig. 3.2.1 Log in to Access Sign Up Page
Enter a username and password. Read the terms of service, set I have read and agree to the terms of service, and click SIGN UP.
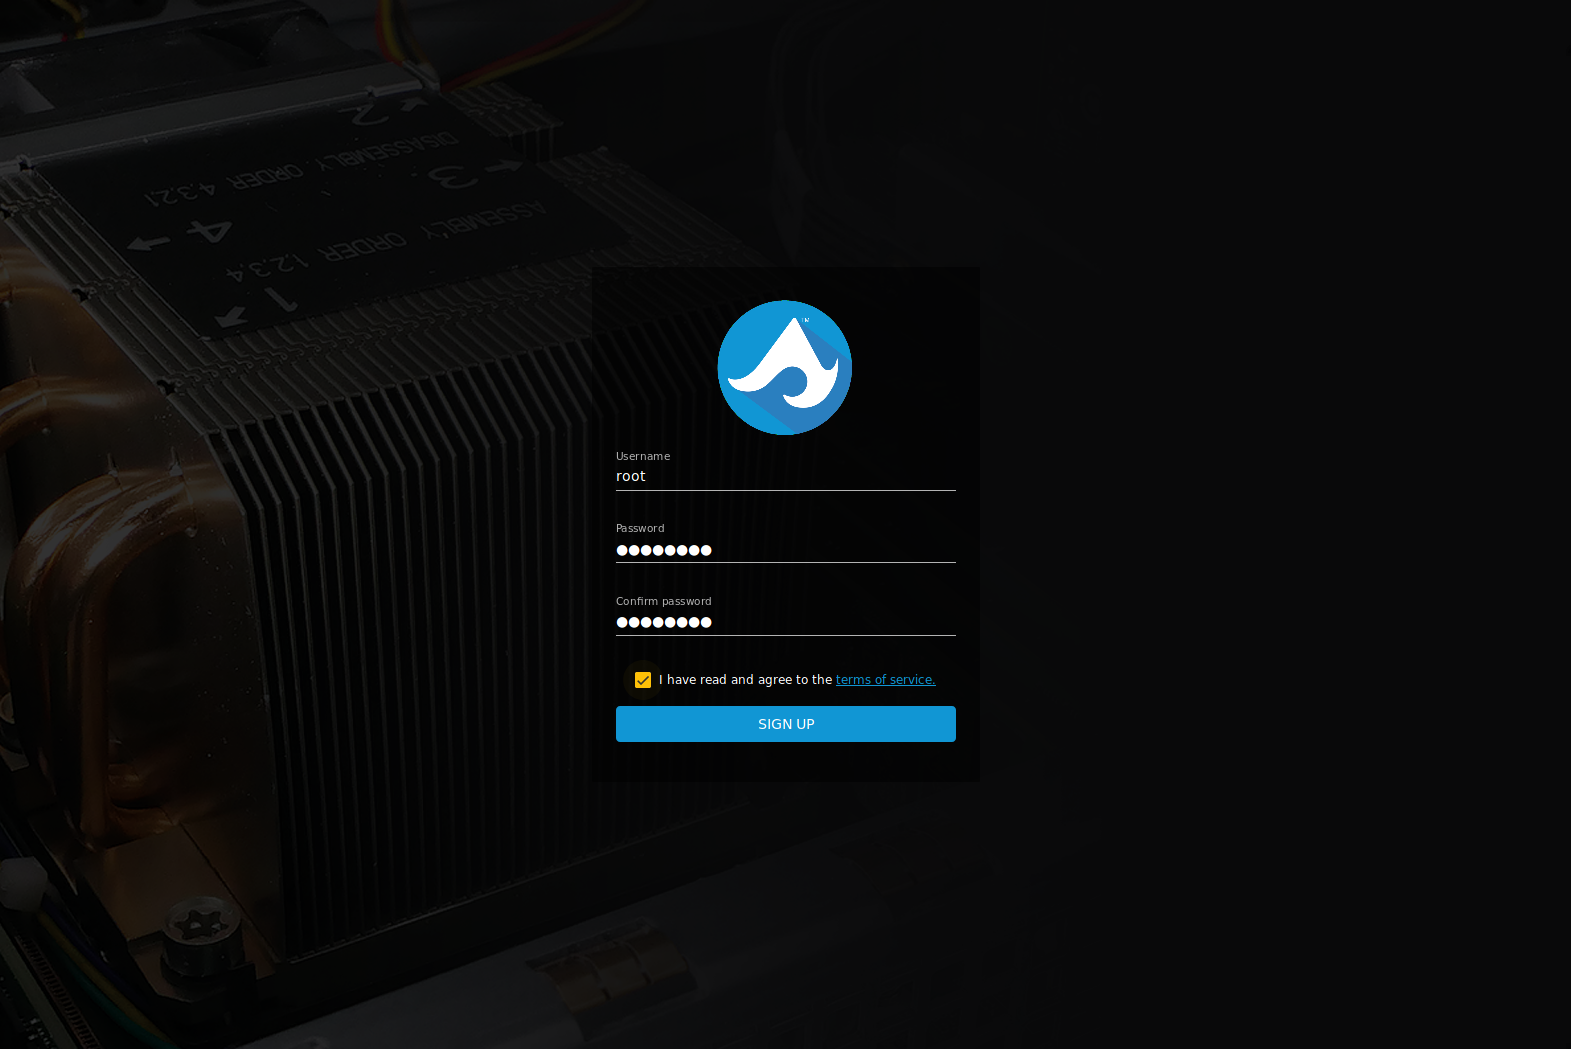
Fig. 3.2.2 Sign Up for TrueCommand™
Log in with the administrator user just created. The TrueCommand™ web interface is displayed.
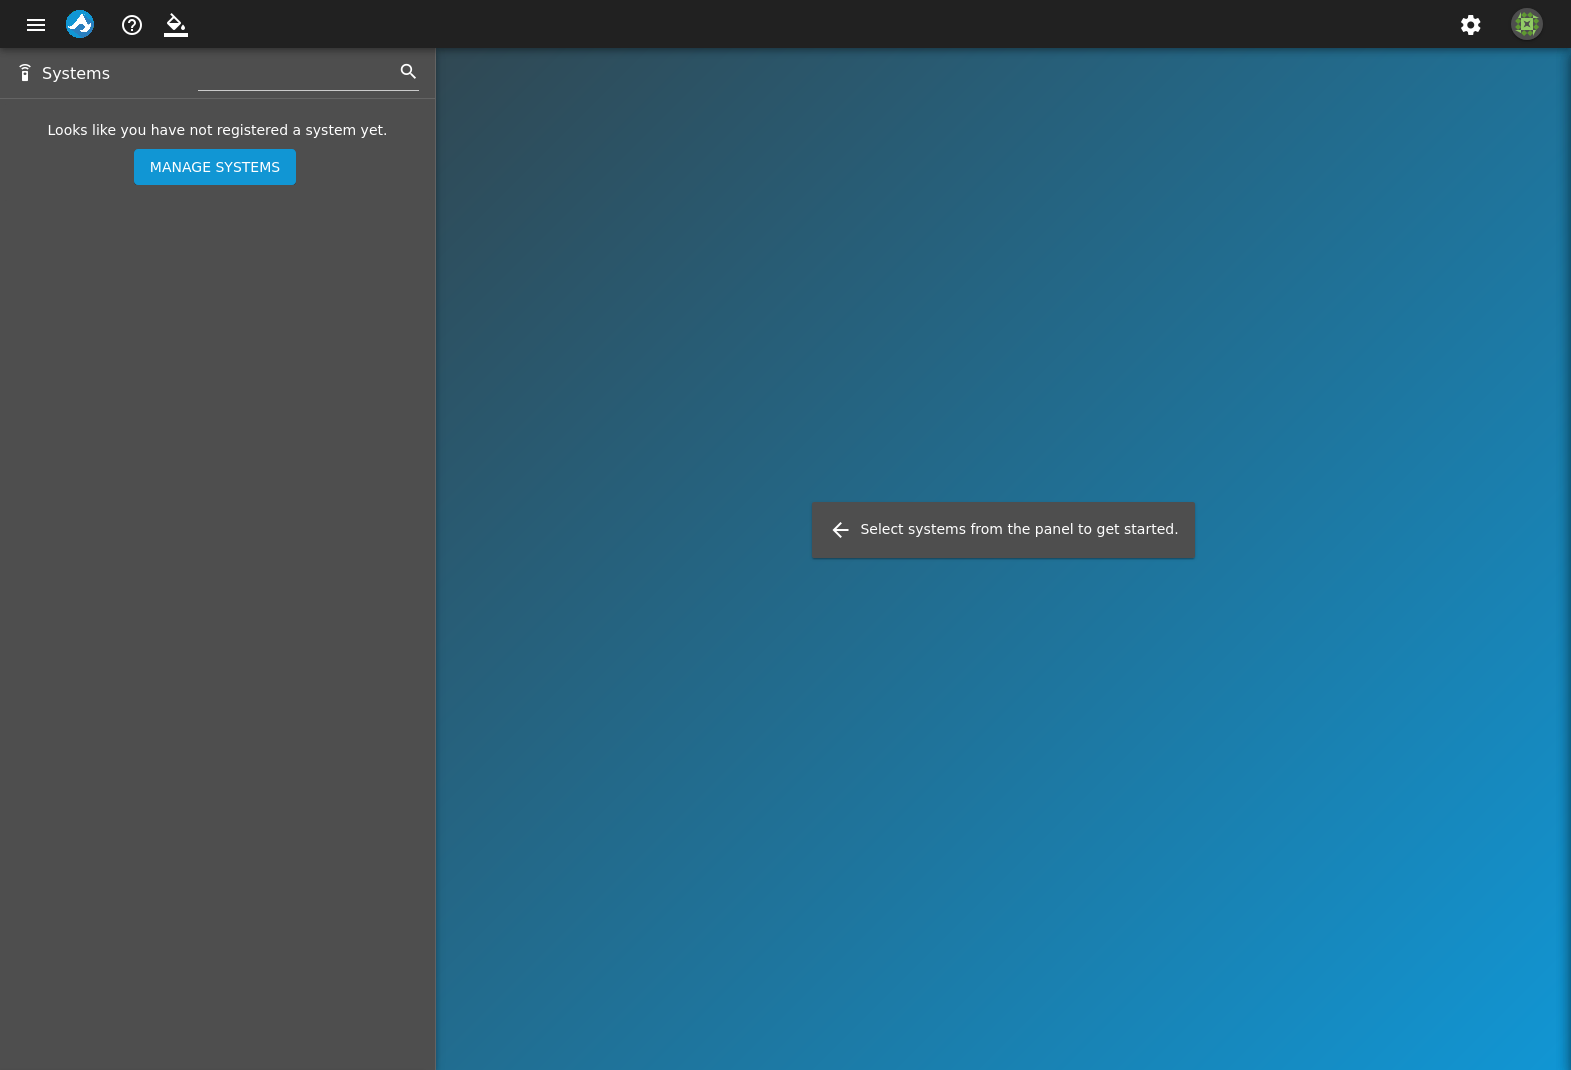
Fig. 3.2.3 Empty Dashboard
The Dashboard is empty until TrueCommand™ begins monitoring systems.
4. Dashboard
The dashboard is used to manage and monitor FreeNAS® and TrueNAS® systems. It displays system storage capacity, CPU usage, memory usage, network statistics, and other useful information. To open the dashboard, click the TrueCommand™ logo in the upper-left side of the web interface.
The dashboard is empty when first setting up TrueCommand™ because no systems are being monitored. Add Systems to view them on the dashboard. All added systems are shown on the dashboard by default. Each system summary has options for that system, including viewing more details, opening the system web interface, installing updates, and others. These options change according to the account permissions that is currently logged in to the TrueCommand™ web interface.
To hide a system on the dashboard, unset the checkbox in the Systems side panel. Access the system by clicking System web interface in the side panel. This opens the system interface associated with the DNS hostname or IP address. TrueCommand™ uses SSL by default to connect to other systems. This means if an authentic certificate authority is not used on the system, TrueCommand™ cannot connect to view the system web interface. See Certificate Authorities and Certificates for more detailed information on how to create a certificate.
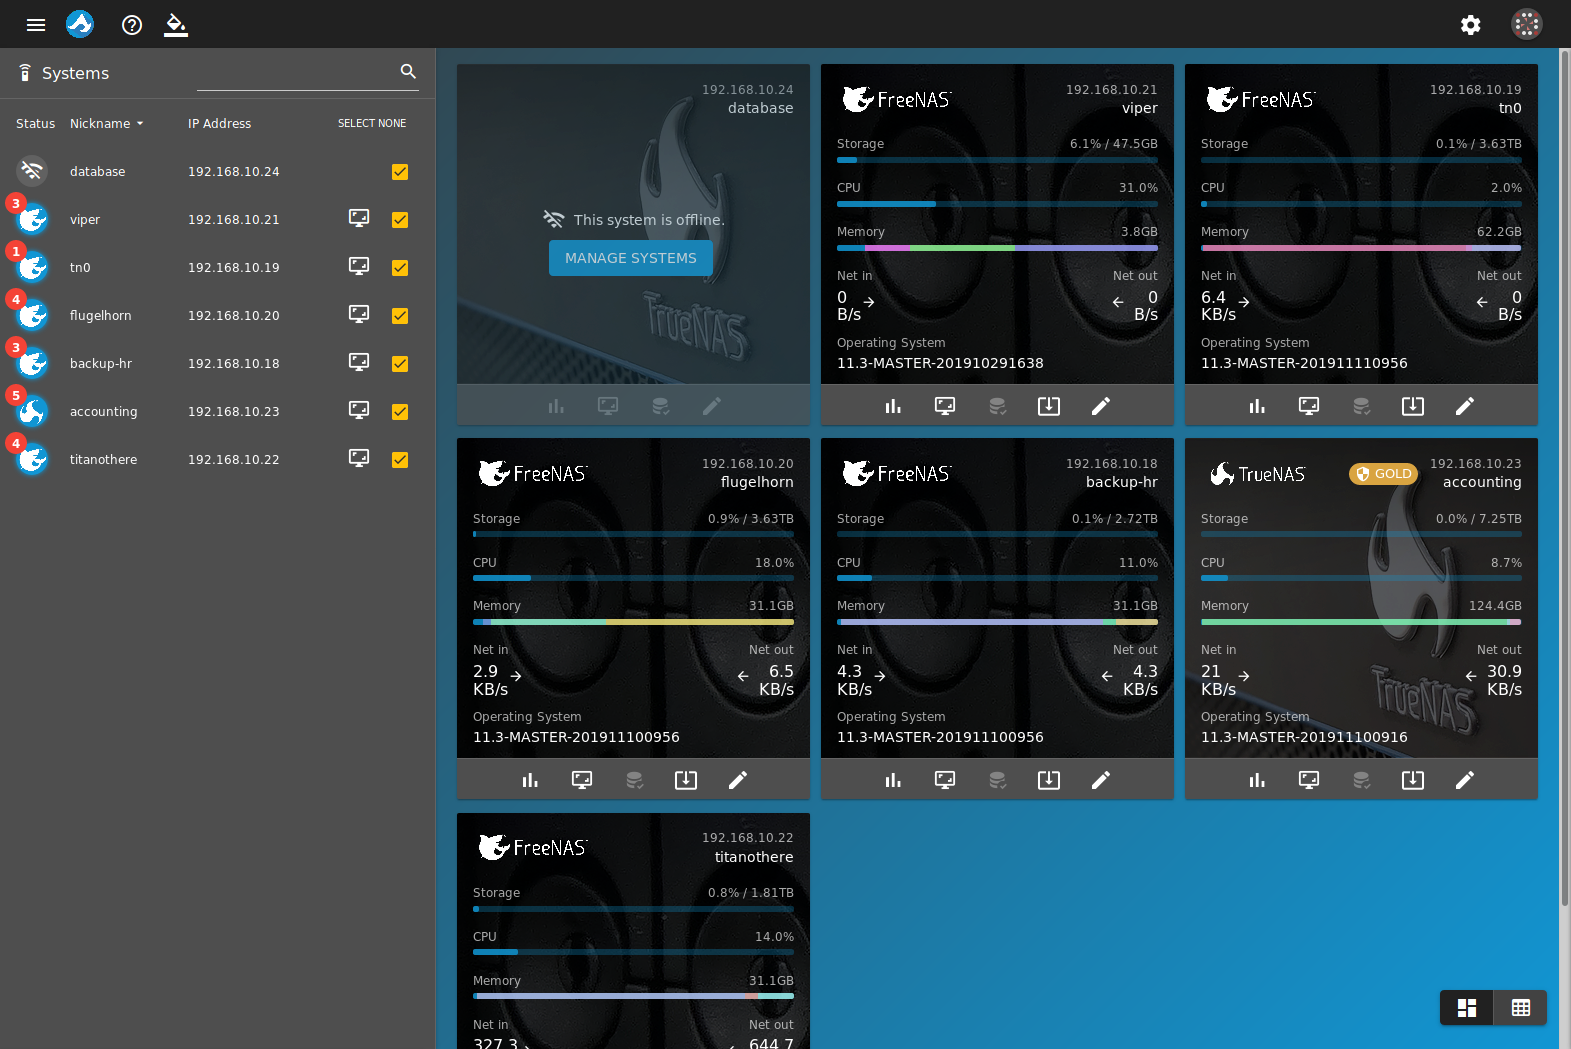
Fig. 4.1 Dashboard with Systems
Live statistics are displayed for each connected system. To edit the TrueCommand™ settings for a system, click the edit button. FreeNAS® or TrueNAS® systems with available updates show a system update button. Clicking system update installs updates and reboots that system.
Clicking System web interface in the side panel accesses that system. This opens the system interface associated with the DNS hostname or IP address.
To hide a system on the dashboard, unset the checkbox in the Systems side panel. View more information about a specific system by hiding all other systems on the dashboard. When only one system is shown, additional tabs show more system details. There are also system controls for user accounts that can administrate the FreeNAS® or TrueNAS® system:
Metrics shows a variety of system usage statistics. These can be filtered by date. The data from each graph can be downloaded as a
.jsonfile. To download the graph data, hover over the desired graph and click Download.Storage summarizes the storage pool status. Clicking metrics for a pool shows more usage details and dataset notes.
Clicking expand shows the disk status. Clicking metrics for one of the related disks shows the full activity history of that disk.
Network shows the configuration and current bandwidth of each physical and virtual network interface. Clicking metrics for a device shows more detailed traffic graphs.
Services lists every available service. Service states are displayed, along with options to stop, start, or set a service to auto-start.
Jails lists jails with configuration details and current state. Jails can be started or stopped.
Virtual Machines lists virtual machines (VM) with configuration details and current status. VMs can also be started or stopped.
Alerts shows alerts generated by the FreeNAS® or TrueNAS® system. Alerts are sorted between Active and Resolved notices. To see more details or comments on an alert, click the alert error icon. Alerts can be marked as resolved or removed completely.
Database Backups manages database files copied from attached iXsystems™ NAS systems.
Audit tracks changes that have been made to the system configuration. TrueCommand™ updates the audit log every 30 minutes with entries that show which item changed and whether a TrueCommand™ user initiated the change. To keep log information secure, it is recommended to secure NAS connections with SSL. To view the complete entry for the configuration change, click show.
4.1. Managing NAS Databases
TrueCommand™ detects when changes are made to an attached iXsystems™ NAS system configuration and creates a copy of the NAS database. These database copies can be restored to one or more iXsystems™ NAS systems, cloning that configuration. FreeNAS® or TrueNAS® systems must be version 11.2 or greater to permit automated database backups.
By default, TrueCommand™ saves up to seven copies of a single system database. This count resets when the attached iXsystems™ NAS is updated to a new version of FreeNAS® or TrueNAS®. For example, say TrueCommand™ has saved five different database files from a TrueNAS® 11.2 system. When that system is updated to TrueNAS® 11.3, TrueCommand™ keeps the existing 11.2 database copies and automatically saves up to seven copies of the 11.3 system database.
Automated backup settings are located in the TrueCommand™ configuration options.
To back up a NAS database manually, go to the and click database backup.
Saved database files can be located by going to the , showing details for a single system, and clicking the Database Backups tab. Each entry shows the FreeNAS® or TrueNAS® database version, when the database was copied to TrueCommand™, and buttons to delete or restore the database.
Restoring a Database
Danger
Do not restore a database to a system that has a different version of FreeNAS® or TrueNAS® installed! See the FreeNAS® or TrueNAS® documentation for instructions about rolling a system back to a software version that matches the database being restored.
Clicking database restore shows restore options for the selected database. Click ADD SYSTEM to choose a system to restore to that database configuration. Choosing multiple systems applies that database to all selected systems, allowing easy cloning of a single FreeNAS® or TrueNAS® configuration across multiple systems. Systems are unavailable in both TrueCommand™ and the individual NAS web interface while the database is applied.
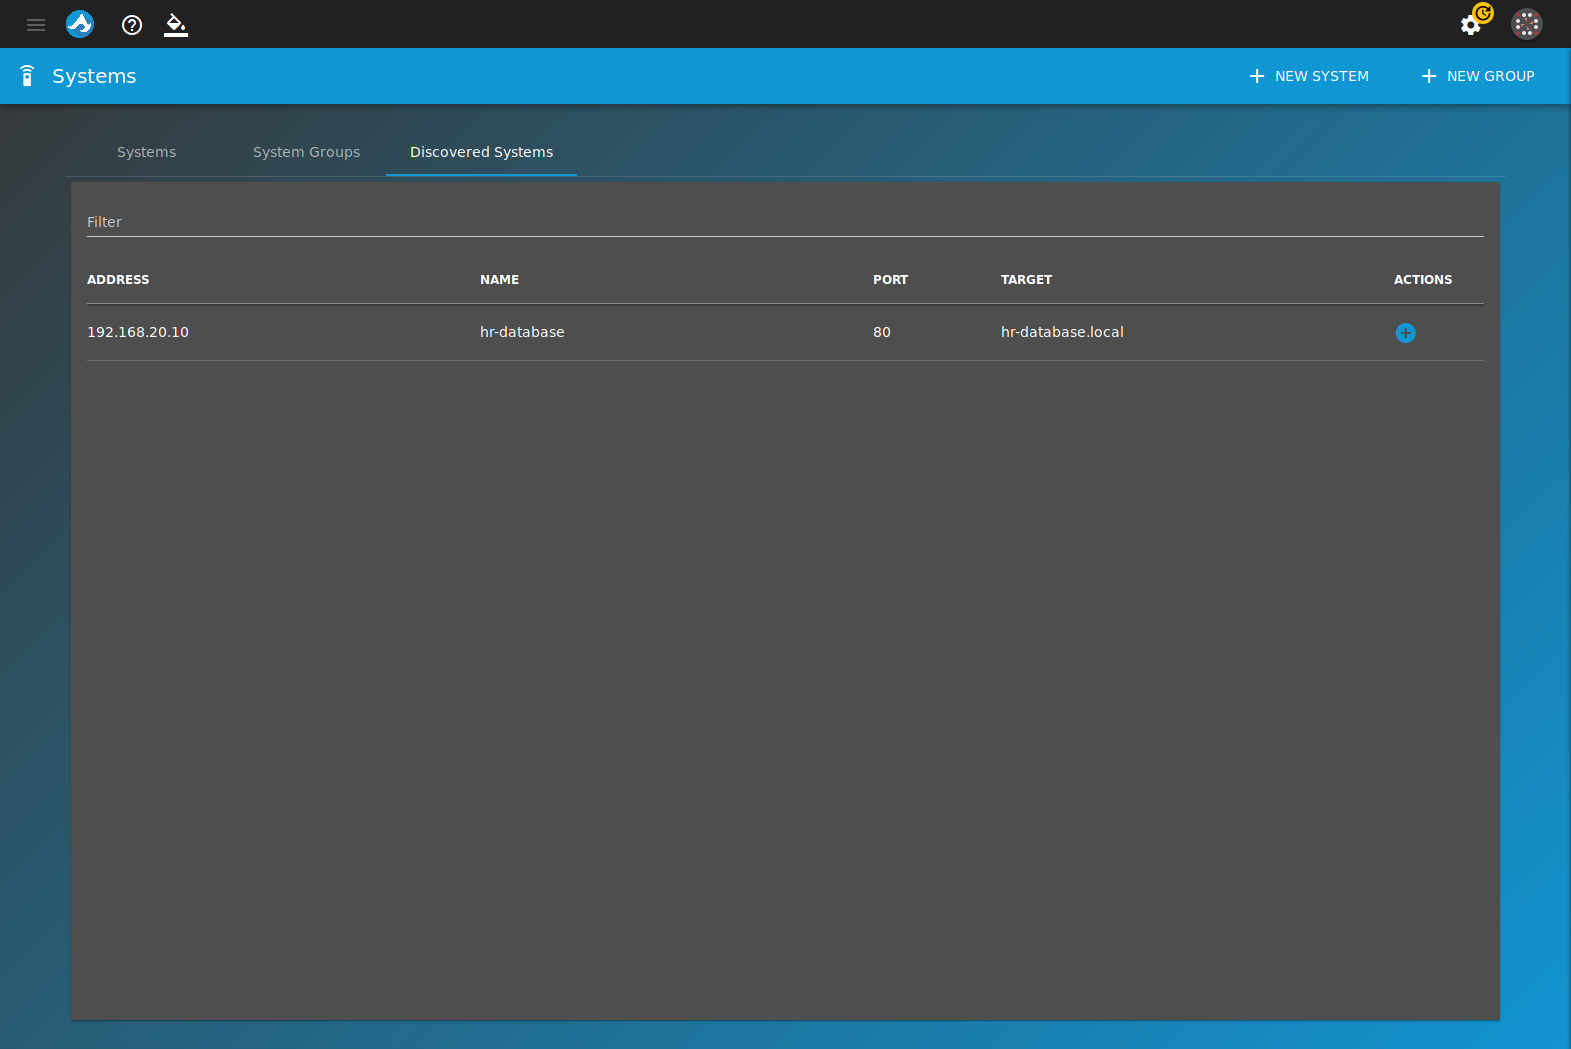
5. Systems
Systems contains all the options for TrueCommand™ to begin monitoring a system. The systems page has three tabs: Systems, System Groups, and Discovered Systems. View the systems page by going to configure systems.
Click configure systems to begin monitoring a system. Enter the system IP address or DNS hostname, nickname, and password. If a mistake is made, the contents of the fields can be reset by clicking RESET FORM. To add the new system, click ADD SYSTEM. Adding a system with an incorrect password shows that system as offline in the dashboad and added systems list.
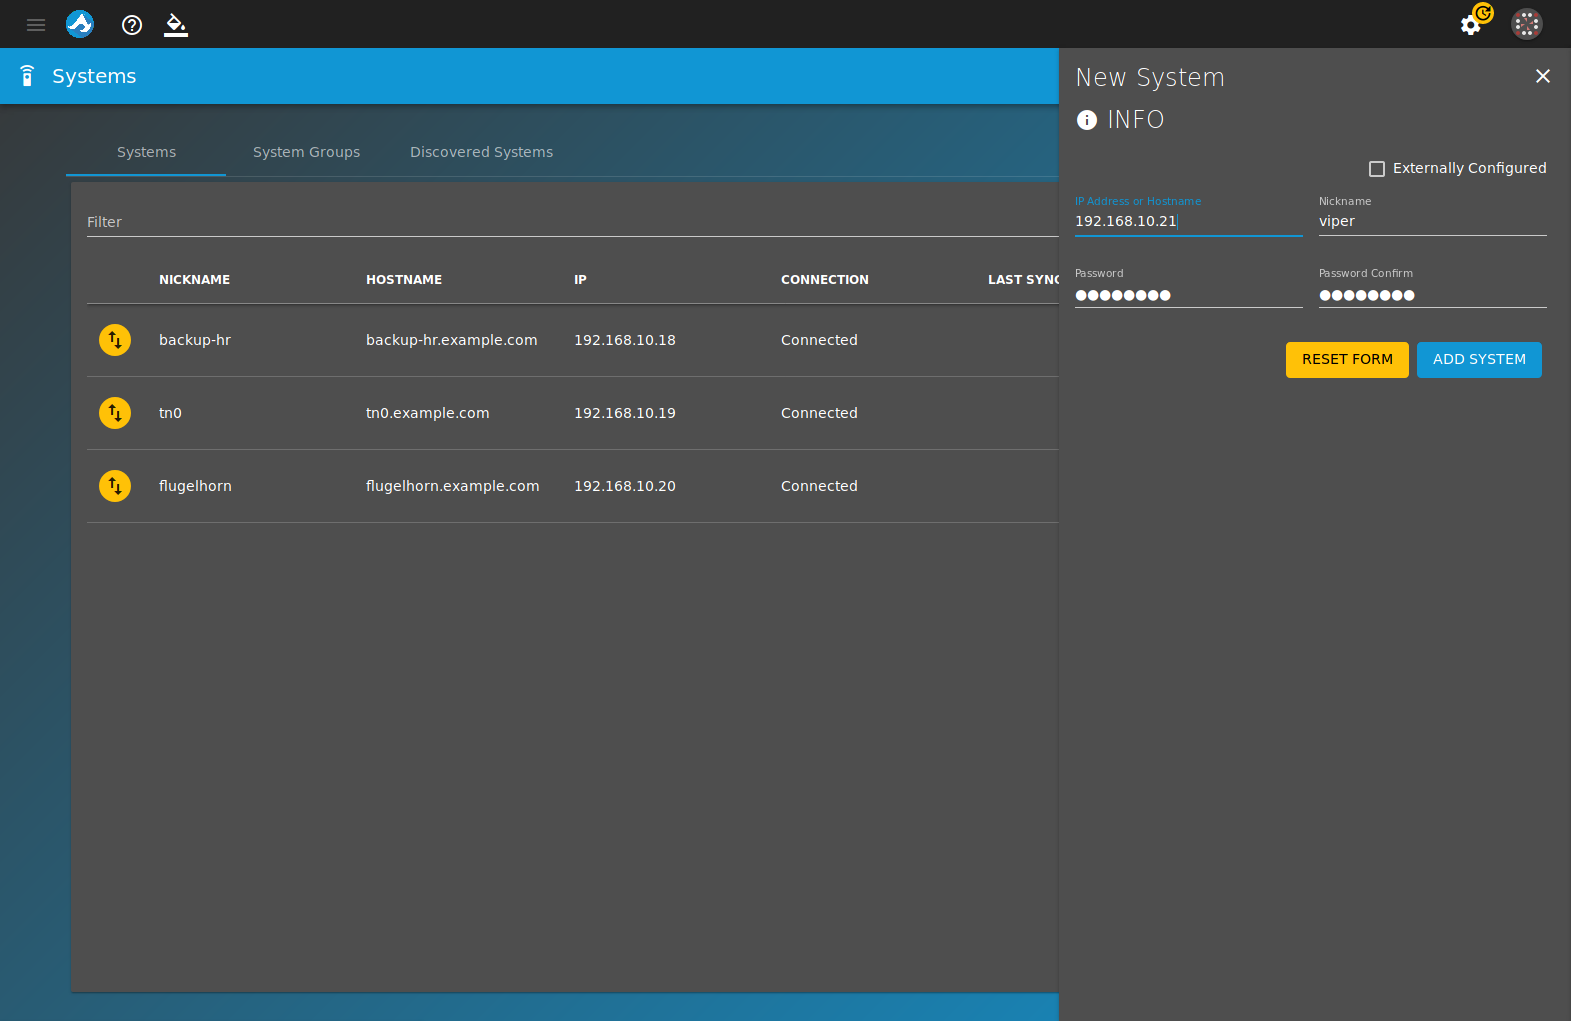
Fig. 5.1 Adding a New System
Click Systems to view all added systems.
Systems can be edited by clicking edit. Change the system information by entering new information in the fields and clicking SAVE CHANGES. To go back to the original contents of the fields, click RESET FORM.
A system can be removed from TrueCommand™ monitoring by clicking delete.
5.1. Groups
Groups are collections of systems that are organized by TrueCommand™ administrators. Systems are organized into groups to efficiently manage permissions and reports.
Click System Groups to view the list of created groups and the systems they contain. Groups are created by clicking configure . Enter a group name. Click ADD SYSTEM to add a system to the group. Repeat this step to add multiple systems to a group. Click CREATE GROUP when all desired systems are added to the group.
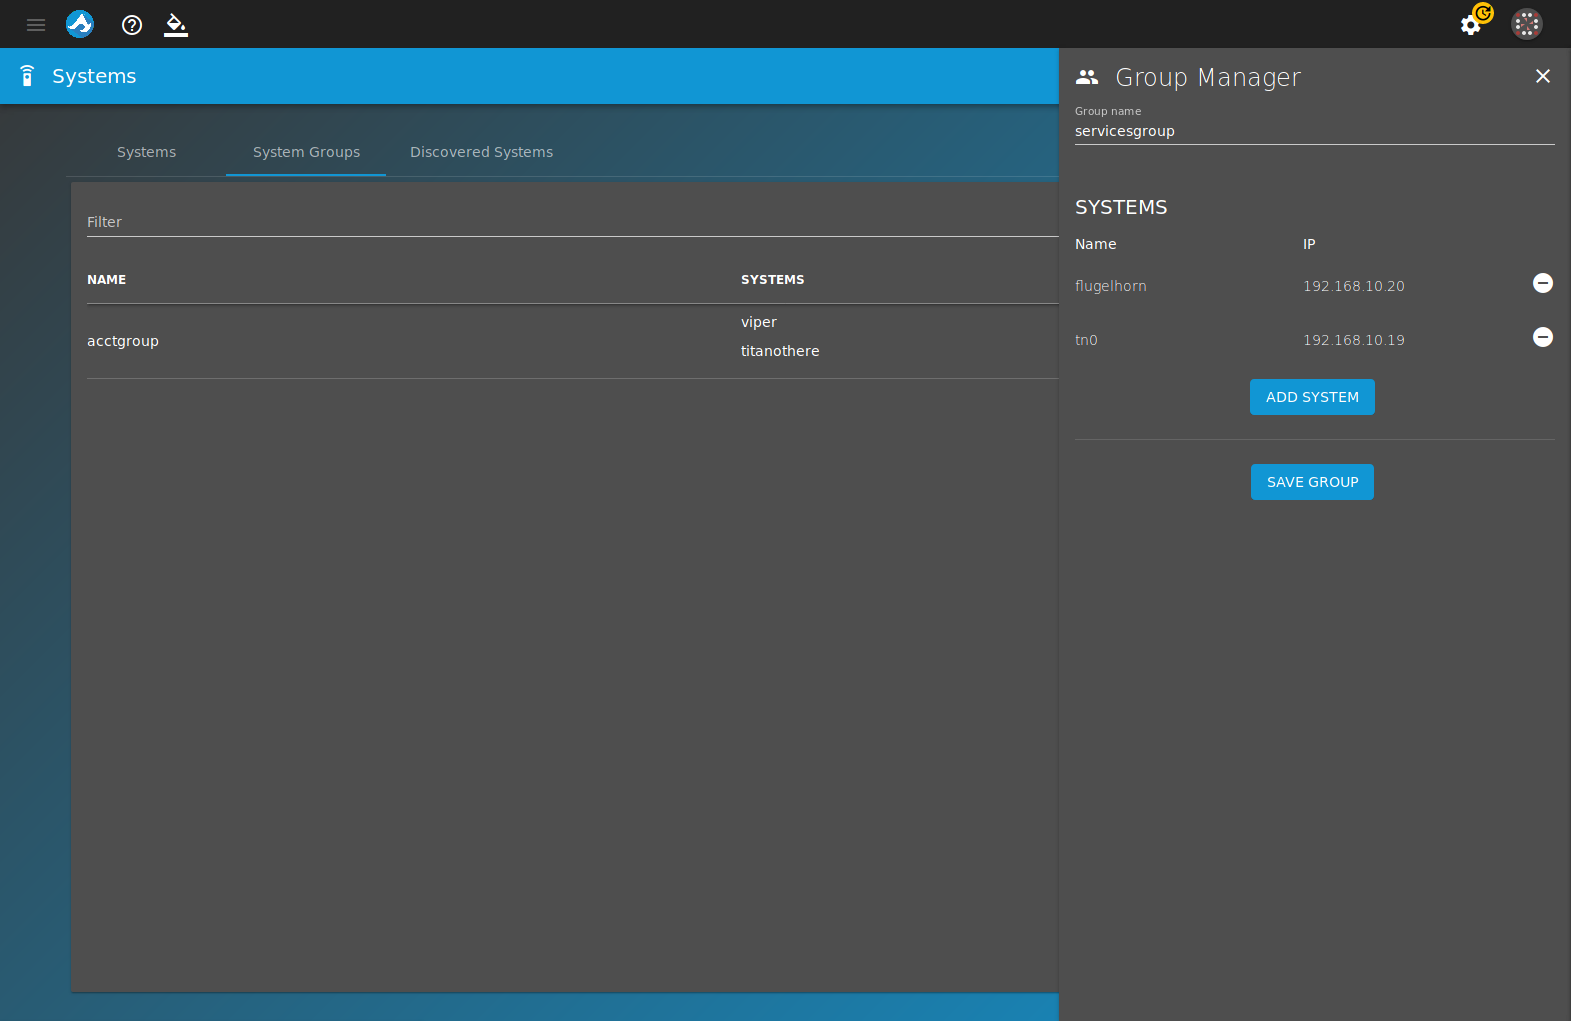
Fig. 5.1.1 Adding a New Group
Editing a group allows updating the group name or changing which systems are members of that group.
To delete a system group, click delete. Confirm the deletion by clicking YES.
6. Users
TrueCommand™ allows multiple people to connect to the system with personalized settings. Each person has a unique user account.
6.1. Add User
Register a new user by clicking configure . Enter a descriptive username and an authentication method for the user. The DEFAULT authentication method uses the TrueCommand™ web interface to log in. LDAP/AD allows for a single sign on experience through Lightweight Directory Access Protocol (LDAP) or Active Directory (AD). Usernames and passwords are provided through LDAP or AD. This means a user can log in with an LDAP or AD account without creating a TrueCommand™ login. The LDAP server IP address or DNS hostname and Domain are required to use LDAP/AD. The LDAP or AD Username (optional) is required if the TrueCommand™ username does not match the LDAP or AD credentials.
After entering the information, click CREATE USER to add the user to TrueCommand™. Repeat this process to add multiple users.
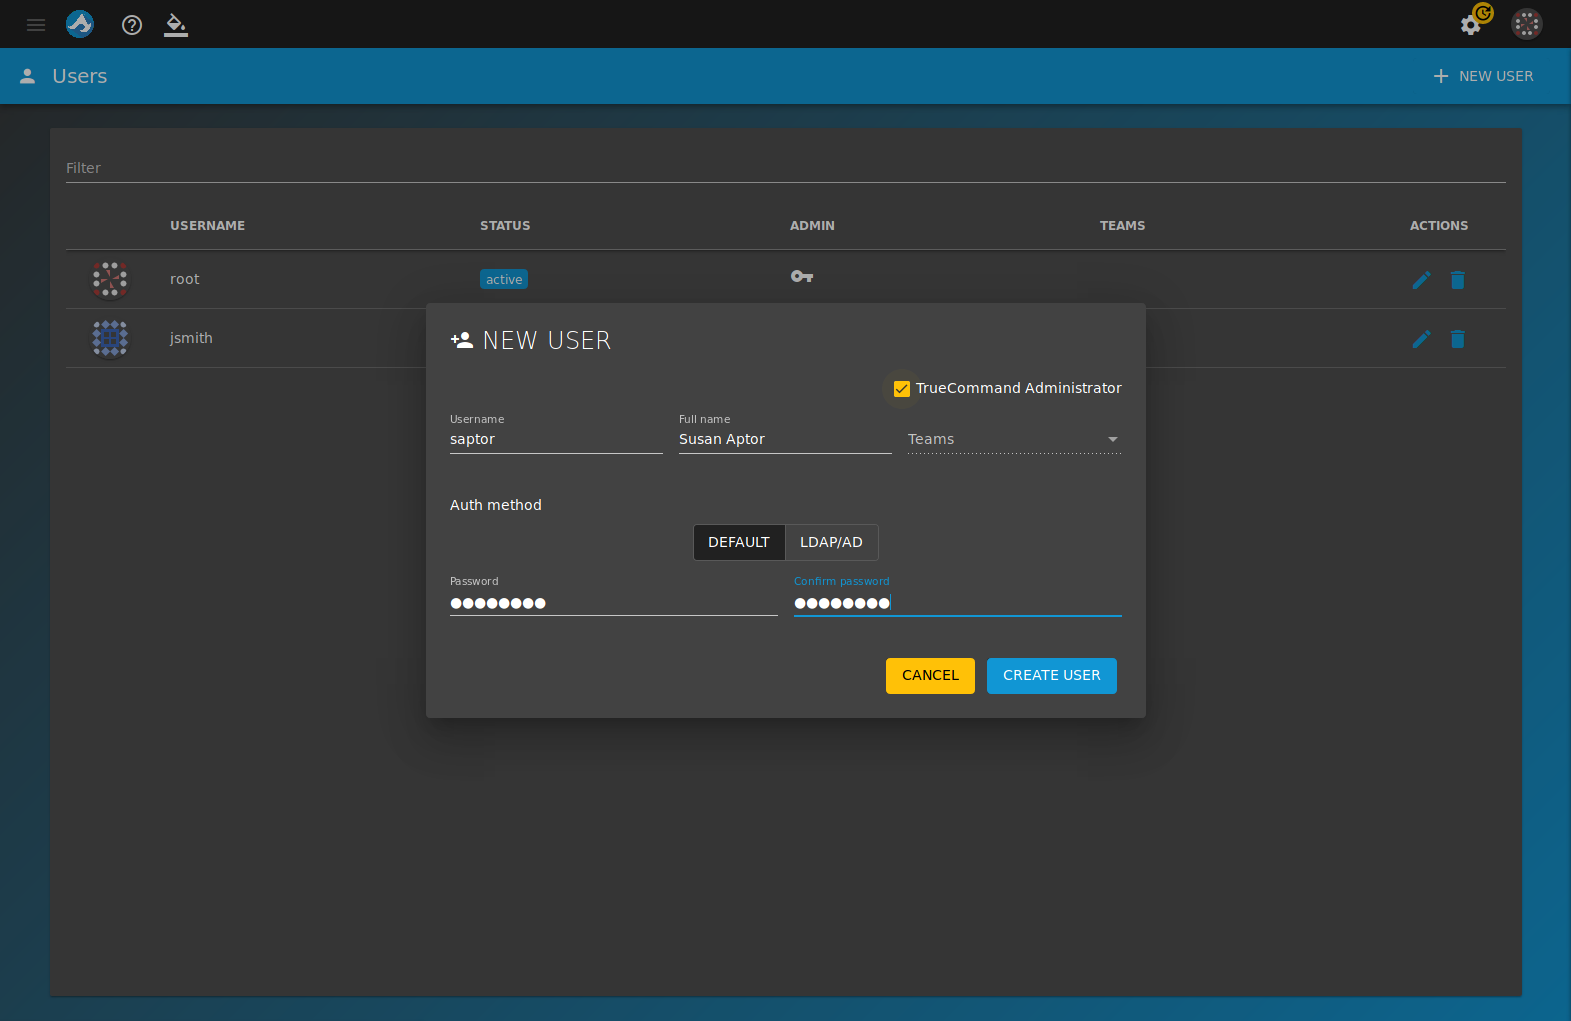
Fig. 6.1.1 Adding a User
Users can be assigned to Teams. When a team is created, select a team from the drop-down to add the user to that team. Users can be members of multiple teams.
Users can be deleted by clicking delete.
Warning
Deleting a user permanently removes the user and cannot be undone.
6.2. Edit User
Edit users from the configure edit menu. Editing a user requires entering the current password for that user. These details can be changed for a user:
- AVATAR: Click edit and choose an avatar image. An avatar is a picture associated with the user.
- USER DETAILS: A user can be given administrator privileges by clicking the slider. The Username, Full Name, Title, Email, Phone, and Auth method can be changed. The LDAP server IP address or DNS hostname and Domain are required to use LDAP/AD. The LDAP or AD Username (optional) is required if the TrueCommand™ and LDAP or AD username are different. To go back to the original contents of the fields, click RESET FORM.
- JOINED TEAMS: The CREATE A NEW TEAM button appears if no teams exist. When teams are present, the JOIN TEAM button appears. Click JOIN TEAM to add the user to a team. Users can be added to multiple teams. Click minus to remove the user from a team.
- SYSTEM ACCESS: The MANAGE SYSTEMS button appears if a system has not been added to TrueCommand™. When a system has been added, the ADD SYSTEM button appears. Click ADD SYSTEM and select a system from the drop-down to give the user access to that system. To assign the type of access to the system, choose read or read/write from the ACCESS drop-down. To remove a user’s access to a particular system, click minus on the desired system.
- SYSTEM GROUPS: A MANAGE GROUPS button appears if a group has not been created. When a group has been created an ADD GROUP button appears. Click ADD GROUP and select a group from the drop-down to give the user access to all the systems in that group. To assign the type of access to the group, choose read or read/write from the ACCESS drop-down. To remove a user’s access to a particular group, click minus on the desired group.
- End User License Agreement (EULA): The EULA can be viewed by clicking VIEW THE EULA.
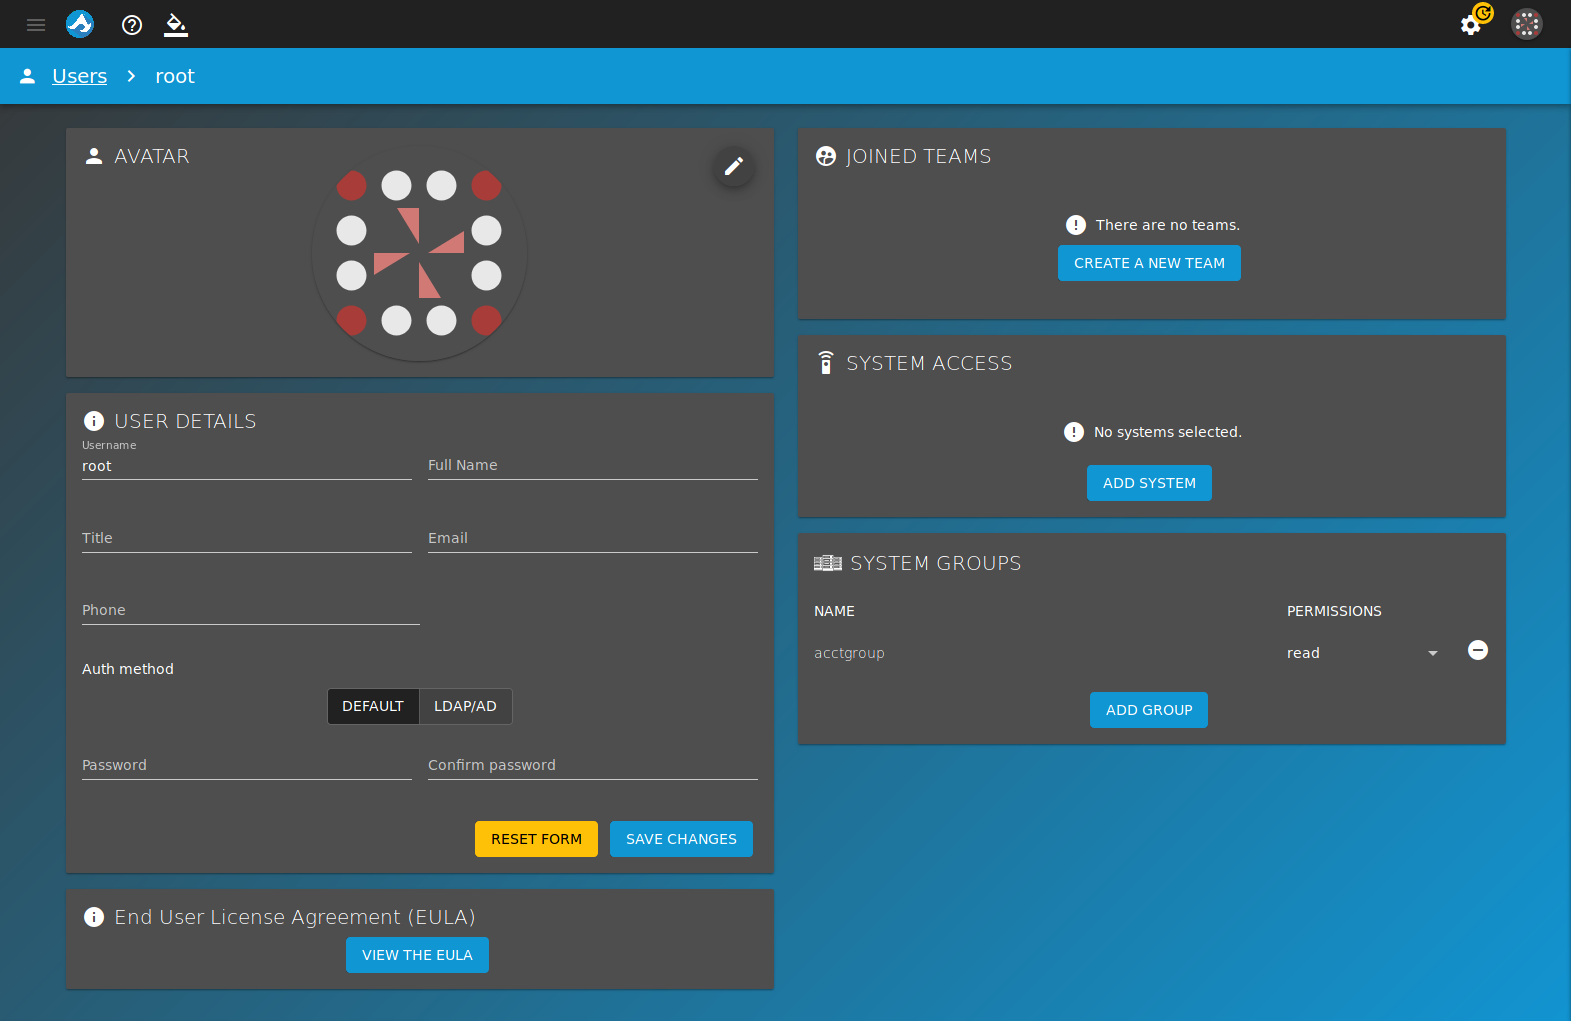
Fig. 6.2.1 Editing a User
7. Teams
Teams are a collection of users. They provide a more efficient way of managing users. For example, changing the permissions for one team is much faster than changing the permissions for many individual users.
7.1. Add Team
A team is created by clicking configure . Enter a name and select an avatar for the new team. Click CREATE TEAM to create the team.
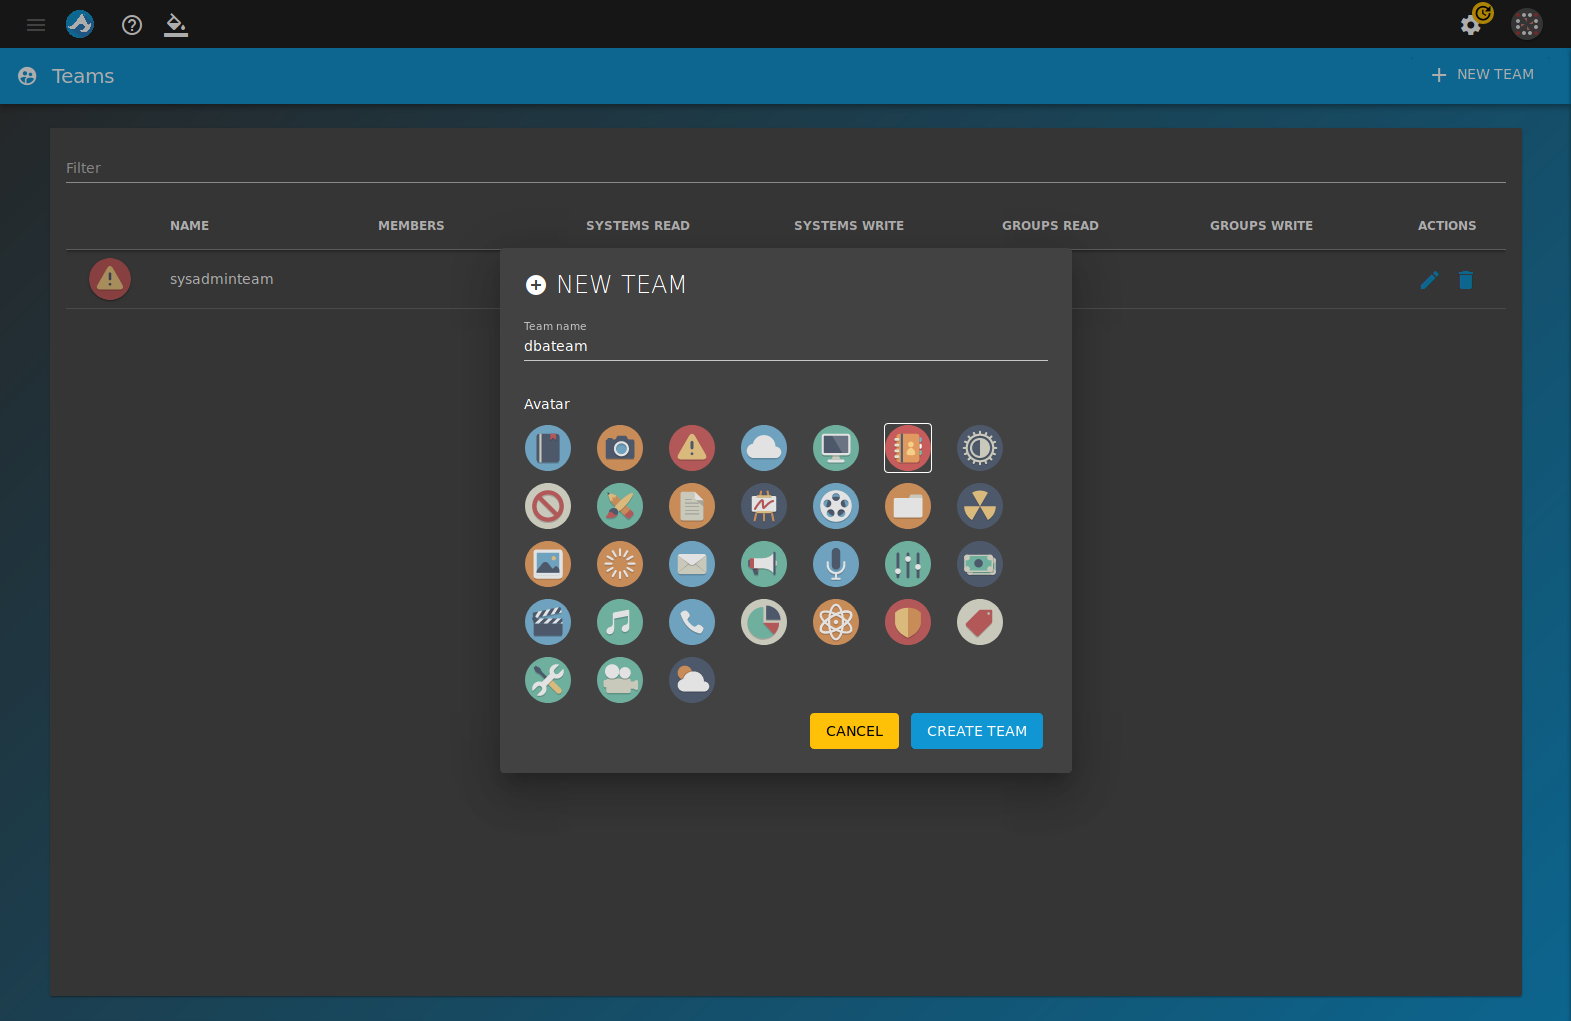
Fig. 7.1.1 Adding a New Team
7.2. Edit Team
Click configure edit to edit a team. These options can be changed:
- TEAM AVATAR: Click edit to upload an avatar image or use an existing image.
- MEMBERS: To add users to the team, click ADD USER and choose them from the drop-down. To remove users from the team, click minus on the desired user.
- SYSTEM ACCESS: Give the team access to specific systems by clicking ADD SYSTEM and selecting systems from the drop-down. This gives all users that are a part of the team access to the systems selected. To change the type of access, click read or read/write from the ACCESS drop-down. To remove a system from access by the team, click minus on the desired system.
- SYSTEM GROUPS: Give the team access to created groups of systems by clicking ADD GROUP and selecting groups from the drop-down. This gives all members of the team access to the group of systems selected. To change the type of access, click the ACCESS drop-down and select read or read/write. To remove a group from access of the team, click minus on the desired group.
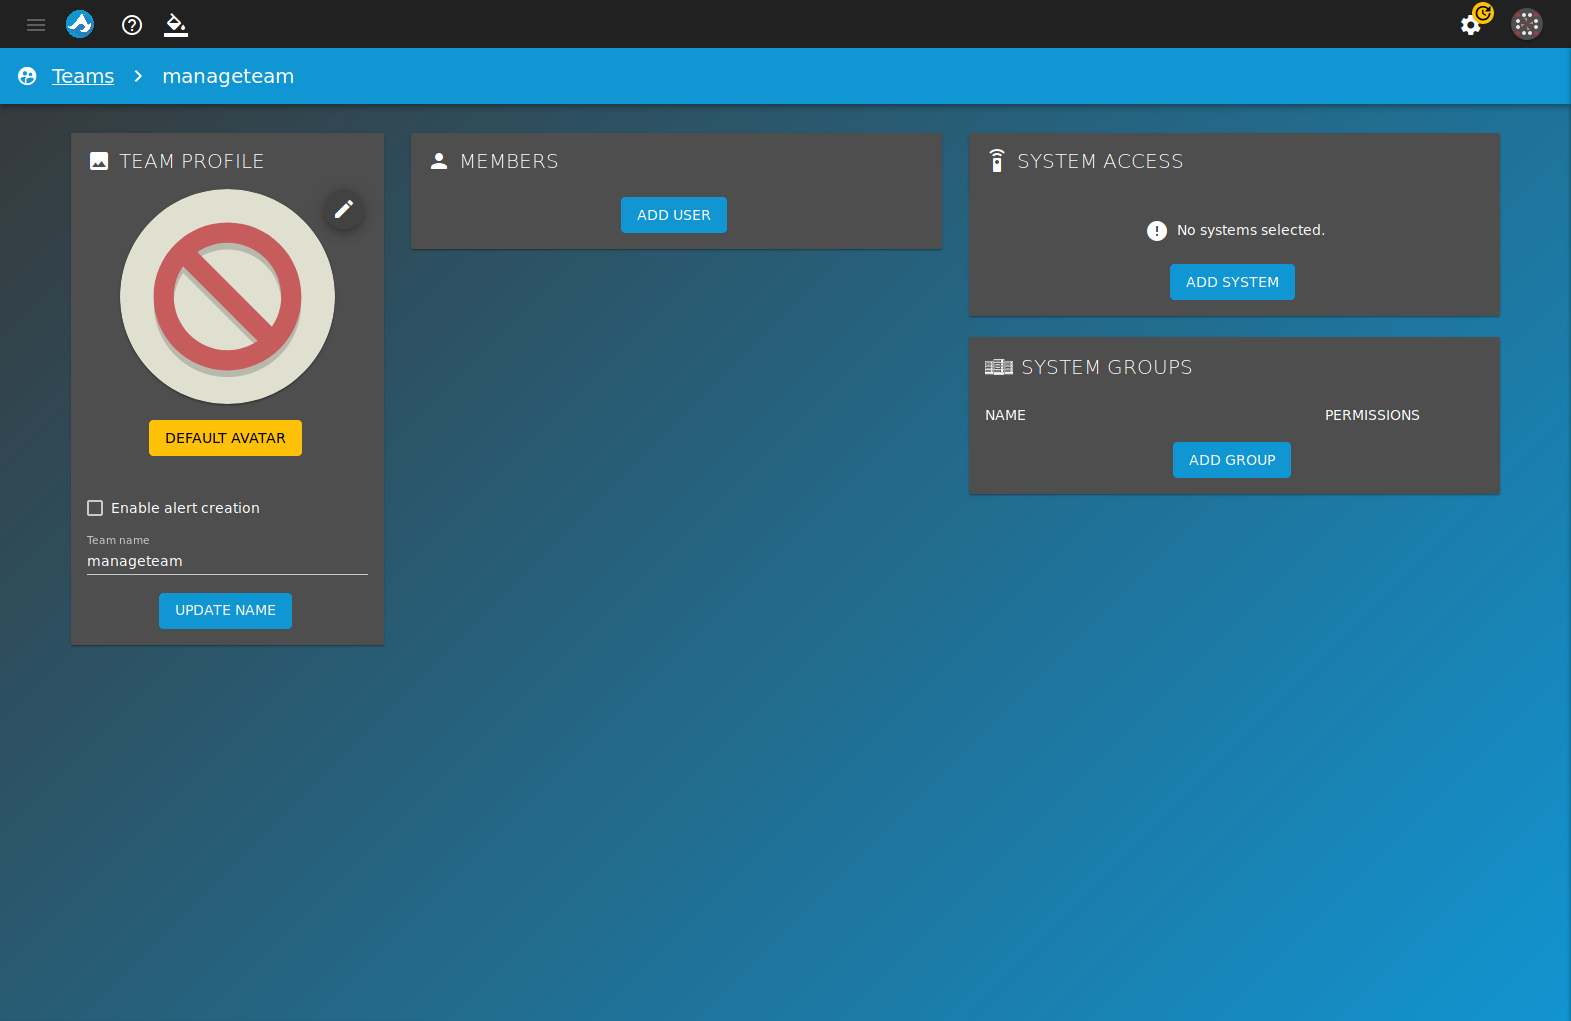
Fig. 7.2.1 Editing a Team
8. Alerts
TrueCommand™ alerts provide visual warnings for monitored systems that require attention. These alerts are either generated by the monitored system or an alert rule created in TrueCommand™.
To see all alerts that TrueCommand™ has discovered, go to the User Menu and click all alerts. Administrator accounts can see all generated alerts. A non-administrator account can only view alerts for systems that the individual account has permission to read.
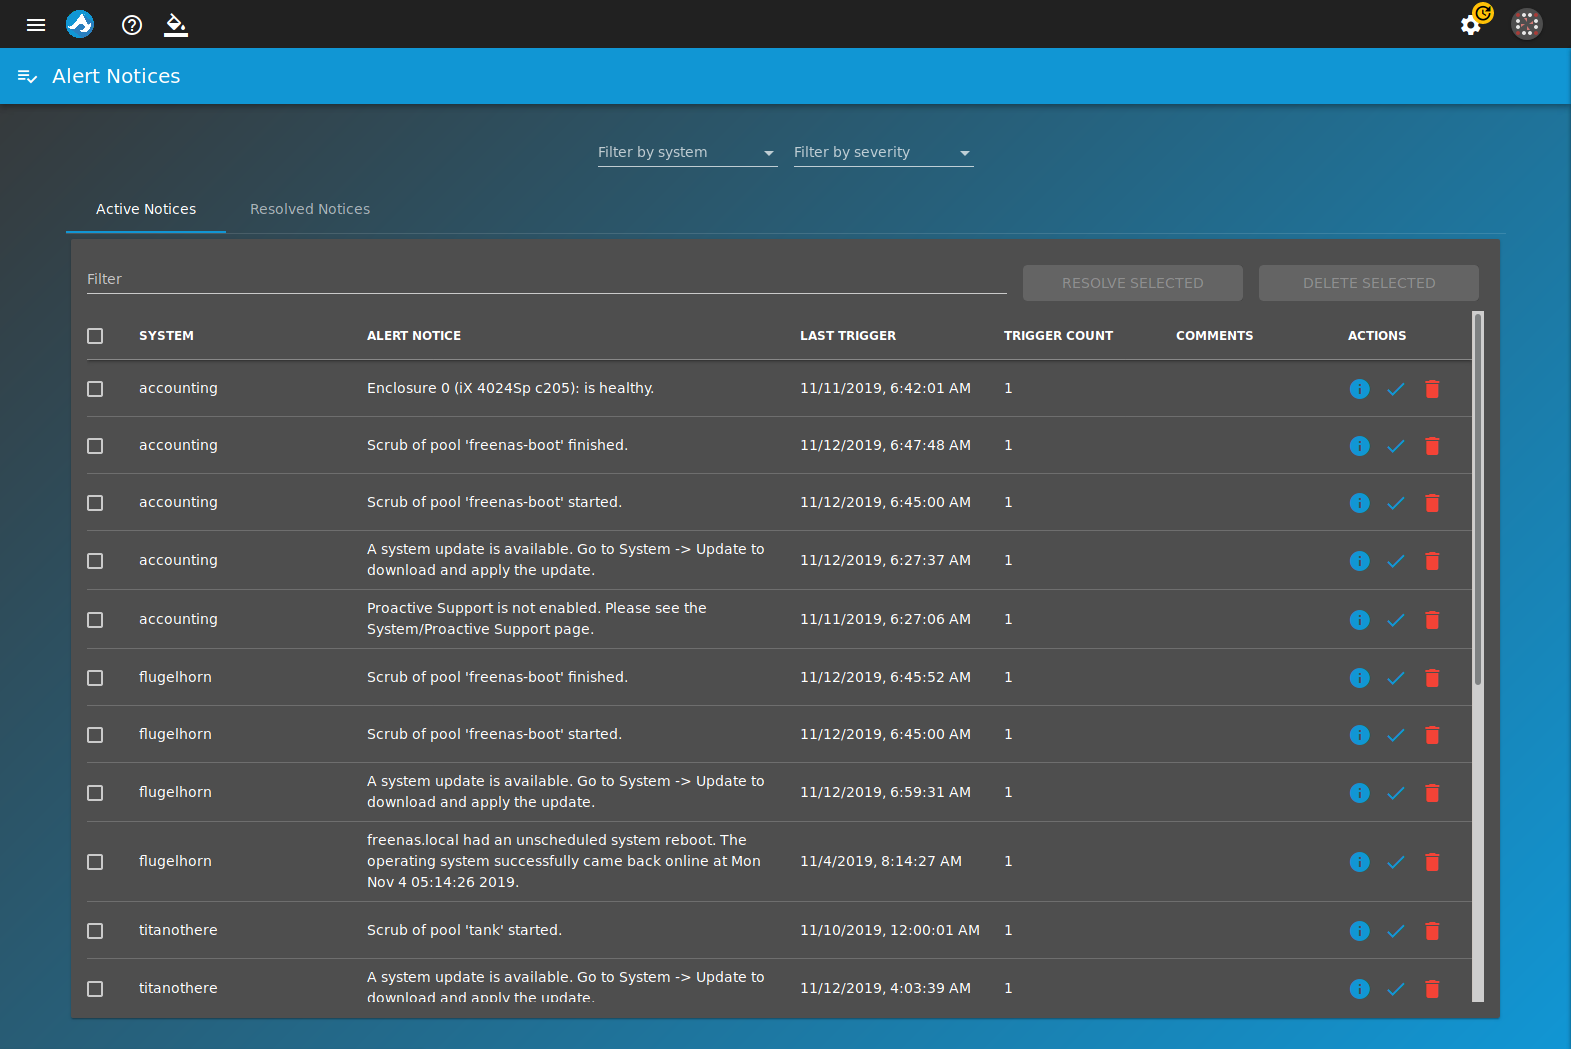
Fig. 8.1 Alert Notices
The Active Notices tab shows all unresolved alerts. Alerts are moved to the Resolved Notices tab by clicking alert resolve. To resolve multiple alerts, select each alert and click alert resolve.
Click alert information to view additional comments about an alert. To write notes about an alert, enter information in the Leave a comment field and click ADD COMMENT.
Administrator accounts can delete an alert by clicking delete. Deleting an alert cannot be undone. To delete multiple alerts, select each alert and click delete.
8.1. System Alerts
Alerts generated by a monitored system display in both Systems and the Dashboard as a number above the system icon. To view all alerts for to a single system, go to the , select a single system, and click the Alerts tab.
Each active and resolved alert is visible in this tab. Clicking alert information shows details for that alert, including the option to leave comments about the alert.
To globally configure which system alerts are ignored by TrueCommand™, go to configure administration, and select configure. Find Ignore alerts from a connected NAS and choose the Alert Categories. NAS-generated alerts marked with the selected categories will not be shown by TrueCommand™.
Individual systems can have their own ignored alert categories. This overrides the global value set in administration. To set ignored alerts for a single system, go to configure systems, edit a system entry (edit), and set the Alert Categories.
8.2. TrueCommand™ Alert Rules
Alerts in TrueCommand™ are generated from alert rules. Several default rules are built into TrueCommand™. TrueCommand™ administrators and team members with the appropriate permissions can create new alert rules.
To give a team permission to create new alert rules, go to configure teams, edit a team, and set Enable alert creation. Team members are restricted to creating rules for those systems that the team member has permission to view.
To view all TrueCommand™ alert rules, open the User Menu and click alert rules.
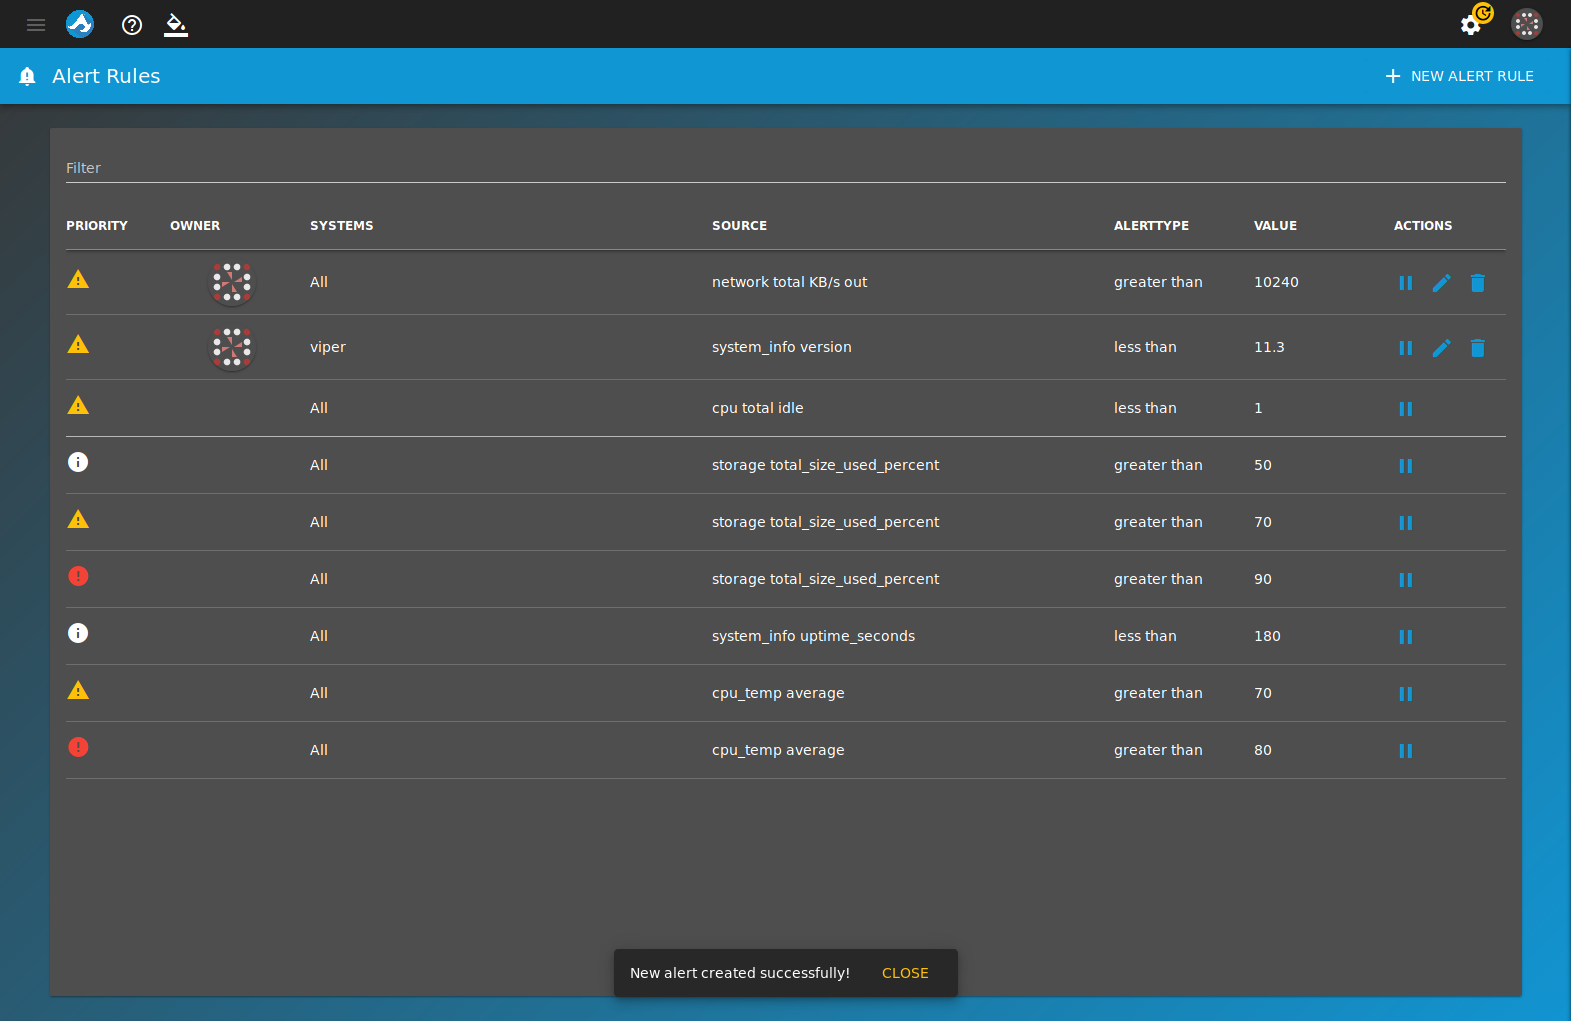
Fig. 8.2.1 Alert Rules
Details about each TrueCommand™ alert rule are shown on this page, including which user account created the rule. Alert rules can be activated (▶) or suspended (), edited (), or deleted () by either an administrator account or the account that created the rule.
New TrueCommand™ alert rules can be created to monitor a wide variety of system information and generate a TrueCommand™ alert if specific conditions occur. To create a new alert rule, click + NEW ALERT RULE and follow the creation wizard:
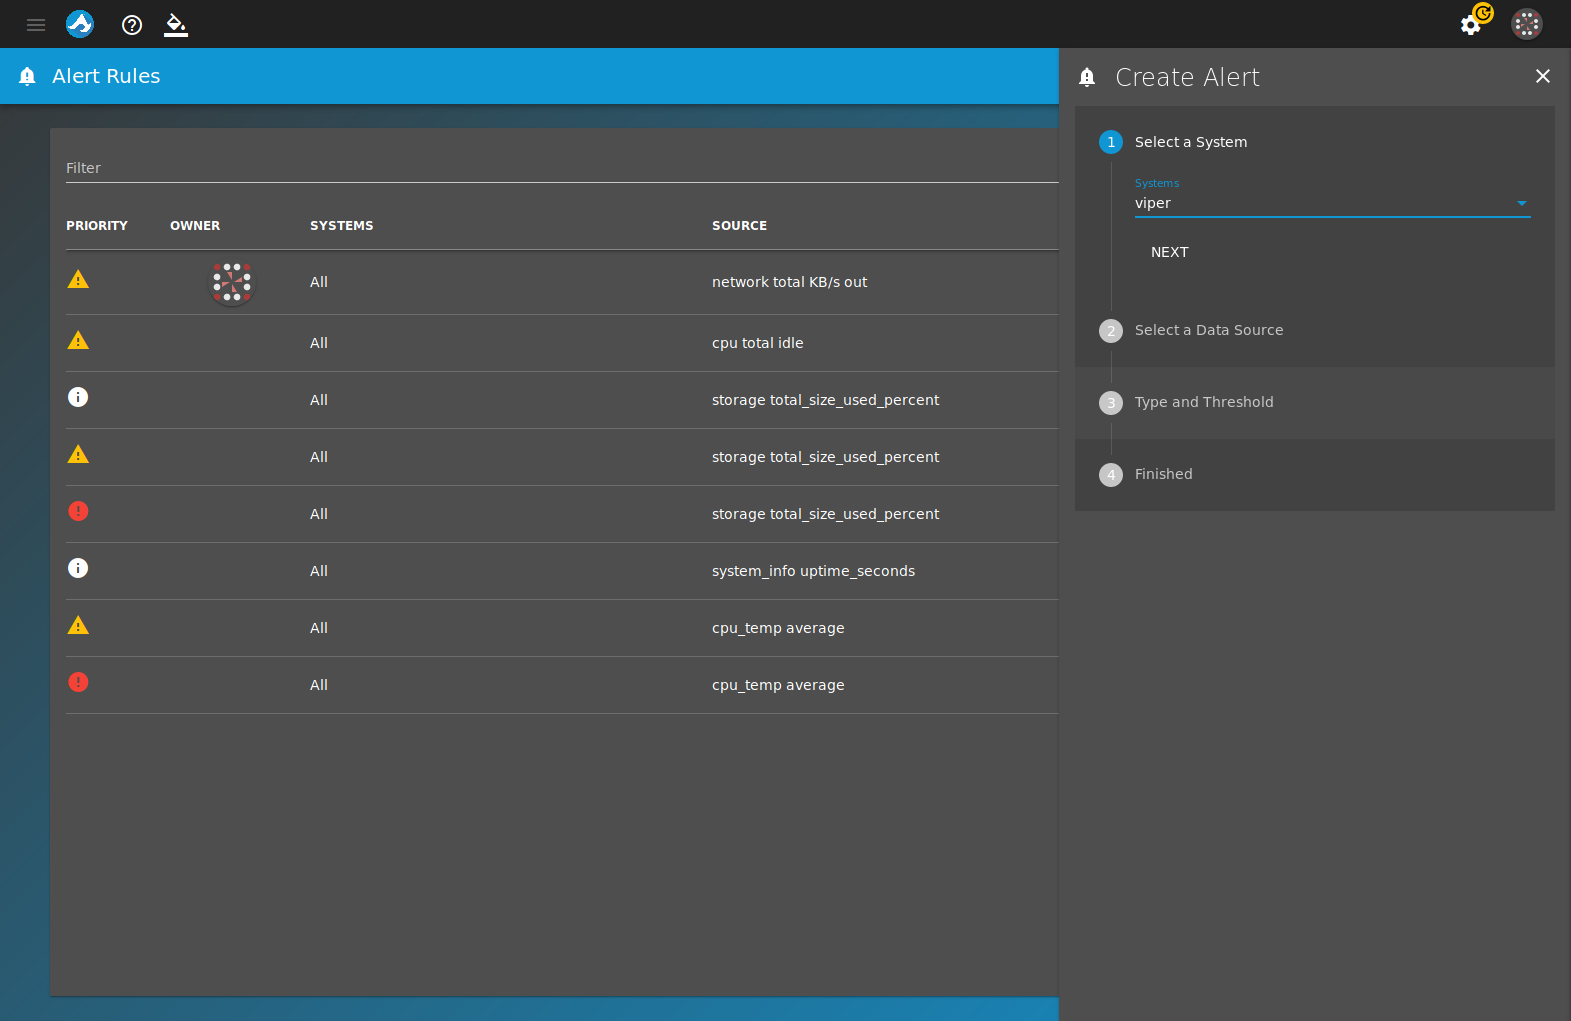
Fig. 8.2.2 Adding a New Alert Rule
- Select a System: The rule will apply to these systems.
- Select a Data Source: Choose a data source for the rule. This is the type of information that can trigger an alert. For example, choosing cpu_temp means the alert rule monitors the temperature of the chosen system.
- Type and Threshold: Create the rule conditions:
- Data type: This is the specific data TrueCommand™ will monitor. The options change depending on the Data Source.
- Priority level: Choose Information, Warning, or Critical. This determines the category of alerts generated by this rule.
- Comparison type: A conditional statement that applies to the Data type and the Comparison value.
- Comparison value: Enter a value appropriate to the options scenario and options selected. This can act as a threshold or limitation on when an alert is generated by the rule.
- Finished: To create the new alert, click CREATE ALERT. To start over, click RESET.
8.3. Alert Plugins
TrueCommand™ uses plugins to expand how alerts are communicated to individual users or administrators. TrueCommand™ administrators can install an alert plugin by going to configure . Installed plugins are shown first. Select the Browse tab and install the chosen plugin by clicking +.
Individual user accounts can use the installed plugins to manage how that account is notified of an alert. To configure a plugin, open the User Menu and click Plugins. Find the desired plugin and click configure.
9. Reports
The Reports page provides a list of reports created by and shared with the current user. A default report is already created and is available to all users. The default report shows network traffic, storage percent used, and memory utilization for the chosen systems.
View the Reports page by clicking User Menu .
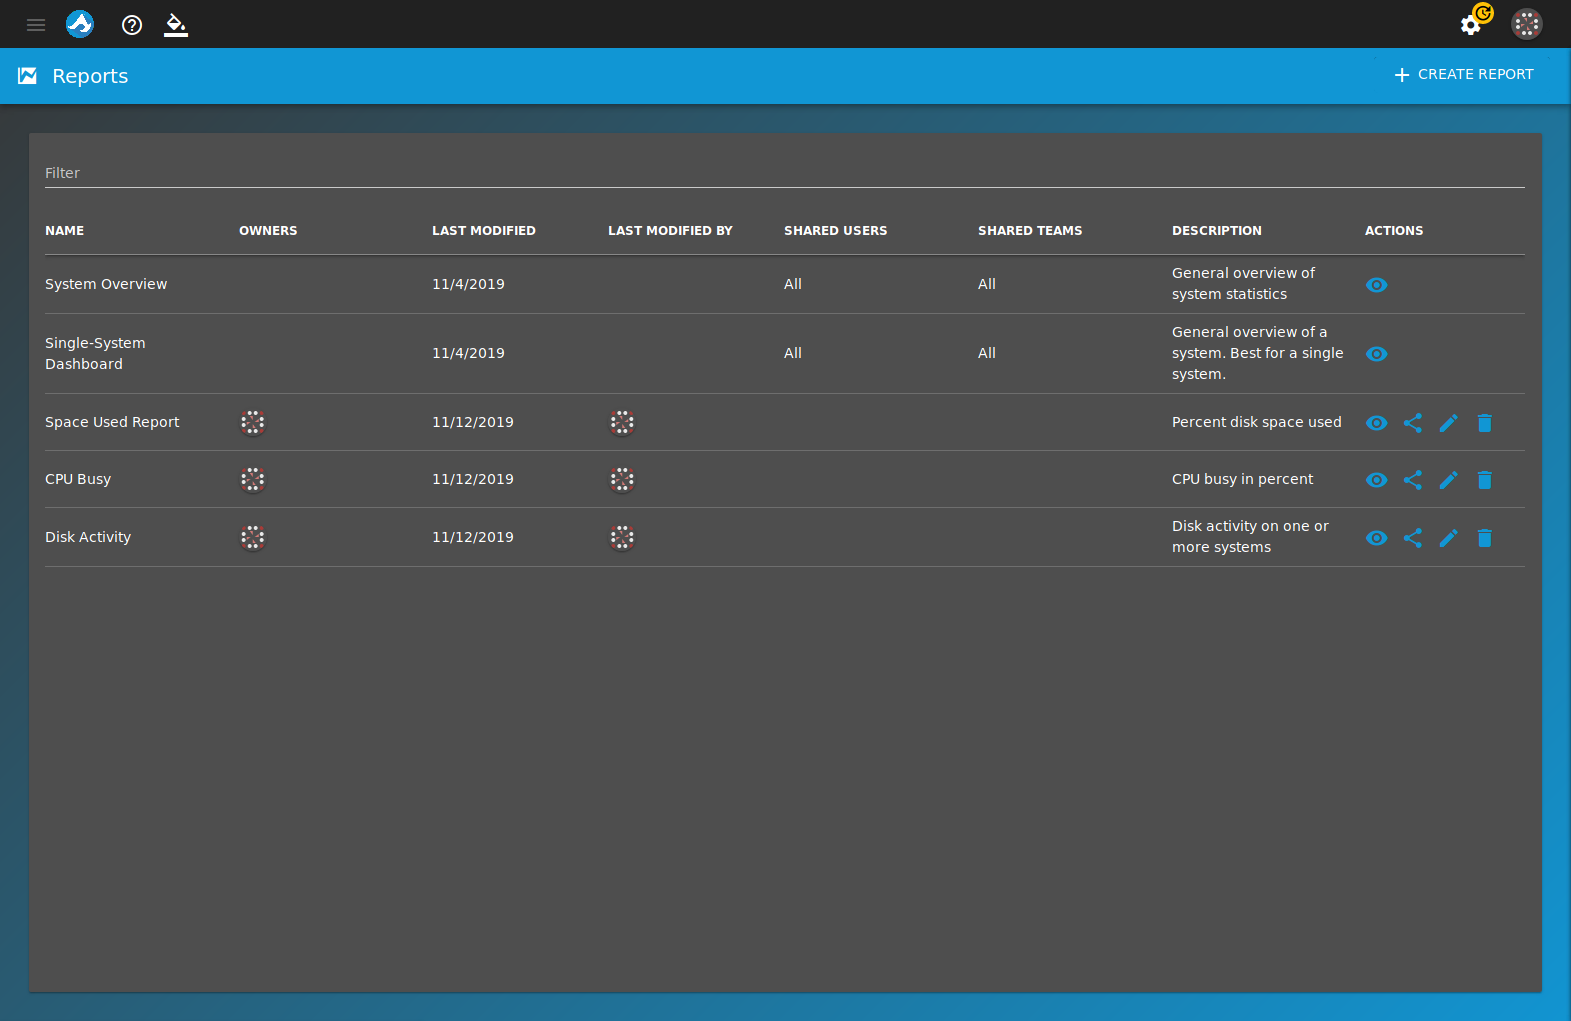
Fig. 9.1 Reports Page
9.1. Create Report
Click CREATE REPORT to create a customizable report. Enter a report name and an optional description for the report. Click BROWSE WIDGETS or WIDGET to add charts to the report. Most charts are already configured to report certain settings. To create a custom chart with custom settings, add Custom Area Chart, Custom Bar Chart, or Custom Line Chart. Fill in these options when adding a custom chart:
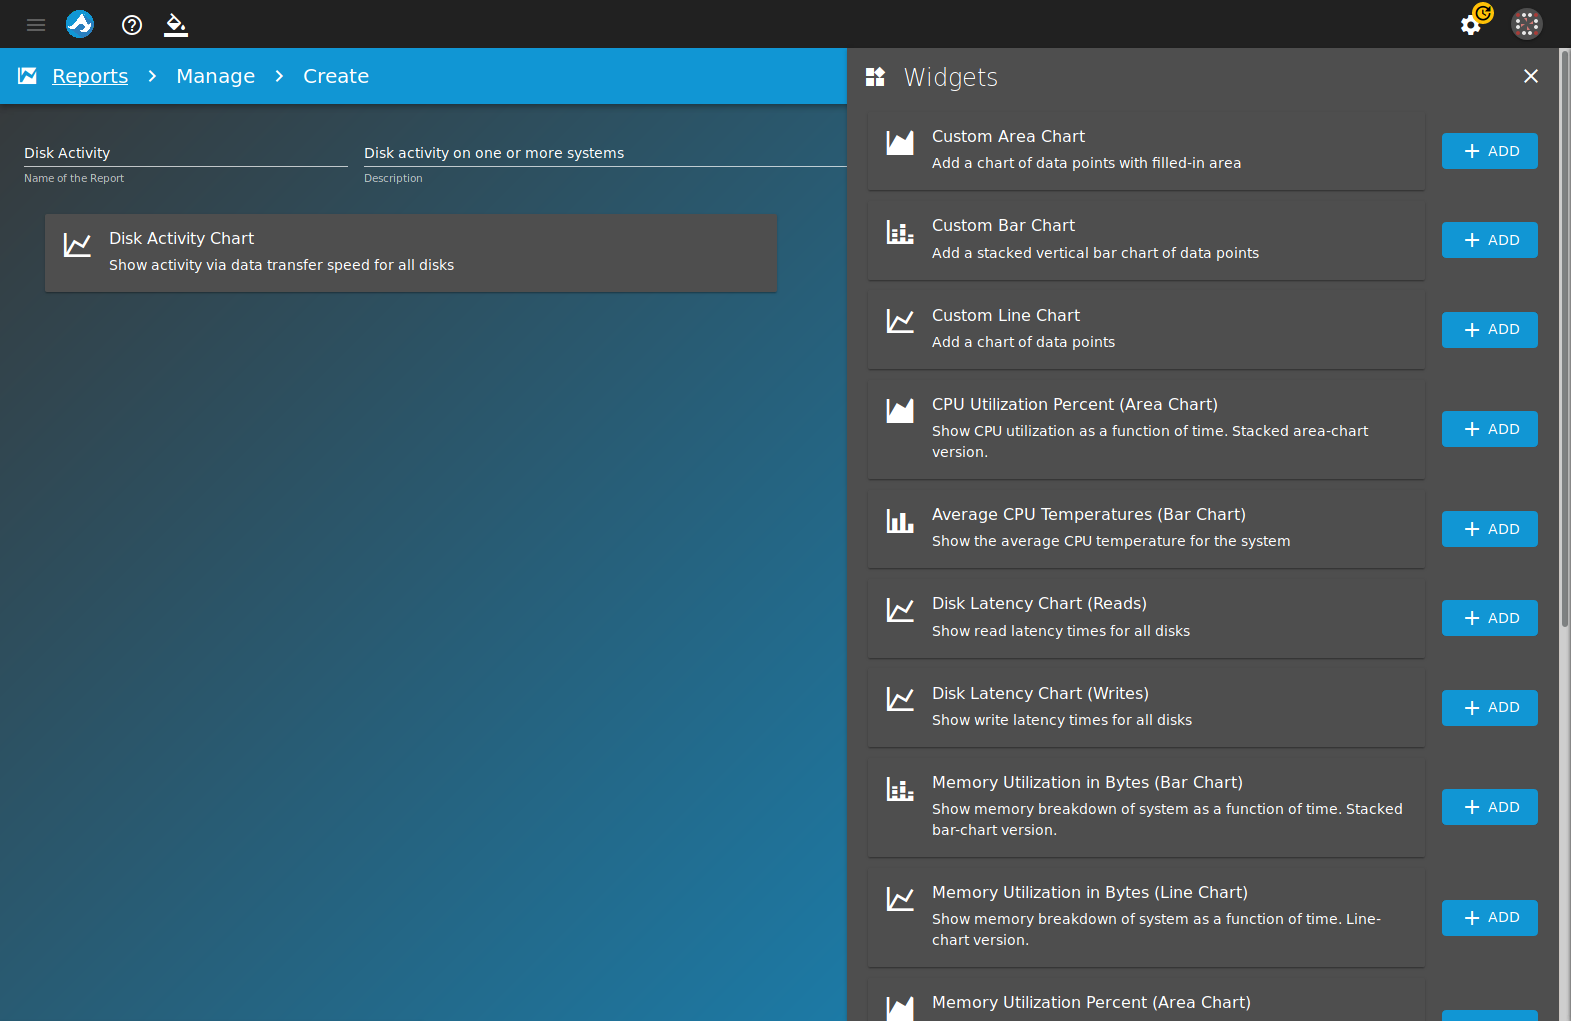
Fig. 9.1.1 Adding a New Chart
- General Settings: Enter a Title, Subtitle (optional), Axis label (optional), Point size, Line size, Y min (optional), and Y max (optional) for the chart. Stack the values can be set to bring data points on the chart closer together. This setting is useful for charts that have many different data points at the max Y value. Click NEXT.
- Data sources: Add data sources to the chart by clicking expand and selecting appropriate sources. Multiple data sources can be added to one chart. Click NEXT.
- Summary: This step shows the values set in General Settings and the data sources selected. Click SAVE to continue. Click BACK to go back and change a setting or data source.
After adding charts to the report, click SAVE to create a report specific to that user.
9.2. View Report
Go to User Menu and click show on the appropriate report. Select the systems to be used for the report. Select the time period for the report. 1D generates a report with data going back one day, 1W generates a report with data going back one week, and 1MO generates a report with data going back one month. Click GENERATE to view the report.
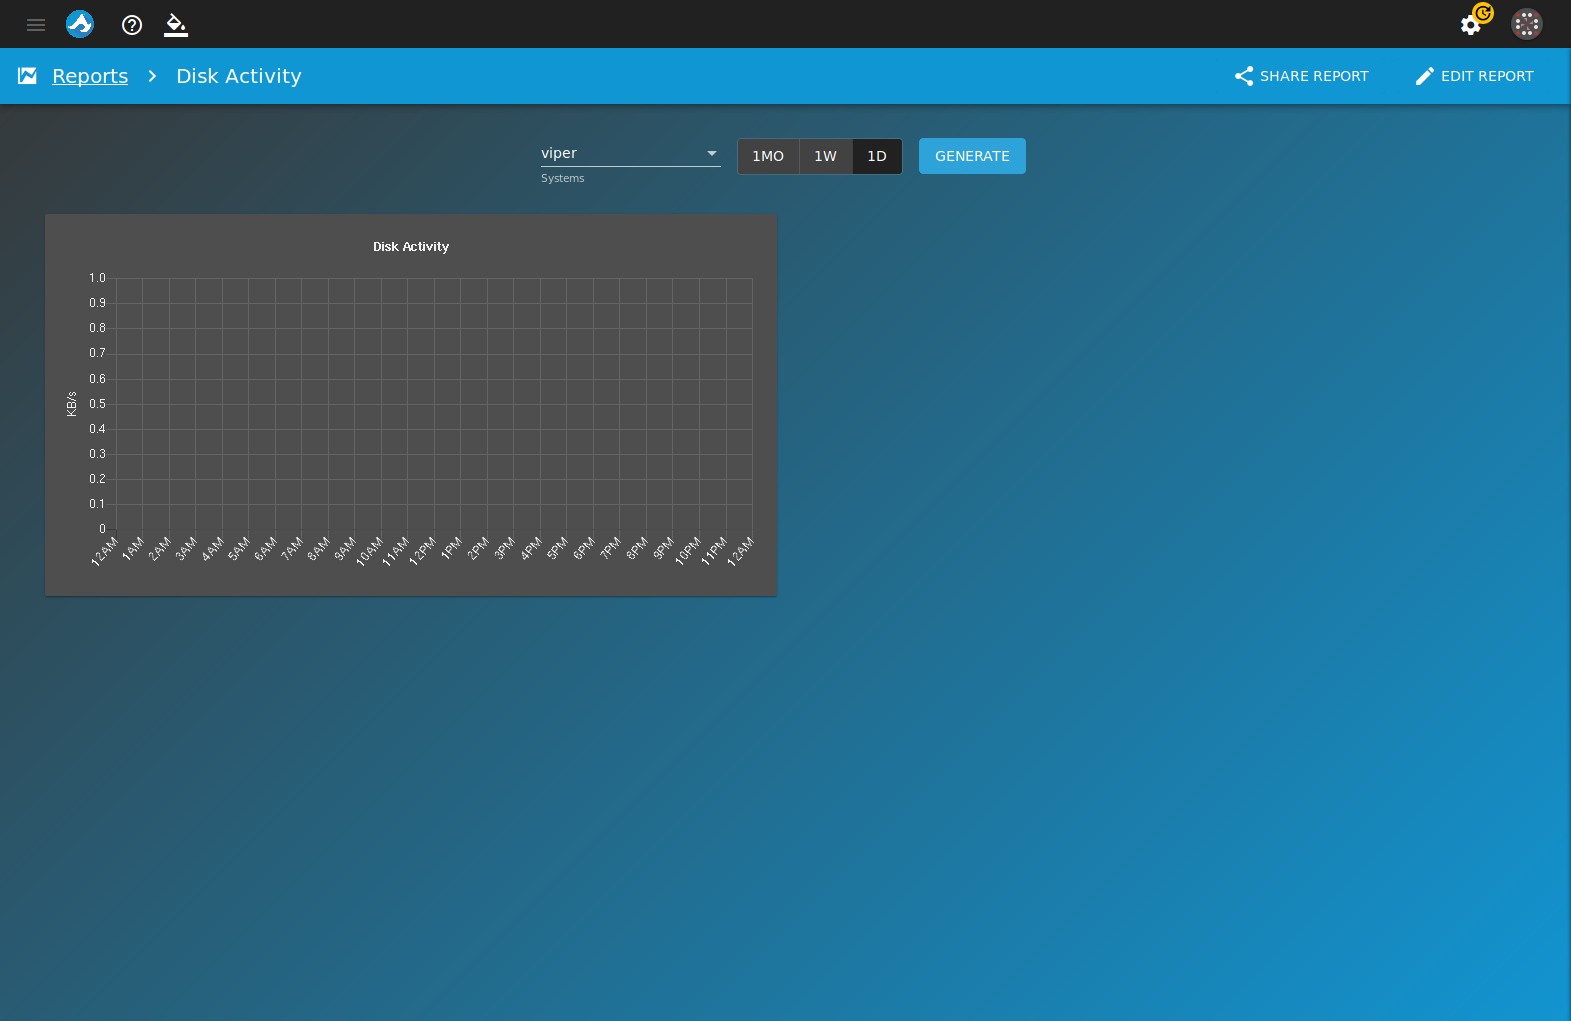
Fig. 9.2.1 View Custom Report
9.3. Share Report
Reports can be shared by going to User Menu and clicking report share on the report to be shared. Reports can also be shared by going to User Menu show and clicking SHARE REPORT.
Reports can be shared with individual users or entire teams. Set either OWNER or SHARED WITH for the desired user. Every user can be by clicking OWNER or SHARED WITH. Users with OWNER staus can edit the report. Users with SHARED WITH status can only view the report. Click SAVE to confirm the sharing settings.
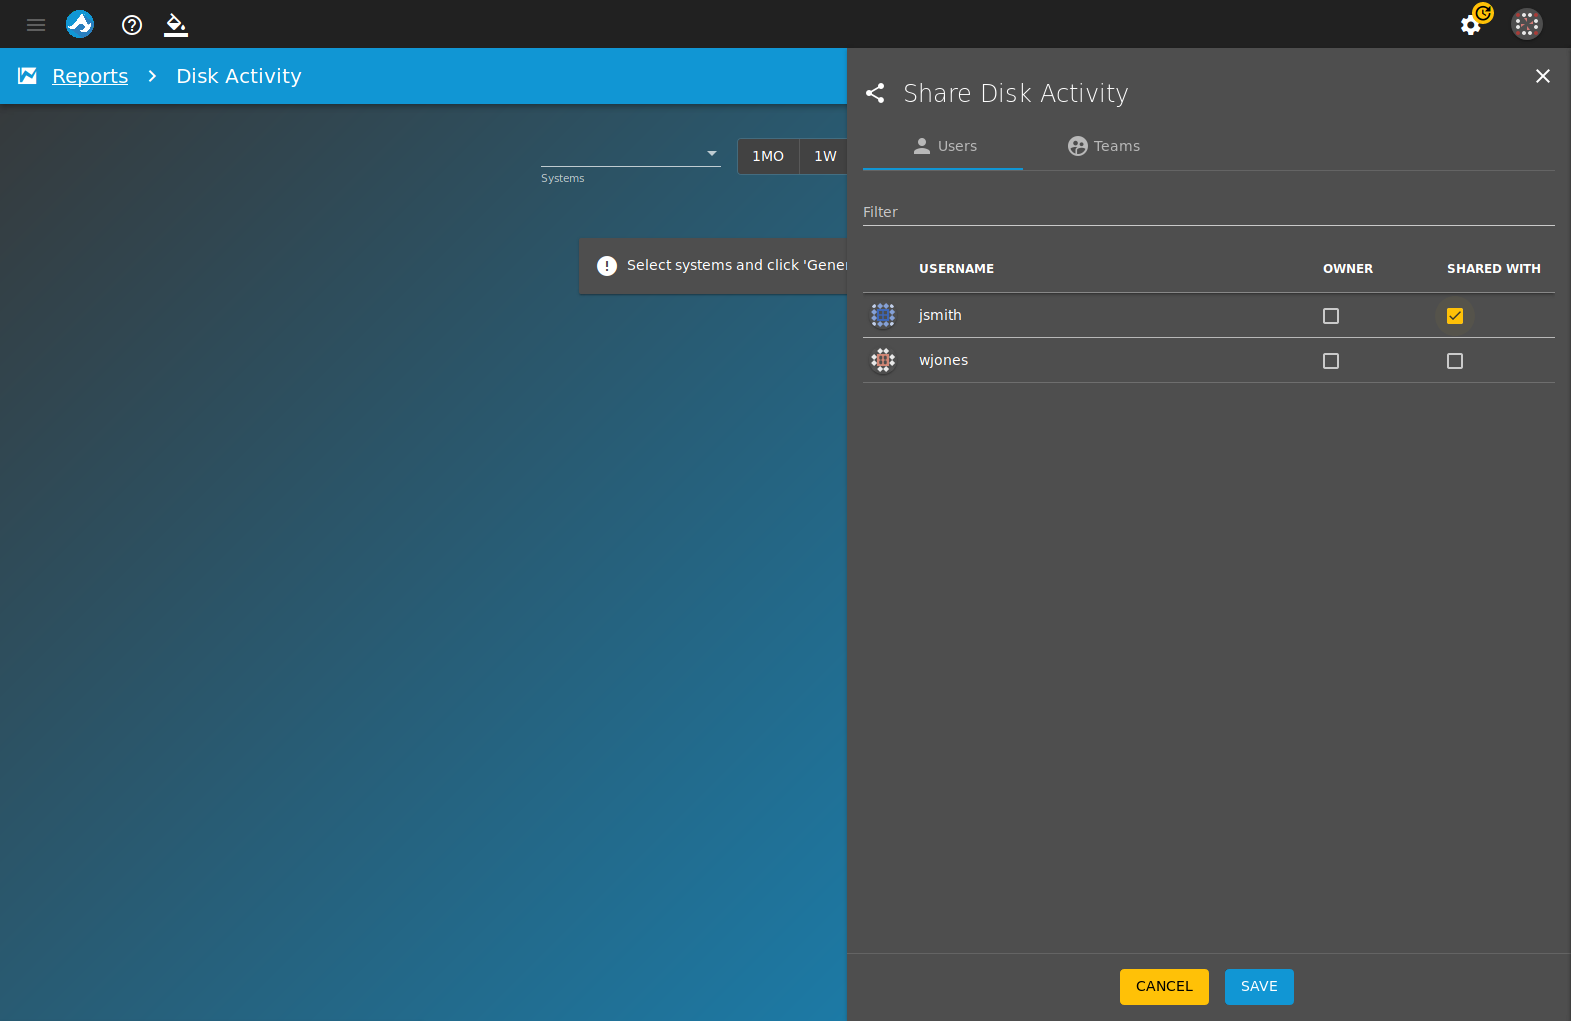
Fig. 9.3.1 Reports Sharing
10. Logs
Logs track activity on TrueCommand™. For example, if a user deletes a system from TrueCommand™, the log records which user deleted it along with other information associated with the deleted system. All system logs are shown by default. To hide specific system related logs, select them from the Hide drop down. Multiple entries can be selected. All system logs can be displayed again by clicking SHOW ALL. Logs can also be filtered by searching in the Filter text field. Click an entry in the log list to show more information.
Click DOWNLOAD ALL LOGS to download a .json file of
all system logs. Click REFRESH to refresh the list with
the latest entries.
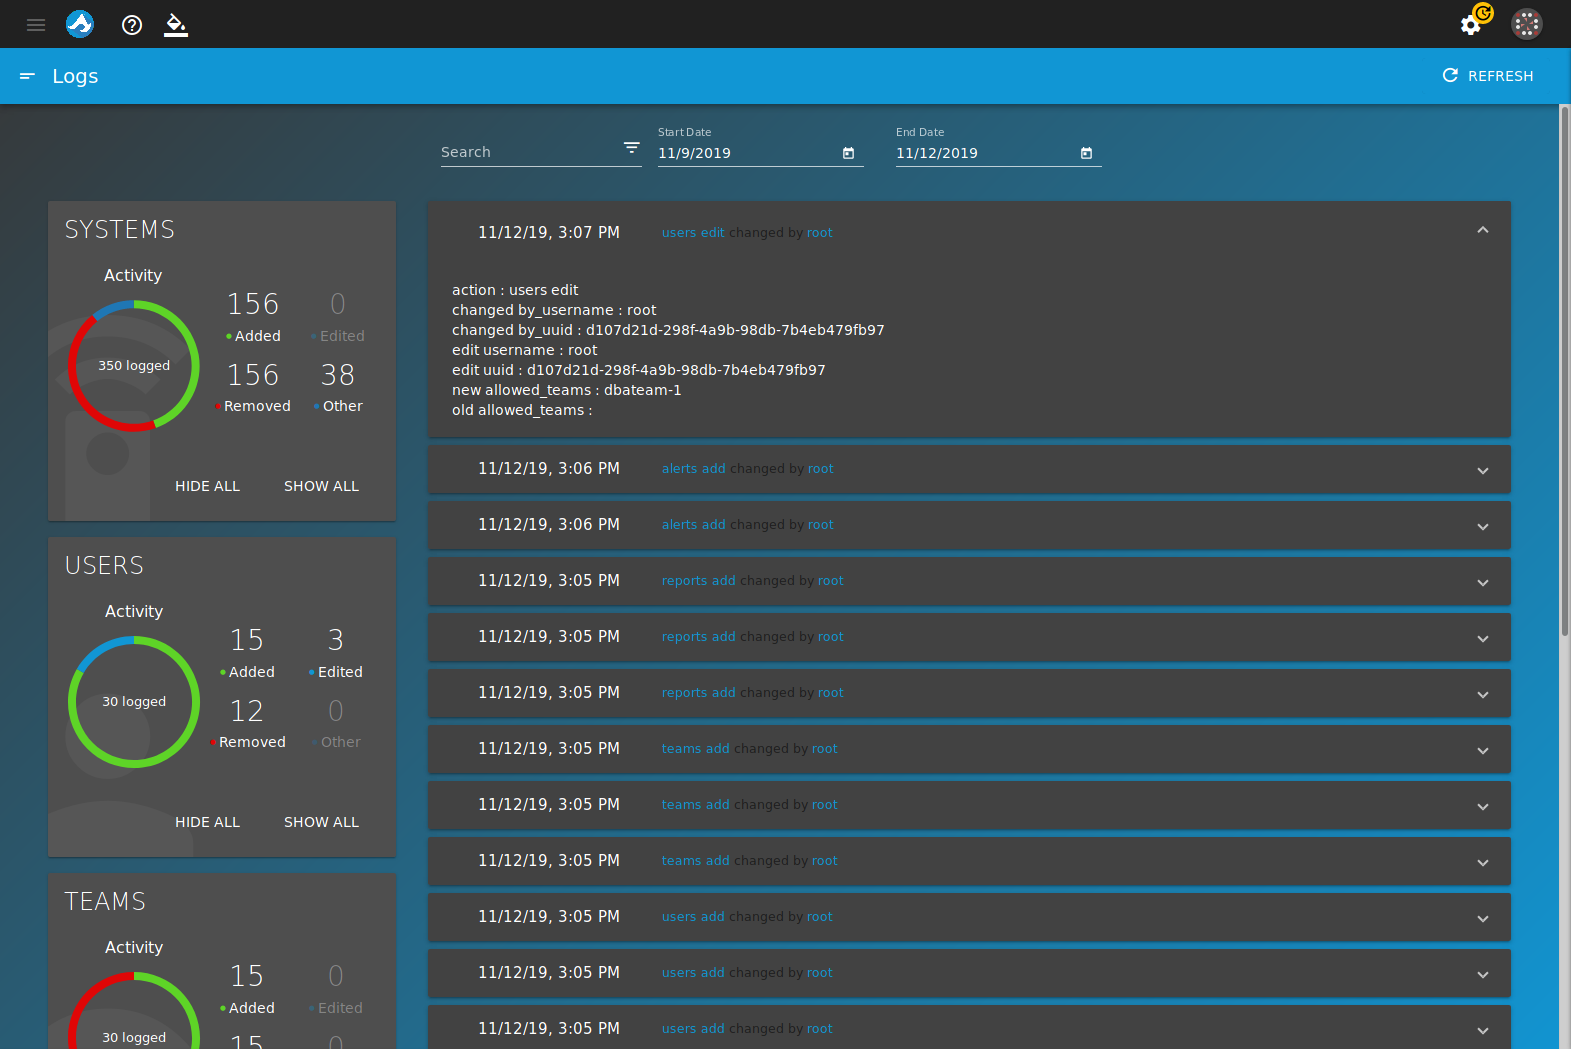
Fig. 10.1 Log Entry
11. Administration
The ADMINISTRATION page has these tabs: About, Certificates, and Configuration. The ADMINISTRATION page is accessed from configure .
Note
The Administration option is only available to users with administrator permissions.
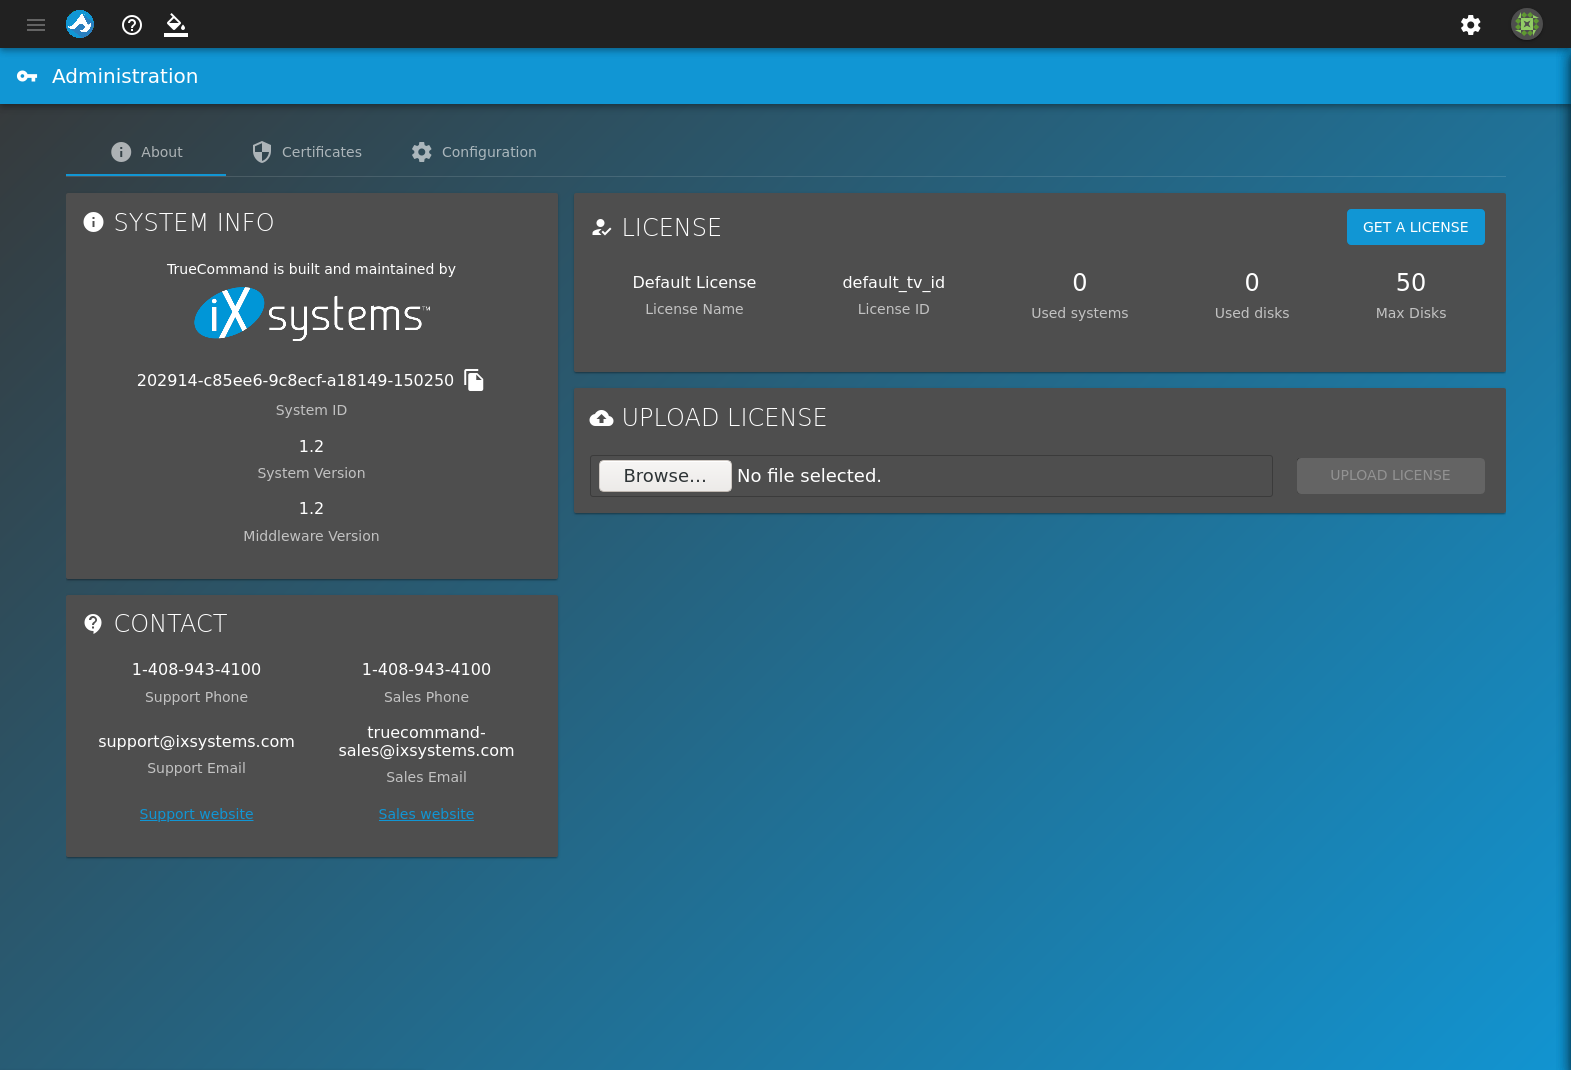
Fig. 11.1 Administration Information
The About tab contains:
- SYSTEM INFO: Show the current TrueCommand™ system ID and version.
- LICENSE: Display details about the current license. Clicking GET A LICENSE opens a new browser tab to purchase a TrueCommand™ license.
- CONTACT: Show the iXsystems™ Support phone number and email address as well as the Sales phone number and email.
- UPLOAD LICENSE: Click Browse… to open the file browser. Select the new license file to upload. Click UPLOAD LICENSE to apply the new license to TrueCommand™.
Note
Contact iXsystems™ support to upgrade the TrueCommand™ license.
Certificates shows the certificates and CAs used by TrueCommand™ and has options to upload or import a certificate or CA.
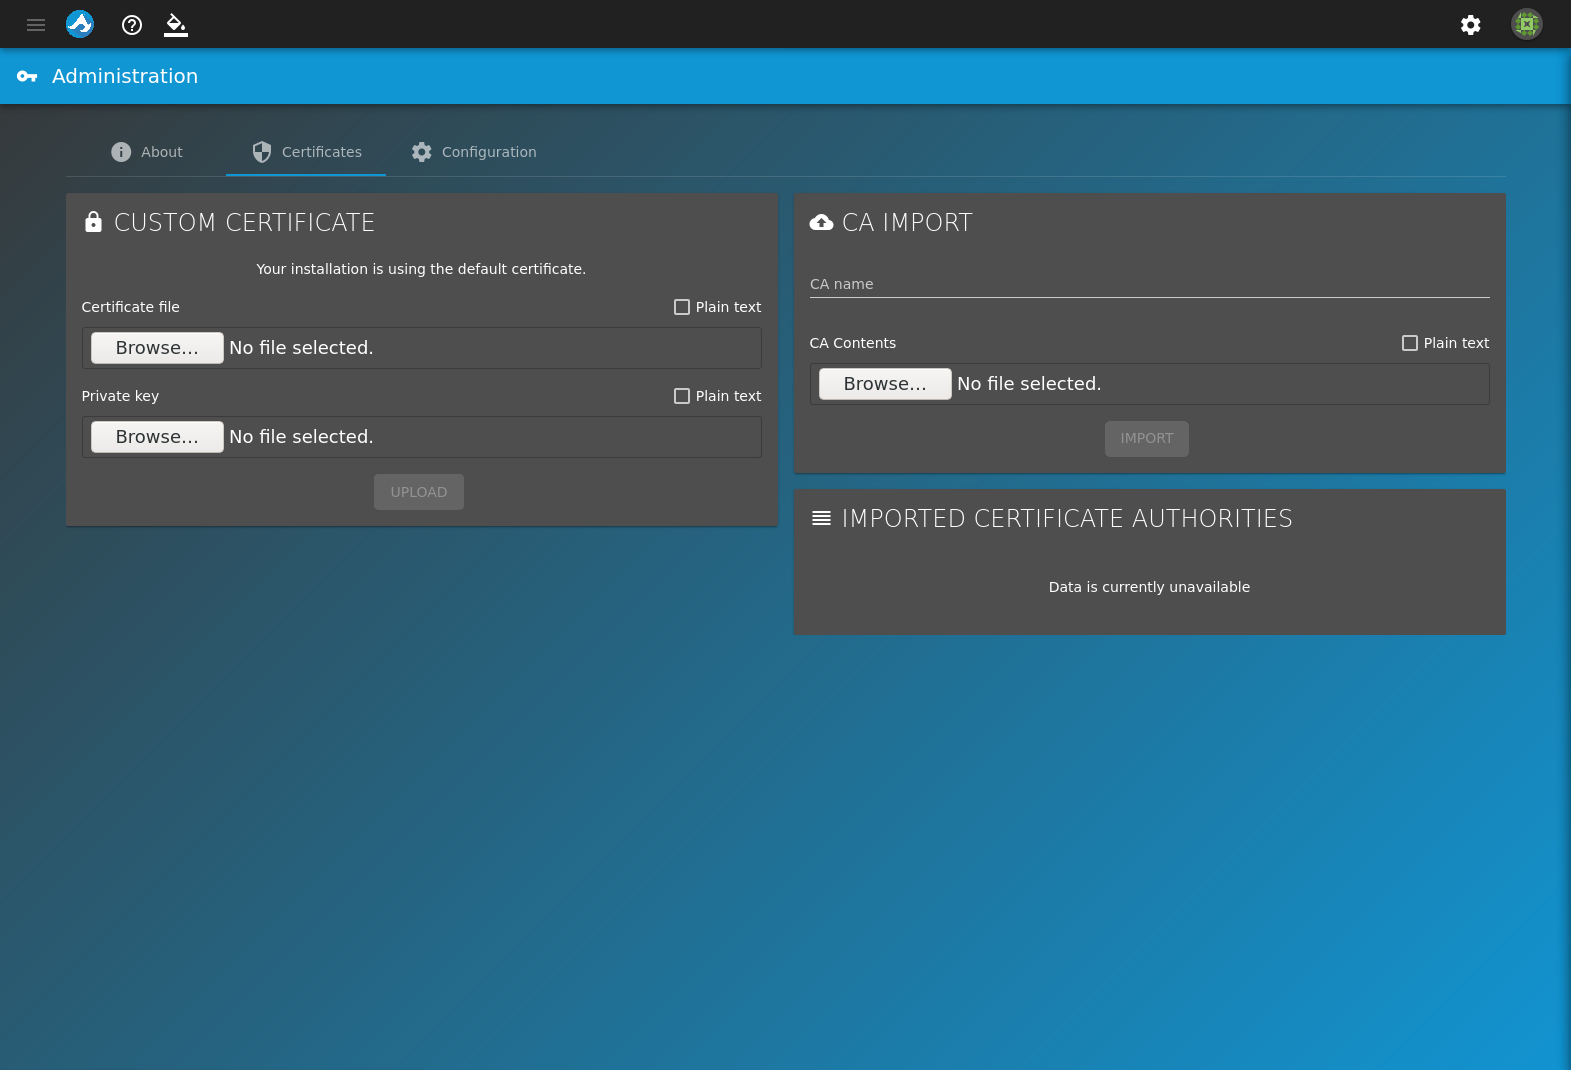
Fig. 11.2 Administration Certificates Options
Clicking Browse opens a dialog to upload a file from the local system. Selecting Plain text allows copying and pasting the raw text of a certificate or CA in the form.
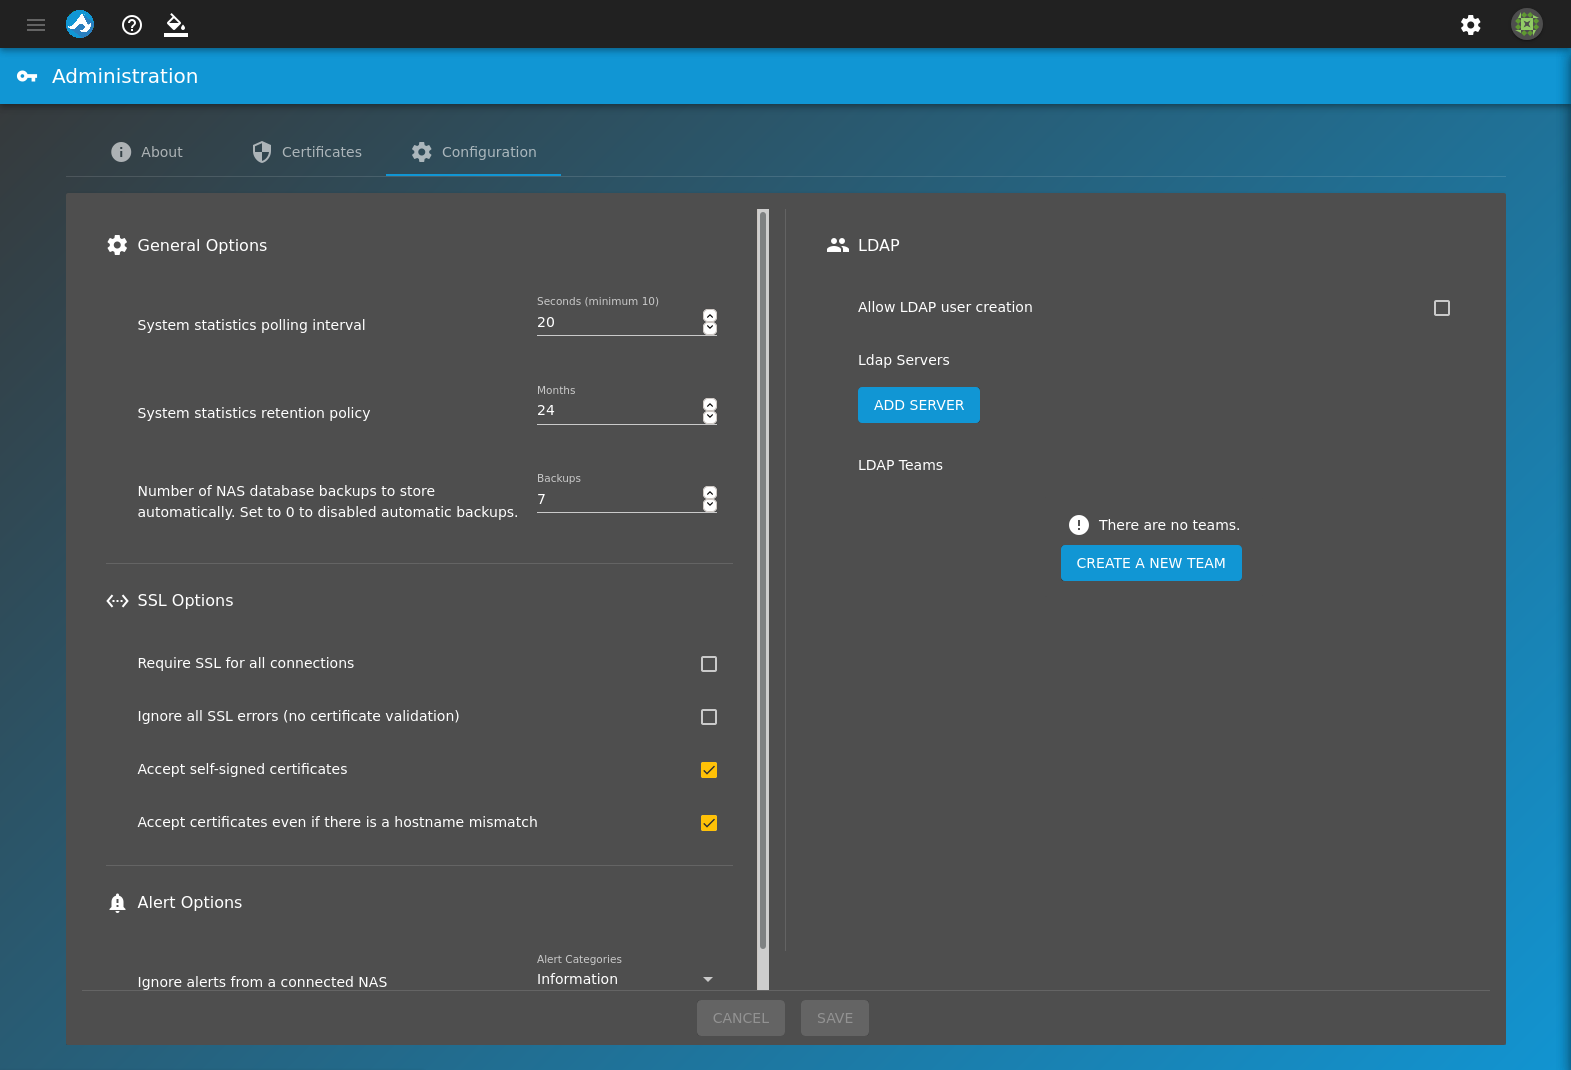
Fig. 11.3 Administration Configuration Options
The Configuration tab contains:
- General Options:
- System statistics polling interval: The ammount of time, in seconds, TrueCommand™ pulls statistics from systems being monitored. The minumum is 10 seconds.
- System statistics retention policy: The amount of time, in months, TrueCommand™ keeps statistics that were pulled from systems being monitored.
- Number of NAS database backups to store automatically: Number of database copies that TrueCommand™ stores for a single attached iXsystems™ NAS system. See Managing NAS Databases for more details.
- SSL options:
- Require SSL for all connections: Set to require SSL for all connection types. This is useful when a monitored system does not allow SSL-secured access or if the monitored system is using a custom port.
- Ignore all SSL errors (no certificate validation): Set to disable SSL certificate validation.
- Accept self-signed certiicates: Set by defualt. Allows TrueCommand™ to connect to systems using self-signed certificates.
- Accept certificates even if there is a hostname mismatch: Set by default. Accepts certificates that have the system hostname, but was registered in TrueCommand™ with an IP address or vice-versa.
- Alert Options:
- Ignore alerts from a connected NAS: Chose an alert category to ignore. Multiple categories can be selected.
- LDAP:
- Allow LDAP user creation: Set this to enable LDAP users
to be dynamically created in TrueCommand™ when logging in with LDAP
credentials. For example, at the login screen you can enter
username@domainwith the LDAP password of that user. - LDAP servers: Enter an LDAP server IP address or DNS
hostname and Domain. The Domain must be a
fully qualified domain name (FDQN).
For example,
myhost.example.comis a FDQN. Multiple LDAP servers and Domains can be added by clicking ADD SERVER. LDAP server credentials can be removed by clicking delete.
- Allow LDAP user creation: Set this to enable LDAP users
to be dynamically created in TrueCommand™ when logging in with LDAP
credentials. For example, at the login screen you can enter
- LDAP Teams:
- Teams can be selected so that each TrueCommand™ user created through LDAP is automatically assigned to the chosen teams. Teams can be removed from the list by clicking minus.
Click SAVE to save the new system configuration. To reset the fields back to the previous values, click CANCEL.
12. Help Text
TrueCommand™ includes a help text feature that shows additional information when the mouse pointer is held over an element in the web interface.
Click help to enable the help text dialog. When the dialog is enabled it is displayed in the bottom left corner of the web interface. When help text is enabled and the mouse pointer is held over an element, additional text about the element is displayed in the dialog. If help text is disabled and the mouse pointer is held over an element, a small tool tip is displayed.
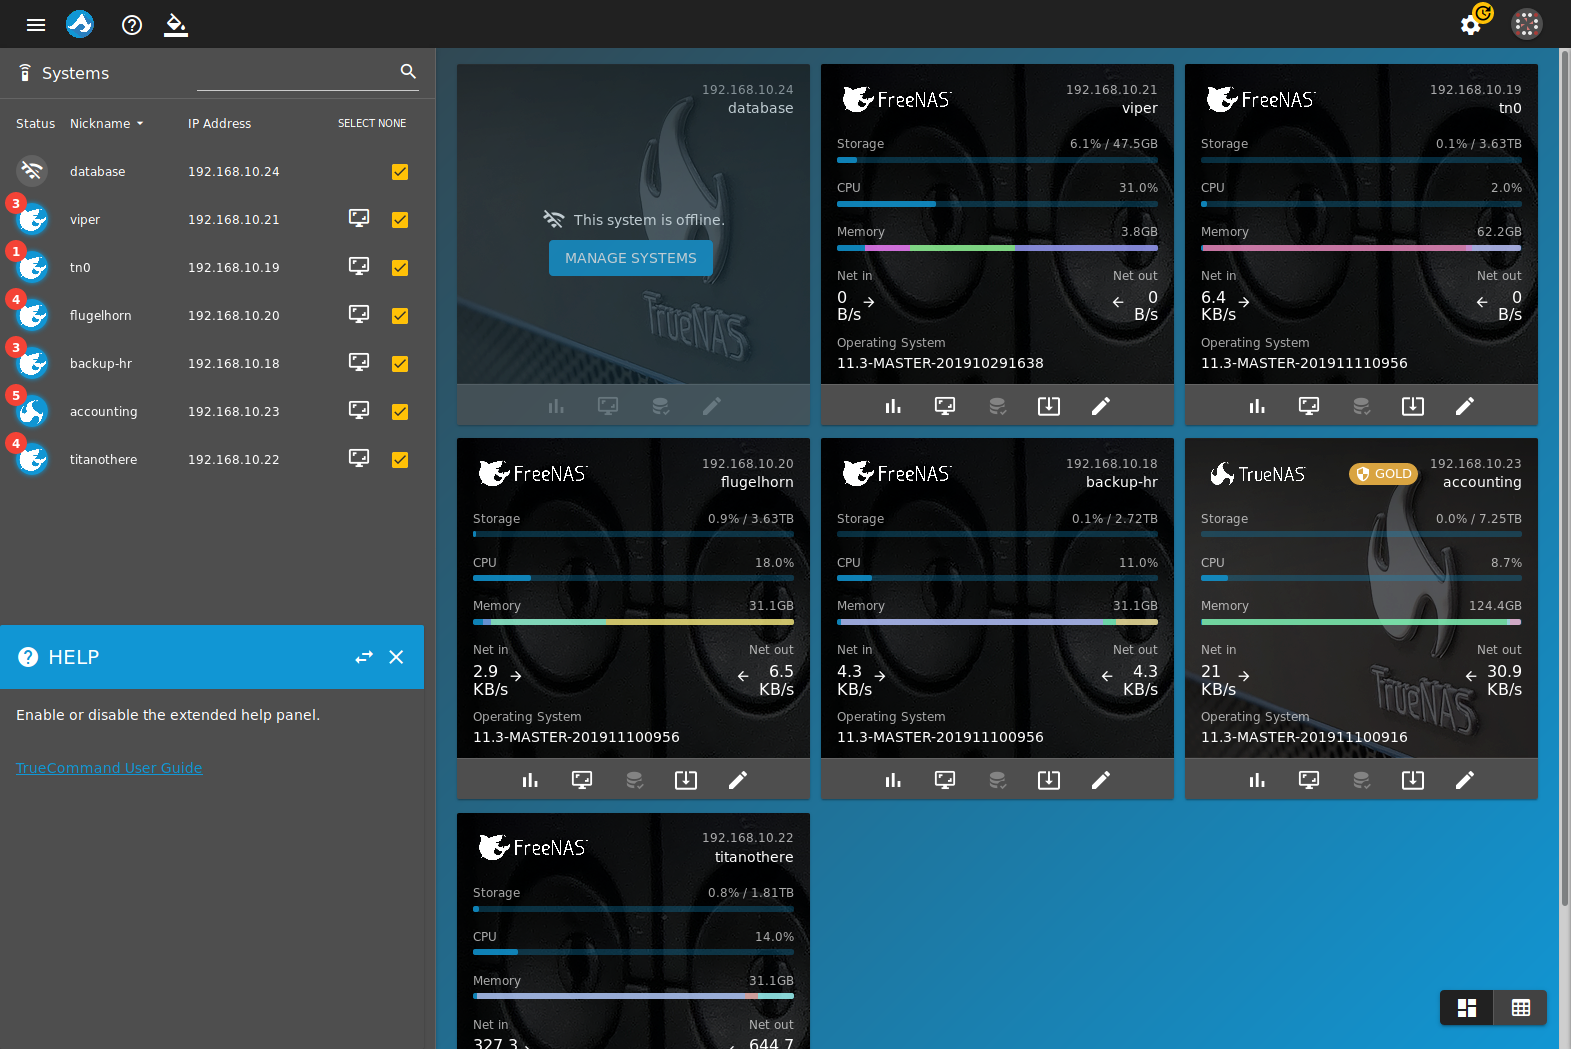
Fig. 12.1 Help Text for Dashboard button
13. User Menu
The user avatar is displayed in the top right corner of the web interface. Click the avatar to display a list of options that include:
API: interface to test API calls to the middleware. Advanced users and developers can use the middleware to program their own monitoring applications. API calls generate a response which is displayed on the page. Click UI LOG to download the web interface log.
Click MW LOG to view the middleware log.
TrueCommand™ API documentation is available by adding
/docsto the end of the TrueCommand™ hostname or IP address in the browser address bar.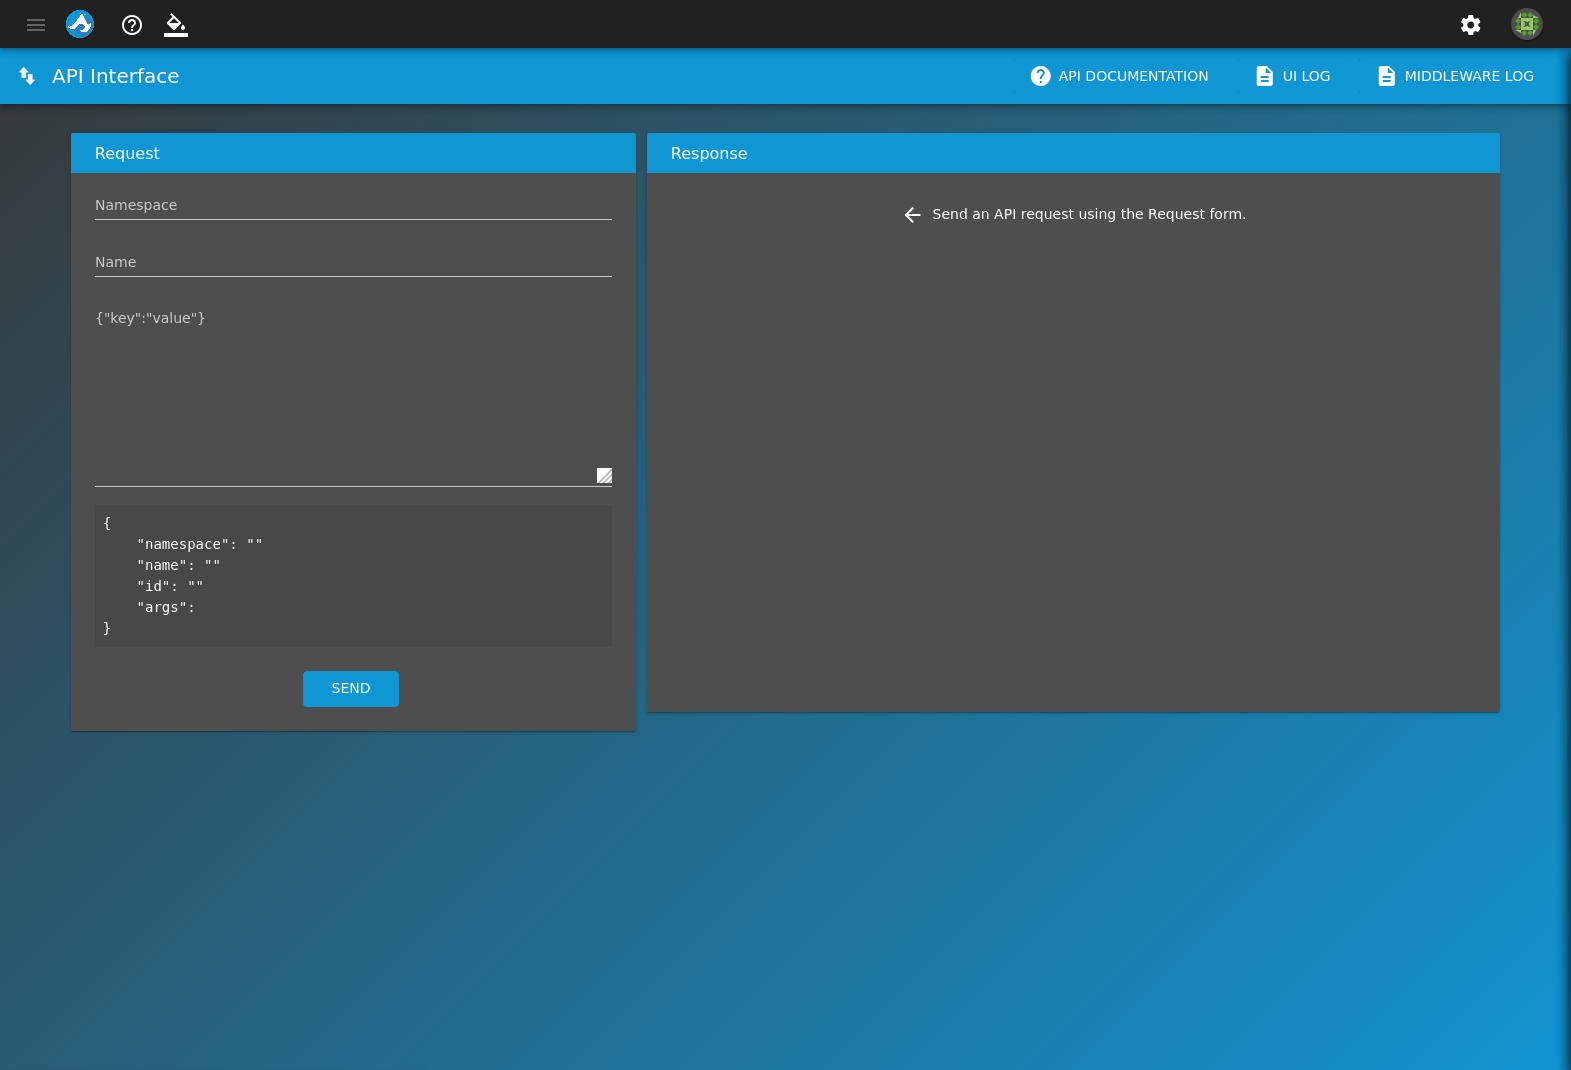
Fig. 13.1 API Interface
- Log Out: Log out of the TrueCommand™ web interface.