7. Tasks
The Tasks section of the web interface is used to configure repetitive tasks:
- Cron Jobs schedules a command or script to automatically execute at a specified time
- Init/Shutdown Scripts configures a command or script to automatically execute during system startup or shutdown
- Rsync Tasks schedules data synchronization to another system
- S.M.A.R.T. Tests schedules disk tests
- Periodic Snapshot Tasks schedules automatic creation of filesystem snapshots
- Replication Tasks automate the replication of snapshots to a remote system
- Resilver Priority controls the priority of resilvers
- Scrub Tasks schedules scrubs as part of ongoing disk maintenance
- Cloud Sync Tasks schedules data synchronization to cloud providers
Each of these tasks is described in more detail in this section.
Note
By default, Scrub Tasks are run once a month by an automatically-created task. S.M.A.R.T. Tests and Periodic Snapshot Tasks must be set up manually.
7.1. Cron Jobs
cron(8) is a daemon that runs a command or script on a regular schedule as a specified user.
Navigate to and click ADD to create a cron job. Figure 7.1.1 shows the configuration screen that appears.
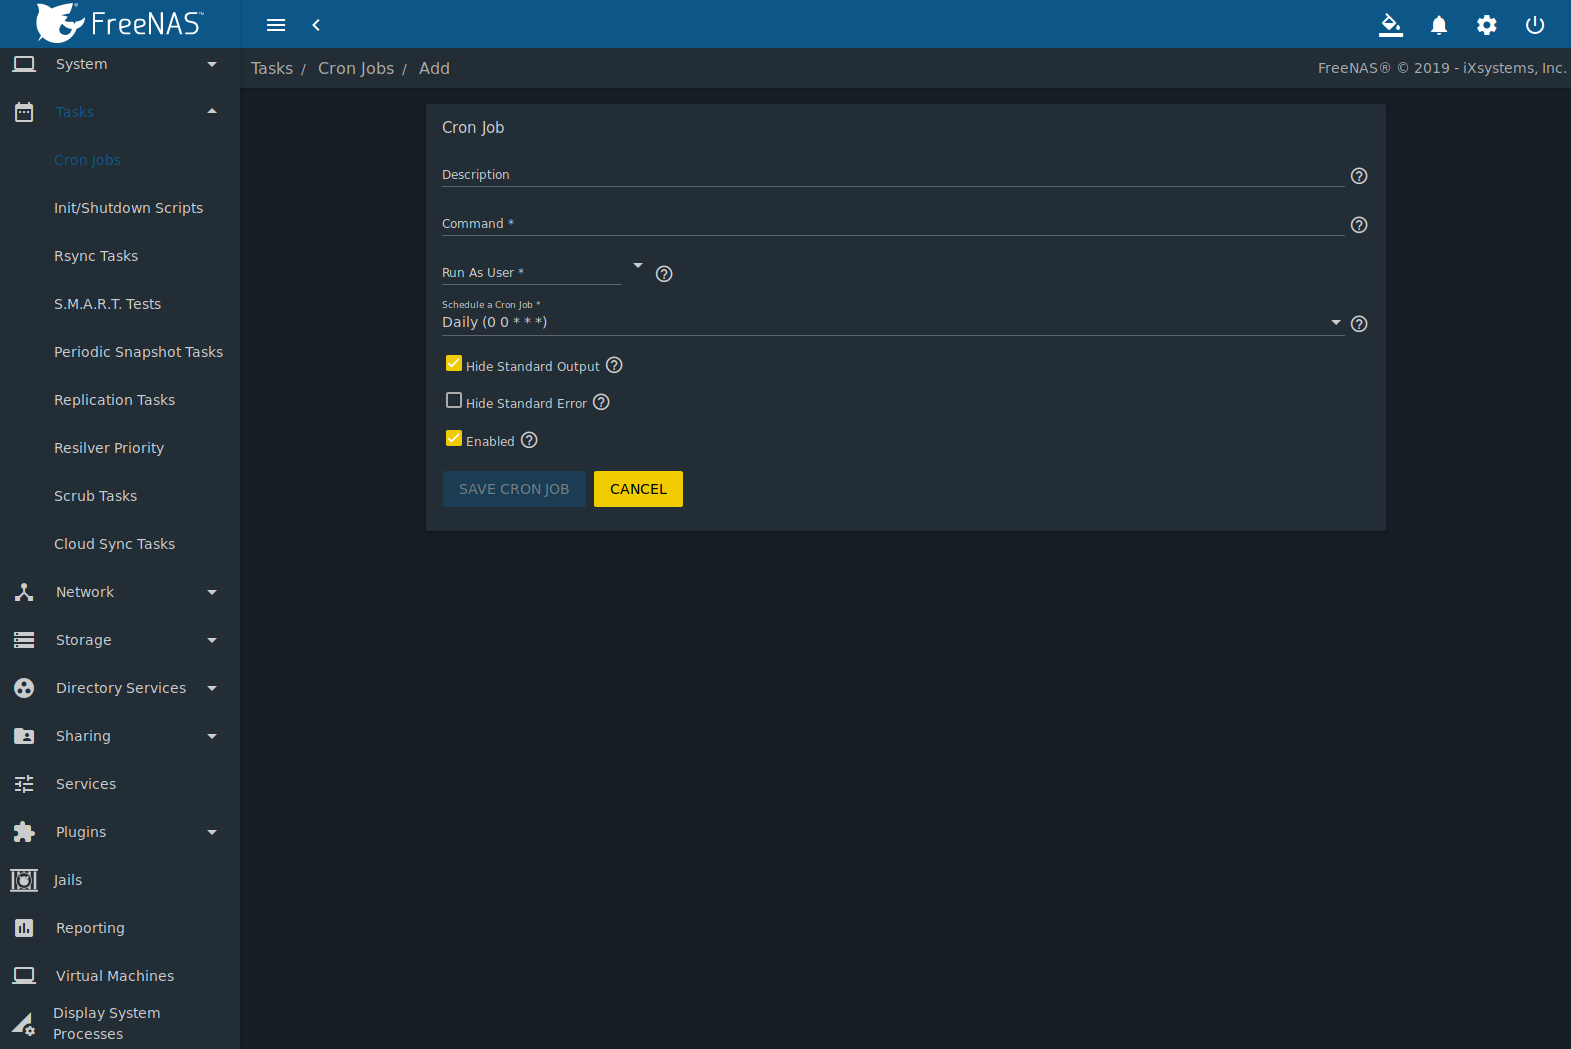
Fig. 7.1.1 Creating a Cron Job
Table 7.1.1 lists the configurable options for a cron job.
| Setting | Value | Description |
|---|---|---|
| Description | string | Enter a description of the cron job. |
| Command | drop-down menu | Enter the full path to the command or script to be run. If it is a script, testing it at the command line is recommended to ensure it works. |
| Run As User | string | Select a user account to run the command. The user must have permissions allowing them to run the command or script. |
| Schedule a Cron Job | drop-down menu | Select how often to run the cron job. Choices are Hourly, Daily, Weekly, Monthly, or Custom. Select Custom to open the advanced scheduler. |
| Hide Standard Output | checkbox | Hide standard output (stdout) from the command. When unset, any standard output is mailed to the user account cron used to run the command. |
| Hide Standard Error | checkbox | Hide error output (stderr) from the command. When unset, any error output is mailed to the user account cron used to run the command. |
| Enable | checkbox | Enable this cron job. When unset, disable the cron job without deleting it. |
Cron jobs are shown in . This table displays the user, command, description, schedule, and whether the job is enabled. This table is adjustable by setting the different column checkboxes above it. Set Toggle to display all options in the table. Click (Options) for to show the Run Now, Edit, and Delete options.
Note
% symbols are automatically escaped and do not
need to be prefixed with backslashes. For example, use
date '+%Y-%m-%d' in a cron job to generate a filename based
on the date.
7.2. Init/Shutdown Scripts
FreeNAS® provides the ability to schedule commands or scripts to run at system startup or shutdown.
Go to and click ADD.
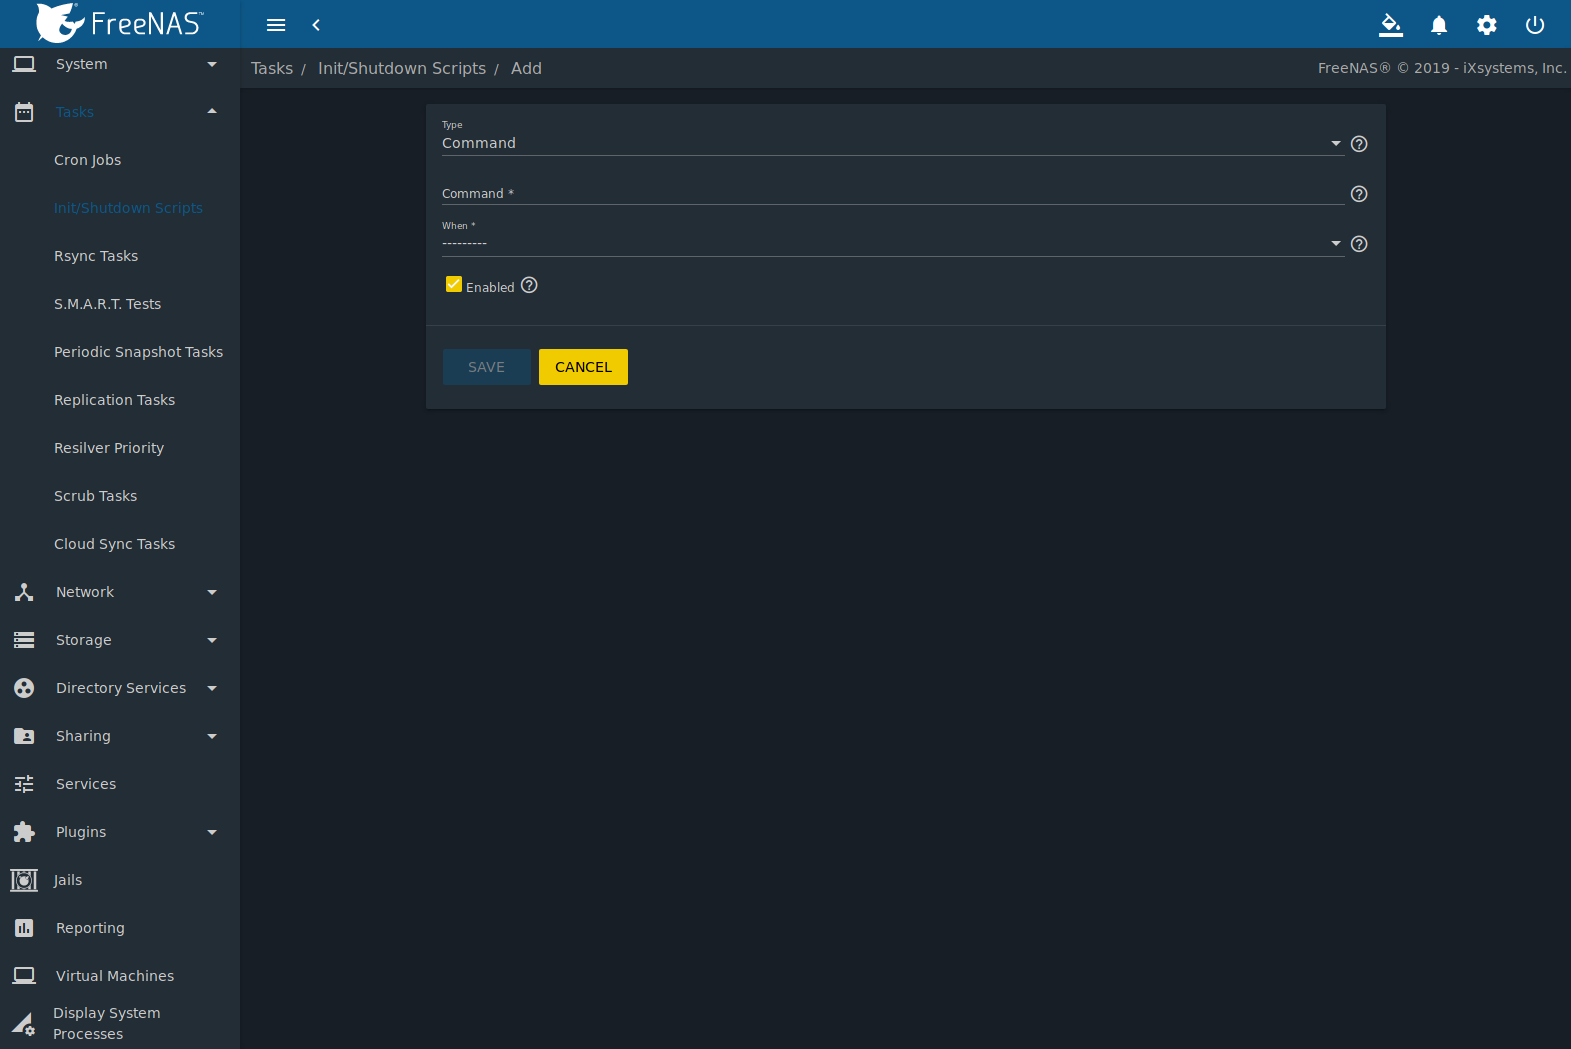
Fig. 7.2.1 Add an Init/Shutdown Command or Script
| Setting | Value | Description |
|---|---|---|
| Type | drop-down menu | Select Command for an executable or Script for an executable script. |
| Command or Script | string | If Command is selected, enter the command with any options. When Script is selected, click (Browse) to select the script from an existing pool. |
| When | drop-down menu | Select when the Command or Script runs:
|
| Enabled | checkbox | Enable this task. Unset to disable the task without deleting it. |
Scheduled commands must be in the default path. The full path to the command can also be included in the entry. The path can be tested with which {commandname} in the Shell. When available, the path to the command is shown:
[root@freenas ~]# which ls
/bin/ls
When scheduling a script, test the script first to verify it is executable and achieves the desired results.
Note
Init/shutdown scripts are run with sh.
Init/Shutdown tasks are shown in . Click (Options) for a task to Edit or Delete that task.
7.3. Rsync Tasks
Rsync is a utility that copies specified data from one system to another over a network. Once the initial data is copied, rsync reduces the amount of data sent over the network by sending only the differences between the source and destination files. Rsync is used for backups, mirroring data on multiple systems, or for copying files between systems.
Rsync is most effective when only a relatively small amount of the data has changed. There are also some limitations when using rsync with Windows files. For large amounts of data, data that has many changes from the previous copy, or Windows files, Replication Tasks are often the faster and better solution.
Rsync is single-threaded and gains little from multiple processor cores.
To see whether rsync is currently running, use pgrep rsync from
the Shell.
Both ends of an rsync connection must be configured:
- the rsync server: this system pulls (receives) the data. This system is referred to as PULL in the configuration examples.
- the rsync client: this system pushes (sends) the data. This system is referred to as PUSH in the configuration examples.
FreeNAS® can be configured as either an rsync client or an rsync server. The opposite end of the connection can be another FreeNAS® system or any other system running rsync. In FreeNAS® terminology, an rsync task defines which data is synchronized between the two systems. To synchronize data between two FreeNAS® systems, create the rsync task on the rsync client.
FreeNAS® supports two modes of rsync operation:
- rsync module mode: exports a directory tree, and the configured settings of the tree as a symbolic name over an unencrypted connection. This mode requires that at least one module be defined on the rsync server. It can be defined in the FreeNAS® web interface under . In other operating systems, the module is defined in rsyncd.conf(5).
- rsync over SSH: synchronizes over an encrypted connection. Requires the configuration of SSH user and host public keys.
This section summarizes the options when creating an rsync task. It then provides a configuration example between two FreeNAS® systems for each mode of rsync operation.
Note
If there is a firewall between the two systems or if the other system has a built-in firewall, make sure that TCP port 873 is allowed.
Figure 7.3.1 shows the screen that appears after navigating to and clicking ADD. Table 7.3.1 summarizes the configuration options available when creating an rsync task.
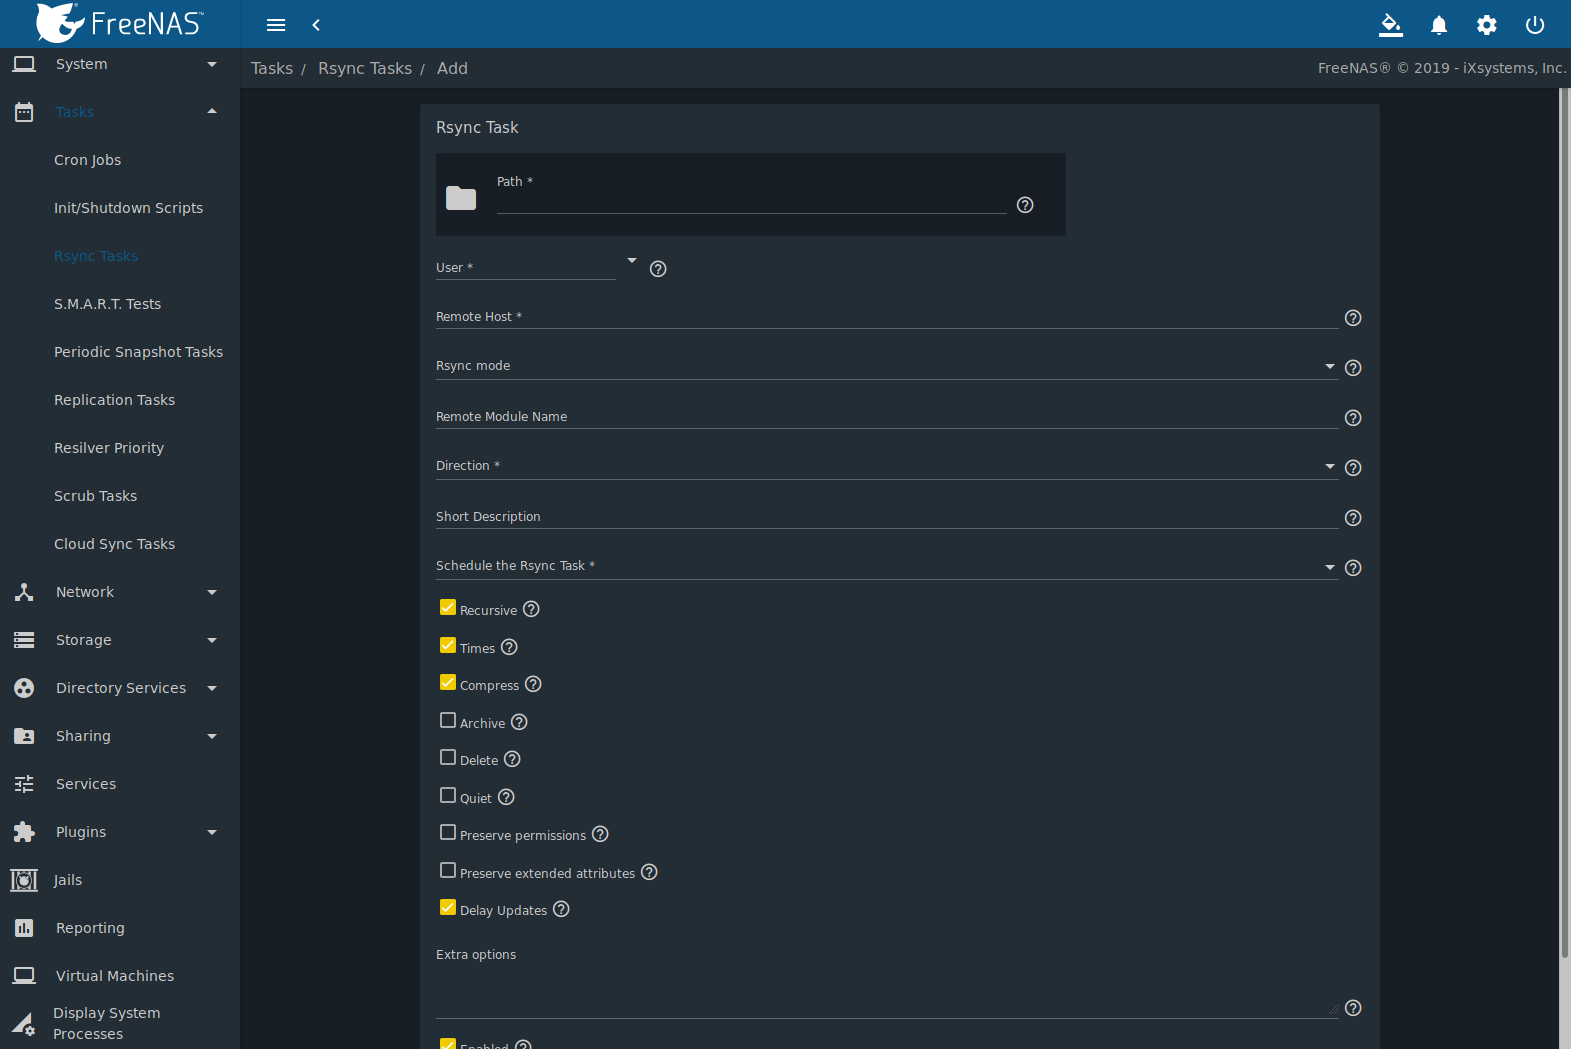
Fig. 7.3.1 Adding an Rsync Task
| Setting | Value | Description |
|---|---|---|
| Path | browse button | Browse to the path to be copied. Path lengths cannot be greater than 255 characters. |
| User | drop-down menu | Select the user to run the rsync task. The user selected must have permissions to write to the specified directory on the remote host. |
| Remote Host | string | Enter the IP address or hostname of the remote system that will store the copy. Use the format username@remote_host if the username differs on the remote host. |
| Remote SSH Port | integer | Only available in Rsync over SSH mode. Allows specifying an SSH port other than the default of 22. |
| Rsync mode | drop-down menu | The choices are Rsync Module mode or Rsync over SSH mode |
| Remote Module Name | string | At least one module must be defined in rsyncd.conf(5) of the rsync server or in the Rsync Modules of another system. |
| Remote Path | string | Only appears when using Rsync over SSH mode. Enter the existing path on the remote host to sync with, for example, /mnt/pool. Note that the path length cannot be greater than 255 characters. |
| Validate Remote Path | checkbox | Verifies the existence of the Remote Path. |
| Direction | drop-down menu | Direct the flow of the data to the remote host. Choices are Push Pull. Default is to push to a remote host. |
| Short Description | string | Enter a description of the rsync task. |
| Schedule the Rsync Task | drop-down menu | Choose how often to run the task. Choices are Hourly, Daily, Weekly, Monthly, or Custom. Select Custom to open the advanced scheduler. |
| Recursive | checkbox | Set to include all subdirectories of the specified directory. When unset, only the specified directory is included. |
| Times | checkbox | Set to preserve the modification times of files. |
| Compress | checkbox | Set to reduce the size of the data to transmit. Recommended for slow connections. |
| Archive | checkbox | When set, rsync is run recursively, preserving symlinks, permissions, modification times,
group, and special files. When run as root, owner, device files, and special files are
also preserved. Equivalent to rsync -rlptgoD. |
| Delete | checkbox | Set to delete files in the destination directory that do not exist in the source directory. |
| Quiet | checkbox | Set to suppress informational messages from the remote server. |
| Preserve permissions | checkbox | Set to preserve original file permissions. This is useful when the user is set to root. |
| Preserve extended attributes | checkbox | Extended attributes are preserved, but must be supported by both systems. |
| Delay Updates | checkbox | Set to save the temporary file from each updated file to a holding directory until the end of the transfer when all transferred files are renamed into place. |
| Extra options | string | Additional rsync(1) options to include.
Note: The * character
must be escaped with a backslash (\*.txt)
or used inside single quotes. ('*.txt') |
| Enabled | checkbox | Enable this rsync task. Unset to disable this rsync task without deleting it. |
If the rysnc server requires password authentication, enter
--password-file=/PATHTO/FILENAME in the
Extra options field, replacing /PATHTO/FILENAME
with the appropriate path to the file containing the password.
Created rsync tasks are listed in Rsync Tasks. Click (Options) for an entry to display buttons for Edit, Delete, or Run Now.
7.3.1. Rsync Module Mode
This configuration example configures rsync module mode between the two following FreeNAS® systems:
- 192.168.2.2 has existing data in
/mnt/local/images. It will be the rsync client, meaning that an rsync task needs to be defined. It will be referred to as PUSH. - 192.168.2.6 has an existing pool named
/mnt/remote. It will be the rsync server, meaning that it will receive the contents of/mnt/local/images. An rsync module needs to be defined on this system and the rsyncd service needs to be started. It will be referred to as PULL.
On PUSH, an rsync task is defined in , ADD. In this example:
- the Path points to
/usr/local/images, the directory to be copied - the Remote Host points to 192.168.2.6, the IP address of the rsync server
- the Rsync Mode is Rsync module
- the Remote Module Name is backups; this will need to be defined on the rsync server
- the Direction is Push
- the rsync is scheduled to occur every 15 minutes
- the User is set to root so it has permission to write anywhere
- the Preserve Permissions option is enabled so that the original permissions are not overwritten by the root user
On PULL, an rsync module is defined in , ADD. In this example:
- the Module Name is backups; this needs to match the setting on the rsync client
- the Path is
/mnt/remote; a directory calledimageswill be created to hold the contents of/usr/local/images - the User is set to root so it has permission to write anywhere
- Hosts allow is set to 192.168.2.2, the IP address of the rsync client
Descriptions of the configurable options can be found in Rsync Modules.
To finish the configuration, start the rsync service on PULL in
.
If the rsync is successful, the contents of
/mnt/local/images/ will be mirrored to
/mnt/remote/images/.
7.3.2. Rsync over SSH Mode
SSH replication mode does not require the creation of an rsync module or for the rsync service to be running on the rsync server. It does require SSH to be configured before creating the rsync task:
- a public/private key pair for the rsync user account (typically root) must be generated on PUSH and the public key copied to the same user account on PULL
- to mitigate the risk of man-in-the-middle attacks, the public host key of PULL must be copied to PUSH
- the SSH service must be running on PULL
To create the public/private key pair for the rsync user account, open Shell on PUSH and run ssh-keygen. This example generates an RSA type public/private key pair for the root user. When creating the key pair, do not enter the passphrase as the key is meant to be used for an automated task.
ssh-keygen -t rsa
Generating public/private rsa key pair.
Enter file in which to save the key (/root/.ssh/id_rsa):
Created directory '/root/.ssh'.
Enter passphrase (empty for no passphrase):
Enter same passphrase again:
Your identification has been saved in /root/.ssh/id_rsa.
Your public key has been saved in /root/.ssh/id_rsa.pub.
The key fingerprint is:
f5:b0:06:d1:33:e4:95:cf:04:aa:bb:6e:a4:b7:2b:df root@freenas.local
The key's randomart image is:
+--[ RSA 2048]----+
|        .o. oo   |
|         o+o. .  |
|       . =o +    |
|        + +   o  |
|       S o .     |
|       .o        |
|      o.         |
|    o oo         |
|     **oE        |
|-----------------|
|                 |
|-----------------|
FreeNAS® supports RSA keys for SSH. When creating the key, use
-t rsa to specify this type of key. Refer to
Key-based Authentication
for more information.
Note
If a different user account is used for the rsync task, use the su - command after mounting the filesystem but before generating the key. For example, if the rsync task is configured to use the user1 user account, use this command to become that user:
su - user1
Next, view and copy the contents of the generated public key:
more .ssh/id_rsa.pub
ssh-rsa AAAAB3NzaC1yc2EAAAADAQABAAABAQC1lBEXRgw1W8y8k+lXPlVR3xsmVSjtsoyIzV/PlQPo
SrWotUQzqILq0SmUpViAAv4Ik3T8NtxXyohKmFNbBczU6tEsVGHo/2BLjvKiSHRPHc/1DX9hofcFti4h
dcD7Y5mvU3MAEeDClt02/xoi5xS/RLxgP0R5dNrakw958Yn001sJS9VMf528fknUmasti00qmDDcp/kO
xT+S6DFNDBy6IYQN4heqmhTPRXqPhXqcD1G+rWr/nZK4H8Ckzy+l9RaEXMRuTyQgqJB/rsRcmJX5fApd
DmNfwrRSxLjDvUzfywnjFHlKk/+TQIT1gg1QQaj21PJD9pnDVF0AiJrWyWnR root@freenas.local
Go to PULL and paste (or append) the copied key into the SSH Public Key field of (Options) , or the username of the specified rsync user account. The paste for the above example is shown in Figure 7.3.2. When pasting the key, ensure that it is pasted as one long line and, if necessary, remove any extra spaces representing line breaks.
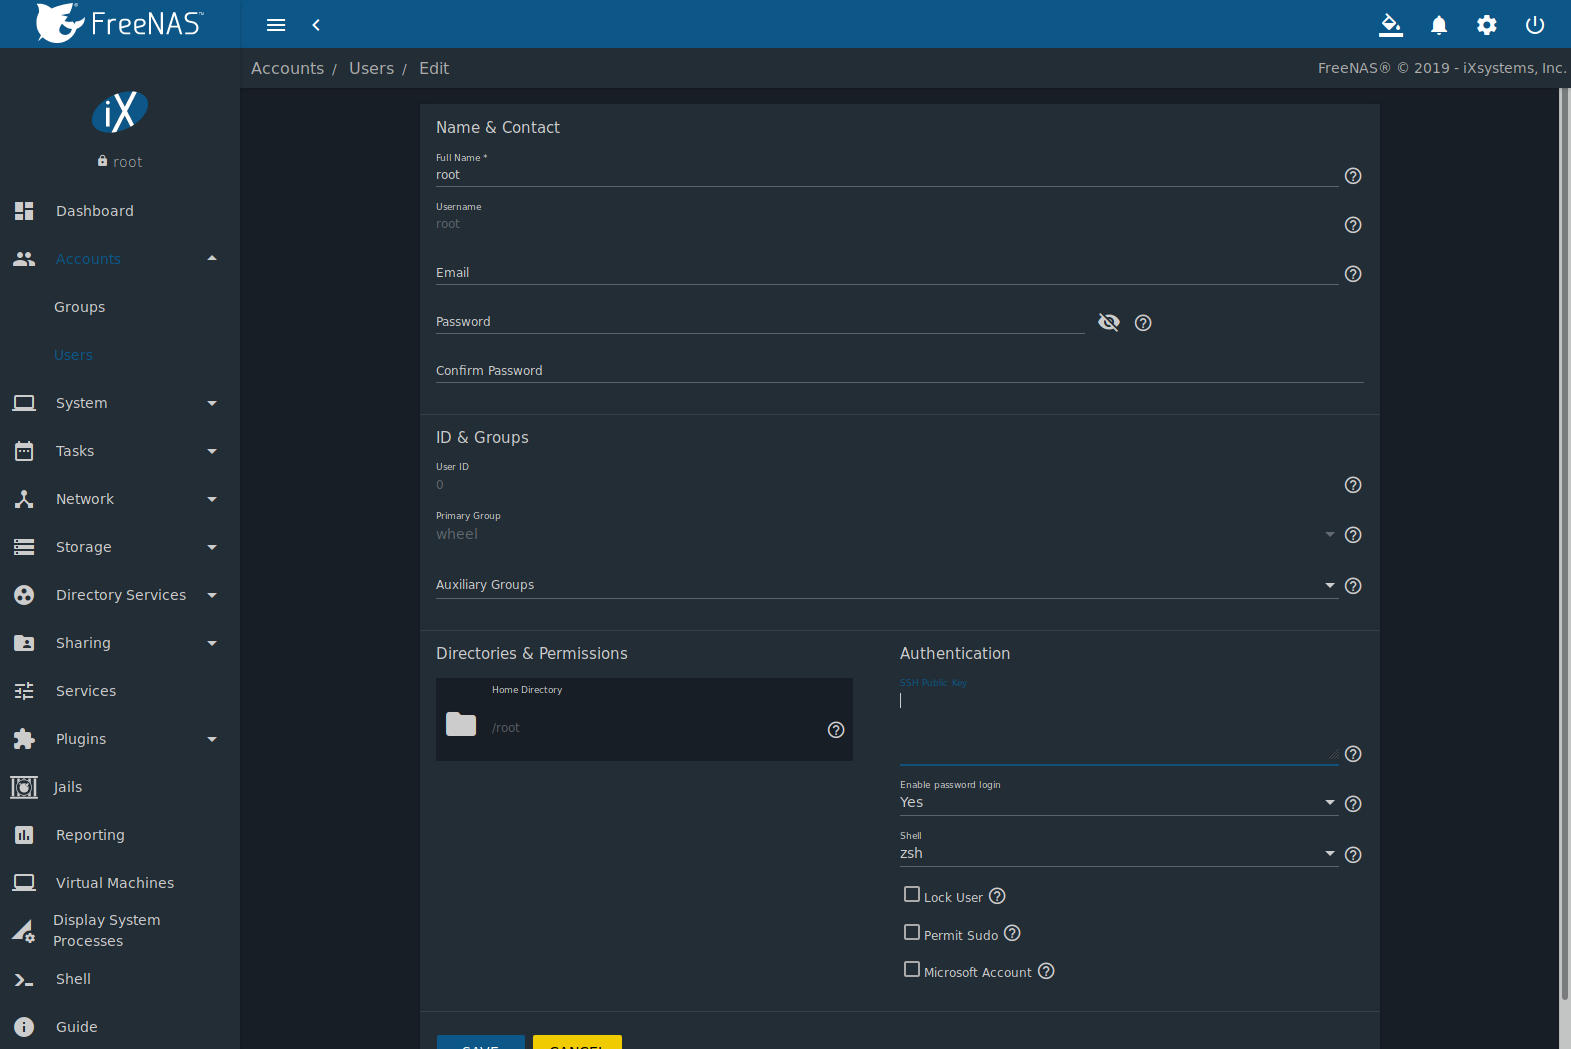
Fig. 7.3.2 Pasting the User SSH Public Key
While on PULL, verify that the SSH service is running in and start it if it is not.
Next, copy the host key of PULL using Shell on PUSH. The
command copies the RSA host key of the PULL server used in our
previous example. Be sure to include the double bracket >> to
prevent overwriting any existing entries in the known_hosts
file:
ssh-keyscan -t rsa 192.168.2.6 >> /root/.ssh/known_hosts
Note
If PUSH is a Linux system, use this command to copy the RSA key to the Linux system:
cat ~/.ssh/id_rsa.pub | ssh user@192.168.2.6 'cat >> .ssh/authorized_keys'
The rsync task can now be created on PUSH. To configure rsync SSH mode using the systems in our previous example, the configuration is:
- the Path points to
/mnt/local/images, the directory to be copied - the Remote Host points to 192.168.2.6, the IP address of the rsync server
- the Rsync Mode is Rsync over SSH
- the rsync is scheduled to occur every 15 minutes
- the User is set to root so it has permission to write anywhere; the public key for this user must be generated on PUSH and copied to PULL
- the Preserve Permissions option is enabled so that the original permissions are not overwritten by the root user
Save the rsync task and the rsync will automatically occur according
to the schedule. In this example, the contents of
/mnt/local/images/ will automatically appear in
/mnt/remote/images/ after 15 minutes. If the content does not
appear, use Shell on PULL to read /var/log/messages. If the
message indicates a n (newline character) in the key, remove the
space in the pasted key–it will be after the character that appears
just before the n in the error message.
7.4. S.M.A.R.T. Tests
S.M.A.R.T. (Self-Monitoring, Analysis and Reporting Technology) is a monitoring system for computer hard disk drives to detect and report on various indicators of reliability. Replace the drive when a failure is anticipated by S.M.A.R.T. Most modern ATA, IDE, and SCSI-3 hard drives support S.M.A.R.T. – refer to the drive documentation for confirmation.
Click and ADD to add a new scheduled S.M.A.R.T. test. Figure 7.4.1 shows the configuration screen that appears. Tests are listed under S.M.A.R.T. Tests. After creating tests, check the configuration in , then click the power button for the S.M.A.R.T. service in to activate the service. The S.M.A.R.T. service will not start if there are no pools.
Note
To prevent problems, do not enable the S.M.A.R.T. service if the disks are controlled by a RAID controller. It is the job of the controller to monitor S.M.A.R.T. and mark drives as Predictive Failure when they trip.
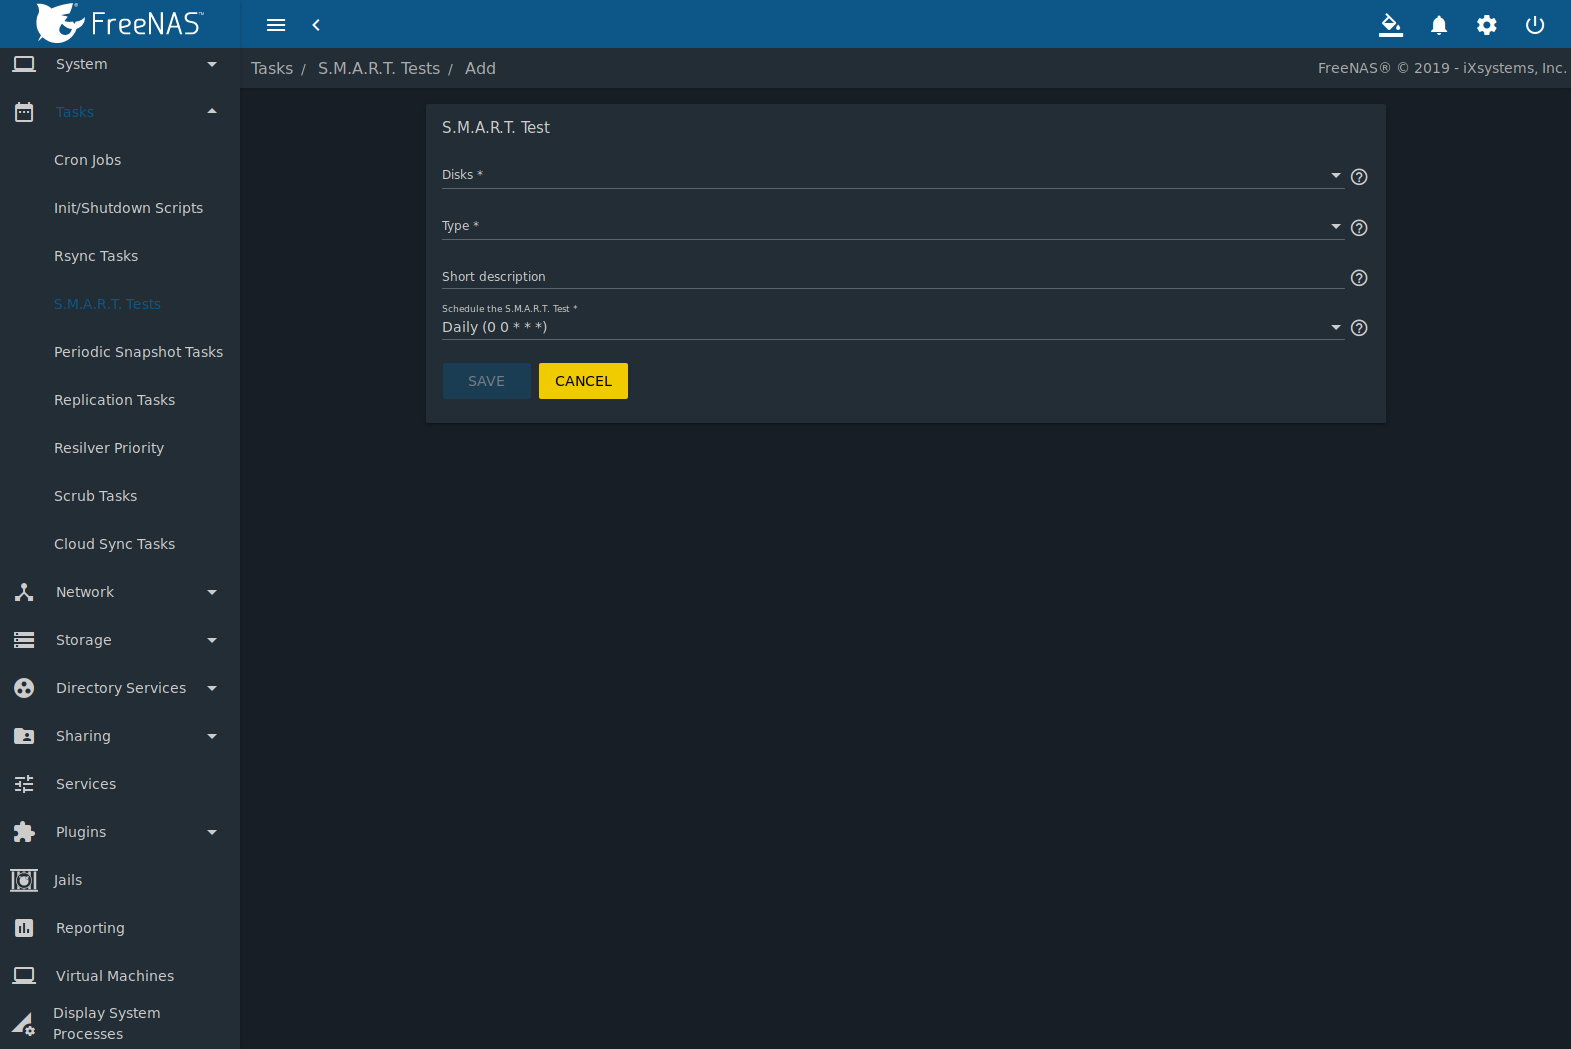
Fig. 7.4.1 Adding a S.M.A.R.T. Test
Table 7.4.1 summarizes the configurable options when creating a S.M.A.R.T. test.
| Setting | Value | Description |
|---|---|---|
| Disks | drop-down menu | Select the disks to monitor. |
| Type | drop-down menu | Choose the test type. See smartctl(8) for descriptions of each type. Some test types will degrade performance or take disks offline. Avoid scheduling S.M.A.R.T. tests simultaneously with scrub or resilver operations. |
| Short description | string | Optional. Enter a description of the S.M.A.R.T. test. |
| Schedule the S.M.A.R.T. Test | drop-down menu | Choose how often to run the task. Choices are Hourly, Daily, Weekly, Monthly, or Custom. Select Custom to open a visual scheduler for selecting minutes, hours, days, month, and days of week. |
An example configuration is to schedule a Short Self-Test once a week and a Long Self-Test once a month. These tests do not have a performance impact, as the disks prioritize normal I/O over the tests. If a disk fails a test, even if the overall status is Passed, consider replacing that disk.
Warning
Some S.M.A.R.T. tests cause heavy disk activity and can drastically reduce disk performance. Do not schedule S.M.A.R.T. tests to run at the same time as scrub or resilver operations or during other periods of intense disk activity.
Which tests will run and when can be verified by typing smartd -q showtests within Shell.
The results of a test can be checked from Shell by specifying the name of the drive. For example, to see the results for disk ada0, type:
smartctl -l selftest /dev/ada0
When an email address is entered in the Email field of
,
the system sends an email to that address when a test fails. Logging
information for S.M.A.R.T. tests can be found in
/var/log/daemon.log.
7.5. Periodic Snapshot Tasks
A periodic snapshot task allows scheduling the creation of read-only versions of pools and datasets at a given point in time. Snapshots can be created quickly and, if little data changes, new snapshots take up very little space. For example, a snapshot where no files have changed takes 0 MB of storage, but as changes are made to files, the snapshot size changes to reflect the size of the changes.
Snapshots keep a history of files, providing a way to recover an older copy or even a deleted file. For this reason, many administrators take snapshots often, store them for a period of time, and store them on another system, typically using Replication Tasks. Such a strategy allows the administrator to roll the system back to a specific point in time. If there is a catastrophic loss, an off-site snapshot can be used to restore the system up to the time of the last snapshot.
A pool must exist before a snapshot can be created. Creating a pool is described in Pools.
To create a periodic snapshot task, navigate to and click ADD. This opens the screen shown in Figure 7.5.1. Table 7.5.1 describes the fields in this screen.
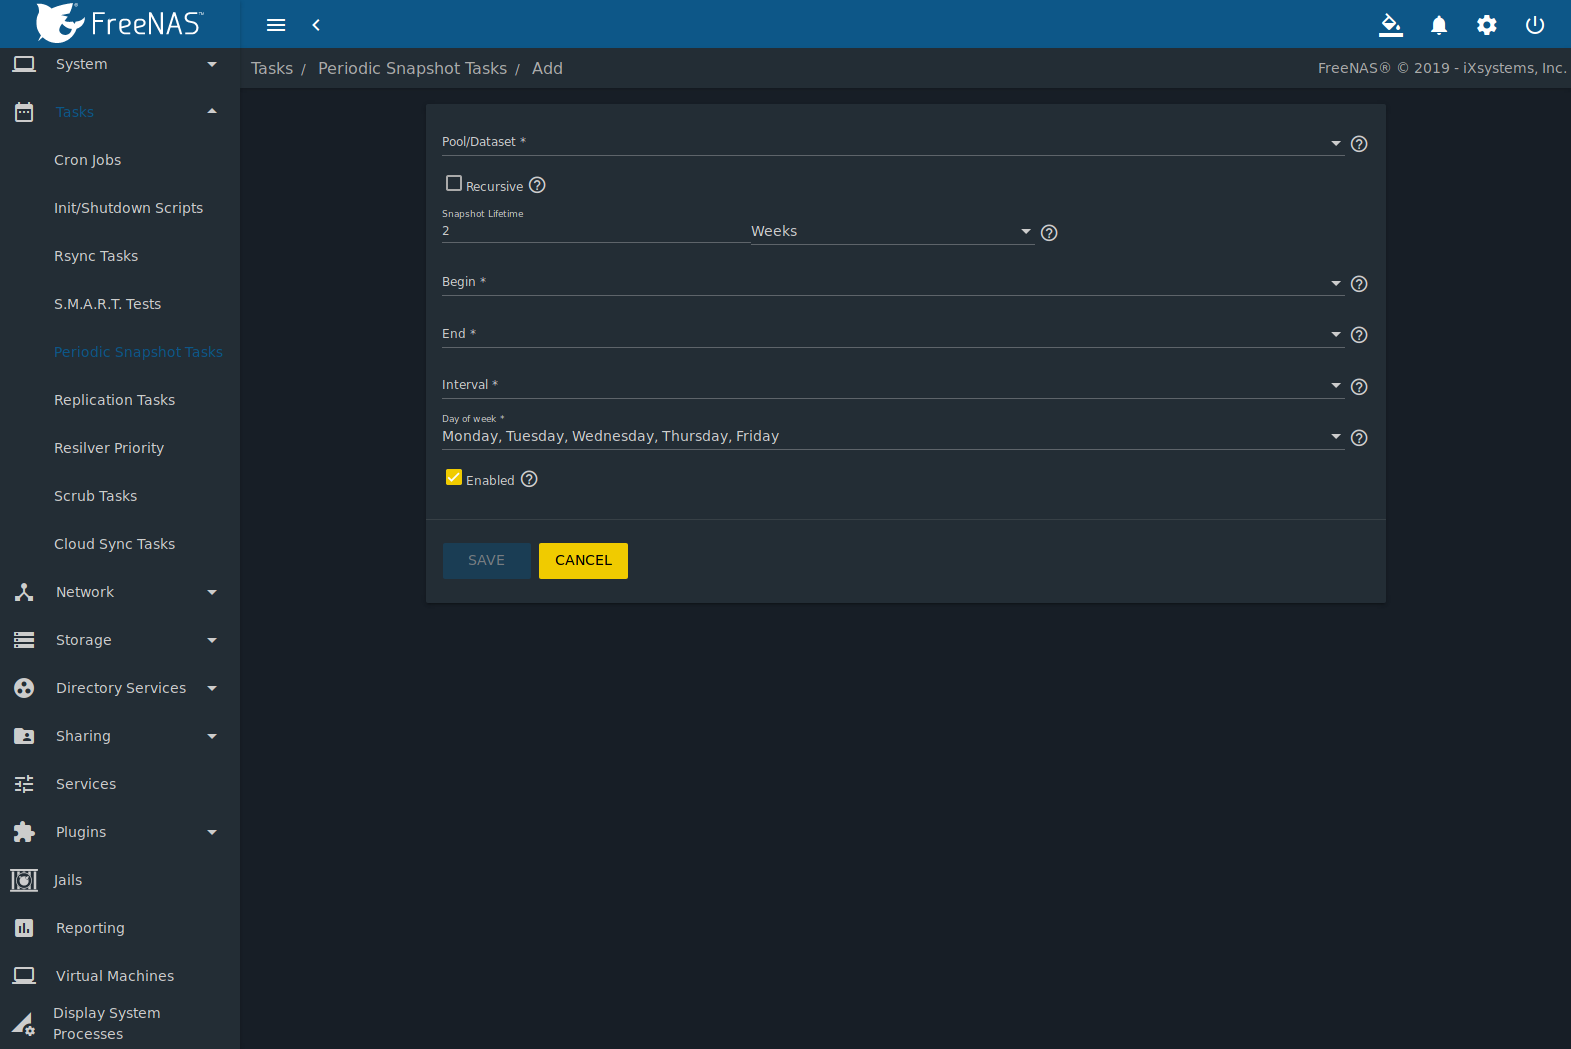
Fig. 7.5.1 Creating a Periodic Snapshot
| Setting | Value | Description |
|---|---|---|
| Pool/Dataset | drop-down menu | Select an existing pool, dataset, or zvol. |
| Recursive | checkbox | Set this option to take separate snapshots of the pool or dataset and each of the child datasets. Deselect to take a single snapshot of the specified pool or dataset with no child datasets. |
| Snapshot Lifetime | integer and drop-down menu | Define a length of time to retain the snapshot on this system. After the time expires, the snapshot is removed. Snapshots replicated to other systems are not affected. |
| Begin | drop-down menu | Choose the hour and minute when the system can begin taking snapshots. |
| End | drop-down menu | Choose the hour and minute when the system must stop taking snapshots. |
| Interval | drop-down menu | Define how often the system takes snapshots between Begin and End times. |
| Day of week | checkboxes | Choose the days of the week to take the snapshots. |
| Enabled | checkbox | Unset to disable the task without deleting it. |
If the Recursive option is enabled, child datasets of this dataset are included in the snapshot and there is no need to create snapshots for each child dataset. The downside is that there is no way to exclude particular child datasets from a recursive snapshot.
Click SAVE when finished customizing the task. Defined tasks are listed alphabetically in Periodic Snapshot Tasks. Click (Options) for an entry to display the Edit and Delete buttons.
7.6. Replication Tasks
Replication is the duplication of snapshots from one FreeNAS® system to another computer. When a new snapshot is created on the source computer, it is automatically replicated to the destination computer. Replication is typically used to keep a copy of files on a separate system, with that system sometimes being at a different physical location.
The basic configuration requires a source system with the original data and a destination system where the data will be replicated. When a periodic snapshot of the selected dataset occurs, the replication task copies the data to the destination system.
When snapshots are automatically created on the source computer, they are replicated to the destination computer. First-time replication tasks can take a long time to complete as the entire snapshot must be copied to the destination system. Replicated data is not visible on the receiving system until the replication task completes. Later replications only send the changes to the destination system. Interrupting a running replication requires the replication task to restart from the beginning.
The target dataset on the receiving system is automatically created in read-only mode to protect the data. To mount or browse the data on the receiving system, create a clone of the snapshot and use the clone. Clones are created in read/write mode, making it possible to browse or mount them. See Snapshots for more information on creating clones.
7.6.1. Examples: Common Configuration
The examples shown here use the same setup of source and destination computers.
7.6.1.1. Alpha (Source)
Alpha is the source computer with the data to be replicated. It is at IP address 10.0.0.102. A pool named alphapool has already been created, and a dataset named alphadata has been created on that pool. This dataset contains the files which will be snapshotted and replicated onto Beta.
This new dataset has been created for this example, but a new dataset is not required. Most users will already have datasets containing the data they wish to replicate.
Click and ADD to create a periodic snapshot of the source dataset. Add the alphapool/alphadata dataset to the Pool/Dataset field. Figure 7.6.1 shows the configured periodic snapshot.
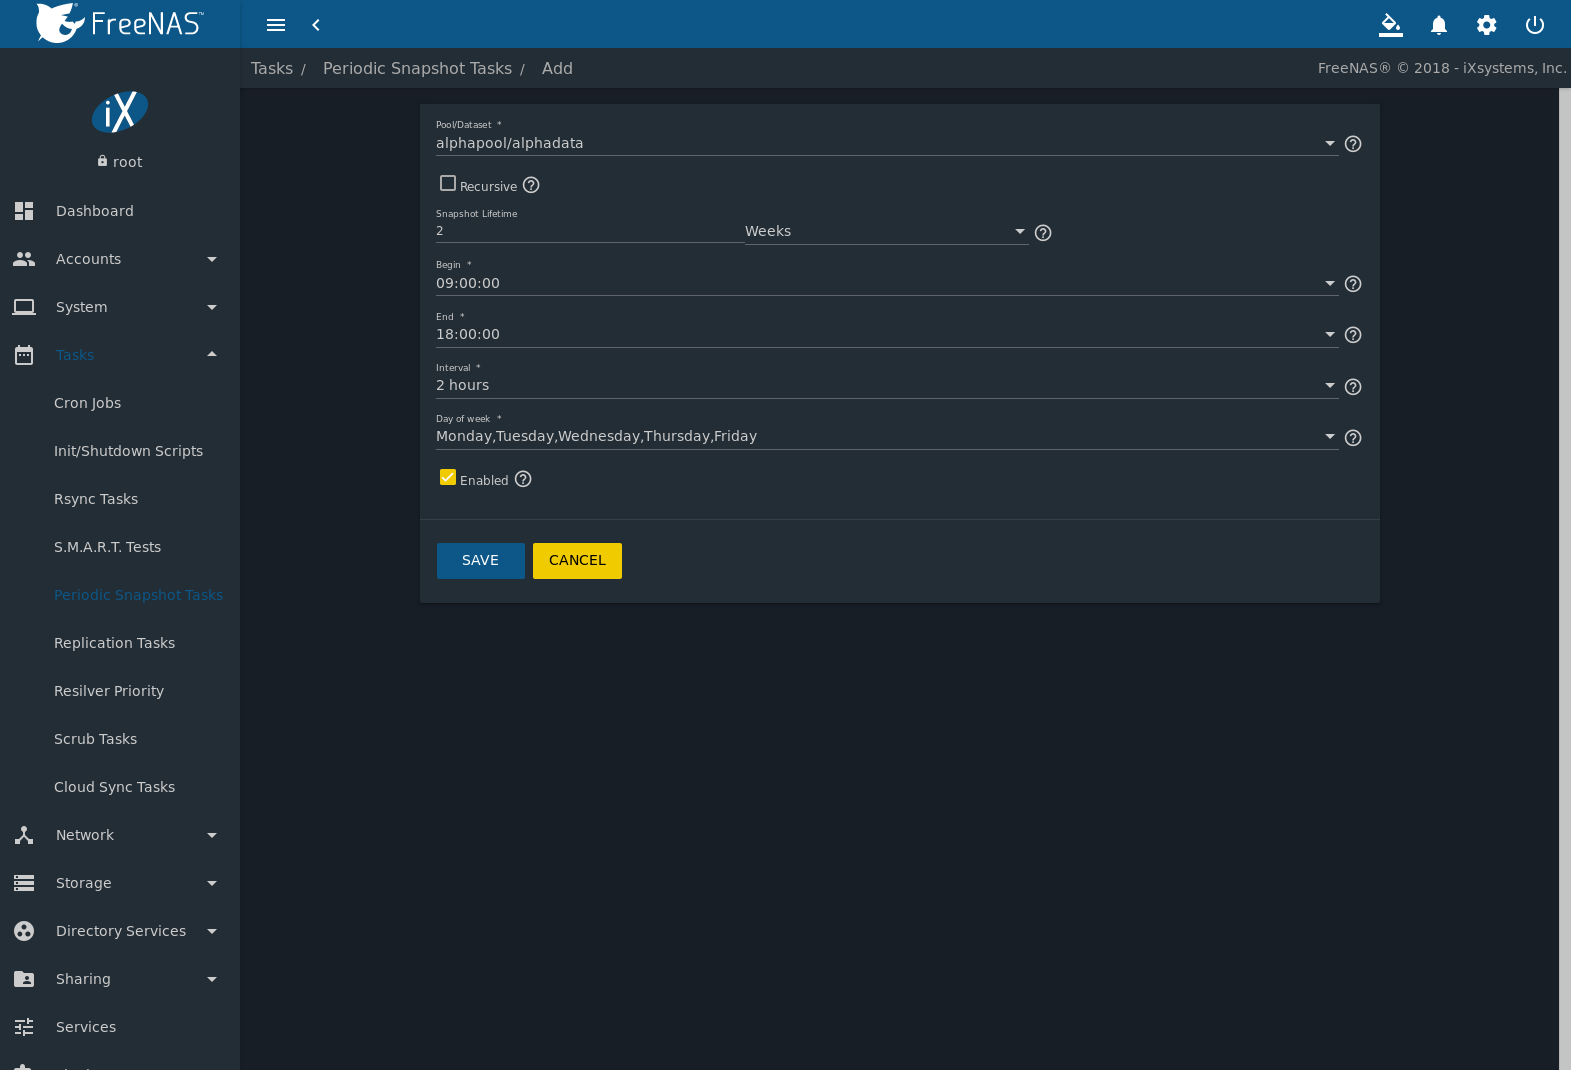
Fig. 7.6.1 Create a Periodic Snapshot for Replication
This example creates a snapshot of the alphapool/alphadata dataset every two hours from Monday through Friday between the hours of 9:00 and 18:00 (6:00 PM). Snapshots are automatically deleted after their chosen lifetime of two weeks expires.
7.6.1.2. Beta (Destination)
Beta is the destination computer where the replicated data will be copied. It is at IP address 10.0.0.118. A pool named betapool has already been created.
Snapshots are transferred with SSH. To allow incoming connections, this service is enabled on Beta. The service is not required for outgoing connections, and so does not need to be enabled on Alpha.
7.6.2. Example: FreeNAS® to FreeNAS® Semi-Automatic Setup
FreeNAS® offers a special semi-automatic setup mode that simplifies setting up replication. Create the replication task on Alpha by clicking Replication Tasks and then ADD.
Select alphapool/alphadata as the dataset to replicate. betapool is the destination pool where alphadata snapshots are replicated. The Setup mode dropdown is set to Semi-Automatic as shown in Figure 7.6.2. The IP address of Beta is entered in the Remote Hostname field. A hostname can be entered here if local DNS resolves for that hostname.
Note
If WebGUI HTTP -> HTTPS Redirect is enabled in on the destination computer, set Remote HTTP/HTTPS Port to the HTTPS port and ensure Remote HTTPS is enabled when creating the replication on the source computer.
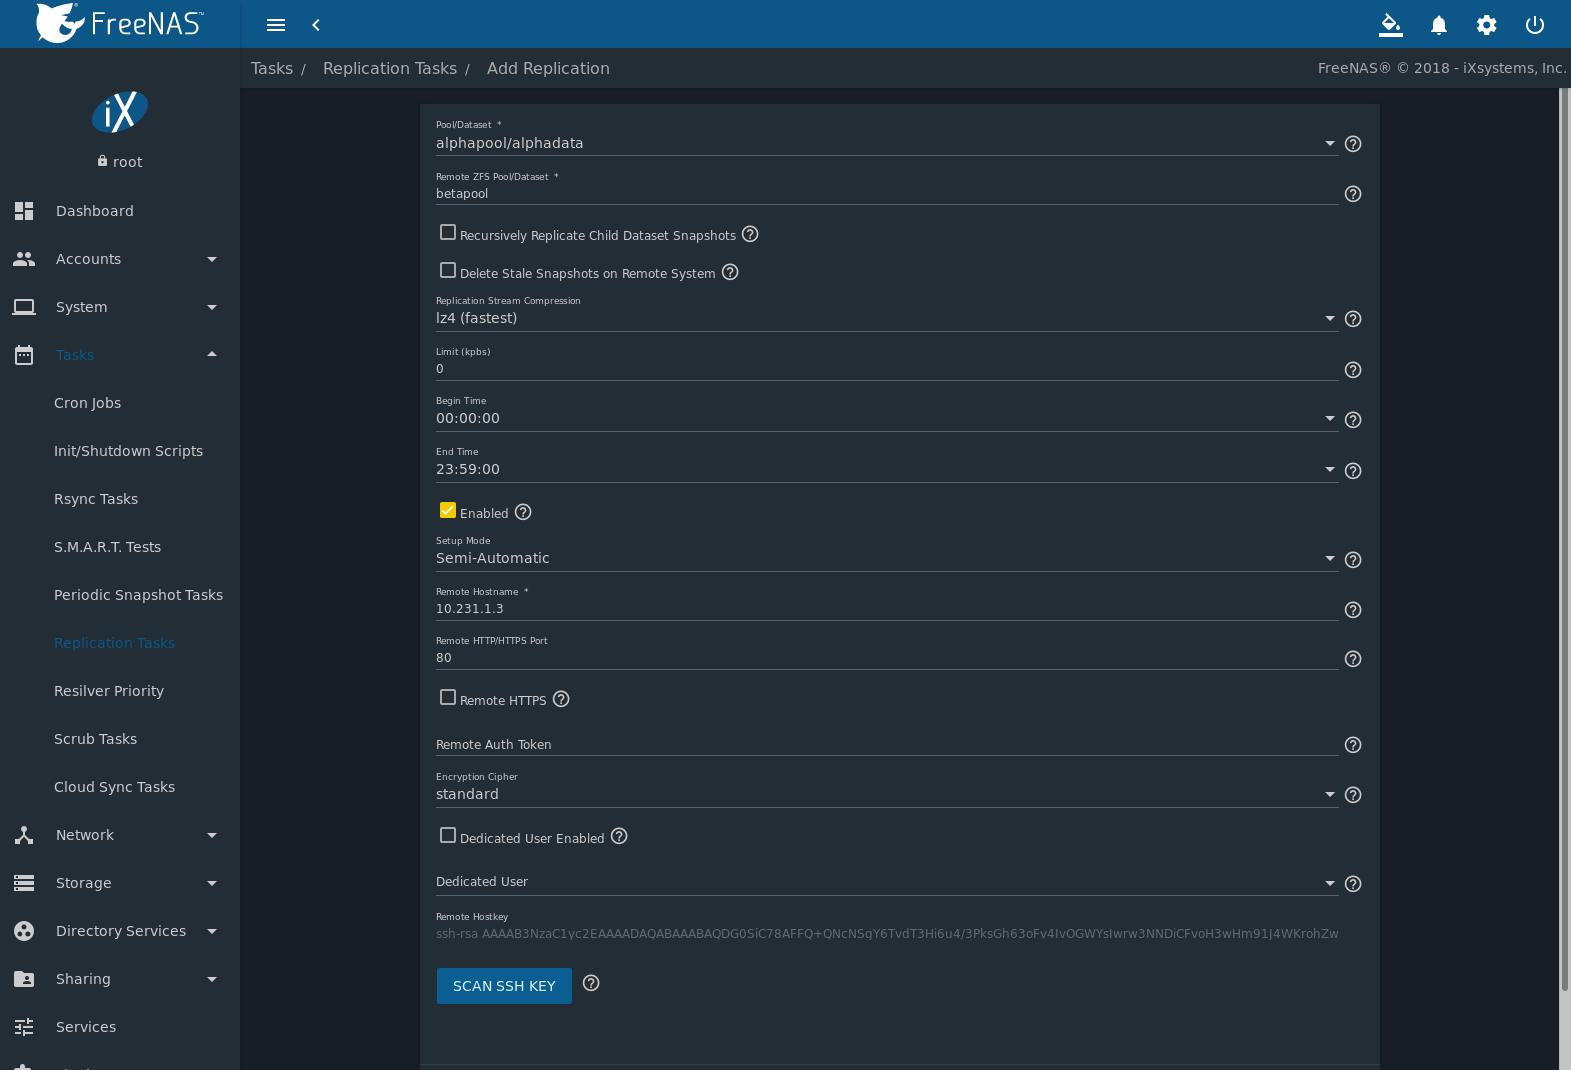
Fig. 7.6.2 Add Replication Dialog, Semi-Automatic
The Remote Auth Token field expects a special token from the Beta computer. On Beta, navigate to , and click REPLICATION TOKEN. A dialog showing the temporary authorization token is shown as in Figure 7.6.3.
Highlight the temporary authorization token string with the mouse and copy it.
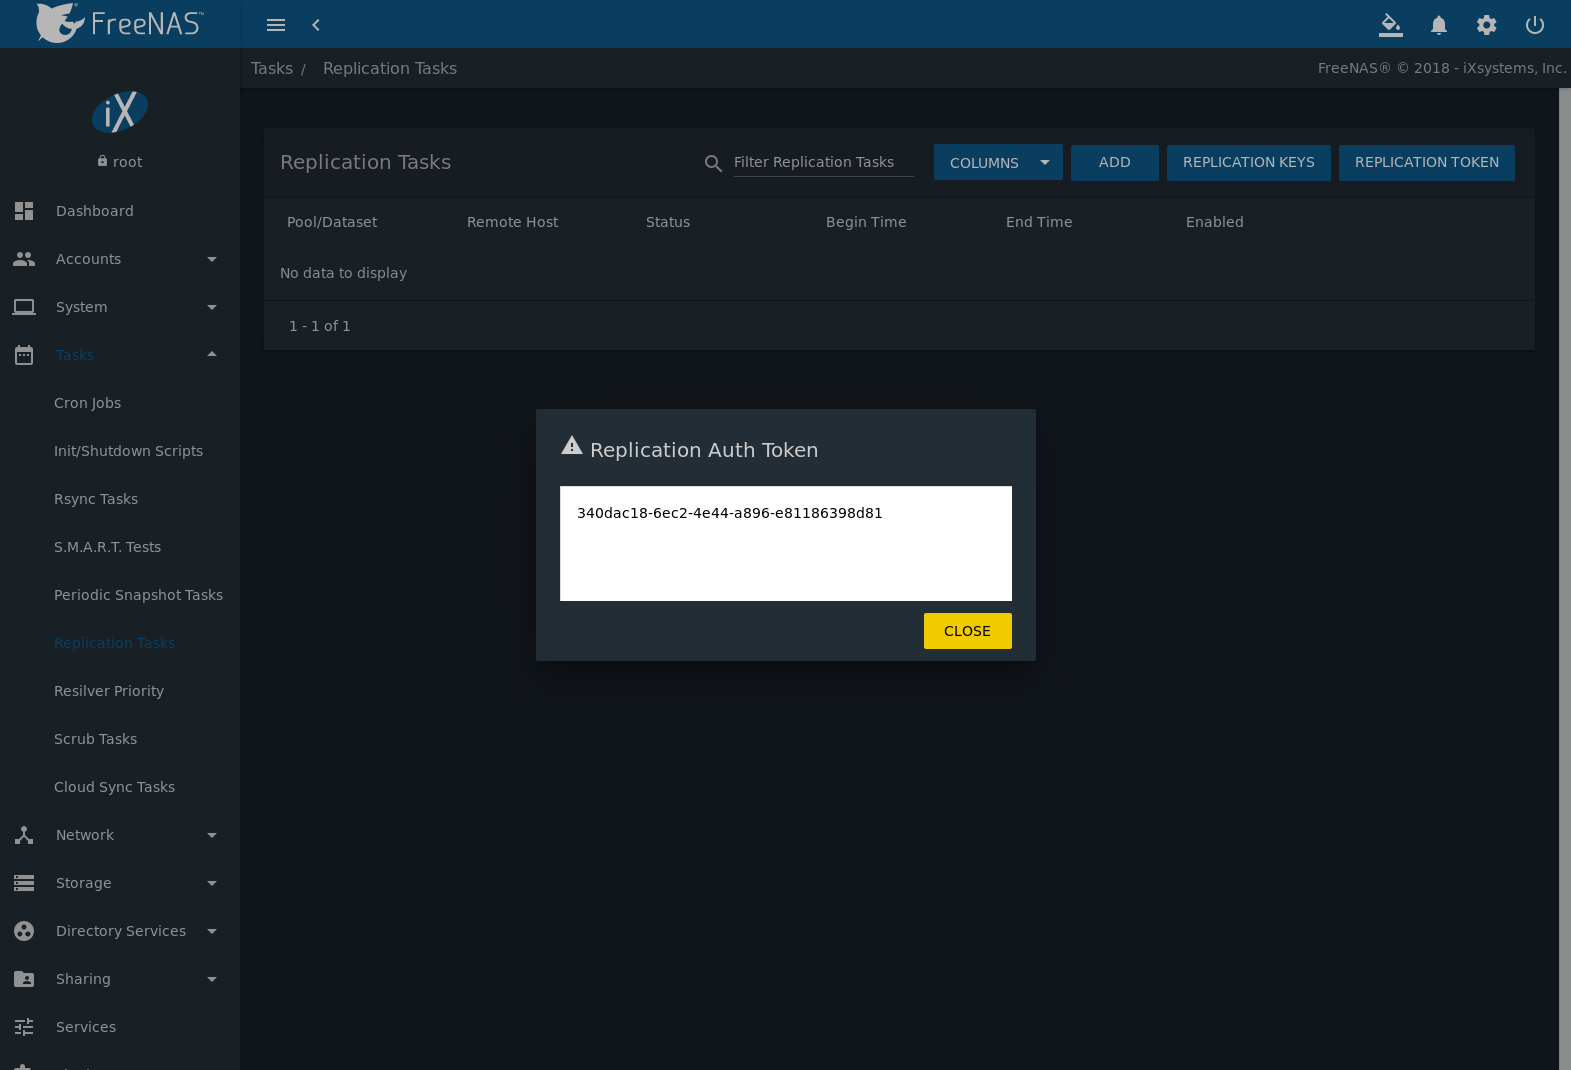
Fig. 7.6.3 Temporary Authentication Token on Destination
On the Alpha system, paste the copied temporary authorization token string into the Remote Auth Token field as shown in Figure 7.6.4.
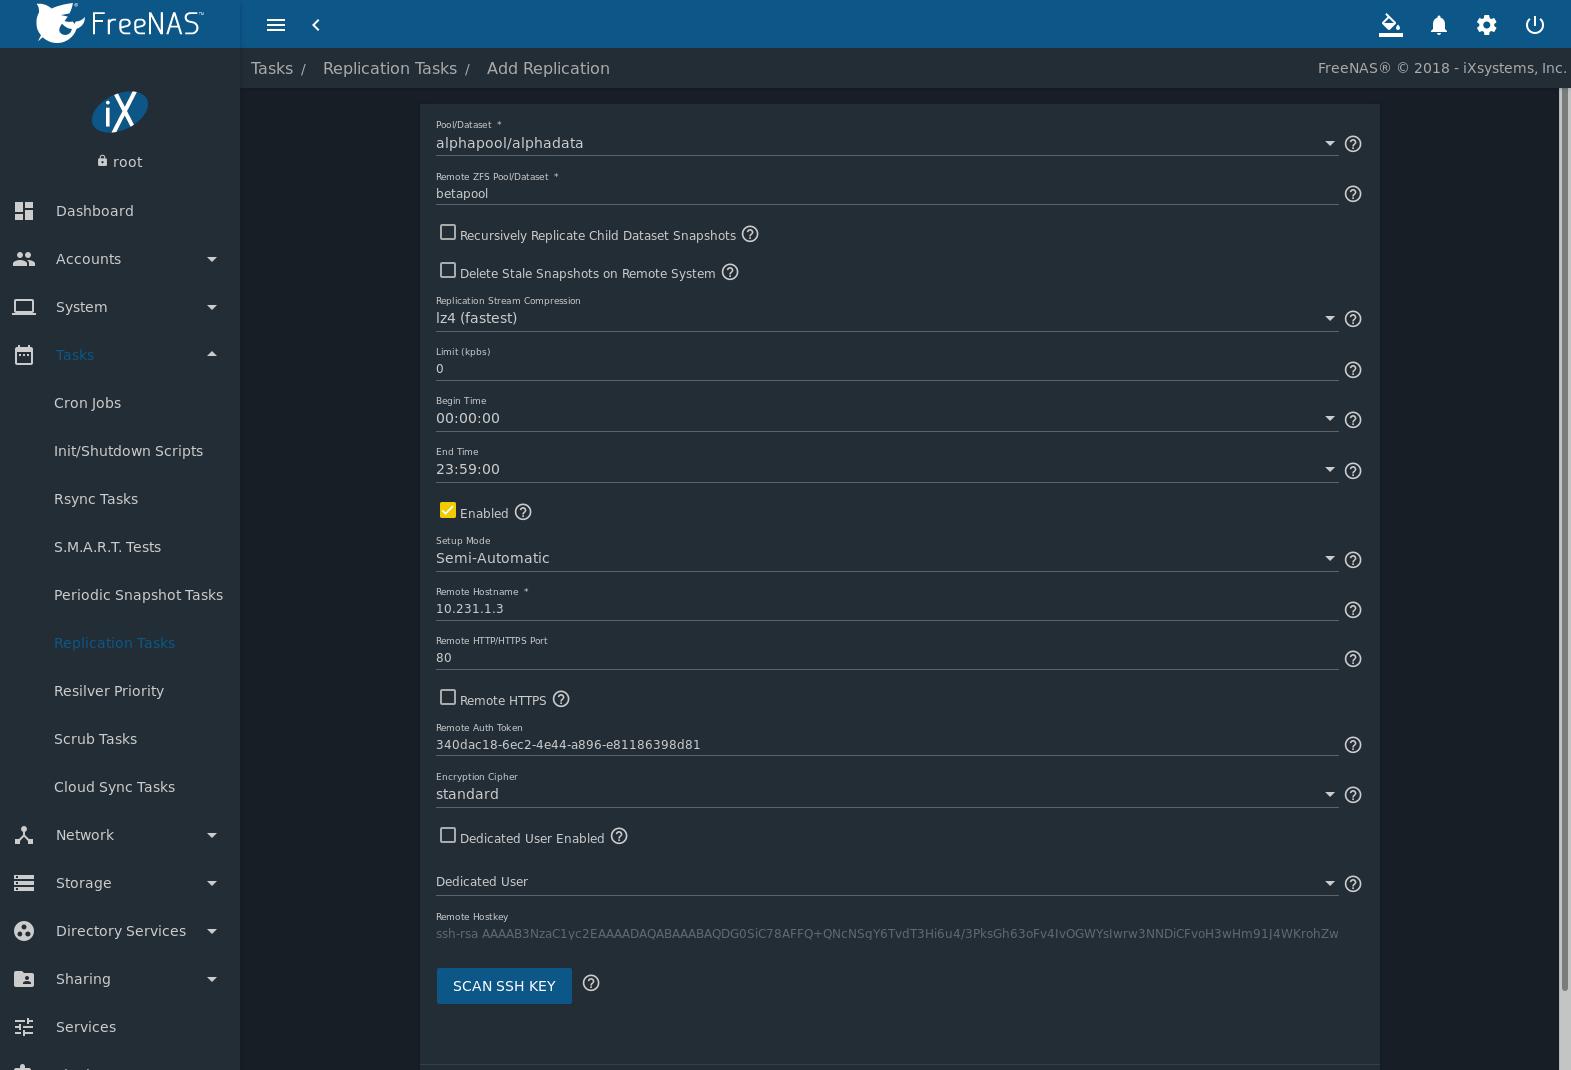
Fig. 7.6.4 Temporary Authentication Token Pasted to Source
Finally, click SAVE to create the replication task. After each periodic snapshot is created, a replication task will copy it to the destination system. See Limiting Replication Times for information about restricting when replication is allowed to run.
Note
The temporary authorization token is only valid for a few minutes. If a Token is invalid message is shown, get a new temporary authorization token from the destination system, clear the Remote Auth Token field, and paste in the new one.
7.6.3. Example: FreeNAS® to FreeNAS® Dedicated User Replication
A dedicated user can be used for replications rather than the root user. This example shows the process using the semi-automatic replication setup between two FreeNAS® systems with a dedicated user named repluser. SSH key authentication is used to allow the user to log in remotely without a password.
In this example, the periodic snapshot task has not been created yet. If the periodic snapshot shown in the example configuration has already been created, go to , click (Options) for the task and Delete to remove it before continuing.
On Alpha, click then ADD. Enter repluser for Username, enter /mnt/alphapool/repluser in the Home Directory field, enter Replication Dedicated User for the Full Name, and set Enable password login to No. Leave the other fields at their default values, but note the User ID number. Click SAVE to create the user.
On Beta, the same dedicated user must be created as was created on
the sending computer. Click
then ADD. Enter the User ID
number from Alpha, repluser for Username, enter
/mnt/betapool/repluser in the Home Directory
field, enter Replication Dedicated User for the
Full Name, and set Enable password login to No.
Leave the other fields at their default values. Click SAVE
to create the user.
A dataset with the same name as the original must be created on the
destination computer, Beta. Navigate to
,
click betapool, then (Options) and Add Dataset.
Enter alphadata as the Name, then click
SAVE.
The replication user must be given permissions to the destination dataset. On Beta, open a Shell and enter this command:
zfs allow -ldu repluser create,destroy,diff,mount,readonly,receive,release,send,userprop betapool/alphadata
The destination dataset must also be set to read-only. Enter this command in the Shell:
zfs set readonly=on betapool/alphadata
The replication user must also be able to mount datasets. On Beta, go to and click ADD. Enter vfs.usermount for the Variable, 1 for the Value, and choose Sysctl from the Type drop-down. Click SAVE.
Back on Alpha, create a periodic snapshot of the source dataset. Figure 7.6.1 shows the configuration.
On Alpha, create the replication task by clicking Replication Tasks and click ADD. alphapool/alphadata is selected as the dataset to replicate. betapool/alphadata is the destination pool and dataset where alphadata snapshots are replicated.
The Setup mode dropdown is set to Semi-Automatic as shown in Figure 7.6.2. The IP address of Beta is entered in the Remote hostname field. A hostname can be entered here if local DNS resolves for that hostname.
Note
If WebGUI HTTP -> HTTPS Redirect is enabled in on the destination computer, set the Remote HTTP/HTTPS Port to the HTTPS port and enable the Remote HTTPS when creating the replication on the source computer.
The Remote Auth Token field expects a special token from the Beta computer. On Beta, click , then REPLICATION TOKEN. A dialog showing the temporary authorization token is shown as in Figure 7.6.3.
Highlight the temporary authorization token string with the mouse and copy it.
On the Alpha system, paste the copied temporary authorization token string into the Remote Auth Token field as shown in Figure 7.6.4.
Set the Dedicated User Enabled option. Choose repluser in the Dedicated User drop-down.
Click SAVE to create the replication task.
Note
The temporary authorization token is only valid for a few minutes. If a Token is invalid message is shown, get a new temporary authorization token from the destination system, clear the Remote Auth Token field, and paste in the new one.
Replication will begin when the periodic snapshot task runs.
Additional replications can use the same dedicated user that has already been set up. The permissions and read only settings made through the Shell must be set on each new destination dataset.
7.6.4. Example: FreeNAS® to FreeNAS® or Other Systems, Manual Setup
This example uses the same basic configuration of source and destination computers shown above, but the destination computer is not required to be a FreeNAS® system. Other operating systems can receive the replication if they support SSH, ZFS, and the same features that are in use on the source system. The details of creating pools and datasets, enabling SSH, and copying encryption keys will vary when the destination computer is not a FreeNAS® system.
7.6.4.1. Encryption Keys
A public encryption key must be copied from Alpha to Beta to allow a secure connection without a password prompt. On Alpha, navigate to and click REPLICATION KEYS. This produces the window shown in Figure 7.6.5. Use the mouse to highlight the key data shown in the window, then copy it.
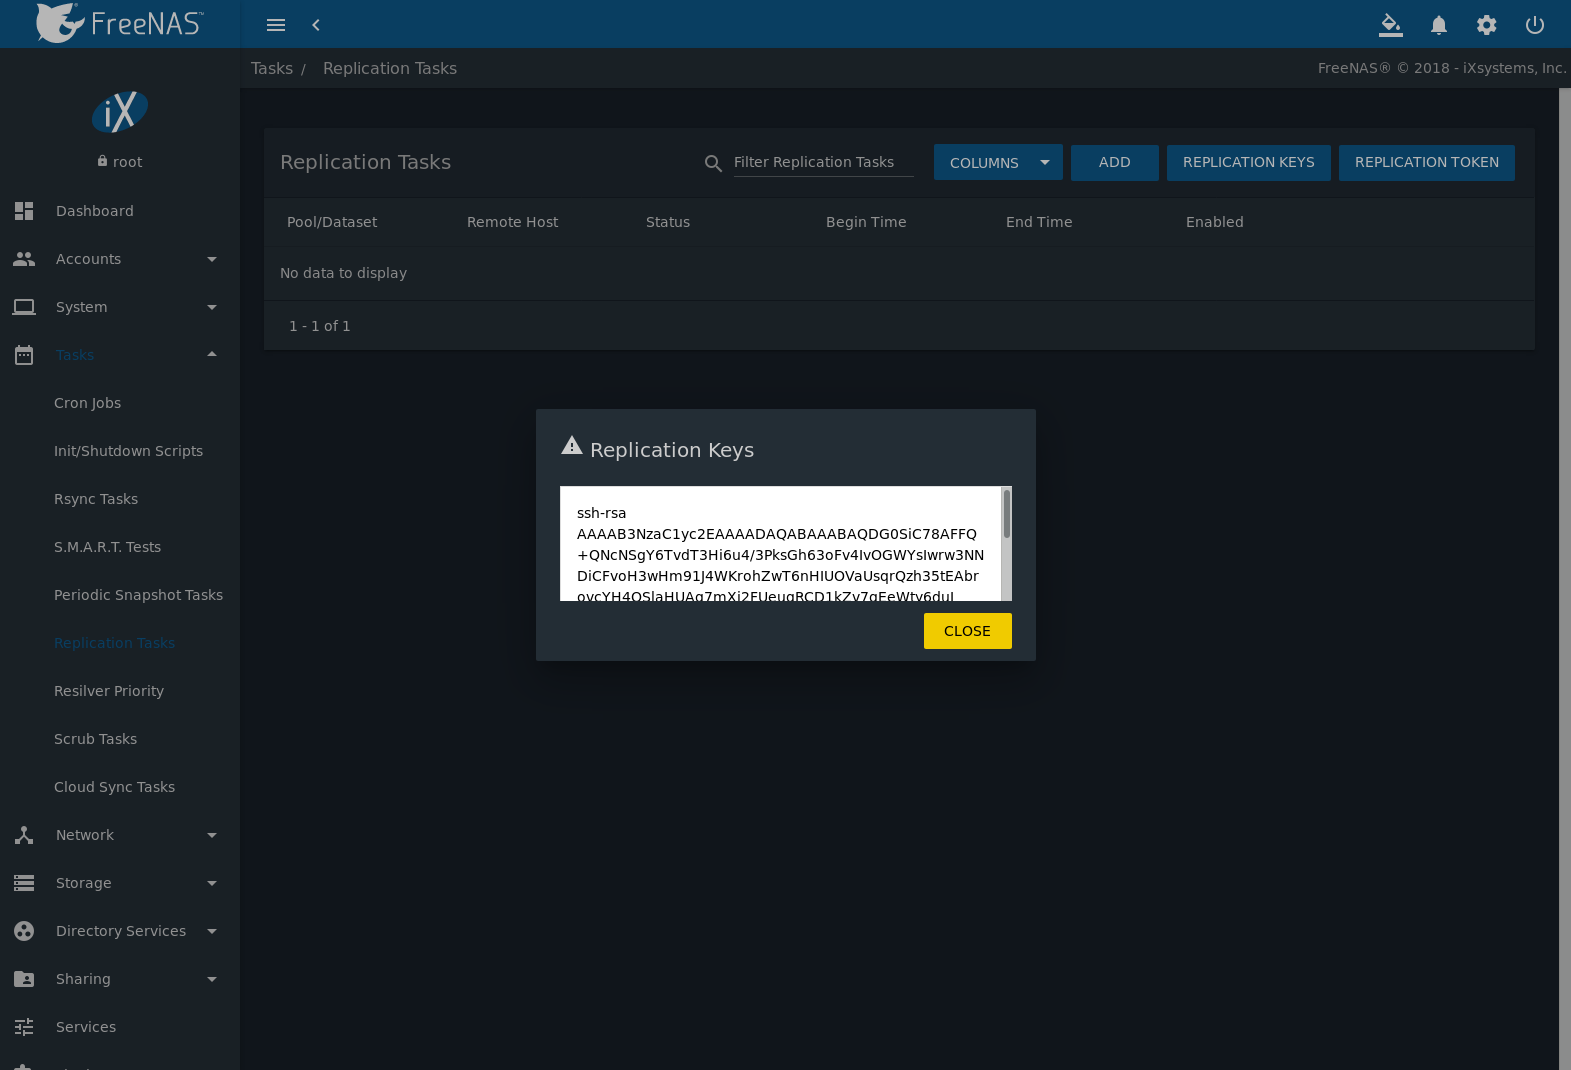
Fig. 7.6.5 Copy the Replication Key
On Beta, go to . Click (Options) for the root account, then Edit. Paste the copied key into the SSH Public Key field and click SAVE as shown in Figure 7.6.6.
Fig. 7.6.6 Paste the Replication Key
Back on Alpha, create the replication task by clicking Replication Tasks and ADD. alphapool/alphadata is selected as the dataset to replicate. The destination pool is betapool. The alphadata dataset and snapshots are replicated there. The IP address of Beta is entered in the Remote Hostname field as shown in Figure 7.6.7. A hostname can be entered here if local DNS resolves for that hostname.
Click the SCAN SSH KEY button to retrieve the SSH host keys from Beta and fill the Remote Hostkey field. Finally, click SAVE to create the replication task. After each periodic snapshot is created, a replication task will copy it to the destination system. See Limiting Replication Times for information about restricting when replication is allowed to run.
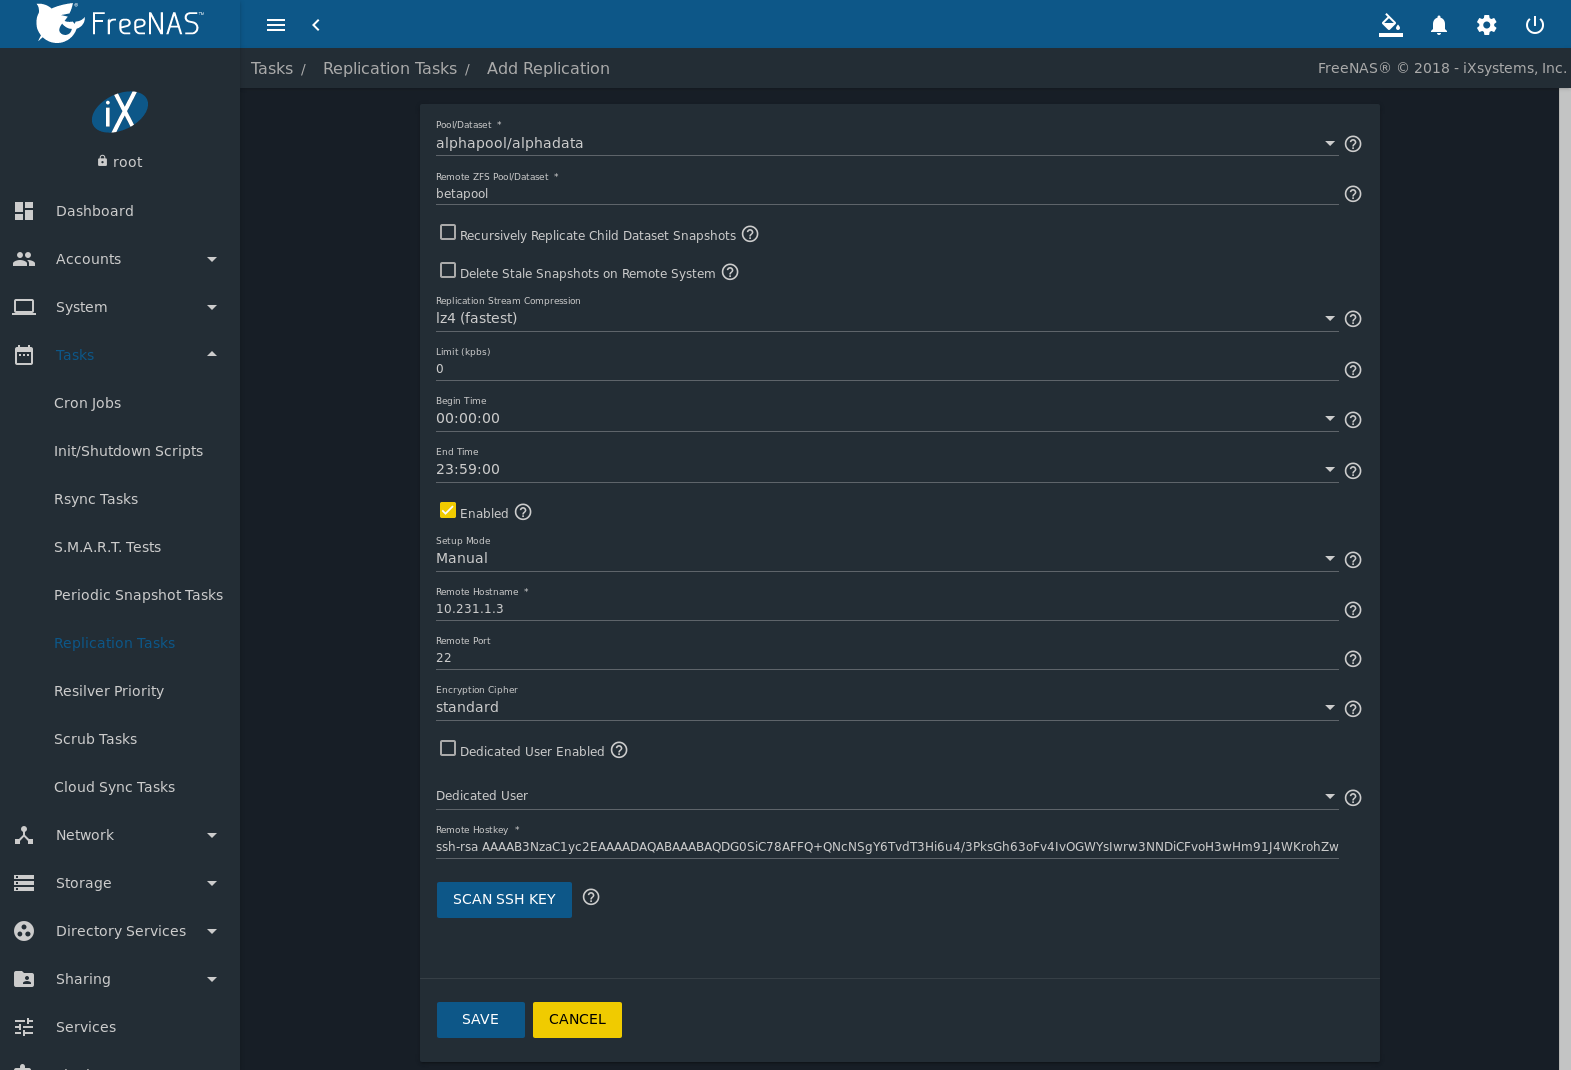
Fig. 7.6.7 Add Replication Dialog
7.6.5. Replication Options
Table 7.6.1 describes the options in the replication task dialog.
| Setting | Value | Description |
|---|---|---|
| Pool/Dataset | drop-down menu | On the source computer with snapshots to replicate, choose an existing pool or dataset with an active periodic snapshot task. |
| Remote ZFS Pool/Dataset | string | Enter the pool or dataset on the remote or destination computer that will store snapshots. Example: poolname/datasetname, not the mountpoint or filesystem path. |
| Recursively Replicate Child Dataset Snapshots | checkbox | Set to include snapshots of child datasets from the primary dataset. |
| Delete Stale Snapshots on Remote System | checkbox | Set to delete snapshots from the remote system which are also no longer present on the source computer. |
| Replication Stream Compression | drop-down menu | Select a compression algorithm to reduce the size of the data being replicated. Choices are lz4 (fastest), pigz (all rounder), plzip (best compression), or Off (no compression). |
| Limit (kbps) | integer | Limit replication speed to the specified value in kbps. Default of 0 is unlimited. |
| Begin Time | drop-down menu | Set the time to start the replication task. |
| End Time | drop-down menu | Define the time the replication must start. A started replication task continues until it is finished. |
| Enabled | checkbox | Unset to disable the scheduled replication task without deleting it. |
| Setup Mode | drop-down menu | Choose the configuration mode for the remote system. Choices are Manual or Semi-Automatic. Note Semi-Automatic only works with remote version 9.10.2 or later. |
| Remote Hostname | string | Enter the IP address or DNS name of the remote system to receive the replication data. |
| Remote Port | string | Enter the port used by the SSH server on the remote system. |
| Encryption Cipher | drop-down menu | Standard provides the best security. Fast is less secure, but has better transfer rates for devices with limited cryptographic speed. Disabled is for networks where the entire path between sources and destinations is trusted. |
| Dedicated User Enabled | checkbox | Set to allow a user account other than root to be used for replication. |
| Dedicated User | drop-down menu | Select the user account to use for replication. Only available if Dedicated User Enabled is enabled. |
| Remote Hostkey | string | Paste the host key of the destination NAS configured for the Replication Task. Use the SCAN SSH KEY button to automatically retrieve the public host key of the remote system. |
The replication task runs after a new periodic snapshot is created. The periodic snapshot and any new manual snapshots of the same dataset are replicated onto the destination computer.
When multiple replications have been created, replication tasks run serially, one after another. Completion time depends on the number and size of snapshots and the bandwidth available between the source and destination computers.
The first time a replication runs, it must duplicate data structures from the source to the destination computer. This can take much longer to complete than subsequent replications, which only send differences in data.
Warning
Snapshots record incremental changes in data. If the receiving system does not have at least one snapshot that can be used as a basis for the incremental changes in the snapshots from the sending system, there is no way to identify only the data that has changed. In this situation, the snapshots in the receiving system target dataset are removed so a complete initial copy of the new replicated data can be created.
Navigating to displays Figure 7.6.8, the list of replication tasks. Status shows the current status of each replication task. The display is updated periodically, always showing the latest status.

Fig. 7.6.8 Replication Task List
Note
The encryption key that was copied from the source computer
(Alpha) to the destination computer (Beta) is an RSA public
key located in the /data/ssh/replication.pub file on the
source computer. The host public key used to identify the
destination computer (Beta) is from the
/etc/ssh/ssh_host_rsa_key.pub file on the destination
computer.
7.6.6. Replication Encryption
The default Encryption Cipher Standard setting provides good security. Fast is less secure than Standard but can give reasonable transfer rates for devices with limited cryptographic speed. For networks where the entire path between source and destination computers is trusted, the Disabled option can be chosen to send replicated data without encryption.
7.6.7. Limiting Replication Times
The Begin and End times in a replication task make it possible to restrict when replication is allowed. These times can be set to only allow replication after business hours, or at other times when disk or network activity will not slow down other operations like snapshots or Scrub Tasks. The default settings allow replication to occur at any time.
These times control when replication task are allowed to start, but will not stop a replication task that is already running. Once a replication task has begun, it will run until finished.
7.6.8. Troubleshooting Replication
Replication depends on SSH, disks, network, compression, and encryption to work. A failure or misconfiguration of any of these can prevent successful replication.
7.6.8.1. SSH
SSH must be able to connect from the source system to the destination system with an encryption key. This is tested from Shell by making an SSH connection from the source system to the destination system. From the previous example, this is a connection from Alpha to Beta at 10.0.0.118. Start the Shell on the source machine (Alpha), then enter this command:
ssh -vv -i /data/ssh/replication 10.0.0.118
On the first connection, the system might say
No matching host key fingerprint found in DNS.
Are you sure you want to continue connecting (yes/no)?
Verify that this is the correct destination computer from the
preceding information on the screen and type yes. At this
point, an SSH shell connection is open to the destination
system, Beta.
If a password is requested, SSH authentication is not working. See
Figure 7.6.5 above. This key
value must be present in the /root/.ssh/authorized_keys file
on Beta, the destination computer. The /var/log/auth.log
file can show diagnostic errors for login problems on the destination
computer also.
7.6.8.2. Compression
Matching compression and decompression programs must be available on
both the source and destination computers. This is not a problem when
both computers are running FreeNAS®, but other operating systems might
not have lz4, pigz, or plzip compression programs installed by
default. An easy way to diagnose the problem is to set
Replication Stream Compression to Off. If the
replication runs, select the preferred compression method and check
/var/log/debug.log on the FreeNAS® system for errors.
7.6.8.3. Manual Testing
On Alpha, the source computer, the /var/log/messages file
can also show helpful messages to locate the problem.
On the source computer, Alpha, open a Shell and manually send
a single snapshot to the destination computer, Beta. The snapshot
used in this example is named auto-20161206.1110-2w. As
before, it is located in the alphapool/alphadata dataset. A
@ symbol separates the name of the dataset from the name of
the snapshot in the command.
zfs send alphapool/alphadata@auto-20161206.1110-2w | ssh -i /data/ssh/replication 10.0.0.118 zfs recv betapool
If a snapshot of that name already exists on the destination computer, the system will refuse to overwrite it with the new snapshot. The existing snapshot on the destination computer can be deleted by opening a Shell on Beta and running this command:
zfs destroy -R betapool/alphadata@auto-20161206.1110-2w
Then send the snapshot manually again. Snapshots on the destination
system, Beta, are listed from the Shell with
zfs list -t snapshot or from
.
Error messages here can indicate any remaining problems.
7.7. Resilver Priority
Resilvering, or the process of copying data to a replacement disk, is best completed as quickly as possible. Increasing the priority of resilvers can help them to complete more quickly. The Resilver Priority menu makes it possible to increase the priority of resilvering at times where the additional I/O or CPU usage will not affect normal usage. Select to display the screen shown in Figure 7.7.1. Table 7.7.1 describes the fields on this screen.
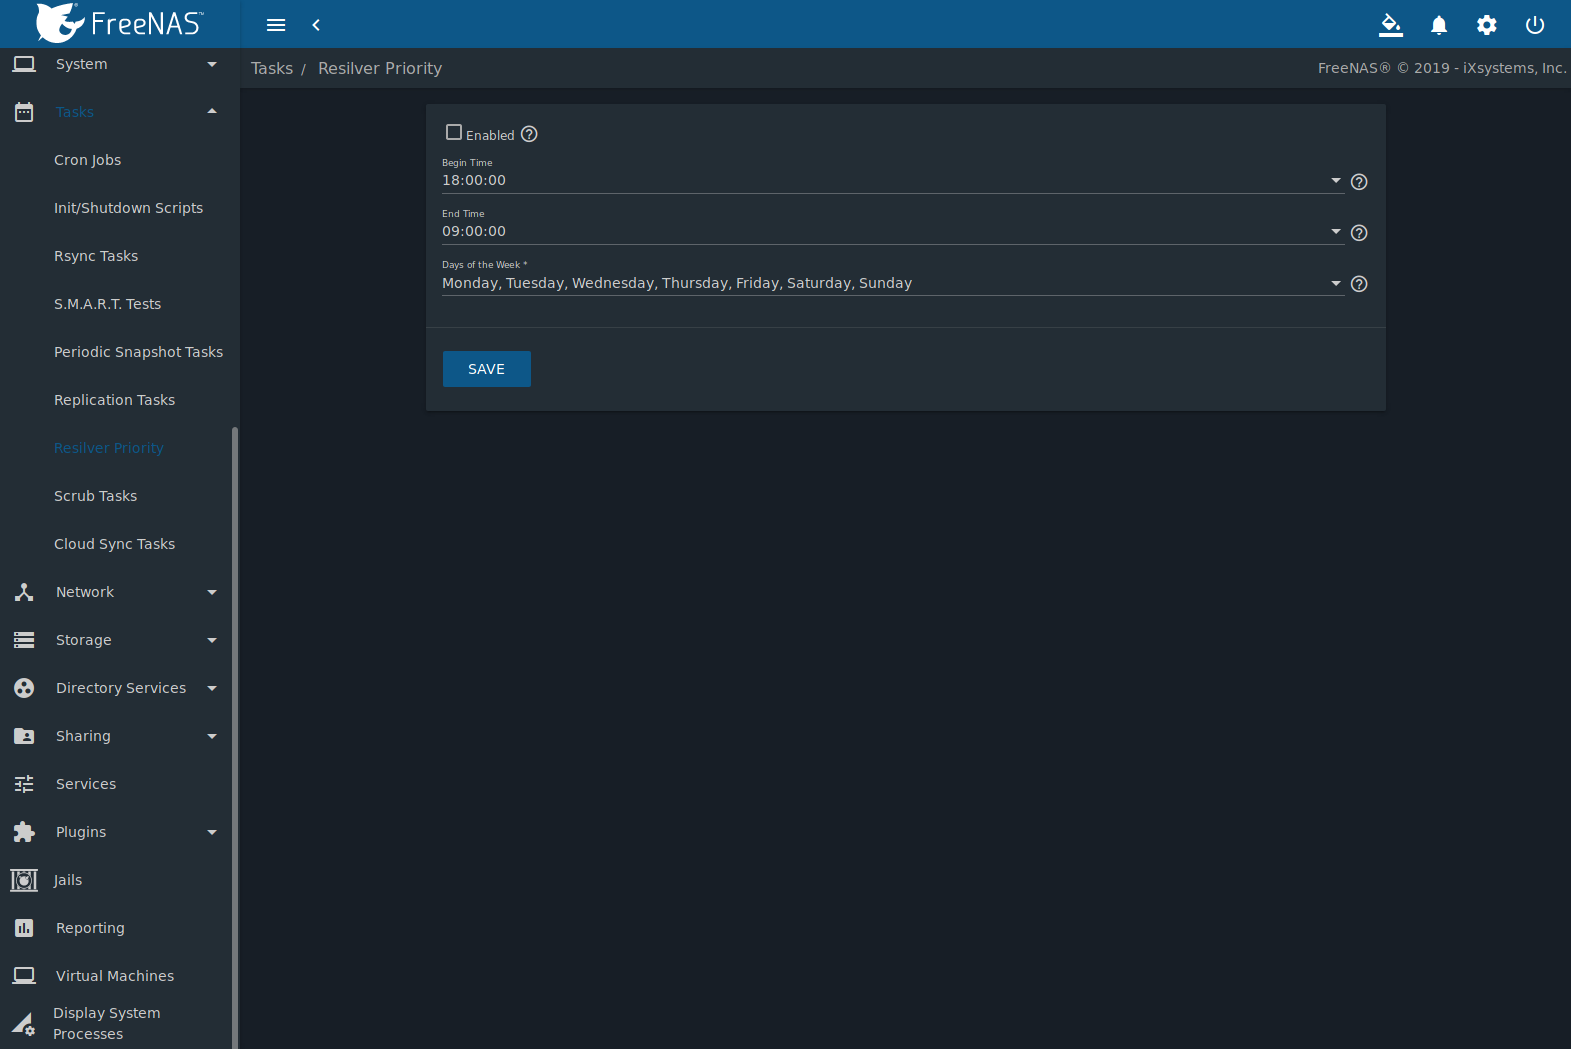
Fig. 7.7.1 Resilver Priority
| Setting | Value | Description |
|---|---|---|
| Enabled | checkbox | Set to run resilver tasks between the configured times. |
| Begin Time | drop-down | Choose the hour and minute when resilver tasks can be started. |
| End Time | drop-down | Choose the hour and minute when new resilver tasks can no longer be started. This does not affect active resilver tasks. |
| Days of the Week | checkboxes | Select the days to run resilver tasks. |
7.8. Scrub Tasks
A scrub is the process of ZFS scanning through the data on a pool. Scrubs help to identify data integrity problems, detect silent data corruptions caused by transient hardware issues, and provide early alerts of impending disk failures. FreeNAS® makes it easy to schedule periodic automatic scrubs.
It is recommneded that each pool is scrubbed at least once a month. Bit errors in critical data can be detected by ZFS, but only when that data is read. Scheduled scrubs can find bit errors in rarely-read data. The amount of time needed for a scrub is proportional to the quantity of data on the pool. Typical scrubs take several hours or longer.
The scrub process is I/O intensive and can negatively impact performance. Schedule scrubs for evenings or weekends to minimize impact to users. Make certain that scrubs and other disk-intensive activity like S.M.A.R.T. Tests are scheduled to run on different days to avoid disk contention and extreme performance impacts.
Scrubs only check used disk space. To check unused disk space, schedule S.M.A.R.T. Tests of Type Long Self-Test to run once or twice a month.
Scrubs are scheduled and managed with .
When a pool is created, a scrub is automatically scheduled. An entry
with the same pool name is added to
.
A summary of this entry can be viewed with
.
Figure 7.8.1
displays the default settings for the pool named pool1. In
this example, (Options) and Edit for a pool is clicked to
display the Edit screen.
Table 7.8.1 summarizes the options in this
screen.
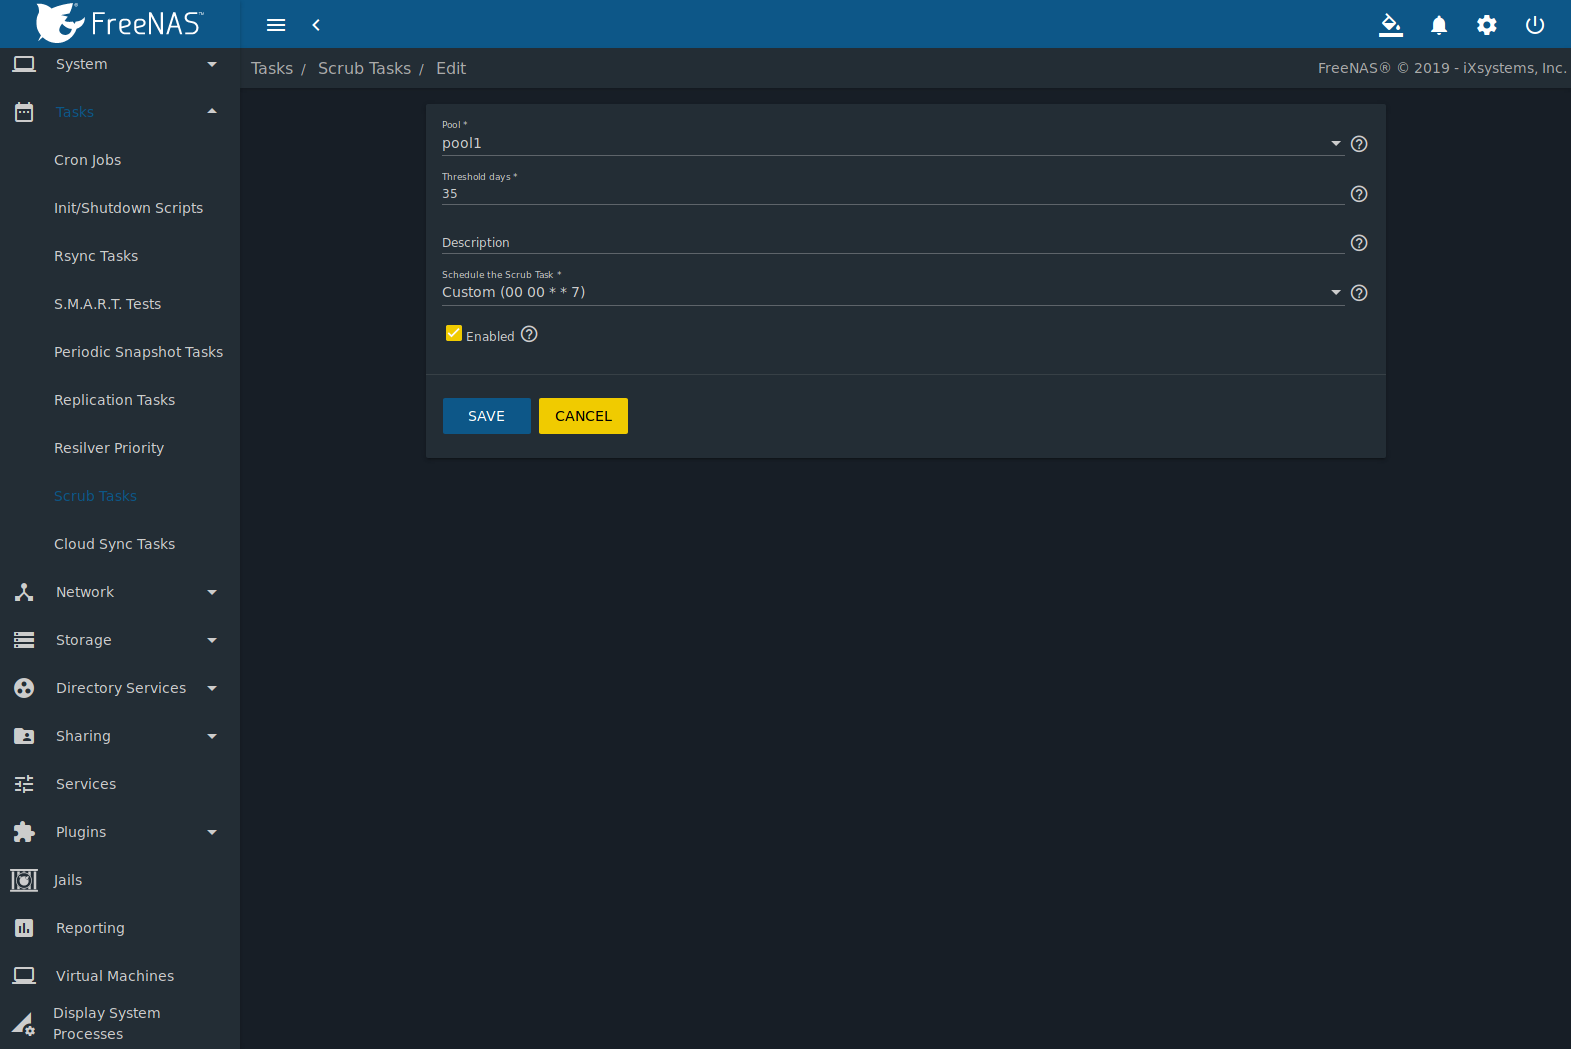
Fig. 7.8.1 Viewing Pool Default Scrub Settings
| Setting | Value | Description |
|---|---|---|
| Pool | drop-down menu | Choose a pool to scrub. |
| Threshold days | string | Define the number of days to prevent a scrub from running after the last has completed. This ignores any other calendar schedule. The default is a multiple of 7 to ensure the scrub always occurs on the same weekday. |
| Description | string | Describe the scrub task. |
| Schedule the Scrub Task | drop-down menu | Choose how often to run the scrub task. Choices are Hourly, Daily, Weekly, Monthly, or Custom. Select Custom to open a visual scheduler for selecting minutes, hours, days, month, and days of week. |
| Enabled | checkbox | Unset to disable the scheduled scrub without deleting it. |
Note
Scrub tasks are run if and only if the threshhold is met or exceeded and the task is scheduled to run on the date marked.
Review the default selections and, if necessary, modify them to meet the needs of the environment. Note that the Threshold days field is used to prevent scrubs from running too often, and overrides the schedule chosen in the other fields. Also, if a pool is locked or unmounted when a scrub is scheduled to occur, it will not be scrubbed.
Scheduled scrubs can be deleted with the Delete button, but this is not recommended. Scrubs can provide an early indication of disk issues before a disk failure. If a scrub is too intensive for the hardware, consider temporarily deselecting the Enabled button for the scrub until the hardware can be upgraded.
7.9. Cloud Sync Tasks
Files or directories can be synchronized to remote cloud storage providers with the Cloud Sync Tasks feature.
Warning
This Cloud Sync task might go to a third party commercial vendor not directly affiliated with iXsystems. Please investigate and fully understand that vendor’s pricing policies and services before creating any Cloud Sync task. iXsystems is not responsible for any charges incurred from the use of third party vendors with the Cloud Sync feature.
Cloud Credentials must be defined before a cloud sync is created. One set of credentials can be used for more than one cloud sync. For example, a single set of credentials for Amazon S3 can be used for separate cloud syncs that push different sets of files or directories.
A cloud storage area must also exist. With Amazon S3, these are called buckets. The bucket must be created before a sync task can be created.
After the cloud credentials have been configured, is used to define the schedule for running a cloud sync task. The time selected is when the Cloud Sync task is allowed to begin. The cloud sync runs until finished, even after the time selected.
An example is shown in Figure 7.9.1.
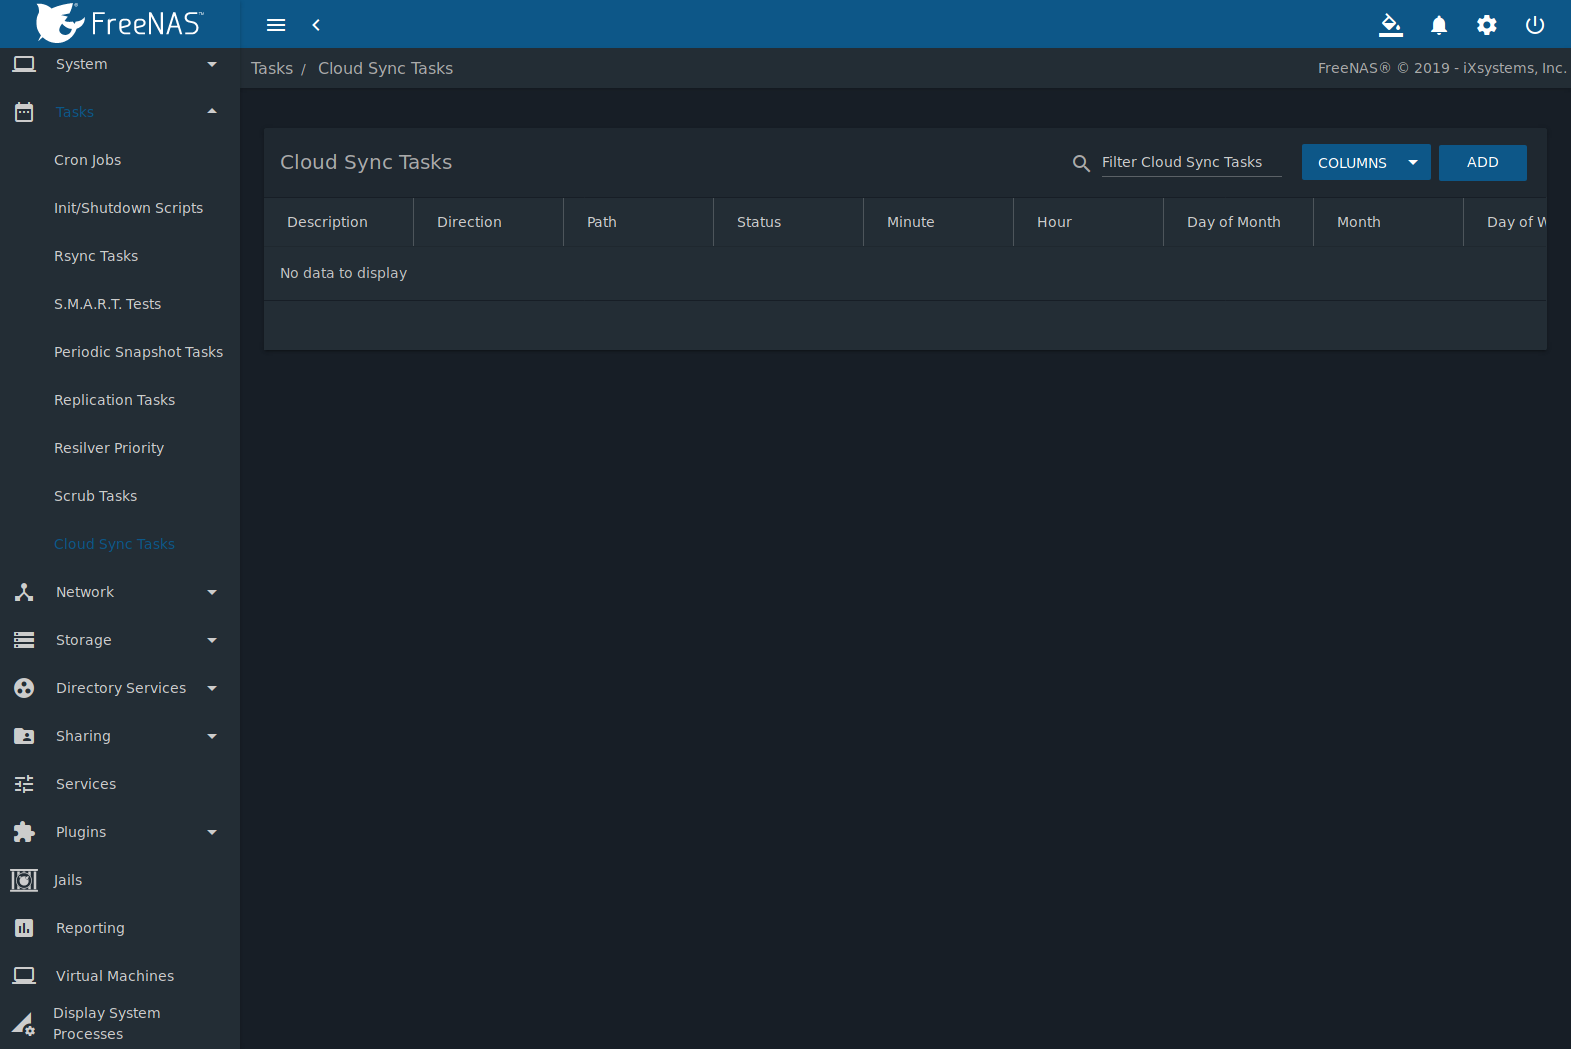
Fig. 7.9.1 Cloud Sync Status
When an existing task has run, a ✓ or x is shown
to reflect the success or failure of the task. Click either symbol to
open the Logs window. This window displays logs related to
the task that ran. Click DOWNLOAD LOGS to open a popup
window to download the .log file.
Click ADD to display the Add Cloud Sync menu shown in Figure 7.9.2.
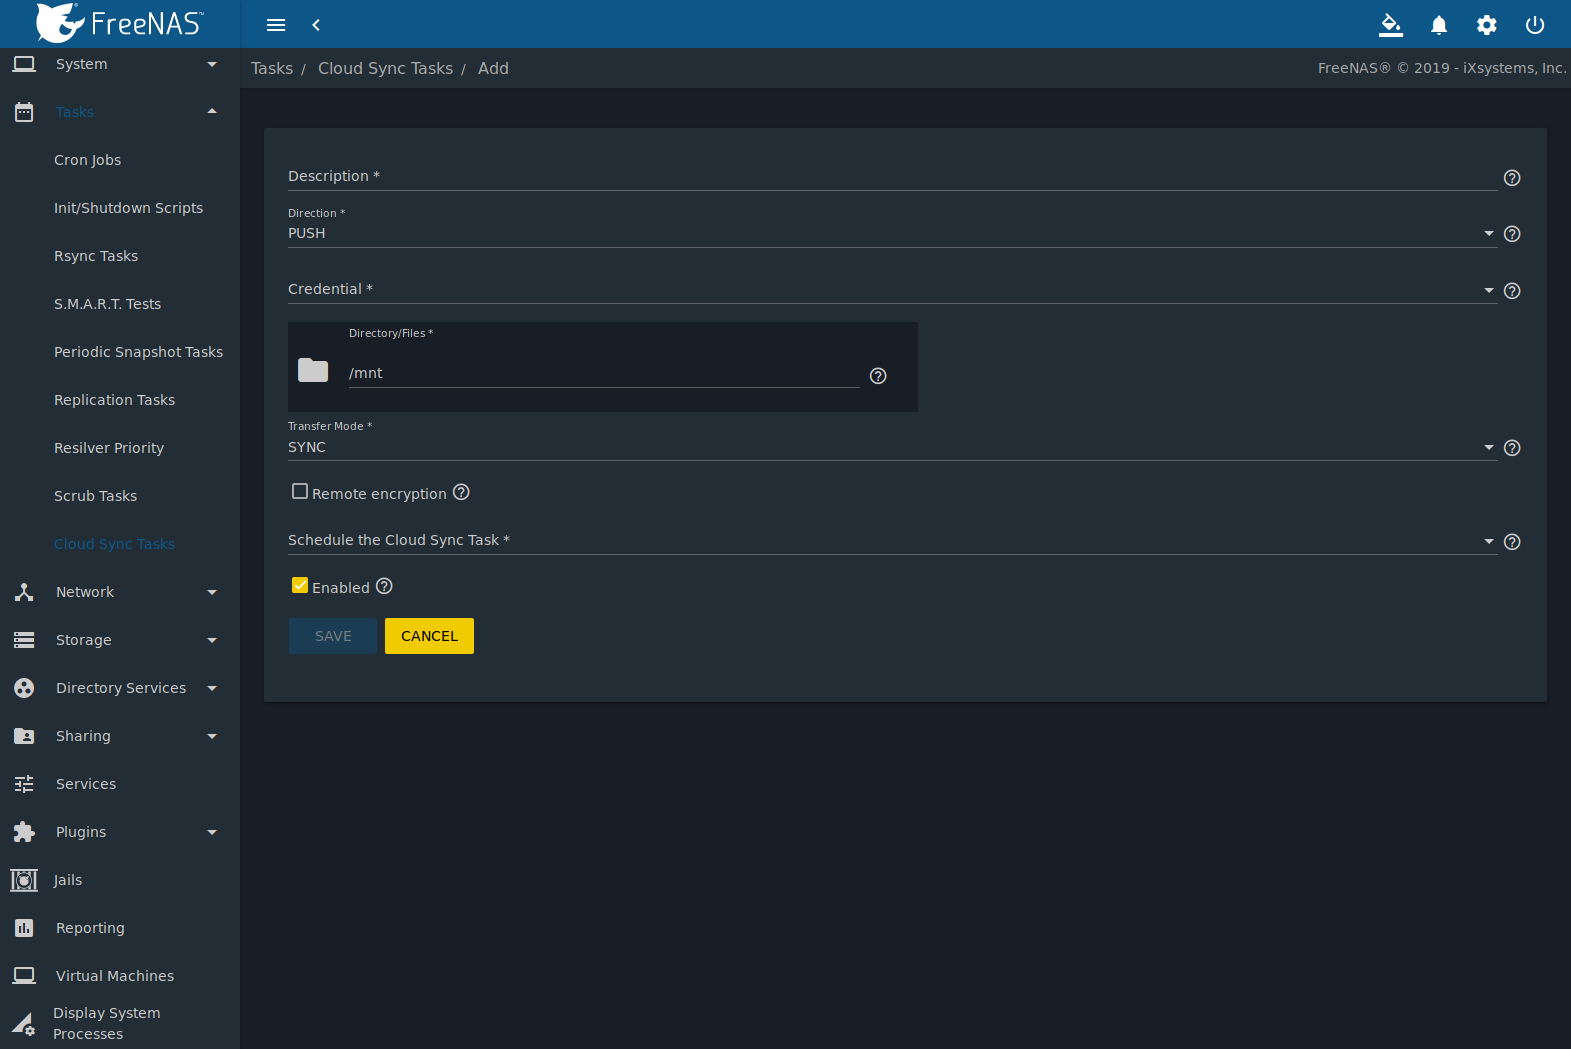
Fig. 7.9.2 Adding a Cloud Sync
Table 7.9.1 shows the configuration options for Cloud Syncs.
| Setting | Value Type | Description |
|---|---|---|
| Description | string | Enter a description of the Cloud Sync Task. |
| Direction | drop-down menu | Push sends data to cloud storage. Pull receives data from cloud storage. |
| Credential | drop-down menu | Select the cloud storage provider credentials from the list of available Cloud Credentials. The credential is tested and an error is displayed if a connection cannot be made. SAVE is disabled until a valid credential is entered. |
| Bucket/Container | drop-down menu | Bucket: Only appears when an S3 credential is the Provider. Select the predefined S3 bucket to use. Container: Only appears when a |
| Folder | browse button | The name of the predefined folder within the selected bucket or container. Type the name or click (Browse) to list the remote filesystem and choose the folder. |
| Encryption | drop-down menu | Only appears when an S3 credential is the Provider. Choices are None (no encryption) or AES-256 (encrypted). |
| Directory/Files | browse button | Select the directories or files to be sent to the cloud for Push syncs, or the destination to be written for Pull syncs. Be cautious about the destination of Pull jobs to avoid overwriting existing files. |
| Transfer Mode | drop-down menu | Sync makes files on the destination system identical to those on the source. Files that are removed from the source are also removed from the destination, similar to rsync --delete. Copy copies files from the source to the destination, skipping files that are identical, similar to rsync. Move copies files from the source to the destination, deleting files from the source after the copy, similar to mv. |
| Remote encryption | checkbox | Set to encrypt files before transfer and store the encrypted files on the remote system. rclone Crypt is used. |
| Filename encryption | checkbox | Only appears when Remote encryption is enabled. Set to encrypt the shared file names. |
| Encryption password | string | Only appears when Remote encryption is enabled. Enter the password to encrypt and decrypt remote data. Warning: Always save and back up this password. Losing the encryption password can result in data loss. |
| Encryption salt | string | Only appears when Remote encryption is enabled. Enter a long string of random characters for use as salt for the encryption password. Warning: Save and back up the encryption salt value. Losing the salt value can result in data loss. |
| Schedule the Cloud Sync Task | drop-down menu | Choose how often or at what time to start a sync. Choices are Hourly, Daily, Weekly, Monthly, or Custom. Select Custom to open the advanced scheduler. |
| Enabled | checkbox | Enable this Cloud Sync Task. Unset to disable this Cloud Sync Task without deleting it. |
Note
If the selected credential is incorrect it prompts for a correction. Click the Fix Credential button to return to the page for the selected credential.
Note
If rclone sync encounters any errors, files are not deleted in the destination. This includes a common error when the Dropbox copyright detector flags a file as copyrighted.
To modify an existing cloud sync, click (Options) to access the Run Now, Edit, and Delete options.
7.9.1. Cloud Sync Example
This example shows a Push cloud sync which writes an accounting department backup file from the FreeNAS® system to Amazon S3 storage.
Before the new cloud sync was added, a bucket called cloudsync-bucket was created with the Amazon S3 web console for storing data from the FreeNAS® system.
Click and ADD to enter the credentials for storage on an Amazon AWS account. The credential is given the name S3 Storage, as shown in Figure 7.9.3:
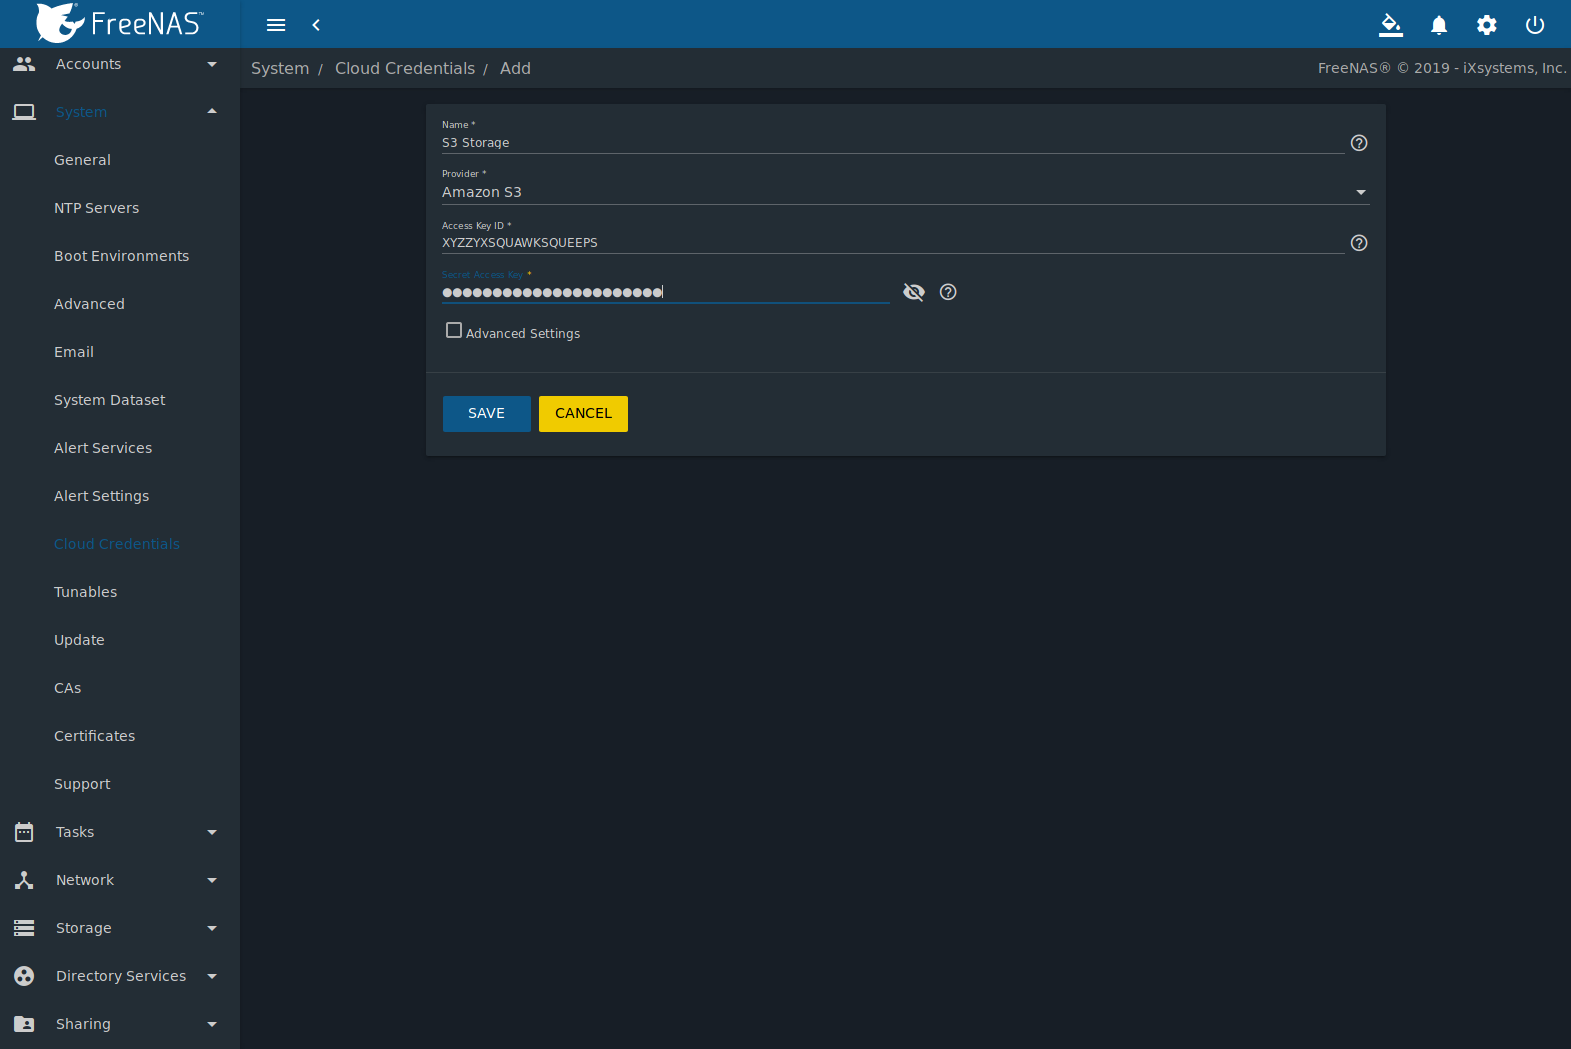
Fig. 7.9.3 Example: Adding Cloud Credentials
The local data to be sent to the cloud is a single file called
accounting-backup.bin on the smb-storage dataset.
Click and ADD to create a cloud sync job. The Description is set to backup-acctg to describe the job. This data is being sent to cloud storage, so this is a Push. The provider comes from the cloud credentials defined in the previous step, and the destination bucket cloudsync-bucket has been chosen.
The Directory/Files is adjusted to the data file.
The remaining fields are for setting a schedule. The default is to send the data to cloud storage once an hour, every day. The options provide great versatility in configuring when a cloud sync runs, anywhere from once a minute to once a year.
The Enabled field is enabled by default, so this cloud sync will run at the next scheduled time.
The completed dialog is shown in Figure 7.9.4:
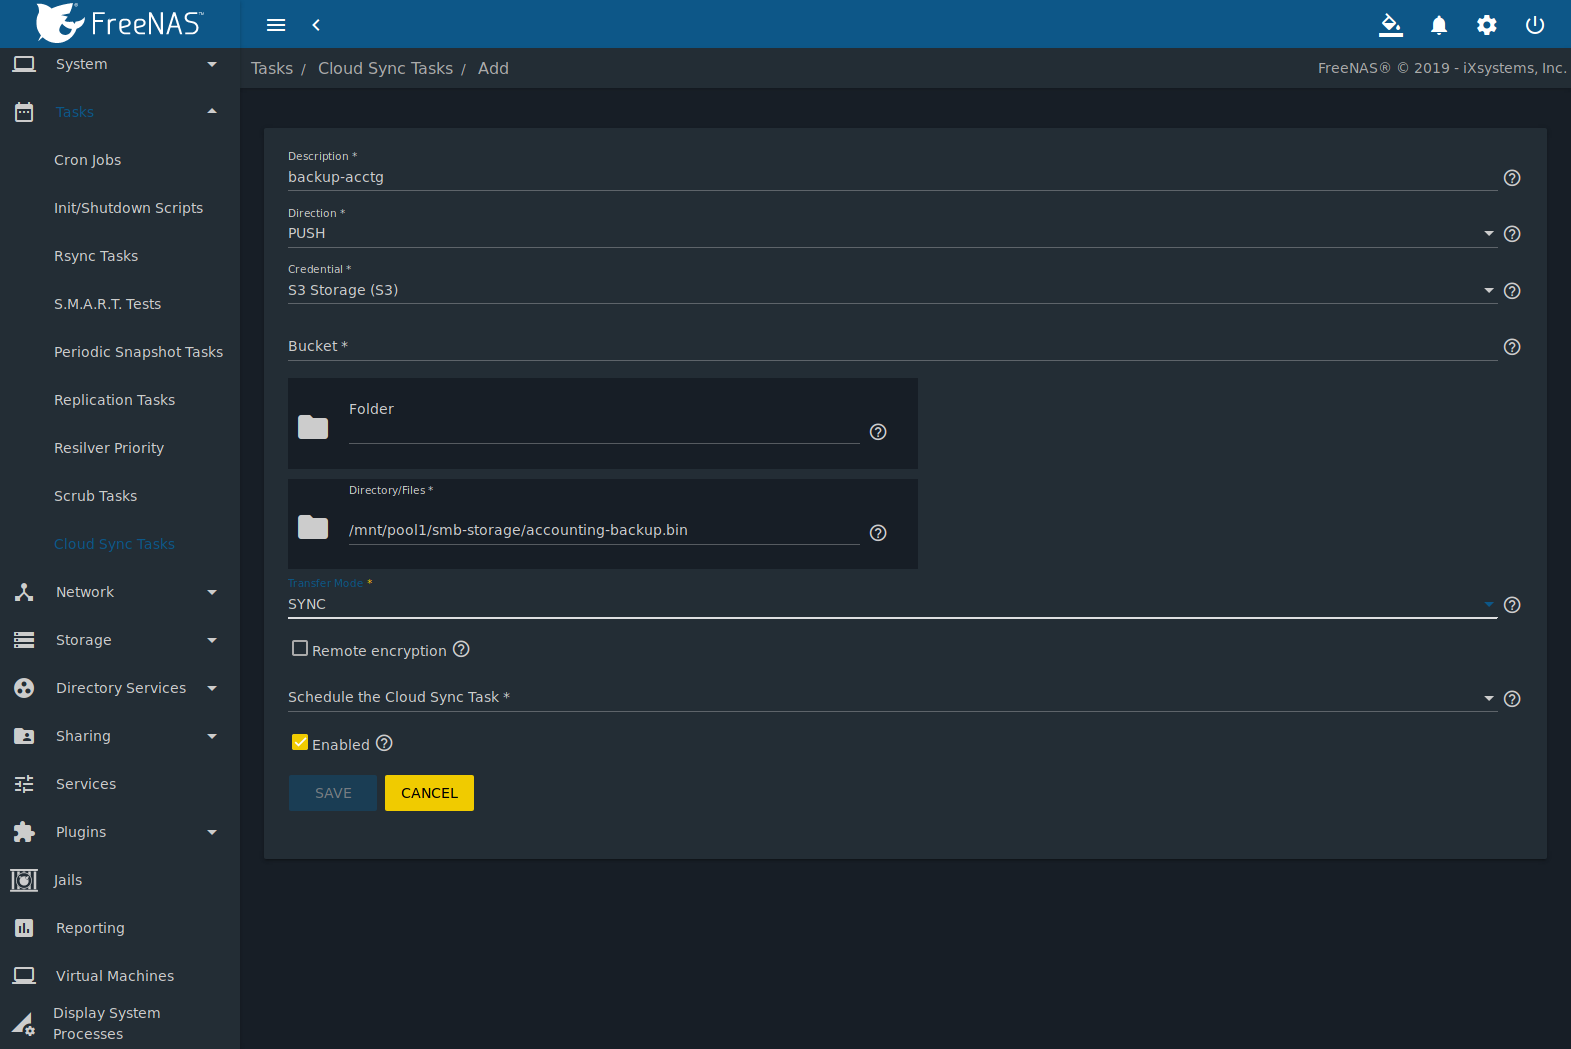
Fig. 7.9.4 Example: Adding a Cloud Sync