6. Tasks
The Tasks section of the administrative GUI is used to configure repetitive tasks:
- Cloud Sync schedules data synchronization to cloud providers
- Cron Jobs schedules a command or script to automatically execute at a specified time
- Init/Shutdown Scripts configures a command or script to automatically execute during system startup or shutdown
- Rsync Tasks schedules data synchronization to another system
- S.M.A.R.T. Tests schedules disk tests
Each of these tasks is described in more detail in this section.
Note
By default, Scrubs are run once a month by an automatically-created task. S.M.A.R.T. Tests and Periodic Snapshot Tasks must be set up manually.
6.1. Cloud Sync
Files or directories can be synchronized to remote cloud storage providers with the Cloud Sync feature.
Warning
This Cloud Sync task might go to a third party commercial vendor not directly affiliated with iXsystems. Please investigate and fully understand that vendor’s pricing policies and services before creating any Cloud Sync task. iXsystems is not responsible for any charges incurred from the use of third party vendors with the Cloud Sync feature.
Selecting shows the screen in Figure 6.1.1. This screen shows a single cloud sync called backup-acctg that “pushes” a file to cloud storage. The last run finished with a status of SUCCESS.
Existing cloud syncs can be run manually, edited, or deleted with the buttons that appear when a single cloud sync line is selected by clicking with the mouse.
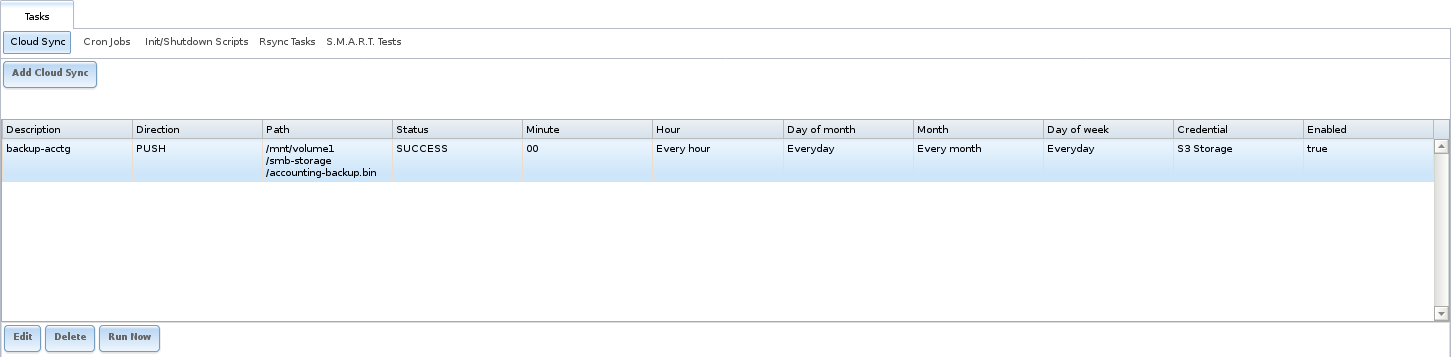
Fig. 6.1.1 Cloud Sync Status
Cloud Credentials must be defined before a cloud sync is created. One set of credentials can be used for more than one cloud sync. For example, a single set of credentials for Amazon S3 can be used for separate cloud syncs that push different sets of files or directories.
A cloud storage area must also exist. With Amazon S3, these are called buckets. The bucket must be created before a sync task can be created.
After the credentials and receiving bucket have been created, a cloud sync task is created with . The Add Cloud Sync dialog is shown in Figure 6.1.2.
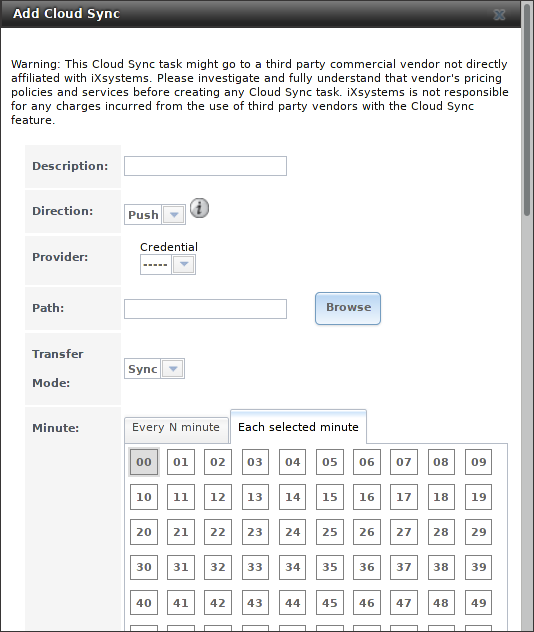
Fig. 6.1.2 Adding a Cloud Sync
Table 6.1.1 shows the configuration options for Cloud Syncs.
| Setting | Value Type | Description |
|---|---|---|
| Description | string | a descriptive name for this Cloud Sync |
| Direction | string | Push to send data to cloud storage, or Pull to pull data from the cloud storage |
| Provider | drop-down menu | select the cloud storage provider; the list of providers is defined by Cloud Credentials |
| Amazon S3 Buckets | drop-down menu | only appears when an S3 credential is the Provider; select the bucket to use |
| Folder | string | only appears when an S3 credential is the Provider; input the name of the folder to sync to |
| Server Side Encryption | drop-down menu | only appears when an S3 credential is the Provider; choices are None (no encryption) or AES-256 (encrypted) |
| Path | browse button | select the directories or files to be sent for Push syncs or the destinations for Pull syncs |
| Transfer Mode | drop-down menu | Sync (default): make files on destination system identical to those on the source; files removed from the source are removed from the destination (like rsync --delete) Copy: copy files from the source to the destination, skipping files that are identical (like rsync) Move: copy files from the source to the destination, deleting files from the source after the copy (like mv) |
| Minute | slider or minute selections | select Every N minutes and use the slider to choose a value, or select Each selected minute and choose specific minutes |
| Hour | slider or hour selections | select Every N hours and use the slider to choose a value, or select Each selected hour and choose specific hours |
| Day of month | slider or day of month selections | select Every N days of month and use the slider to choose a value, or select Each selected day of month and choose specific days |
| Month | checkboxes | months when the Cloud Sync runs |
| Day of week | checkboxes | days of the week when the Cloud Sync runs |
| Enabled | checkbox | uncheck to temporarily disable this Cloud Sync |
Take care when choosing a Direction. Most of the time, Push will be used to send data to the cloud storage. Pull retrieves data from cloud storage, but be careful: files retrieved from cloud storage will overwrite local files with the same names in the destination directory.
Provider is the name of the cloud storage provider. These providers are defined by entering credentials in Cloud Credentials.
After the Provider is chosen, a list of available cloud storage areas from that provider is shown. With Amazon AWS, this is a drop-down with names of existing buckets. Choose a bucket, and a folder inside that bucket if desired.
Path is the path to the directories or files on the FreeNAS® system. On Push jobs, this is the source location for files sent to cloud storage. On Pull jobs, the Path is where the retrieved files are written. Again, be cautious about the destination of Pull jobs to avoid overwriting existing files.
The Minute, Hour, Days of month, guilabel:Months, and Days of week fields permit creating a flexible schedule of when the cloud synchronization takes place.
Finally, the Enabled field makes it possible temporarily disable a cloud sync job without deleting it.
6.1.1. Cloud Sync Example
This example shows a Push cloud sync which writes an accounting department backup file from the FreeNAS® system to Amazon S3 storage.
Before the new cloud sync was added, a bucket called cloudsync-bucket was created with the Amazon S3 web console for storing data from the FreeNAS® system.
is used to enter the credentials for storage on an Amazon AWS account. The credential is given the name S3 Storage, as shown in Figure 6.1.3:
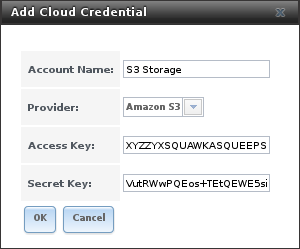
Fig. 6.1.3 Example: Adding Cloud Credentials
The local data to be sent to the cloud is a single file called
accounting-backup.bin on the smb-storage dataset. A
cloud sync job is created with
.
The Description is set to backup-acctg to describe the
job. This data is being sent to cloud storage, so this is a Push.
The provider comes from the cloud credentials defined in the previous
step, and the destination bucket cloudsync-bucket has been chosen.
The Path to the data file is selected.
The remaining fields are for setting a schedule. The default is to send the data to cloud storage once an hour, every day. The options provide great versatility in configuring when a cloud sync runs, anywhere from once a minute to once a year.
The Enabled field is checked by default, so this cloud sync will run at the next scheduled time.
The completed dialog is shown in Figure 6.1.4:
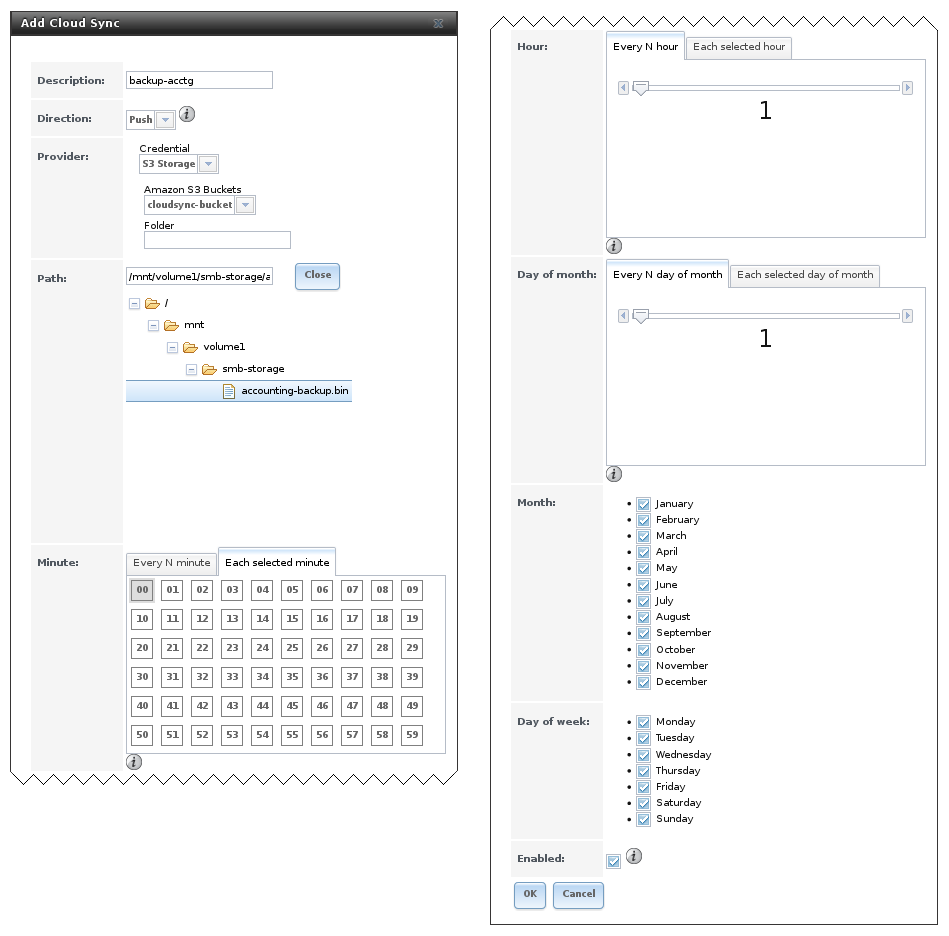
Fig. 6.1.4 Example: Adding a Cloud Sync
6.2. Cron Jobs
cron(8) is a daemon that runs a command or script on a regular schedule as a specified user.
Figure 6.2.1 shows the screen that opens after clicking .
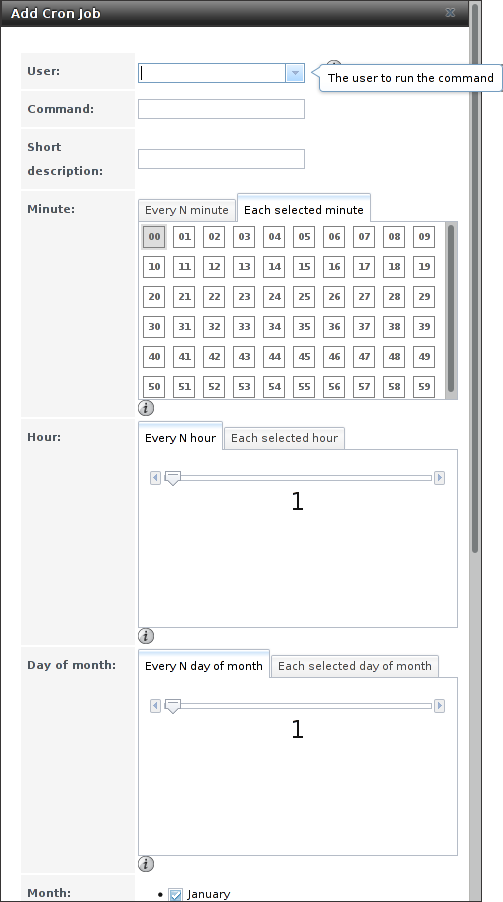
Fig. 6.2.1 Creating a Cron Job
Table 6.2.1 lists the configurable options for a cron job.
| Setting | Value | Description |
|---|---|---|
| User | drop-down menu | make sure the selected user has permission to run the specified command or script |
| Command | string | the full path to the command or script to be run; if it is a script, test it at the command line first to make sure that it works as expected |
| Short description | string | optional |
| Minute | slider or minute selections | with the slider, the cron job occurs every N minutes; with minute selections, the cron job occurs at the highlighted minutes |
| Hour | slider or hour selections | with the slider, the cron job occurs every N hours; with hour selections, the cron job occurs at the highlighted hours |
| Day of month | slider or month selections | with the slider, cron job occurs every N days; with day selections, cron job occurs on the highlighted days each month |
| Month | checkboxes | cron job occurs on the selected months |
| Day of week | checkboxes | cron job occurs on the selected days |
| Redirect Stdout | checkbox | disables emailing standard output to the root user account |
| Redirect Stderr | checkbox | disables emailing errors to the root user account |
| Enabled | checkbox | uncheck disable the cron job without deleting it |
Cron jobs are shown in View Cron Jobs. Highlight a cron job entry to display buttons to Edit, Delete, or Run Now.
Note
% symbols are automatically escaped and should
not be prefixed with backslashes. For example, use
date '+%Y-%m-%d' in a cron job to generate a filename based
on the date.
6.3. Init/Shutdown Scripts
FreeNAS® provides the ability to schedule commands or scripts to run at system startup or shutdown.
Figure 6.3.1 shows the screen that opens after clicking . Table 6.3.1 summarizes the options.
Scheduled commands must be in the default path. The full path to
the command can also be included in the entry. The path can be tested
by typing which commandname. If the command is not found, it
is not in the path.
When scheduling a script, make sure that the script is executable and has been fully tested to ensure it achieves the desired results.
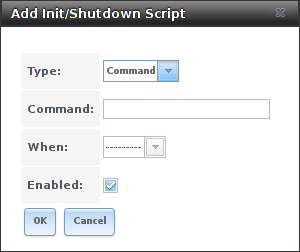
Fig. 6.3.1 Add an Init/Shutdown Script
| Setting | Value | Description |
|---|---|---|
| Type | drop-down menu | select from Command (for an executable) or Script (for an executable script) |
| Command | string | if Command is selected, enter the command plus any desired options; if Script is selected, browse to the location of the script |
| When | drop-down menu | select when the command/script will run; choices are Pre Init (very early in boot process before filesystems are mounted), Post Init (towards end of boot process before FreeNAS services are started), or Shutdown |
| Enabled | checkbox | uncheck to disable the task |
6.4. Rsync Tasks
Rsync is a utility that copies specified data from one system to another over a network. Once the initial data is copied, rsync reduces the amount of data sent over the network by sending only the differences between the source and destination files. Rsync can be used for backups, mirroring data on multiple systems, or for copying files between systems.
Rsync is most effective when only a relatively small amount of the data has changed. There are also some limitations when using Rsync with Windows files. For large amounts of data, data that has many changes from the previous copy, or Windows files, Replication Tasks are often the faster and better solution.
Rsync is single-threaded and gains little from multiple processor
cores. To see whether rsync is currently running, use
pgrep rsync from the Shell.
Both ends of an rsync connection must be configured:
- the rsync server: this system pulls (receives) the data. This system is referred to as PULL in the configuration examples.
- the rsync client: this system pushes (sends) the data. This system is referred to as PUSH in the configuration examples.
FreeNAS® can be configured as either an rsync client or an rsync server. The opposite end of the connection can be another FreeNAS® system or any other system running rsync. In FreeNAS® terminology, an rsync task defines which data is synchronized between the two systems. To synchronize data between two FreeNAS® systems, create the rsync task on the rsync client.
FreeNAS® supports two modes of rsync operation:
- rsync module mode: exports a directory tree, and its configured settings, as a symbolic name over an unencrypted connection. This mode requires that at least one module be defined on the rsync server. It can be defined in the FreeNAS® GUI under . In other operating systems, the module is defined in rsyncd.conf(5).
- rsync over SSH: synchronizes over an encrypted connection. Requires the configuration of SSH user and host public keys.
This section summarizes the options when creating an rsync task. It then provides a configuration example between two FreeNAS® systems for each mode of rsync operation.
Note
If there is a firewall between the two systems or if the other system has a built-in firewall, make sure that TCP port 873 is allowed.
Figure 6.4.1 shows the screen that appears after selecting . Table 6.4.1 summarizes the options that can be configured when creating an rsync task.
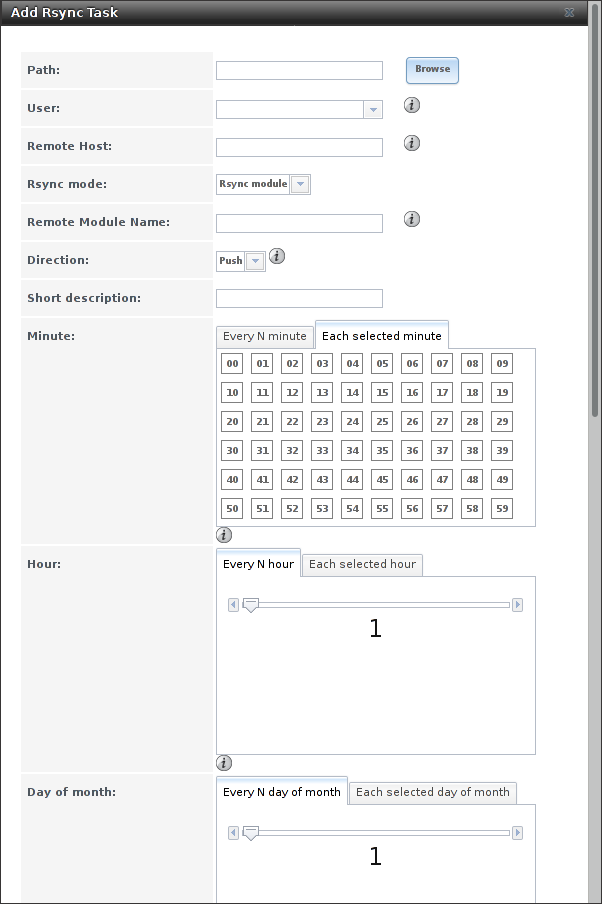
Fig. 6.4.1 Adding an Rsync Task
| Setting | Value | Description |
|---|---|---|
| Path | browse button | browse to the path that to be copied; note that a path length greater than 255 characters will fail |
| User | drop-down menu | specified user must have permission to write to the specified directory on the remote system; due to a limitation in FreeBSD, the user name cannot contain spaces or exceed 17 characters |
| Remote Host | string | IP address or hostname of the remote system that will store the copy; use the format username@remote_host if the username differs on the remote host |
| Remote SSH Port | integer | only available in Rsync over SSH mode; allows specifying an SSH port other than the default of 22 |
| Rsync mode | drop-down menu | choices are Rsync module or Rsync over SSH |
| Remote Module Name | string | only appears when using Rsync module mode, at least one module must be defined in rsyncd.conf(5) of rsync server or in the Rsync Modules of another system |
| Remote Path | string | only appears when using Rsync over SSH mode, enter the existing path on the remote host to sync with (e.g. /mnt/volume); note that maximum path length is 255 characters |
| Validate Remote Path | checkbox | if the Remote Path does not yet exist, check this box to have it automatically created |
| Direction | drop-down menu | choices are Push or Pull; default is to push to a remote host |
| Short Description | string | optional |
| Minute | slider or minute selections | if use the slider, sync occurs every N minutes; if use minute selections, sync occurs at the highlighted minutes |
| Hour | slider or hour selections | if use the slider, sync occurs every N hours; if use hour selections, sync occurs at the highlighted hours |
| Day of month | slider or day selections | if use the slider, sync occurs every N days; if use day selections, sync occurs on the highlighted days |
| Month | checkboxes | task occurs on the selected months |
| Day of week | checkboxes | task occurs on the selected days of the week |
| Recursive | checkbox | if checked, copy will include all subdirectories of the specified volume |
| Times | checkbox | preserve modification times of files |
| Compress | checkbox | recommended on slow connections as reduces size of data to be transmitted |
| Archive | checkbox | equivalent to -rlptgoD (recursive, copy symlinks as symlinks, preserve permissions, preserve modification times, preserve group, preserve owner (super-user only), and preserve device files (super-user only) and special files) |
| Delete | checkbox | delete files in destination directory that do not exist in sending directory |
| Quiet | checkbox | suppresses informational messages from the remote server |
| Preserve permissions | checkbox | preserves original file permissions; useful if User is set to root |
| Preserve extended attributes | checkbox | both systems must support extended attributes |
| Delay Updates | checkbox | when checked, the temporary file from each updated file is saved to a holding directory until the end of the transfer, when all transferred files are renamed into place |
| Extra options | string | rsync(1)
options not covered by the GUI; if the * character is used, it
must be escaped with a backslash (\*.txt)
or used inside single quotes ('*.txt') |
| Enabled | checkbox | uncheck to disable the rsync task without deleting it; note that when the Rsync service is OFF, the rsync task will continue to look for the server unless this checkbox is unchecked |
If the rysnc server requires password authentication, enter
--password-file=/PATHTO/FILENAME in the
Extra options box, replacing /PATHTO/FILENAME
with the appropriate path to the file containing the password.
Created rsync tasks will be listed in View Rsync Tasks. Highlight the entry for an rsync task to display buttons for Edit, Delete, or Run Now.
6.4.1. Rsync Module Mode
This configuration example configures rsync module mode between the two following FreeNAS® systems:
- 192.168.2.2 has existing data in
/mnt/local/images. It will be the rsync client, meaning that an rsync task needs to be defined. It will be referred to as PUSH. - 192.168.2.6 has an existing volume named
/mnt/remote. It will be the rsync server, meaning that it will receive the contents of/mnt/local/images. An rsync module needs to be defined on this system and the rsyncd service needs to be started. It will be referred to as PULL.
On PUSH, an rsync task is defined in . In this example:
- the Path points to
/usr/local/images, the directory to be copied - the Remote Host points to 192.168.2.6, the IP address of the rsync server
- the Rsync Mode is Rsync module
- the Remote Module Name is backups; this will need to be defined on the rsync server
- the Direction is Push
- the rsync is scheduled to occur every 15 minutes
- the User is set to root so it has permission to write anywhere
- the Preserve Permissions checkbox is checked so that the original permissions are not overwritten by the root user
On PULL, an rsync module is defined in . In this example:
- the Module Name is backups; this needs to match the setting on the rsync client
- the Path is
/mnt/remote; a directory calledimageswill be created to hold the contents of/usr/local/images - the User is set to root so it has permission to write anywhere
- Hosts allow is set to 192.168.2.2, the IP address of the rsync client
Descriptions of the configurable options can be found in Rsync Modules.
To finish the configuration, start the rsync service on PULL in
.
If the rsync is successful, the contents of
/mnt/local/images/ will be mirrored to
/mnt/remote/images/.
6.4.2. Rsync over SSH Mode
SSH replication mode does not require the creation of an rsync module or for the rsync service to be running on the rsync server. It does require SSH to be configured before creating the rsync task:
- a public/private key pair for the rsync user account (typically root) must be generated on PUSH and the public key copied to the same user account on PULL
- to mitigate the risk of man-in-the-middle attacks, the public host key of PULL must be copied to PUSH
- the SSH service must be running on PULL
To create the public/private key pair for the rsync user account, open Shell on PUSH and run ssh-keygen. This example generates an RSA type public/private key pair for the root user. When creating the key pair, do not enter the passphrase as the key is meant to be used for an automated task.
ssh-keygen -t rsa
Generating public/private rsa key pair.
Enter file in which to save the key (/root/.ssh/id_rsa):
Created directory '/root/.ssh'.
Enter passphrase (empty for no passphrase):
Enter same passphrase again:
Your identification has been saved in /root/.ssh/id_rsa.
Your public key has been saved in /root/.ssh/id_rsa.pub.
The key fingerprint is:
f5:b0:06:d1:33:e4:95:cf:04:aa:bb:6e:a4:b7:2b:df root@freenas.local
The key's randomart image is:
+--[ RSA 2048]----+
|        .o. oo   |
|         o+o. .  |
|       . =o +    |
|        + +   o  |
|       S o .     |
|       .o        |
|      o.         |
|    o oo         |
|     **oE        |
|-----------------|
|                 |
|-----------------|
FreeNAS® supports RSA keys for SSH. When creating the key, use
-t rsa to specify this type of key.
Note
If a different user account is used for the rsync task, use the su - command after mounting the filesystem but before generating the key. For example, if the rsync task is configured to use the user1 user account, use this command to become that user:
su - user1
Next, view and copy the contents of the generated public key:
more .ssh/id_rsa.pub
ssh-rsa AAAAB3NzaC1yc2EAAAADAQABAAABAQC1lBEXRgw1W8y8k+lXPlVR3xsmVSjtsoyIzV/PlQPo
SrWotUQzqILq0SmUpViAAv4Ik3T8NtxXyohKmFNbBczU6tEsVGHo/2BLjvKiSHRPHc/1DX9hofcFti4h
dcD7Y5mvU3MAEeDClt02/xoi5xS/RLxgP0R5dNrakw958Yn001sJS9VMf528fknUmasti00qmDDcp/kO
xT+S6DFNDBy6IYQN4heqmhTPRXqPhXqcD1G+rWr/nZK4H8Ckzy+l9RaEXMRuTyQgqJB/rsRcmJX5fApd
DmNfwrRSxLjDvUzfywnjFHlKk/+TQIT1gg1QQaj21PJD9pnDVF0AiJrWyWnR root@freenas.local
Go to PULL and paste (or append) the copied key into the SSH Public Key field of , or the username of the specified rsync user account. The paste for the above example is shown in Figure 6.4.2. When pasting the key, ensure that it is pasted as one long line and, if necessary, remove any extra spaces representing line breaks.
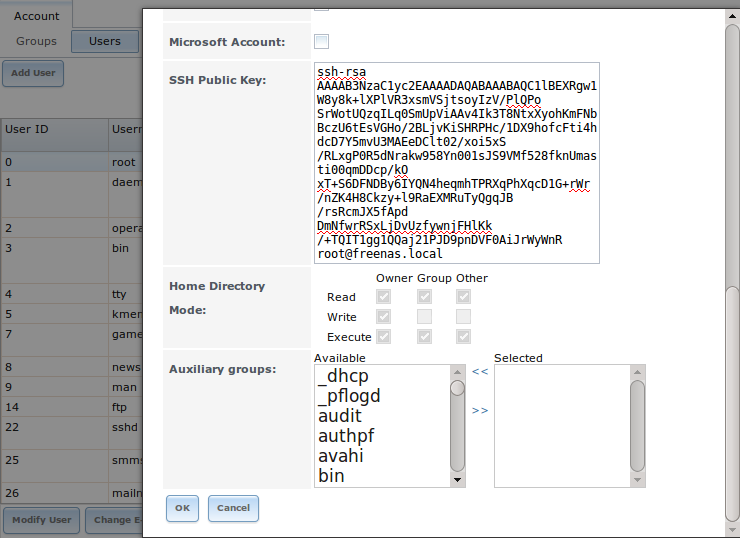
Fig. 6.4.2 Pasting the User’s SSH Public Key
While on PULL, verify that the SSH service is running in and start it if it is not.
Next, copy the host key of PULL using Shell on PUSH. The following
command copies the RSA host key of the PULL server used in our
previous example. Be sure to include the double bracket >> to
prevent overwriting any existing entries in the known_hosts
file:
ssh-keyscan -t rsa 192.168.2.6 >> /root/.ssh/known_hosts
Note
If PUSH is a Linux system, use this command to copy the RSA key to the Linux system:
cat ~/.ssh/id_rsa.pub | ssh user@192.168.2.6 'cat >> .ssh/authorized_keys'
The rsync task can now be created on PUSH. To configure rsync SSH mode using the systems in our previous example, the configuration is as follows:
- the Path points to
/mnt/local/images, the directory to be copied - the Remote Host points to 192.168.2.6, the IP address of the rsync server
- the Rsync Mode is Rsync over SSH
- the rsync is scheduled to occur every 15 minutes
- the User is set to root so it has permission to write anywhere; the public key for this user must be generated on PUSH and copied to PULL
- the Preserve Permissions checkbox is checked so that the original permissions are not overwritten by the root user
Save the rsync task and the rsync will automatically occur according
to the schedule. In this example, the contents of
/mnt/local/images/ will automatically appear in
/mnt/remote/images/ after 15 minutes. If the content does not
appear, use Shell on PULL to read /var/log/messages. If the
message indicates a n (newline character) in the key, remove the
space in the pasted key–it will be after the character that appears
just before the n in the error message.
6.5. S.M.A.R.T. Tests
S.M.A.R.T. (Self-Monitoring, Analysis and Reporting Technology) is a monitoring system for computer hard disk drives to detect and report on various indicators of reliability. When a failure is anticipated by S.M.A.R.T., the drive should be replaced. Most modern ATA, IDE, and SCSI-3 hard drives support S.M.A.R.T. Refer to the drive documentation for confirmation.
Figure 6.5.1 shows the configuration screen that appears after selecting . Tests are listed under View S.M.A.R.T. Tests. After creating tests, check the configuration in , then click the slider to ON for the S.M.A.R.T. service in . The S.M.A.R.T. service will not start if there are no volumes.
Note
To prevent problems, do not enable the S.M.A.R.T. service if the disks are controlled by a RAID controller. It is the job of the controller to monitor S.M.A.R.T. and mark drives as Predictive Failure when they trip.
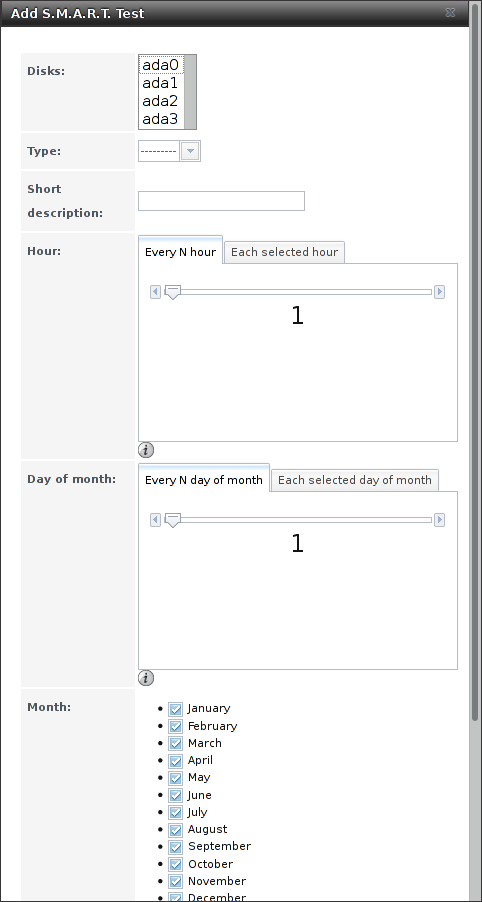
Fig. 6.5.1 Adding a S.M.A.R.T. Test
Table 6.5.1 summarizes the configurable options when creating a S.M.A.R.T. test.
| Setting | Value | Description |
|---|---|---|
| Disks | list | highlight disks to monitor |
| Type | drop-down menu | select type of test to run; see smartctl(8) for a description of each type of test (note that some test types will degrade performance or take disks offline; do not schedule S.M.A.R.T. tests at the same time as a scrub or during a resilver operation) |
| Short description | string | optional |
| Hour | slider or hour selections | if use the slider, test occurs every N hours; if use hour selections, test occurs at the highlighted hours |
| Day of month | slider or day selections | if use the slider, test occurs every N days; if use day selections, test occurs on the highlighted days |
| Month | checkboxes | select the months for the test to occur |
| Day of week | checkboxes | select the days of the week for the test to occur |
An example configuration is to schedule a Short Self-Test once a week and a Long Self-Test once a month. These tests should not have a performance impact, as the disks prioritize normal I/O over the tests. If a disk fails a test, even if the overall status is Passed, start to think about replacing that disk.
Warning
Some S.M.A.R.T. tests cause heavy disk activity and can drastically reduce disk performance. Do not schedule S.M.A.R.T. tests to run at the same time as scrub or resilver operations or during other periods of intense disk activity.
Which tests will run and when can be verified by typing smartd -q showtests within Shell.
The results of a test can be checked from Shell by specifying the name of the drive. For example, to see the results for disk ada0, type:
smartctl -l selftest /dev/ada0
If an email address is entered in the Email to report
field of
,
the system will send an email to that address when a test fails. Logging
information for S.M.A.R.T. tests can be found in
/var/log/daemon.log.