I've lurked for quite some time in the forums, reading, learning, and ultimately deciding to build a FreeNAS system over buying a prebuilt. I had actually acquired some of the hardware in 2017 in my initial desire to build a NAS until I realized how much the drives would cost... That all changed last week with the Newegg 8TB WD Red sale and my wife's growing business storage.
For starters, my equipment is a bit older because it was purchased based on a previous hardware guide that is now obsolete or cannibalized from my old desktop. What my system will be using as of right now:
Case: Rosewill ATX Mid Tower case w/ 3 fans (fits 7 3.5" drives max, but contemplating a newer/smaller case)
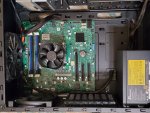
MB: Supermicro X10SLL-F
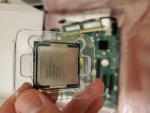
CPU: Intel i3 4330 w/ active cooler (cooler needs replaced)
RAM: 2x8GB Micron MT18KSF1G72AZ-1G6E1ZE ECC DDR3 DIMMs
Boot Device: Sandisk 64GB Ultra Fit USB x2
HDD: WD Red 8TB x4
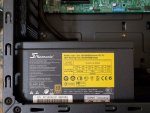
PSU: Seasonic M12II 620W Bronze PSU (plan to change this out for something newer)
At the moment I'm still waiting on the WD drives to be delivered, so I scrounged up some old 2.5" drives to familiarize myself with FreeNAS.
Last night I decided it was time to begin building, so I stripped the old desktop case and got to work. As you can see, everything fit nicely after rearranging some standoffs and removing excess components. For the time being the CD Drives aren't going anywhere because I don't have the front panel pieces to fill those gaps. The bottom right has the capacity for 5x3.5" drives with 2 more trays right above there.

Once everything was installed in the case, I hooked up an old VGA monitor and booted to BIOS, but wouldn't it figure, it was password-protected... So I pulled the CMOS battery and we were in. After I made sure everything in BIOS looked good, I connected to the IPMI port and opened a web browser. Guess what, another non-default password! That's what I get for buying on eBay :D After some reading and tooling about, I found you can reset the password by using FreeDOS and the IPMICFG tool from Supermicro (https://ericmathison.com/blog/reset-supermicro-ipmi-password-to-factory-default/). With that finished, I flipped through some menus to see what was there but didn't really change anything yet.
After all of that, I finally booted from the USB drive and let FreeNAS install! Everything went off smoothly and I was able to log in to the system via a web browser and normal Ethernet port on the NAS. It was at this point I stopped and decided to go to bed. In the coming days I'll be messing with the temporary system before the WD drives arrive and preparing myself for the final (maybe) system.
I'd love to hear your thoughts on anything I've done so far and gladly take critiques. Case and PSU recommendations are also welcome! I have a lot more reading to do, so thanks to everyone in the community who has helped those who have asked questions before or offered advice to the new guys (myself included).
Cheers!
For starters, my equipment is a bit older because it was purchased based on a previous hardware guide that is now obsolete or cannibalized from my old desktop. What my system will be using as of right now:
Case: Rosewill ATX Mid Tower case w/ 3 fans (fits 7 3.5" drives max, but contemplating a newer/smaller case)
MB: Supermicro X10SLL-F
CPU: Intel i3 4330 w/ active cooler (cooler needs replaced)
RAM: 2x8GB Micron MT18KSF1G72AZ-1G6E1ZE ECC DDR3 DIMMs
Boot Device: Sandisk 64GB Ultra Fit USB x2
HDD: WD Red 8TB x4
PSU: Seasonic M12II 620W Bronze PSU (plan to change this out for something newer)
At the moment I'm still waiting on the WD drives to be delivered, so I scrounged up some old 2.5" drives to familiarize myself with FreeNAS.
Last night I decided it was time to begin building, so I stripped the old desktop case and got to work. As you can see, everything fit nicely after rearranging some standoffs and removing excess components. For the time being the CD Drives aren't going anywhere because I don't have the front panel pieces to fill those gaps. The bottom right has the capacity for 5x3.5" drives with 2 more trays right above there.
Once everything was installed in the case, I hooked up an old VGA monitor and booted to BIOS, but wouldn't it figure, it was password-protected... So I pulled the CMOS battery and we were in. After I made sure everything in BIOS looked good, I connected to the IPMI port and opened a web browser. Guess what, another non-default password! That's what I get for buying on eBay :D After some reading and tooling about, I found you can reset the password by using FreeDOS and the IPMICFG tool from Supermicro (https://ericmathison.com/blog/reset-supermicro-ipmi-password-to-factory-default/). With that finished, I flipped through some menus to see what was there but didn't really change anything yet.
After all of that, I finally booted from the USB drive and let FreeNAS install! Everything went off smoothly and I was able to log in to the system via a web browser and normal Ethernet port on the NAS. It was at this point I stopped and decided to go to bed. In the coming days I'll be messing with the temporary system before the WD drives arrive and preparing myself for the final (maybe) system.
I'd love to hear your thoughts on anything I've done so far and gladly take critiques. Case and PSU recommendations are also welcome! I have a lot more reading to do, so thanks to everyone in the community who has helped those who have asked questions before or offered advice to the new guys (myself included).
Cheers!