Supermicro X9SRL-F boot error B7 and B9

Manyakus

Dabbler
Joined
Jan 9, 2019
Messages
18
Hello all,

I am having an error loading up my newly built server.
The motherboard I have is the X9SRL-F and the user manual tells me that these errors are of RAM issue.
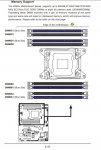
The manual tells me to populate the blue DIMM first.
I have four RAMS Samsung 16gb (each) 2RX4 PC3L-12800R (M393B2G70QH0-YK0).
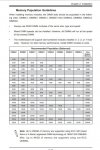
Installing the RAM as per manual; DIMMA1 + DIMMB1 + DIMMD1 + DIMMC1, gives me an error on boot B7 and B9.
When I remove DIMMC1 it boots on three of the four ram with no problem.
When I populate DIMMC1 it will not boot and will give me the error B7
Switching all these ram together will still result in having a successful boot only if DIMMC1 is not populated.
The BIOS has been upgraded from 3.2 to 3.3 with no avail.
The motherboard was also reset by clearing the CMOS using the jumper short method (JBT1).
The only configuration that permitted the FOUR SAMSUNG ECC rams to function correctly together is by populating DIMMA1 + DIMMA2 + DIMMB1 + DIMMB2 (unbalanced way). Which tells me that the Samsung rams are not be defective.

However switching to non ECC (crucial) rams from my other PC tower had the system successfully boot using the DIMMA1 + DIMMB1 + DIMMD1 + DIMMC1 thus giving me the impression that the ram slot DIMMC1 is not defective.

This build is new to me and I am not sure to whether return the rams or maybe tweak something in the bios. I am also suspecting the low voltage ram model that I have purchased. I am looking for some experienced users who had run through ram compatibility issues and might shed some light on my error B7 and B9.


Thank you
 

Attachments

  • ram 1.JPG
    ram 1.JPG
    76.7 KB · Views: 1,642
  • ram 2.JPG
    ram 2.JPG
    87.3 KB · Views: 1,409

Yorick

Wizard
Joined
Nov 4, 2018
Messages
1,912
Do you have BIOS options to step down from 1600 to 1333? Try clocking the memory below the max. Reaching, admittedly.

This note in the manual: “ Note: Up to 256GB of memory are supported using ECC QR (Quad Rank or 4-Rank) registered DIMM technology at 1600/1333/1066/800 MHz. Up to 64GB of memory are supported using non-ECC UDIMMs.”

You got DR memory there. The manual doesn’t even mention DR or SR. So ... tested with QR only?
Edit: Manual only mentions QR but tested memory list includes DR. Don’t know what to think.

Edit2: Try this as well. A1/A2 and B1/B2. Spreading across both channels, while not recommended in the manual, might be worth a test. Oh wait you already tried that and it worked. I’d go that way then.
 
Last edited:

Manyakus

Dabbler
Joined
Jan 9, 2019
Messages
18
Thanks @Yorick

I found a youtube video but its in Russina, they have the same problem, they remove the motherboard from the case and all the DIMMS works.
They put an washer insulation between the screw and standoff and this is what fixed their problem.


So I did the same, removed the motherboard from the case, and guess what, all the DIMMS are working.
I am really puzzled and I don't understand what is the problem.
This lead me to the motherboard/chassis grounding problem.
There must be something in that regard.
 

Yorick

Wizard
Joined
Nov 4, 2018
Messages
1,912
Wow. Great find! That's really odd.
 

Hoeser

Dabbler
Joined
Sep 23, 2016
Messages
23
There shouldn't be any advantage to suppressing a grounding point. I suspect that the physical distortion of the board created by the spacer is what is causing this to work. I've seen B7 hangs that were corrected simply by re-seating the dimm a number of times in the socket on an X9DRi board. I wonder if there is a production problem with these boards, possibly a weak solder joint in that area.
 

Manyakus

Dabbler
Joined
Jan 9, 2019
Messages
18
So I re-seated the RAMS and it did not work. The only way the 4th ECC Ram would work is if the motherboard is not inside the case. However putting Crucial RAM I would not have any problems. This thing puzzled me.

So I've installed back the Samsung ECC RAM with the motherboard outside the case, turned on the power and put back the motherboard inside the case and I lost connection of the 4th Ram.
Took out the motherboard again and inspected the area behind the 4th Dimm.
There is a piece of I don't know what protruding from the PC case and touching the back side of the 4th Dimm (where you have the solders).
So this stupid thing is shorting (Grounding) the 4th Dimm.

So Now I understand why the ECC SAMSUMG RAM would not work on the 4th DIMM
But I dont understand why the CRUCIAL RAMM would work on the 4th DIMM even with the shorting.

In any case I have all my 64GB ECC RAM working now.
Thank you all for your inputs!
 

Hoeser

Dabbler
Joined
Sep 23, 2016
Messages
23
There is a piece of I don't know what protruding from the PC case and touching the back side of the 4th Dimm (where you have the solders).

That makes a lot more sense.

It's unfortunate but possible that you have damaged the logic/circuit controlling the 4th DIMM with that short to ground, it might be why it only selectively works now.

I've had a similar issue recently. Picked up a refurbished system in a supermicro 24U case with a loose screw touching some of the SAS backplane as well as the chassis. When installing a drive into the slot with the short, it caused a short to ground which roasted one of the diodes on the backplane cauing the loss of 4 of the 24 sas bays. It was pretty well hidden and could not be seen until the backplane was removed later.

*edit* - grammar error.
 
Last edited:

Manyakus

Dabbler
Joined
Jan 9, 2019
Messages
18
When I removed the piece shorting the back side of the 4th DIMM, it is working now.
It is reading correctly the ECC RAM at the 4th DIMM.
So I guess I did not damage anything and +1 for Supermicro being so resiliant to stupid people assembling pc's.

I learned my lesson!
 

Velcade

Contributor
Joined
Mar 28, 2019
Messages
108
I'm running this same issue. A1, B1, D1 all work fine but as soon as I try and install memory into C1 I get the B7 boot error. I'll remove the motherboard and see if there is anything touching the backside of C1.
 
Last edited:

Ericloewe

Server Wrangler
Moderator
Joined
Feb 15, 2014
Messages
20,194
Also check the CPU socket for bent pins.
 

Velcade

Contributor
Joined
Mar 28, 2019
Messages
108
Also check the CPU socket for bent pins.

I looked when I first got the board, I didn't see any. I guess it is possible I bent some while installing the CPU. I'll do a double check for peace of mind.
 

Velcade

Contributor
Joined
Mar 28, 2019
Messages
108
I had the same issue that Manyakus had. My case (Define R6) came with preinstalled motherboard standoffs. I had one standoff (top middle) that is not used by the board and was making contact with C1.

I feel like an idiot :mad: but I was able to remove the standoff and it boots right up! Lesson learned...
 
Top