My requirements for Docker are fairly simple: I needed a way to run services that have not been ported to FreeBSD, but are available as Docker images. While almost all Linux software that's open source is ported to FreeBSD too, closed-source software cannot be easily ported, but is often available for Docker (like ecoDMS, UniFi Video, ...). So any solution involving Rancher, Docker-Compose, Kubernetes or any such container orchestration is way overkill for me.
After spending considerable time trying to decide how to get Docker running on my FreeNAS machine, I ultimately settled on a barebones VM with a minimal Linux installation running Docker. This took some research, and a lot of trial and error, until I understood it to the point where I actually understood what I did, rather than just fiddling around long enough until it seemed to somehow do what it should. Since I documented the whole process so I could reproduce it if I have to, I decided to post the result in the Resource section as well.
If you spot any mistakes - from typos and bad formatting to explanations that aren't easily understandable, problems you encounter or things that change in future versions of FreeNAS, please point them out in the comments and I'll do my best to update the guide.
This version of the guide was written for FreeNAS 11.1-U5.
1. Considerations
Some preliminary thoughts on the choice of guest operating system, dataset layouts, and host to guest sharing concepts
2. Creating the VM and its devices
Step by step: How to create the VM and the VM devices we need
3. Installing and booting the guest OS
Step by step: How to install the guest OS and do basic setup
4. Creating and mounting NFS shares
Step by step: How to create NFS shares and mount them in the VM
5. Installing and running Docker
Step by step: How to install Docker in the VM
6. Running Docker images
An example of how to run Docker images in the VM
Appendix: Odds and Ends
Stuff that didn't make it into the guide.
Appendix: Common Problems
Problems that have been known to happen, and their solutions
After spending considerable time trying to decide how to get Docker running on my FreeNAS machine, I ultimately settled on a barebones VM with a minimal Linux installation running Docker. This took some research, and a lot of trial and error, until I understood it to the point where I actually understood what I did, rather than just fiddling around long enough until it seemed to somehow do what it should. Since I documented the whole process so I could reproduce it if I have to, I decided to post the result in the Resource section as well.
If you spot any mistakes - from typos and bad formatting to explanations that aren't easily understandable, problems you encounter or things that change in future versions of FreeNAS, please point them out in the comments and I'll do my best to update the guide.
This version of the guide was written for FreeNAS 11.1-U5.
1. Considerations
Some preliminary thoughts on the choice of guest operating system, dataset layouts, and host to guest sharing concepts
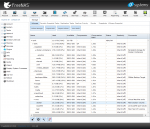
- The main OS disk should be a ZVol for performance reasons. Since these are difficult to distinguish from datasets in the storage list, I create ZVols as children of a separate dataset (tank/vms/, see screenshot below) that is not used for anything else.
- 10 GiB should be enough considering that all data will be persisted outside the VM (see below).
- UPDATE: 10 GiB is, in the below configuration, actually a bad idea. I filled up those 10 GiB rather quickly when I added more containers: Images for the containers have to be downloaded and can quite quickly exceed those 10 GiB. Either go with a much larger ZVol (100 GiB?), since expanding a ZVol is a rather unpleasant experience; or mount another dataset (see next Consideration item) to hold the downloaded docker images. I went with the first option, but will probably switch to the another mounted dataset for images soon, since that will reduce the ZVol size (most of which will still be unused).
- 10 GiB should be enough considering that all data will be persisted outside the VM (see below).
- Docker will eventually host multiple containers, most of which need data to be persisted. How should those 'persistent directories' be handled between FreeNAS and Docker VM?
- SMB has better permission granularity using ACLs, but NFS is faster than SMB [Citation needed] and granular permissions are not necessary for Host/Container communication so we're using NFS. NFSv4 is faster than NFSv2 and NFSv3, so that's what we'll use. If you have clients that require NFSv3, ignore the respective settings in the NFS section.
- We can either mount one 'docker-appdata' dataset into the VM and create subdirectories for each container, or create multiple datasets and mount them individually.
- Note: It is not possible to access child datasets of an NFS shared dataset. From the FreeNAS doc: Each volume or dataset is considered to be its own filesystem and NFS is not able to cross filesystem boundaries.
- Each dataset underneath tank/appdata/docker-containers (e.g. tank/appdata/docker-containers/ecodms/ and tank/appdata/nextcloud/) must be shared and mounted in the guest OS individually.
- If you create another level of child datasets (for example /tank/appdata/docker-containers/nextcloud/db/ and /tank/appdata/docker-containers/nextcloud/files/, because the Nextcloud database needs different settings than the files dataset), you must share those individually instead of sharing the nextcloud dataset.
- We'll choose Debian 9 ('stretch') as the VM Guest/Docker Host OS - it has a lightweight, console-only installation and strongly favours stability over adding the latest package versions. (Also, I couldn't get CentOS or Ubuntu Server Core to do what I wanted them to.)
- Get it from debian.org > Getting Debian > Download an installation image > Tiny CDs, flexible USB sticks, etc. > amd64 > netboot > mini.iso

2. Creating the VM and its devices
Step by step: How to create the VM and the VM devices we need
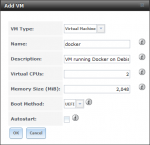
- In the FreeNAS UI, go to VMs and add a new VM.
- As Boot Method, we'll pick UEFI
- Virtual CPUs: 2 (or more; 1 isn't a good idea in times of ubiquitous multithreading)
- Memory Size (MiB): 2048 (I chose this as a starting point; depending on your containers' requirements)
- Autostart is currently pointless if using an encrypted volume, since bhyve VMs are not automatically restarted when decrypting the volume. This may change with future FreeNAS updates however.

- In the FreeNAS UI, set up the following devices for the VM:
- Type: Network Interface
- Adapter Type: VirtIO
- NIC to attach: choose the right network adapter depending on the network you want the VM to be accessible from
- MAC Address: set a MAC e.g. for DHCP address pinning or keep empty
- Type: VNC
- Resolution: 800x600 (Debian's grub bootloader seems to have problems with higher resolutions)
- Bind to: choose the IP you want the VM to be reachable at
- Password: Set a password for VNC connections to the VM. Using VNC access, an attacker can reset the VM's root password, so this might be a good idea.
- Type: Disk
- ZVol: pick the ZVol you created for this VM
- Mode: VirtIO
- Type: CD-ROM
- CD-ROM (ISO): pick the Debian installer image
- Type: Network Interface
3. Installing and booting the guest OS
Step by step: How to install the guest OS and do basic setup
- Familiarise yourself with Debian. Seriously, do it, read at least these two pages:
- Connect to the VM using VNC. Use the IP, port and password you chose when setting up the VM's VNC device. If you didn't set a port, the randomly assigned port is shown in the FreeNAS UI's VMs list.
- Note: In current versions of bhyve there's a bug with non-US keyboard layouts. With the workaround described in the comments, I got a German keyboard layout fully working.
- The VM should automatically boot into the Debian installer. Follow the installer prompts.
- When asked during the installation process which predefined collections to install, select only SSH server and standard system utilities.
- If you want to apply the non-US keyboard workaround, this is the earliest opportunity you have for this VM.
Set the Debian installer to the layout matching your physical keyboard, and your local OS - the one you're working from - to US keyboard layout.
Whenever you connect via VNC, set your local OS to US keyboard layout; whenever you connect via SSH, set it back to normal.
- Reboot the VM. In FreeNAS, delete the VM's CD-ROM device to prevent the installer from starting up again.
- The VM might not boot Linux properly after shutting it down. For details about this issue, see Appendix: Common Problems.
- Install sudo
- Login to the shell via SSH
- If you've set up a non-root account, switch user to root:
su -, followed by the root password. - Update the APT package list:
apt update - Install sudo:
apt install sudo - Add your user to the list of sudoers:
adduser <username> sudo - You may have to log out and log in again with that user before using sudo.
- Consider preventing root from logging in via SSH, and only allowing SSH authentication with SSH keypair.
4. Creating and mounting NFS shares
Step by step: How to create NFS shares and mount them in the VM
- In the FreeNAS UI, go to Services > NFS and check Enable NFSv4.
- Since NFSv4 requires any users with access to the share to exist on client and server, we must add any such users in FreeNAS manually. Alternatively, we can set the NFS service to behave like NFSv3, not requiring the client's users to exist on the server, by checking NFSv3 ownership model for NFSv4.
- In the FreeNAS UI, go to Sharing > UNIX (NFS) and add a new share:
- Path: select the dataset or directory to share
- If the docker container needs root permissions on the directory (e.g. because it creates a directory structure as root), we must map the guest's root user & group to the host's equivalents:
- Maproot User: root (any operation done as root on the guest will be mapped to this FreeNAS user)
- Maproot Group: wheel (any operation done as a member of the guest's root group will be mapped to this FreeNAS group)
- In the Docker VM's shell, install the NFS Client:
sudo apt install nfs-common - Edit fstab in a root editor (I installed nano and used that; I trust you'll know how to use the editor you prefer):
sudo nano /etc/fstab- Add the following line to the end of the file to mount the NFS share on boot:
192.168.0.123:/mnt/tank/appdata/docker-containers/ecodms /mnt/docker-containers/ecodms nfs rw 0 0
Replace the IP with your FreeNAS server's IP, and the directories with the correct NFS share path (first path) and the target mount point (second path). The specified mount point directory must exist on the guest OS and be empty!
- Add the following line to the end of the file to mount the NFS share on boot:
- Manually mount all new fstab mounts:
sudo mount -a(or reboot the VM). - Verify that mounting works as intended. In the mounted directory, you should be able to execute all of the following commands as root (or with sudo):
touch testchown root:root testchmod 000 testrm test
5. Installing and running Docker
Step by step: How to install Docker in the VM
- Familiarise yourself with Docker: https://docs.docker.com/get-started/
- Install docker (https://docs.docker.com/install/linux/docker-ce/debian/, or if you're not going with debian, see https://docs.docker.com/install/):
- Install the prerequisites for adding the Docker CE repository to APT:
sudo apt install apt-transport-https ca-certificates curl gnupg2 software-properties-common - Add Docker's GPG Key:
curl -fsSL https://download.docker.com/linux/debian/gpg | sudo apt-key add - - Check the GPG Key's fingerprint against the docker manual (step 3):
sudo apt-key fingerprint 0EBFCD88 - Add the stable Docker CE repository:
sudo add-apt-repository "deb [arch=amd64] https://download.docker.com/linux/debian $(lsb_release -cs) stable" - Update the APT package list to add the docker packages:
sudo apt update - And finally, install Docker:
sudo apt install docker-ce - In case you wonder if it all worked, run the hello-world image:
sudo docker run hello-world
- Install the prerequisites for adding the Docker CE repository to APT:
- Read the Docker Post-installation steps for Linux.
- Make docker run on startup:
sudo systemctl enable docker - You can run docker without sudo. I decided not to, since setting up a new docker container is not a daily task for me.
- Make docker run on startup:
6. Running Docker images
An example of how to run Docker images in the VM
- To run Docker images, go to https://hub.docker.com, find the right image and paste its docker runcommand into the VM's shell.
- Note that you must add sudo to the command if you haven't enabled docker to run without sudo!
- As an example, I'll show ecoDMS (because that is the first image I'm running):
- The following command was copied from the ecodms/allinone-16.09 repository (whose description is in German, but the following principle applies to any other image similarly):
docker run --restart=always -it -d -p 17001:17001 -p 17004:8080 --name "ecodms" -v /volume2/ecodmsData:/srv/data -v /volume1/ecoDMS/scaninput:/srv/scaninput -v /volume1/ecoDMS/backup:/srv/backup -v /volume1/ecoDMS/restore:/srv/restore -t ecodms/allinone-16.09 - I changed it as follows before running it in the VM:
sudo docker run --restart=always -it -d -p 17001:17001 -p 17004:8080 --name "ecodms" -v /mnt/docker-containers/dms/Data:/srv/data -v /mnt/docker-containers/dms/scaninput:/srv/scaninput -v /mnt/docker-containers/dms/backup:/srv/backup -v /mnt/docker-containers/dms/restore:/srv/restore -t ecodms/allinone-16.09(added sudo; chanaged the paths)
The path I used in the docker run command is the mount point I used as the target when mounting the NFS share in section 4. Docker automatically creates the child directories (Data/,scaninput/,backup/,restore/) if they don't exist.
- The following command was copied from the ecodms/allinone-16.09 repository (whose description is in German, but the following principle applies to any other image similarly):
Appendix: Odds and Ends
Stuff that didn't make it into the guide.
I chose to deviate from the dataset layout described above in one way: I created a tank/backups/ dataset with child datasets for each jail or VM that has its own backup functionality. This way I can collect all backups in one place and then run off-site backups from there, rather than collecting those backups from all over the place. For the ecoDMS example, this means another NFS share mounted in the VM, and then changing the docker run command to use that directory for the backups.
Appendix: Common Problems
Problems that have been known to happen, and their solutions
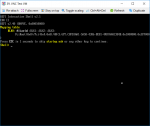
- The VM might not boot Linux properly, instead showing some sort of boot error and, after a timeout, return to the EFI interactive shell (see screenshot below). This is because bhyve, like many other UEFI firmware implementations, does not follow the UEFI specifications for boot entries and boot order.
In a nutshell, the Debian installer tells the UEFI firmware to add the Debian bootloader to its list of boot entries. Unfortunately, bhyve does not save those changes, instead resetting its boot configuration every time the VM is shut down, resulting in some sort of boot error and, after a timeout, returing to the EFI interactive shell (see screenshot below).

To fix this after installation, read [HOWTO] How-to Boot Linux VMs using UEFI. Alternatively, install Debian using a netinst installer and choosing Expert Mode during installation. - If the Debian installer shows a warning saying No kernel modules were found. This probably is due to a mismatch between the kernel used by this version of the installer and the kernel version available in the archive, your mini.iso is out of date. It looks like mini.iso always expects the archive to match its version. To fix, download a new mini.iso as described in section 1.
